- 首页
- » 全志 SOC
- » F1C200S入坑手记
楼主 #1 2020-02-20 22:05:13 分享评论
- Blueskull
- 会员
- 注册时间: 2020-02-20
- 已发帖子: 458
- 积分: 444.5
F1C200S入坑手记
最近入手了一块Widora的板子,准备自己画个最小HMI玩玩。在此同时,把我的路程记录下来。
请移步此处查看最新进展,回复本贴我也会回。实在不回可私信。
https://www.eevblog.com/forum/projects/building-an-hmi-based-on-f1c200s-and-xboot/
离线
#2 2020-02-20 22:46:03 分享评论
- firstman
- 会员
- 注册时间: 2019-04-06
- 已发帖子: 279
- 积分: 279
Re: F1C200S入坑手记
感谢分享, mark 一下.
离线
楼主 #4 2020-02-21 01:48:29 分享评论
- Blueskull
- 会员
- 注册时间: 2020-02-20
- 已发帖子: 458
- 积分: 444.5
Re: F1C200S入坑手记
剔除LUA和GUI搞定了,支持64M内存搞定了,精简启动串口输出也搞定了。
当前阶段的BSP我打了个包,欢迎大家拿走。
睡醒明天搞LittlevGL和framebuffer、触摸屏适配,最好明天能把图形跑出来。
不过因为Widora板子用的是i2c触屏芯片,我的目标板用的是原生tsc,我应该不会花时间在TINY 200上支持触控。
离线
#5 2020-02-21 08:55:00 分享评论
- 红白机
- 会员
- 注册时间: 2020-01-02
- 已发帖子: 133
- 积分: 133
Re: F1C200S入坑手记
感谢分享, mark 一下.
离线
#6 2020-02-21 10:14:31 分享评论
- sea18c
- 会员
- 注册时间: 2019-08-05
- 已发帖子: 230
- 积分: 222.5
Re: F1C200S入坑手记
用AWTK这个GUI功能不是更多吗?
离线
楼主 #7 2020-02-21 12:11:20 分享评论
- Blueskull
- 会员
- 注册时间: 2020-02-20
- 已发帖子: 458
- 积分: 444.5
Re: F1C200S入坑手记
用AWTK这个GUI功能不是更多吗?
不想用LGPL,因为我要静态链接。我做的BSP是开源的,但是我的最终应用是闭源的。
另外,AWTK太强大了,很多功能我用不到。我只需要基本的显示和控件。AWTK的一大堆底层库我都用不到。
AWTK更像wx或者Qt,我需要的是类似MiniGUI的东西。
关于输入法和中文支持,这些我都没有需求。能显示ASCII,能支持常见触控控件,我就OK了。
不用普通单片机的唯一理由就是我想刷新到30fps/60fps,常见的IL系列芯片SPI频率最大10M/15M,可超到30M。
30M串口没法支持320*240*16*30,何况还得考虑过扫描和其他协议损耗。
离线
#8 2020-02-21 12:22:17 分享评论
- sea18c
- 会员
- 注册时间: 2019-08-05
- 已发帖子: 230
- 积分: 222.5
Re: F1C200S入坑手记
不想用LGPL,因为我要静态链接。我做的BSP是开源的,但是我的最终应用是闭源的。
另外,AWTK太强大了,很多功能我用不到。我只需要基本的显示和控件。AWTK的一大堆底层库我都用不到。
AWTK更像wx或者Qt,我需要的是类似MiniGUI的东西。
关于输入法和中文支持,这些我都没有需求。能显示ASCII,能支持常见触控控件,我就OK了。
不用普通单片机的唯一理由就是我想刷新到30fps/60fps,常见的IL系列芯片SPI频率最大10M/15M,可超到30M。
30M串口没法支持320*240*16*30,何况还得考虑过扫描和其他协议损耗。
那也是,功能多也不一定是最好的,适合自己的才是最好的,lvgl我移植好了到xboot,但对xboot不熟悉,下一步都不知怎么进行了。后面可以请教你xboot相关问题吗?
离线
楼主 #9 2020-02-21 12:45:11 分享评论
- Blueskull
- 会员
- 注册时间: 2020-02-20
- 已发帖子: 458
- 积分: 444.5
Re: F1C200S入坑手记
那也是,功能多也不一定是最好的,适合自己的才是最好的,lvgl我移植好了到xboot,但对xboot不熟悉,下一步都不知怎么进行了。后面可以请教你xboot相关问题吗?
我还没你进展快呢:(,不过如果我能帮的我尽量帮。
离线
#10 2020-02-21 13:05:41 分享评论
- sea18c
- 会员
- 注册时间: 2019-08-05
- 已发帖子: 230
- 积分: 222.5
Re: F1C200S入坑手记
我移植lvgl花了好多时间。xboot 里面的驱动 是怎么用的呢,我准备用到按键,我见唱戏机上有十来个按键的。还有就是是否可以建两个任务,实行交替打印?
离线
楼主 #11 2020-02-21 17:24:40 分享评论
- Blueskull
- 会员
- 注册时间: 2020-02-20
- 已发帖子: 458
- 积分: 444.5
Re: F1C200S入坑手记
今天我因为亲共言论被老外的论坛给“言论自由”了。所以所有文章都搬到这里,在这里更新。
离线
楼主 #12 2020-02-21 17:25:21 分享评论
- Blueskull
- 会员
- 注册时间: 2020-02-20
- 已发帖子: 458
- 积分: 444.5
Re: F1C200S入坑手记
Goal:
To build a human to machine interface (HMI) with resistive touch for lab and light industrial applications. Resistive touch is chosen to allow the use with gloves and water/oil contamination.
UI apps are created on the go using a custom static (no function calls, etc.) interpreted language.
UI is updated by itself using link mechanism (i.e. if a slider moves, the progress bar moves accordingly) or serial command.
All controllable widgets can send commands over serial for the external host to process.
Hardware:
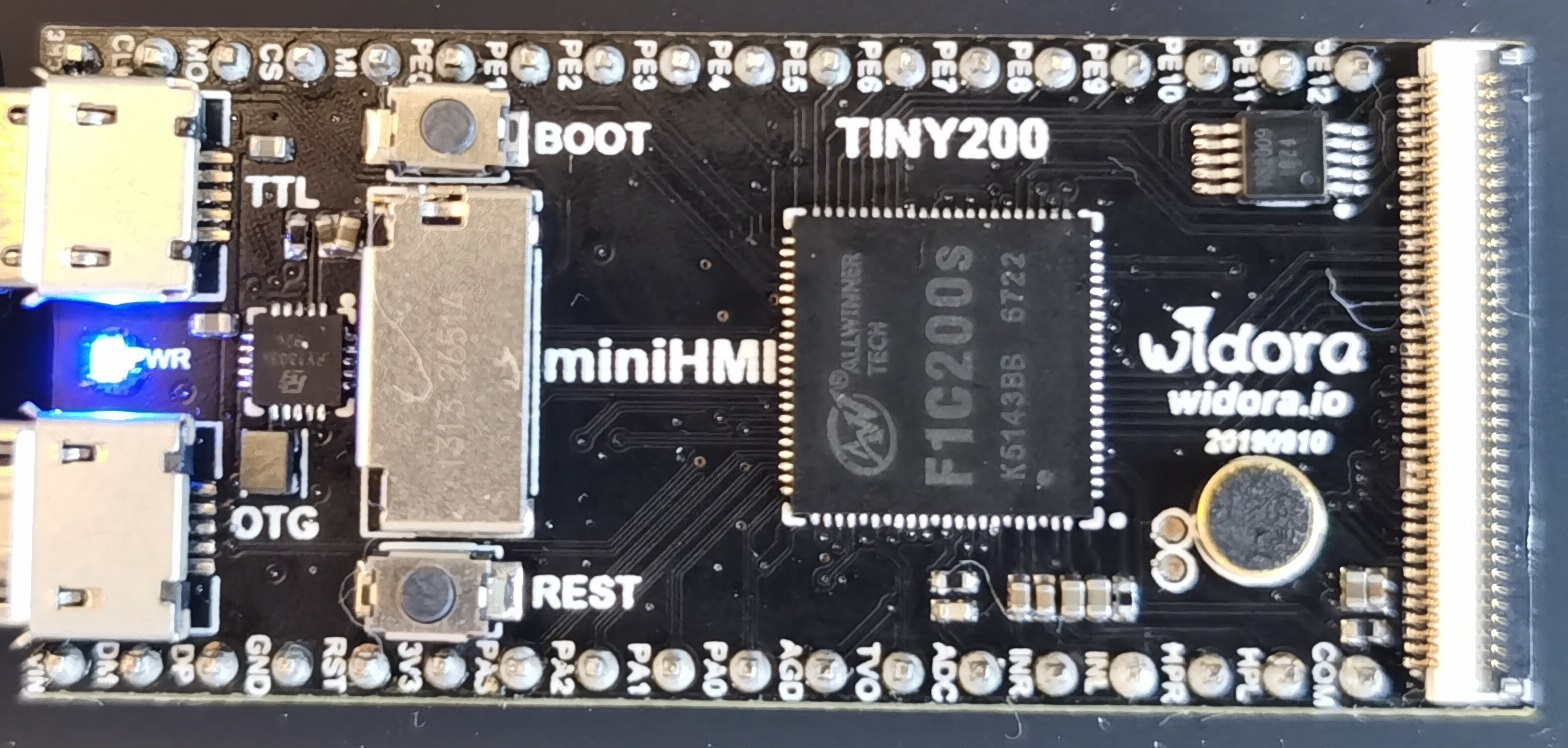
The HMI module is built around AllWinner F1C100S/F1C200S SoC with 450MHz/600MHz ARM9 core, full LCD interface with 2D acceleration, touch screen controller and more.
An external resistive touch screen is connected to the SoC via parallel RGB666/DE/VSYNC/HSYNC and CLK pins.
An onboard NOR flash is used to store firmware and user resource, loaded via serial port.
Only one port is exposed to the external, that is the serial port. USB is only used in debugging phase.
Software:
No full OS like Linux or AllWinner's Melis is used in this case due to the requirement of instant boot.
XBoot is chosen for its high customizability and MIT license.
To further accelerate boot time, all non essential components are stripped from XBoot.
XBoot is used as a task scheduler and HAL, all UI features are implemented using Littlevgl.
To strip XBoot down to bare minimum, all GUI is removed (Freetype, Cairo, PNG, JPG, SVG, XFS), LUA interpreter is removed.
GUI component of XBoot was initially considered, but due to the lack of convenient C interface (it was written in C, but tailored for working with LUA) and huge size (~2.5MB), it was dumped.
A custom app will be used in place of XBoot's shell and LUA interpreter. This app handles serial communication and widget control.
HAL layer (down to framebuffer level) is kept so that my code will be portable in the long run.
Links:
F1C200S datasheet: https://linux-sunxi.org/images/1/11/Allwinner_F1C200s_Datasheet_V1.0.pdf
F1C200S manual: https://linux-sunxi.org/images/2/21/Allwinner_F1C200s_User_Manual_V1.0.pdf
XBoot: https://github.com/xboot/xboot
Dev kit I use: https://item.taobao.com/item.htm?id=587925184119
Dev kit wiki (Chinese): https://wiki.widora.io/tiny200
Another kit (Lichee Pi Nano): https://wiki.sipeed.com/en/lichee/nano.html
Documentation 1 (Chinese): http://nano.lichee.pro/
Documentation 2 (Chinese): https://whycan.cn/t_449.html
Amazing forum for F1C200S (Chinese): https://whycan.cn/f_17.html
离线
楼主 #13 2020-02-21 17:27:16 分享评论
- Blueskull
- 会员
- 注册时间: 2020-02-20
- 已发帖子: 458
- 积分: 444.5
Re: F1C200S入坑手记
Chapter 1: Hardware showcase and demo firmware
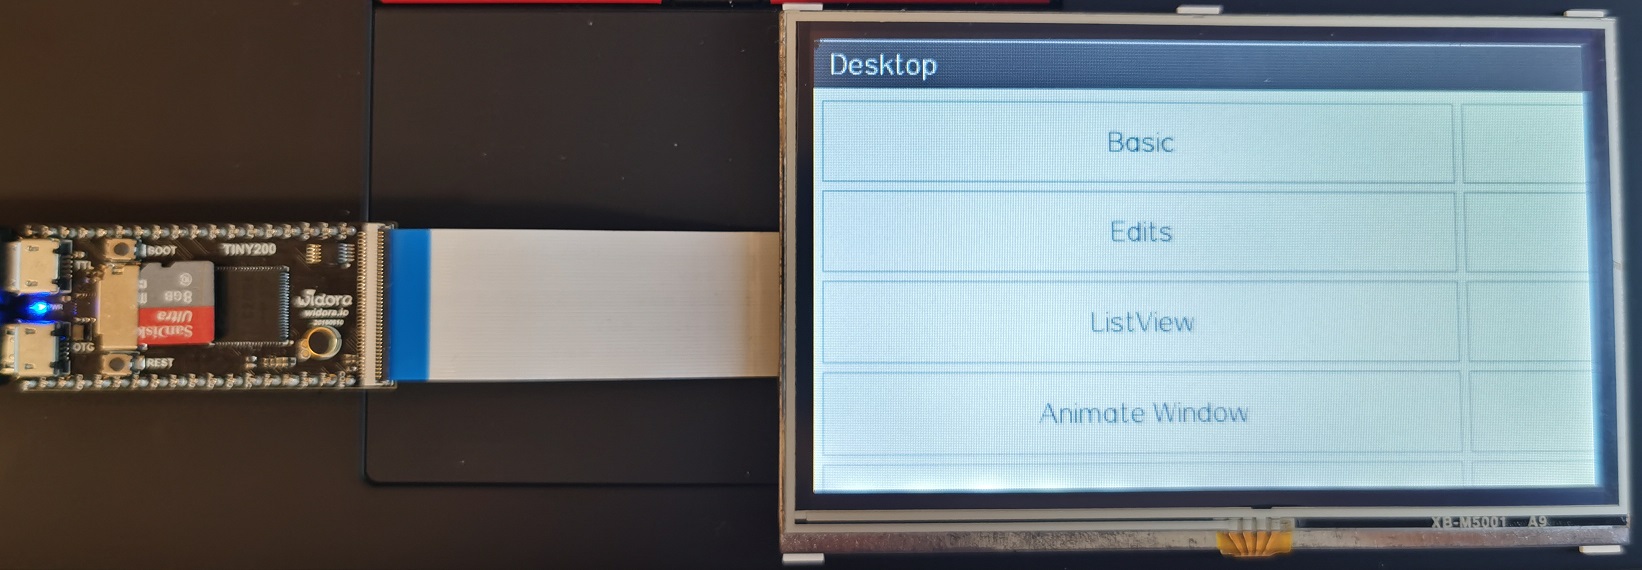
The Widora TINY 200 is a small one, not much larger than a uSD slot, the main chip, two USB ports (console and OTG) and an LCD connector.
The board comes with a 480*272 LCD with resistive touch. After connecting the FFC cable, writing demo firmware, I was able to see the LCD turning on running a demo app based on Linux.
At this moment, touch doesn't work as the firmware I run is not for this board, it was for Lichee pi nano, which is a tiny bit different.
Resolution is also not correct for the same reason.
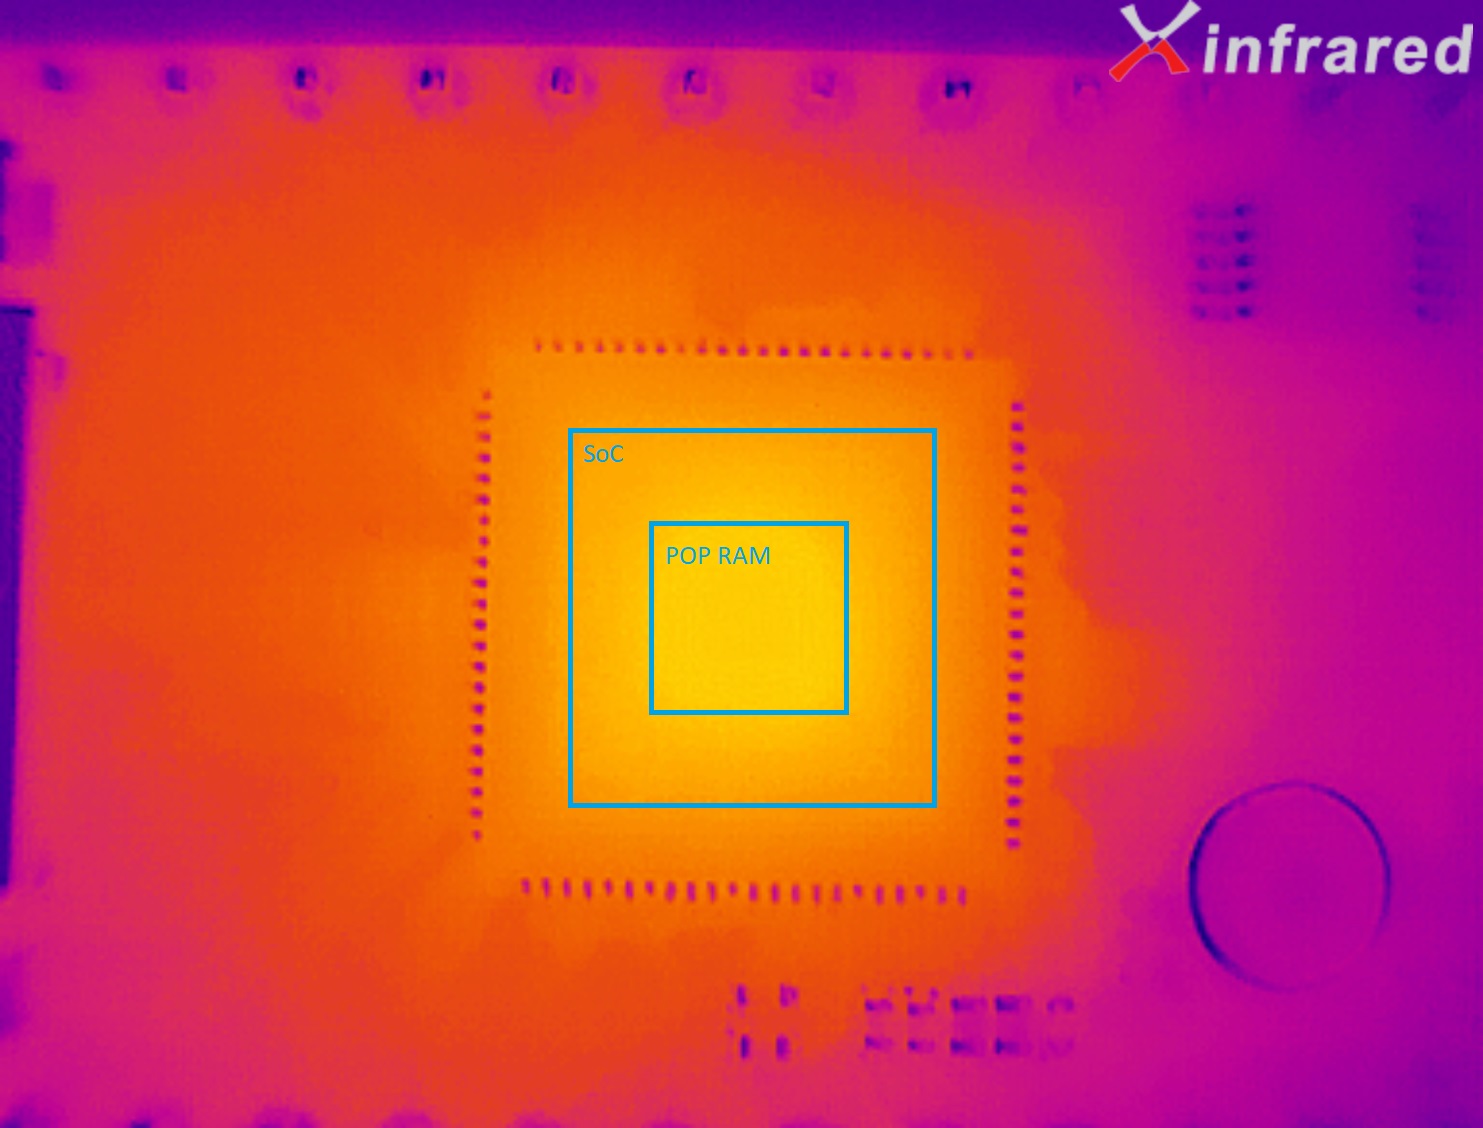
The SoC runs cool. Barely warm to touch. It runs at 5 degs above the rest of the board, which is at around 30C.
Interesting enough, we can see the stacked die structure from thermal image. The top die (hotter) is the RAM, and the bottom die (cooler) is SoC.
The RAM being hotter makes sense as some heat comes out from the SoC through the RAM, so it has to dissipate more heat.
最近编辑记录 Blueskull (2020-02-21 17:29:29)
离线
楼主 #14 2020-02-21 17:29:42 分享评论
- Blueskull
- 会员
- 注册时间: 2020-02-20
- 已发帖子: 458
- 积分: 444.5
Re: F1C200S入坑手记
Chapter 2: Getting XBoot to boot in no time
XBoot is more than a bootloader. It was designed to be a minimum OS, with its own HAL, FS, GUI and even LUA interpreter.
It was so complicated that it was designed to run LUA programs without needing a host side compiler for app development.
While LUA is cool, it is also huge, let alone large libraries like lz4, freetype and cairo. With all options enabled, the binary image for F1C100S is 3.4MB.
What I need is a bare bone system with HAL, FS (FAT only) and nothing. I can come up with my own GUI and my own runtime.
Thus, I stripped XBoot down to bare minimum following this thread (Chinese): http://quotation.github.io/development/2018/10/04/xboot-tailoring.html
1. Remove src/romdisk, this will remove what is known in Linux as initramfs, and there will be only kernel running, not LUA apps and resources.
Since we don't need LUA, we lose nothing. Also delete romdisk related targets in makefile, but leave the one in arch folder as it as the kernel will have to see it and parse it to load devices.
There is a json file in each BSP which is used to tell the kernel what hardware to initialize, essentially ascii version of dtb in Linux. This is the one we want to leave in romdisk.
2. Strip out LUA by removing all lines related to LUA and framework in makefile. Framework is the LUA binding driver for all kernel functions.
Doing so will cause compilation errors due to LUA commands are integrated to CLI shell, so in shell.c there will be function calls to LUA library.
You can strip out related calls t keep the shell while nuking LUA, but what I did was to completely remove the shell as I have no use of it.
To strip the shell, remove src/kernel/shell and src/kernel/command from makefile.
3. Remove graphics libraries such as chipmunk (seriously, why a gaming physics library in an RTOS?), zlib, libpng, libjpeg, pixman, cairo and freetype.
This is a nasty process as text.c in core graphics library depends on freetype.
Since I will be using Littlevgl, I don't need a text engine at all in the kernel, so I removed text.c and font.c from src/kernel/graphic, and all related calls and declarations from surface.c.
I also nuked svg.c and svg-raster.c as I don't need any image support. I'll let Littlevgl to handle all GUI.
4. I also removed XFS support as I have no need to load images from file (anyway I got rid of PNG and JPEG), and if I need, I will use the implementation from Ligglevgl.
XFS is used to implement on the go image file loading. To remove XFS, remove src/kernel/xfs from makefile.
This will cause a ton of compilation errors as surface.c is tangled with XFS. Strip them out line by line will fix it.
I also removed EXT4 and tarball support from src/kernel/vfs in makefile. I left FAT and CPIO as I might need SD in the future, and XBoot binary is in CPIO format.
5. I then removed all unused driver supports in the kernel. There are two types of driver, HAL and kernel.
Kernel driver provides a unified interface cross different platforms, HAL driver is the actual one talking to hardware.
I didn't touch anything in HAL as without reference they won't be called and will be stripped automatically during linking.
To remove kernel drivers, remove line in makefile regarding to drivers in src/driver/ folder, such as src/driver/audio.
I kept ADC, block, clock, clockevent, clocksource, console, dma, framebuffer, gpio, i2c, input, interrupt, led, pwm, rst, sd, spi, uart and wdt.
ADC is used by input to support analog keys (resistive ladder), led is use by framebuffer to support backlight, pwm is used by led.
I don't need I2C, keys and sd in this case, but I'd rather have them in the BSP so I don't have to port them next time I use them in another project.
6. Finally, remove all symbols that are reserved. Normally if a symbol is not used, gcc will strip it out if -s is enabled, but this can be prevented.
This is done to allow dynamic linking (so not every app has to carry those symbols, essentially dynamic linking).
In our case, everything will be compiled to a single binary, so I removed all reserved symbols.
Replace EXPORT_SYMBOL {lots_of_functions} with EXPORT_SYMBOL ; to allow gcc to strip all unused functions.
7. Optionally, you can further modify xbook.mk in your arch folder to add -Wl,--gc-sections in LDFLAGS and -ffunction-sections -fdata-sections in MCFLAGS.
This will allow the compiler to further delete unused symbols. If you are really desperate, you can set -Os in xboot.mk and makefile.
With all efforts, I was able to strip XBoot to 230kB.
Finally, if you wish to do so, you can delete source and header files for all functions you stripped from makefile.
Removing the source will be okay, removing the headers will create troubles as some functions, despite never called, are referenced, so removing them may render the code unable to compile.
Let's take it as an opportunity to pave the road for the future -- if you don't remove those dependencies, in the long run if you call certain functions, your code won't link correctly.
After removing all references to stripped out functions (mostly graphic related), now we have a clean header structure.
离线
楼主 #15 2020-02-21 17:30:46 分享评论
- Blueskull
- 会员
- 注册时间: 2020-02-20
- 已发帖子: 458
- 积分: 444.5
Re: F1C200S入坑手记
Chapter 3: Display the iconic Hello World
Since we nuked the shell, at this time the kernel will have nothing to do after boot.
As we removed the task for the shell to remove shell dependency, we have to add it back, this time pointing to our own app.
In src/init/main.c, add the following between do_automount() and scheduler_loop():
struct task_t * task = task_create(scheduler_self(), "app_main", app_main, NULL, 0, 0);
task_resume(task);
Then create a function call app_main somewhere, and extern it in main.c.
A sample app_main could be simple as this:
#include <xboot.h>

void app_main(struct task_t * task, void * data)
{
int cnt=0;
	while(1)
	{
		printf("%02d: Hello world.\r\n", cnt++);
		if(cnt>99) cnt=0;
		mdelay(1000);
	}
}
Congratulation, now you have a stripped down version of XBoot running your own app.
To tidy things up, let's create a folder called app in src folder, to decouple XBoot and our own app code.
Create an app.c, copy the previous code to it, and create an app.h to declare the function, like this:
#ifndef __APP_H__
#define __APP_H__

#ifdef __cplusplus
extern "C" {
#endif

void app_main(struct task_t * task, void * data);

#ifdef __cplusplus
}
#endif

#endif /* __APP_H__ */
Add app.h to your makefile in INCDIRS section, and add app folder to SRCDIRS section.
Tidy up your main.c to remove all the crap we just added, and now we should have a clean separation between our own code and XBoot.
To try out our work, use sunxi-fel tool to download the program to RAM of F1C200S or SPI flash by appending the following to the grand makefile (not the one in src we we mentioned above, the one in its parent directory, xboot if you cloned it from github):
boot:
	-sunxi-fel spl output/xboot.bin
	sunxi-fel -p write 0x80000000 output/xboot.bin
	sunxi-fel exec 0x80000000

flash:
	sunxi-fel -p spiflash-write 0 output/xboot.bin
最近编辑记录 Blueskull (2020-02-21 17:32:46)
离线
楼主 #16 2020-02-21 17:32:09 分享评论
- Blueskull
- 会员
- 注册时间: 2020-02-20
- 已发帖子: 458
- 积分: 444.5
Re: F1C200S入坑手记
Chapter 4: Doubling the RAM
The official BSP supplied with XBoot is for F1C100S, which has only 32MB of copackaged RAM. Our F1C200S has double the RAM, so let's not waste it.
First, create a copy of the BSP in src/arch/arm32/mach-f1c100s, let's name it mach-f1c200s. In my case I just renamed it not keeping the old, but that probably is a bad idea.
Rename the sast-kk131.c to whatever the name you want that reflects your product, in this case I named it hmi-machine.c. The original use of this BSP was for SAST KK131 media player.
Do some minor modifications starting from line 83, to rename functions and string literals to reflect your product.
Don't worry about changing the name of the file will cause compiler to not find it. The makefile is set to find and compile all files in specified folders.
The next file to modify is xbood.ld, which tells how the linker arranges memory. The most important part is in MEMORY section, change heap len to 48M (since now we have 64M of RAM).
The original BSP author was kind enough to add an auto memory size detection feature in sys-dram.c, so it will automatically adapt both 32MB chip and 64MB chip, and we don't have to change anything.
Finally, make sure your kernel loads the correct device tree file upon booting by renaming BSP/romdisk/boot/sast-kk131.json to xxx.json where xxx is product name string you put in xxx-machine.c.
We can leave BSP for now, but we will come back later to adjust some parameters in that json file according to our hardware configuration. We'll come back after the hardware has been designed.
You can try your new BSP by compiling the project with new PLATFORM parameter when invoking make. To make your life easier, you probably want to add those info in src/makefile.
There are some tidy up works that we can do, such as renaming all f1c100-* files and variables to f1c200-*, but I see no point doing so. You might want to do that if you are submitting it to XBoot mainline.
Finally, it's the moment of truth. Do a simple malloc(40*1048576) should be enough to see if your new BSP can use more than 16MB of heap (which is for 32MB RAM). If it return non null, congratulations.
Just to be on the safe side, I wrote a memtest for it, and it runs perfectly.
#ifdef MEMTEST
	int *buf=malloc(1048576*MEMTEST_SIZE);
	if(!buf)
	{
		LOG("Failed to allocate memory.\r\n");
		while(1) task_yield();
	}
	for(i=0;i<1048576*MEMTEST_SIZE/4;i++)
		buf[i]=i;
	for(i=0;i<1048576*MEMTEST_SIZE/4;i++)
		if(buf[i]!=i) break;
	free(buf);
	if(i!=MEMTEST_SIZE*1048576/4)
	{
		LOG("Memtest failed.\r\n");
		while(1) task_yield();
	}
	LOG("Memtest passed.\r\n");
#endif
Put that in your app_main() before your real business, and define MEMTEST in app.h or app.c, you should be able to see it walking through the entire heap region.
I did a test, and I found I can allocate up to 44MB of heap, which is plenty enough or my HMI application.
离线
#17 2020-02-21 17:32:58 分享评论
- jiangming1399
- 会员
- 注册时间: 2018-06-14
- 已发帖子: 113
- 积分: 113
Re: F1C200S入坑手记
如果只是实现很简单的UI的话,其实我建议自己写一个简单的框架,直接写Framebuffer
离线
楼主 #18 2020-02-21 17:33:36 分享评论
- Blueskull
- 会员
- 注册时间: 2020-02-20
- 已发帖子: 458
- 积分: 444.5
Re: F1C200S入坑手记
Chapter 5: Making the splash message your own
At this point, we should have a pretty functional F1C200S BSP, and we should be able to do some work.
Before getting into app development, let's first customize the splash message.
Following src/init/main.c, you will see it calls a function called do_initcalls, and here's where it prints all messages.
Using grep, we can trace it down to src/kernel/core/initcall.c, which leads us to /src/include/initcall.h, which then leads to machine_initcall().
Tracing that function with grep, we found that in our own BSP/xxx_machine.c we declared machine_initcall() using a macro, which leads to register_machine().
Using the same grep trick, we can pin point to src/kernel/core/machine.c, where register_machine function prints the banner and version using mach->logger().
Grep mach->logger, we can see it was also used in machine_logger(), which is aliased as LOG() macro, then we grep LOG, we can find quite some references.
Therefore, by disabling machine_logger, we can disable all debug info other than the banner and version.
Adding some #ifdef, #else return 0; and #endif gets the problem done, then define your definition name in app.h and include app.h in machine.c.
Now with boot log disabled, splash message gets considerably clean, but we still need to customize banner and version to fit our needs.
In register_machine, a 5 line banner was printed, then the version was printed. We can remove the code or change it to whatever we want.
In our case, I put the banner info in app.c and externed the string in app.h, and modified machine.c to print my banner.
I also removed version line and manually added it in my banner string. We can then remove src/init/version.c and src/include/version.h as they are no longer referenced anywhere.
This is a milestone, and this means the kernel is ready to be used by an app. We sure will modify it from time to time, but the ground work has is now done.
I attached a copy of mine just for reference. It boots in ~0.5s, and most of the time it took was by the boot ROM, which we have absolutely no way to improve.
So, here we go, an as fast as possible RTOS image running on F1C200S ready for app development.
离线
楼主 #19 2020-02-21 18:00:58 分享评论
- Blueskull
- 会员
- 注册时间: 2020-02-20
- 已发帖子: 458
- 积分: 444.5
Re: F1C200S入坑手记
如果只是实现很简单的UI的话,其实我建议自己写一个简单的框架,直接写Framebuffer
嗯,我写了个简单的画方框程序,单纯为了调fb驱动和触摸。
最终版还是要用商品库的,要不后续维护累死了。
最近编辑记录 Blueskull (2020-02-21 18:01:48)
离线
楼主 #20 2020-02-21 23:49:39 分享评论
- Blueskull
- 会员
- 注册时间: 2020-02-20
- 已发帖子: 458
- 积分: 444.5
Re: F1C200S入坑手记
Chapter 6: Mapping peripherals to a specific board
With the SoC support of the BSP ready, we can start working on hardware adoption. Since I want this BSP to be as universal as possible, I tried to bring out as many digital peripherals as possible. My final target use is HMI, but I might add some control features, so let’s bring all possible SPI, I2C and UART ports. I will not be interested in multimedia, so I2S, TVIN/OUT and audio codec will not be considered. Due to limitation of RTOS, I will also not be supporting USB.
After consulting the datasheet and a few reference designs, I found that port D is essentially all occupied by LCD interface, therefore all digital communication peripherals must be brought out on port A/B/C/E/F. Since port B is not bonded on QFN88 package, we will leave it alone. Because the goal is to build a minimum system, we will use the touchscreen interface built-in with the chip, therefore port A is off limit too. Similarly, port C is occupied by SPI NOR flash, thus it is off limit for other uses. Despite I do not plan to support SD card, considering it is such a popular feature, I will reserve port F for it. So, all in all, we only have port E at our disposal. Even for port E, PE0 and PE1 are occupied by startup console and I have no intention on remapping them as doing so will require modification of many codes in the existing BSP.
Considering all pin conflicts, I decided to being out I2C0 on PE11~PE12, SPI1 on PE7~PE10, or alternatively UART2 on PE7~PE8. I also plan to bring out PWM1 on PE6 for LCD backlight dimming, and 4 GPIOs on PE2~PE5. Many existing boards use PE2 as USB OTG, but since we do not have USB support other than debugging, we do not have to support USB host, thus no OTG.
Remember the json file we renamed before in BSP/romdisk/boot? Let’s go back to it and see what it has. If it looks like an ascii device tree file in Linux, then you are right. It is the XBoot version of device tree, and it gets parsed every time the kernel boots. By modifying it, we can change how kernel probes drivers upon booting. Skip everything before line 191, as anything before are not supposed to be touched – clock, reset and interrupt controllers. The first thing we need to get familiarized is GPIO definitions, here we can see port A/C/D/E/F are defined with their logical base address. Write those numbers down as we will be needing those. PA is 0, PC is 64, PD is 96, PE is 128 and PF is 160.
In the PWM section we can see PWM0 defined to use GPIO 0, which is PA0. We intend to use PA0 for touchscreen, but we can leave it as is as anyway we will not be using PWM0. PWM1 is set to use GPIO 134, which is 128+6, or PE6, which is what we intended, thus we can leave this one untouched too. Ignore the times as they don not occupy GPIOs. For I2C0, we can leave the settings as is as GPIO 139 and 140 are PE11 and PE12, exactly what we wanted. Ignore I2C1 and I2C2 as we will never use them. We will also leave UART0 untouched for previously mentioned reasons. UART1 is not used, so let it be. UART2 was set to use GPIO 135 and 136, which are PE7 and PE8, again, what we anticipated, so nothing needs to be done ere either. SPI0 was mapped to PC0~PC3, which is what my hardware uses, and SPI1 was mapped to PE7~PE10, so nothing needs to change here. We will also leave SD as is since there is only one set of SD pins, and they cannot be changed. SPINOR is set to use SPI0, which is correct. We will not change WDT as it does not have pins, and we will leave LRADC as is since we will not be using it. You can remove or just leave led-gpio and ledtrigger there as we do not really need them and really cannot care about them.
Finally, it is time for porting the LCD interface. First, in ts section we need to take a look at calibration term. The tuple dictates how ADC readings are translated to on-screen coordinates. The calibration is based on 2D linear functions, where:
X(x, y)=(k0+k1*x+k2*y)/k6
Y(x, y)=(k3+k4*x+k5*y)/k6
All k factors are stored in coefficient tuple in k0~k6 order. This will be modified once we have real data from an actual touchscreen. We will just leave the default numbers there. Then we move to led-pwm-bl section, where it specifies PWM controller, minimum/maximum duty cycle and default states. The default can be used as is. Lastly, in fb section we can see parameters for the framebuffer, and what we really care are width, height, vertical and horizontal front/back porch times and pixel clock. In this case, I will be using a 480*272 LCD. After consulting the datasheet, I stuffed all correct timing values in fb section. Since I anticipate up to 60fps refresh rate, the pixel clock has to be at least 60*(480+8+43)*(272+4+12)=9.2MHz. The default 33MHz will do just fine, so I left it as is and saved the file. In addition, I also changed length and offset in spinor section since I anticipate my program will be no more than 1MB, so I figured I would save an extra 3MB for custom file storage.
After modifying the device tree file, we can then work on modifying CPU clock. The CPU clock frequency is defined in BSP/sys-clock.c, sys_clock_init(). Change the literal 408000000 to 600000 or 720000. There is a limit of 720MHz in clock_set_pll_cpu(), which you can override to allow the CPU to be overclocked to up to 900MHz, but it is not recommended due to excessive heating and reduced reliability. To reliably operate at 900MHz, core voltage has to be raised from 1.1V to at least 1.2V. It is recommended to operate the CPU at below 600MHz for maximum reliability at 1.1V, and no more than 720MHz at 1.2V.
Despite both XBoot and F1C200S support dynamic CPU clock, the BSP did not have such implementation. To add such feature, populate clk_f1c100s_pll_set_rate() in BSP/drivers/clk-f1c100s-pll.c with:
static void clk_f1c100s_pll_set_rate(struct clk_t * clk, u64_t prate, u64_t rate)
{
	struct clk_f1c100s_pll_pdata_t * pdat = (struct clk_f1c100s_pll_pdata_t *)clk->priv;
	if(pdat->channel==0)
		clock_set_pll_cpu(rate);
}
Then copy clock_set_pll_cpu() and wait_pll_stable() from BSP/sys-clock.c. They have to be declared as static in BSP/sys-clock.c to save a few bytes in order to pack SPL down to 7680 bytes.
At this step, low level porting has been finished, and app development can begin.
最近编辑记录 Blueskull (2020-02-22 00:17:32)
离线
楼主 #21 2020-02-22 02:02:02 分享评论
- Blueskull
- 会员
- 注册时间: 2020-02-20
- 已发帖子: 458
- 积分: 444.5
Re: F1C200S入坑手记
Chapter 7: Writing a buffer to the framebuffer
It is finally the time to get our most important peripheral, the LCD, to work. Despite XBoot has a /sys filesystem, it does not support operating framebuffer as a block device. There is an fb entry in sysfs, but it is only for controlling backlight. To operate the framebuffer, we need to query the framebuffer object from device database, then create a surface on the framebuffer to draw.
XBoot comes with a boot logo program that we can take a look at. The related function is located in src/init/init.c. After reverse engineering the original code, the following code can be used to initialize the framebuffer and fill it with a solid color.
void initfb()
{
	struct device_t *p, *n;
	struct framebuffer_t *fb=NULL;
	struct surface_t *s;
	struct matrix_t m;
	struct color_t c;
	if(list_empty_careful(&__device_head[DEVICE_TYPE_FRAMEBUFFER])) return;
	list_for_each_entry_safe(p, n, &__device_head[DEVICE_TYPE_FRAMEBUFFER], head)
	{
		fb=(struct framebuffer_t *)(p->priv);
		if(fb) break;
	}
	if(!fb) return;
	s=framebuffer_create_surface(fb);
	matrix_init_identity(&m);
	color_init(&c, 0x66, 0xcc, 0xff, 0xff);
	surface_fill(s, NULL, &m, surface_get_width(s), surface_get_height(s), &c, RENDER_TYPE_GOOD);
	framebuffer_present_surface(fb, s, NULL);
	//framebuffer_destroy_surface(fb, s); //Not destroyed since I want it to retain this screen
	framebuffer_set_backlight(fb, 1000); //Max is 1000
}
Apparently, this is not the best code, and we will have a lot of troubles using it since it does not manage variables well and you have to allocate/free objects frequently. Therefore, we need to write a wrapper for the framebuffer to maintain all variables in the entire lifecycle of the framebuffer and surface objects, which we will do later when porting LittlevGL.
最近编辑记录 Blueskull (2020-02-22 02:02:38)
离线
#22 2020-02-22 09:07:48 分享评论
- everlink
- 会员
- 注册时间: 2020-02-16
- 已发帖子: 93
- 积分: 93
Re: F1C200S入坑手记
you write beautiful english at midnight
good work
离线
#23 2020-02-22 09:15:52 分享评论
- 红白机
- 会员
- 注册时间: 2020-01-02
- 已发帖子: 133
- 积分: 133
Re: F1C200S入坑手记
英语这么好, 怪不得可以在墙外怼白皮。
离线
楼主 #24 2020-02-22 23:44:28 分享评论
- Blueskull
- 会员
- 注册时间: 2020-02-20
- 已发帖子: 458
- 积分: 444.5
Re: F1C200S入坑手记
脑残真可怕,我才发现XBoot根本不是抢占式系统,管不得我调了半天任务都不同步。。。
离线
楼主 #25 2020-02-23 01:29:01 分享评论
- Blueskull
- 会员
- 注册时间: 2020-02-20
- 已发帖子: 458
- 积分: 444.5
Re: F1C200S入坑手记
我移植lvgl花了好多时间。xboot 里面的驱动 是怎么用的呢,我准备用到按键,我见唱戏机上有十来个按键的。还有就是是否可以建两个任务,实行交替打印?
可以新建多任务,如何在一个任务里面创建另一个任务可以参考framework/vm.c里面的vmexec实现。
XBoot搞了半天不是抢占式的,所以你的任务里面不能有mdelay之类的循环延时函数,否则会占住cpu资源不放。
要实现多线程,每一个线程的任务尽可能短,需要延时的时候用task_yield()实现。
参考我在XBoot大群里面发的这个:
void sleep(int ms)
{
	clock_t tend=clock()+ms*1000;
	while(likely(clock()<tend)) task_yield();
}
最近编辑记录 Blueskull (2020-02-23 01:29:31)
离线
#26 2020-02-23 14:56:33 分享评论
- myxiaonia
- 会员
- 注册时间: 2019-06-18
- 已发帖子: 83
- 积分: 51.5
Re: F1C200S入坑手记
可以尝试使用rtx啊,keil自己移植好了在arm9上直接用
离线
楼主 #27 2020-02-23 15:59:01 分享评论
- Blueskull
- 会员
- 注册时间: 2020-02-20
- 已发帖子: 458
- 积分: 444.5
Re: F1C200S入坑手记
可以尝试使用rtx啊,keil自己移植好了在arm9上直接用
不用Keil是我的原则之一。从我之前踩过的坑看,买不起的软件坚决不能用。
早晚得被软件开发商,客户或者同行审计出来,然后要么交钱要么推倒重来。
被Altium坑了小十万,office+visio+windows坑了小一万,在下不敢作死了。
所以我现在除了已经买了的Altium+微软全家桶,其他的一概不用。
编译器用gcc/tcc/sdcc,ide不用或者vs community,jlink之流一概不碰。
数值分析用octave,录屏用obs,cad和力热仿真用freecad,电磁仿真用fast field solver。
这样也好,发布项目的时候不用担心别人能不能打开,而且几年间自己也积攒了不少自己写的杂七杂八的工具。
离线
#28 2020-02-23 22:31:55 分享评论
- sea18c
- 会员
- 注册时间: 2019-08-05
- 已发帖子: 230
- 积分: 222.5
Re: F1C200S入坑手记
大神,积累了不少经验,最值钱的也是这经验了。
离线
#29 2020-02-23 22:43:08 分享评论
- sea18c
- 会员
- 注册时间: 2019-08-05
- 已发帖子: 230
- 积分: 222.5
Re: F1C200S入坑手记
楼主,你这个程序直接烧写到F1C100S是不是不行呢,我烧写后显示
MiniHMI, (C) 2020, Bo Gao, Ver 1.0.0, MIT
XBoot, (C) 2007-2020, Jianjun Jiang, Ver 3.0.0, MIT
LittlevGL, (C) 2016, Gabor Kiss-Vamosi, Ver 6.1.1, MIT
离线
楼主 #30 2020-02-23 23:23:48 分享评论
- Blueskull
- 会员
- 注册时间: 2020-02-20
- 已发帖子: 458
- 积分: 444.5
Re: F1C200S入坑手记
楼主,你这个程序直接烧写到F1C100S是不是不行呢,我烧写后显示
MiniHMI, (C) 2020, Bo Gao, Ver 1.0.0, MIT
XBoot, (C) 2007-2020, Jianjun Jiang, Ver 3.0.0, MIT
LittlevGL, (C) 2016, Gabor Kiss-Vamosi, Ver 6.1.1, MIT
就是这样的,我还没有做功能,shell被我干掉了。启动完本来就啥都不做。
我今天才把串口parser做了,lvgl跑通了,顺便把图形部分的代码重构了,明天再更。
离线
#31 2020-02-24 09:30:35 分享评论
- sea18c
- 会员
- 注册时间: 2019-08-05
- 已发帖子: 230
- 积分: 222.5
Re: F1C200S入坑手记
原来的版本,你做了一个hello world 的呀
离线
楼主 #32 2020-02-24 11:04:08 分享评论
- Blueskull
- 会员
- 注册时间: 2020-02-20
- 已发帖子: 458
- 积分: 444.5
Re: F1C200S入坑手记
原来的版本,你做了一个hello world 的呀
哦,你的是F1C100S,那不行,链接脚本得改。而且memtest也不可能分配那么多内存。
你把heap改成16M,memtest大小改成12M应该能跑了。
离线
#33 2020-02-24 11:23:24 分享评论
- sea18c
- 会员
- 注册时间: 2019-08-05
- 已发帖子: 230
- 积分: 222.5
Re: F1C200S入坑手记
哦,你的是F1C100S,那不行,链接脚本得改。而且memtest也不可能分配那么多内存。
你把heap改成16M,memtest大小改成12M应该能跑了。
heap改成16M了,memtest屏蔽了没有启用,但我测试还是不行,链接脚本要改那里呢,我直接复制回原来整个F1C100S平台的文件来测试还是不行,但我用arm32-realview这个平台是正常的哦。
离线
楼主 #34 2020-02-24 14:04:58 分享评论
#35 2020-02-24 14:21:20 分享评论
- novice
- 会员
- 注册时间: 2019-07-26
- 已发帖子: 118
- 积分: 99
Re: F1C200S入坑手记
专门登录对楼主的分享表示感谢。
离线
#36 2020-02-24 18:04:17 分享评论
- sea18c
- 会员
- 注册时间: 2019-08-05
- 已发帖子: 230
- 积分: 222.5
Re: F1C200S入坑手记
楼主直播开车
离线
楼主 #37 2020-02-26 03:15:25 分享评论
- Blueskull
- 会员
- 注册时间: 2020-02-20
- 已发帖子: 458
- 积分: 444.5
Re: F1C200S入坑手记

离线
#38 2020-02-26 09:02:35 分享评论
- sea18c
- 会员
- 注册时间: 2019-08-05
- 已发帖子: 230
- 积分: 222.5
Re: F1C200S入坑手记
感谢Blueskull大神,带领我们从一个坑到另一个坑,从这些坑中学到很多有用的知识,也积累了经验!
离线
#39 2020-02-26 09:04:28 分享评论
- sea18c
- 会员
- 注册时间: 2019-08-05
- 已发帖子: 230
- 积分: 222.5
Re: F1C200S入坑手记
等着你开的硬件坑,我也想打个样版回来,焊接这芯片练练手。
离线
#40 2020-02-26 09:09:57 分享评论
- 我心飞翔
- 会员
- 注册时间: 2019-12-25
- 已发帖子: 82
- 积分: 82
Re: F1C200S入坑手记
原地坐等优秀的楼主开硬坑!
离线
#41 2020-04-17 21:08:56 分享评论
- dykxjh
- 会员
- 注册时间: 2020-03-25
- 已发帖子: 186
- 积分: 146
Re: F1C200S入坑手记
大神 可不可以调一下USB HOST
离线
楼主 #42 2020-04-17 21:22:20 分享评论
- Blueskull
- 会员
- 注册时间: 2020-02-20
- 已发帖子: 458
- 积分: 444.5
Re: F1C200S入坑手记
硬件坑没填上呢,不着急。板子调好再开新坑。
USBH不准备搞。我的板子不支持。我的板子板载USB,ARM的USB直接连到HUB的下行口了。
离线
#43 2020-04-21 09:33:53 分享评论
- xjtyOnly51
- 会员
- 注册时间: 2020-04-20
- 已发帖子: 19
- 积分: 19
Re: F1C200S入坑手记
这几天 同样 入手了一块Widora的板子, 菜鸟上路
离线
#44 2020-04-21 19:33:02 分享评论
- XZHDJH
- 会员
- 注册时间: 2020-01-18
- 已发帖子: 37
- 积分: 37
Re: F1C200S入坑手记
感谢大神分享
离线
#45 2020-04-21 20:16:58 分享评论
- piotr_go
- 会员
- 注册时间: 2020-04-21
- 已发帖子: 7
- 积分: 7
Re: F1C200S入坑手记
Hi
Can You upload latest code to eevblog forum?
I can't download anything from here ![]()
Best regards
Piotr
离线
楼主 #46 2020-04-21 20:23:06 分享评论
- Blueskull
- 会员
- 注册时间: 2020-02-20
- 已发帖子: 458
- 积分: 444.5
Re: F1C200S入坑手记
Hi
Can You upload latest code to eevblog forum?
I can't download anything from hereBest regards
Piotr
Don't really want to necropost on the old thread. PM me with your email and I can send it to you directly.
BTW, I believe posting at least 3 posts here should grant you download privilege. Don't quote on me.
离线
#48 2020-04-21 20:27:28 分享评论
- 晕哥
- 管理员
- 所在地: wechat: whycan_cn
- 注册时间: 2017-09-06
- 已发帖子: 9,416
- 积分: 9202
Re: F1C200S入坑手记
Don't really want to necropost on the old thread. PM me with your email and I can send it to you directly.
BTW, I believe posting at least 3 posts here should grant you download privilege. Don't quote on me.
大神神速,现在涨到7个了,笑哭.gif
离线
#49 2020-04-22 04:34:22 分享评论
- piotr_go
- 会员
- 注册时间: 2020-04-21
- 已发帖子: 7
- 积分: 7
Re: F1C200S入坑手记
I have question about SD-card reading.
What I need to do to make it work?
I can only see "/boot" directory when using "vfs_readdir".
Do I have to mount SD manually or something?
I'm using code from eevblog post "February 20, 2020, 05:41:56 pm".
SD card = FAT32.
Board = lichee pi nano (f1c100s, yes, I changed ram size).
离线
#50 2020-04-22 18:13:20 分享评论
- piotr_go
- 会员
- 注册时间: 2020-04-21
- 已发帖子: 7
- 积分: 7
Re: F1C200S入坑手记
OK, I found out.
I need to add "storage" directory to "romdisk" and then sd card is visible in patch "/storage/sdhci-f1c100s.0.sdcard.p0/".
离线
#51 2020-05-12 12:38:18 分享评论
- robot99
- 会员
- 注册时间: 2020-05-12
- 已发帖子: 4
- 积分: 4
Re: F1C200S入坑手记
感谢分享, mark 一下F1C200S.
离线
#52 2020-05-13 00:49:08 分享评论
- mawmanager
- 会员
- 注册时间: 2020-04-17
- 已发帖子: 1
- 积分: 1
Re: F1C200S入坑手记
感谢分享 入坑全志
离线
#53 2020-05-14 11:22:29 分享评论
- liyucai
- 会员
- 注册时间: 2019-12-06
- 已发帖子: 57
- 积分: 34
Re: F1C200S入坑手记
马克一下。正要买个 歪朵拉 的板子来玩。
离线
#54 2020-05-14 12:00:53 分享评论
- 5761193jia
- 会员
- 注册时间: 2018-02-09
- 已发帖子: 30
- 积分: 9
Re: F1C200S入坑手记
感谢分享
离线
#55 2020-05-21 11:41:12 分享评论
- Targz
- 会员
- 注册时间: 2020-05-21
- 已发帖子: 3
- 积分: 3
Re: F1C200S入坑手记
Wonderful post, Blueskull, it was very interesting to read and follow.
You should consider making a blog
离线
#56 2020-08-06 13:05:01 分享评论
- upoupil
- 会员
- 注册时间: 2020-08-03
- 已发帖子: 2
- 积分: 2
Re: F1C200S入坑手记
据mr.admin先生说,这是怎么编译的,对不对?
1. 下载工具链 arm-2014.05-29-arm-none-linux-gnueabi-i686-pc-linux-gnu.tar.bz2,解压缩到 /usr/local/ 目录.
修改 ~/.bashrc 将上面的工具链添加到PATH:
export PATH=/usr/local/arm-2014.05/bin/:$PATH
2. 下载xboot源码:
以上
3.编译源码:
make PLATFORM=arm32-f1c100s CROSS_COMPILE=arm-linux-
4. spi flash烧录xboot hack过的固件,插入usb公对公线, 上电,出现sunxi-fel 设备之后, 运行:
sudo sunxi-fel -p write 0x80000000 output/xboot.bin;sudo sunxi-fel exec 0x80000000
离线
#57 2020-08-08 13:37:30 分享评论
- wenunit
- 会员
- 注册时间: 2020-04-22
- 已发帖子: 31
- 积分: 1
Re: F1C200S入坑手记
这个必须得顶,我也在做HMI,基于KEIL。没有任何系统和UI,纯裸,基本的显示和触摸,上位机显示文件下载,解析,显示基本都完成了。两个多月了,还在努力中,再有一个多月,应该可以出样品。
最近编辑记录 wenunit (2020-08-08 13:41:27)
离线
#58 2020-08-08 15:06:40 分享评论
- jkl
- 会员
- 注册时间: 2019-11-18
- 已发帖子: 268
- 积分: 151.5
Re: F1C200S入坑手记
很强,mark一下
离线
#59 2020-08-20 11:32:22 分享评论
- hskse
- 会员
- 注册时间: 2020-07-30
- 已发帖子: 2
- 积分: 2
Re: F1C200S入坑手记
基于KEIL的HMI,我真的很期待它。
离线
#60 2020-09-01 12:50:01 分享评论
- ITOP
- 会员
- 注册时间: 2020-08-28
- 已发帖子: 2
- 积分: 2
Re: F1C200S入坑手记
准备入坑F1C200S,提前来学习
离线
#61 2021-12-09 23:02:08 分享评论
- smoony
- 会员
- 注册时间: 2021-12-09
- 已发帖子: 3
- 积分: 3
Re: F1C200S入坑手记
还是上大神的轮子吧
离线
#62 2021-12-16 13:48:30 分享评论
- pinkgun
- 会员
- 注册时间: 2021-12-16
- 已发帖子: 2
- 积分: 2
Re: F1C200S入坑手记
离线
- 不通过:其他
#63 2022-06-25 18:18:10 分享评论
- diancity
- 会员
- 注册时间: 2022-02-14
- 已发帖子: 4
- 积分: 4
Re: F1C200S入坑手记
大佬,xboot怎么初始化的时候启动应用呢?
离线
- 首页
- » 全志 SOC
- » F1C200S入坑手记