楼主 #1 2019-04-02 10:43:38 分享评论
- Jmhh247
- 会员
- 注册时间: 2018-12-21
- 已发帖子: 262
- 积分: 262

笔记-编译LittlevGL GUI demo支持tslib
前提,已经准备好交叉编译工具链和tslib,我用的是buildroot制作好的。
一、下载lvgl模拟器源码:
git clone https://github.com/littlevgl/pc_simulator.git
cd pc_simulator
git submodule update --init
二、修改Makefile
1. 修改CC为自己的gcc;
2. 修改链接标志,添加tslib支持;
3. 注释掉mouse_cursor_icon.c,用不上;
代码片断:
# 1:修改成自己的工具链
#CC = gcc
CC = /home/vmzys/work/2019/code/v3s/my_buildroot/buildroot-2017.08.1/output/host/bin/arm-linux-gnueabihf-gcc

# 2: 添加 tslab共享链接库
#LDFLAGS += -lSDL2 -lm
LDFLAGS += -lts

# 3:用不上,注释掉
#CSRCS +=$(LVGL_DIR)/mouse_cursor_icon.c
三、修改lvgl配置文件
1. 修改lv_conf.h
按实际屏幕尺寸修改
/* Horizontal and vertical resolution of the library.*/
#define LV_HOR_RES          (800)
#define LV_VER_RES          (480)
2. 修改lv_drv_conf.h
主要修改记录如下,其它按需处理:
#  define USE_MONITOR         0
#  define USE_FBDEV           1
#  define USE_MOUSE           0
#  define USE_MOUSEWHEEL      0
#  define USE_EVDEV           1


// 这里按实际修改
#  define EVDEV_NAME   "/dev/input/event1"        /*You can use the "evtest" Linux tool to get the list of devices and test them*/


#  define USE_KEYBOARD        0
3. 修改lv_ex_conf.h
/*******************
 * GENERAL SETTING
 *******************/
#define LV_EX_PRINTF       0       /*Enable printf-ing data*/
#define LV_EX_KEYBOARD     0       /*Add PC keyboard support to some examples (`lv_drivers` repository is required)*/
#define LV_EX_MOUSEWHEEL   0       /*Add 'encoder' (mouse wheel) support to some examples (`lv_drivers` repository is required)*/


#define USE_LV_TUTORIALS   0

#define USE_LV_BENCHMARK   0


/*MCU and memory usage monitoring*/
#define USE_LV_SYSMON      0

/*A terminal to display received characters*/
#define USE_LV_TERMINAL    0

/*Touch pad calibration with 4 points*/
#define USE_LV_TPCAL       0
四、整合tslib到输入驱动 pc_simulator/lv_drivers/indev/evdev.c
代码片断:
// 1: 添加头文件包含
#include "tslib.h"


// 2: ts结构体声明
struct tsdev *ts;


// 3: 修改初始化代码
void evdev_init(void)
{
#if 0
    evdev_fd = open(EVDEV_NAME, O_RDWR | O_NOCTTY | O_NDELAY);
    if(evdev_fd == -1) {
        perror("unable open evdev interface:");
        return;
    }

    fcntl(evdev_fd, F_SETFL, O_ASYNC | O_NONBLOCK);
#endif


	ts = ts_setup(NULL, 1);
	if (!ts) {
		perror("ts_setup");

        return;

		//exit(1);
	}

    evdev_root_x = 0;
    evdev_root_y = 0;
    evdev_button = LV_INDEV_STATE_REL;
}


// 4:修改读取代码
bool evdev_read(lv_indev_data_t * data)
{
#if 0

    struct input_event in;

    while(read(evdev_fd, &in, sizeof(struct input_event)) > 0) {
        if(in.type == EV_REL) {
            if(in.code == REL_X)
				#if EVDEV_SWAP_AXES
					evdev_root_y += in.value;
				#else
					evdev_root_x += in.value;
				#endif
            else if(in.code == REL_Y)
				#if EVDEV_SWAP_AXES
					evdev_root_x += in.value;
				#else
					evdev_root_y += in.value;
				#endif
        } else if(in.type == EV_ABS) {
            if(in.code == ABS_X)
				#if EVDEV_SWAP_AXES
					evdev_root_y = in.value;
				#else
					evdev_root_x = in.value;
				#endif
            else if(in.code == ABS_Y)
				#if EVDEV_SWAP_AXES
					evdev_root_x = in.value;
				#else
					evdev_root_y = in.value;
				#endif
        } else if(in.type == EV_KEY) {
            if(in.code == BTN_MOUSE || in.code == BTN_TOUCH) {
                if(in.value == 0)
                    evdev_button = LV_INDEV_STATE_REL;
                else if(in.value == 1)
                    evdev_button = LV_INDEV_STATE_PR;
            }
        }
    }

#endif

    // tslib
	struct ts_sample samp;
	int ret;

    /* 修改自tslib ts_print.c */

	while (ts_read(ts, &samp, 1) == 1) {

		printf("%ld.%06ld: %6d %6d %6d\n", samp.tv.tv_sec, samp.tv.tv_usec, samp.x, samp.y, samp.pressure);


		#if EVDEV_SWAP_AXES
			evdev_root_x = samp.y;
			evdev_root_y = samp.x;
		#else
			evdev_root_x = samp.x;
			evdev_root_y = samp.y;
		#endif


        if(samp.pressure == 0)
            evdev_button = LV_INDEV_STATE_REL;      //抬起
        else if(samp.pressure == 255)
            evdev_button = LV_INDEV_STATE_PR;
	}


    /*Store the collected data*/

#if EVDEV_SCALE
    data->point.x = map(evdev_root_x, 0, EVDEV_SCALE_HOR_RES, 0, LV_HOR_RES);
    data->point.y = map(evdev_root_y, 0, EVDEV_SCALE_VER_RES, 0, LV_VER_RES);
#else
#if EVDEV_CALIBRATE
	data->point.x = map(evdev_root_x, EVDEV_HOR_MIN, EVDEV_HOR_MAX, 0, LV_HOR_RES);
	data->point.y = map(evdev_root_y, EVDEV_VER_MIN, EVDEV_VER_MAX, 0, LV_VER_RES);
#else
    data->point.x = evdev_root_x;
    data->point.y = evdev_root_y;
#endif
#endif

    data->state = evdev_button;

    if(data->point.x < 0)
      data->point.x = 0;
    if(data->point.y < 0)
      data->point.y = 0;
    if(data->point.x >= LV_HOR_RES)
      data->point.x = LV_HOR_RES - 1;
    if(data->point.y >= LV_VER_RES)
      data->point.y = LV_VER_RES - 1;

    return false;
}
五. 修改main.c
main.c里有很多都是模拟器用的,需要删掉。这里直接用linux fb。
整个代码是比较容易看懂的:
#include "lvgl/lvgl.h"
#include "lv_drivers/display/fbdev.h"
#include "lv_drivers/indev/evdev.h"
#include <unistd.h>

#include "lv_examples/lv_apps/demo/demo.h"
#include "lv_examples/lv_tests/lv_test_theme/lv_test_theme_1.h"

int main(void)
{
    /*LittlevGL init*/
    lv_init();

    /*Linux frame buffer device init*/
    fbdev_init();

    /*Add a display the LittlevGL sing the frame buffer driver*/
    lv_disp_drv_t disp_drv;
    lv_disp_drv_init(&disp_drv);
    disp_drv.disp_flush = fbdev_flush;

    /*It flushes the internalgraphical buffer to the frame buffer*/
    lv_disp_drv_register(&disp_drv);

    /*Create a "Hello world!" label*/
//    lv_obj_t * label = lv_label_create(lv_scr_act(), NULL);
//    lv_label_set_text(label, "Hello world!");
//    lv_obj_align(label, NULL, LV_ALIGN_CENTER, 0, 0);


    lv_indev_drv_t indev_drv;

    lv_indev_drv_init(&indev_drv);/*Basic initialization*/

    evdev_init();

    indev_drv.type=LV_INDEV_TYPE_POINTER;/*See below.*/

    indev_drv.read=evdev_read;/*See below.*/

    lv_indev_drv_register(&indev_drv);/*Register the driver in LittlevGL*/

    //demo_create();

    lv_test_theme_1(lv_theme_night_init(210, NULL));


    /*Handle LitlevGL tasks (tickless mode)*/
    while(1) {
        lv_tick_inc(5);
        lv_task_handler();
        usleep(1000);
    }

    return 0;
}
最后编译:
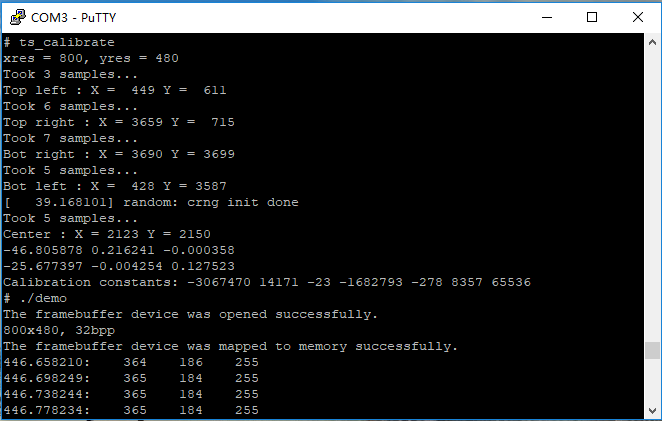
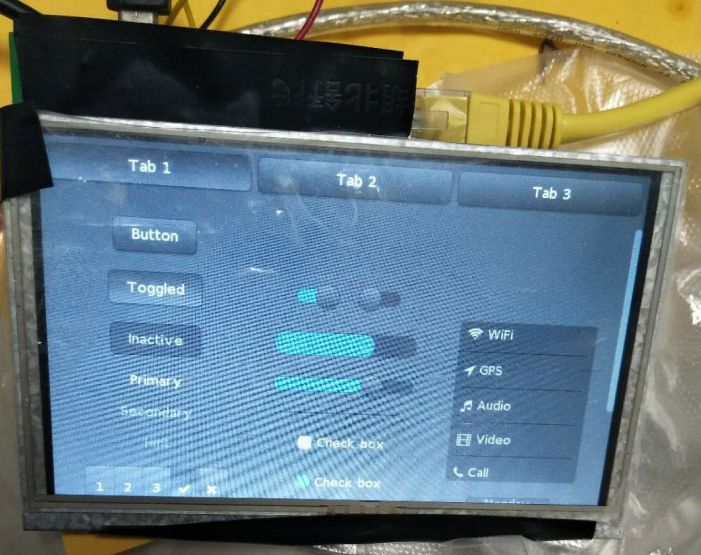
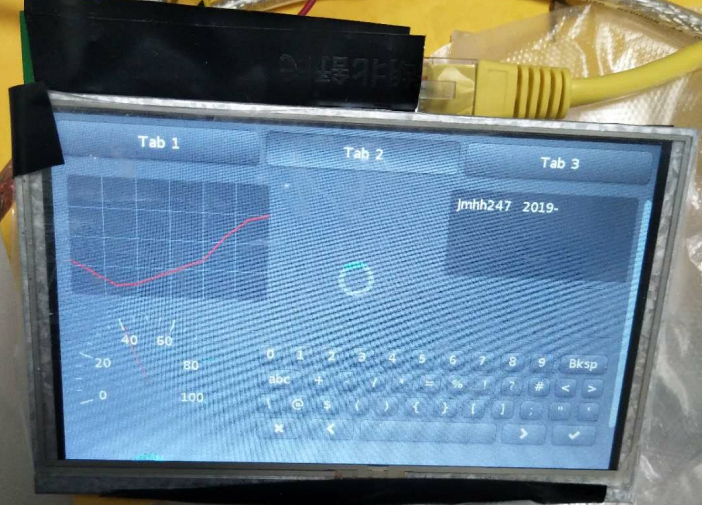
time make 运行截图:


上传一个附件用作参考。
整个工程较大,附件只包含需要修改的文件:main.c,evdev.c,Makefile,lv_conf.h,lv_drv_conf.h,lv_ex_conf.h。
离线
#3 2019-04-02 11:26:25 分享评论
- pythinker
- 会员
- 注册时间: 2019-02-12
- 已发帖子: 215
- 积分: 215
Re: 笔记-编译LittlevGL GUI demo支持tslib
无意路过, 感谢分享!
离线
#4 2019-08-12 21:14:22 分享评论
- 804715358@qq.com
- 会员
- 注册时间: 2019-02-18
- 已发帖子: 19
- 积分: 9
Re: 笔记-编译LittlevGL GUI demo支持tslib
楼主,您好,ts = ts_setup(NULL, 1);这个函数在哪里实现的,我这里用您的配置报错
离线
#6 2019-08-13 09:42:03 分享评论
- 804715358@qq.com
- 会员
- 注册时间: 2019-02-18
- 已发帖子: 19
- 积分: 9
Re: 笔记-编译LittlevGL GUI demo支持tslib
我的tslib是1.1的没有这个函数,现在换成最新的了,但是一直报错,环境变量设置应该没有问题,1.1可以完美运行的,但是1.4报错./usr/local/tslib/bin/ts_test: can't load library 'libts.so.0',急啊,晕哥大神指点下
离线
#7 2019-08-13 09:42:53 分享评论
- 804715358@qq.com
- 会员
- 注册时间: 2019-02-18
- 已发帖子: 19
- 积分: 9
Re: 笔记-编译LittlevGL GUI demo支持tslib
急!
可能是 libts 库里面实现的
离线
#8 2019-08-13 09:50:13 分享评论
- 还能这么玩
- 会员
- 注册时间: 2019-04-14
- 已发帖子: 119
- 积分: 119
Re: 笔记-编译LittlevGL GUI demo支持tslib
离线
楼主 #9 2019-08-13 10:35:57 分享评论
- Jmhh247
- 会员
- 注册时间: 2018-12-21
- 已发帖子: 262
- 积分: 262
Re: 笔记-编译LittlevGL GUI demo支持tslib
楼主,您好,ts = ts_setup(NULL, 1);这个函数在哪里实现的,我这里用您的配置报错
1. 这个函数就是tslib自己的API
在tslib.h里面可以看到
TSAPI struct tsdev *ts_setup(const char *dev_name, int nonblock);正常情况下,只要在应用程序里包含 tslib.h头文件,并且链接了tslib的库,就可以用这些API了。
2. 关于配置报错。这些配置的前提是,tslib已经移植好,可以正常工作。
你需要确认tslib是否能正常工作。(我也是新手,用的是buildroot自动编译好的tslib,本篇笔记不涉及tslib编译。。。)
离线
楼主 #10 2019-08-13 10:37:59 分享评论
- Jmhh247
- 会员
- 注册时间: 2018-12-21
- 已发帖子: 262
- 积分: 262
Re: 笔记-编译LittlevGL GUI demo支持tslib
我的tslib是1.1的没有这个函数,现在换成最新的了,但是一直报错,环境变量设置应该没有问题,1.1可以完美运行的,但是1.4报错./usr/local/tslib/bin/ts_test: can't load library 'libts.so.0',急啊,晕哥大神指点下
我用的版本是tslib-1.11。
离线
#11 2019-08-13 12:59:00 分享评论
- 804715358@qq.com
- 会员
- 注册时间: 2019-02-18
- 已发帖子: 19
- 积分: 9
Re: 笔记-编译LittlevGL GUI demo支持tslib
试了好多版本不行,又回到1.1了,然后在littlevgl里面手工校准了下
804715358@qq.com 说:我的tslib是1.1的没有这个函数,现在换成最新的了,但是一直报错,环境变量设置应该没有问题,1.1可以完美运行的,但是1.4报错./usr/local/tslib/bin/ts_test: can't load library 'libts.so.0',急啊,晕哥大神指点下
我用的版本是tslib-1.11。
离线
#12 2019-10-23 18:38:33 分享评论
- a32425262
- 会员

- 注册时间: 2018-05-06
- 已发帖子: 104
- 积分: 401
Re: 笔记-编译LittlevGL GUI demo支持tslib
一步一步按照上面的来,出现了以下错误
In file included from /workdir/littlevgl/pc_simulator/lvgl/src/lv_core/lv_group.h:19:0,
                 from /workdir/littlevgl/pc_simulator/lvgl/src/lv_core/lv_group.c:9:
/workdir/littlevgl/pc_simulator/lvgl/src/lv_core/../../../lv_conf.h:388:10: fatal error: lvgl/lv_conf_checker.h: No such file or directory
 #include "lvgl/lv_conf_checker.h"
          ^~~~~~~~~~~~~~~~~~~~~~~~
compilation terminated.
make: *** [lv_group.o] Error 1

real    0m0.340s
user    0m0.052s
sys     0m0.048s
最近编辑记录 a32425262 (2019-10-23 18:39:02)
离线
楼主 #13 2019-10-23 19:17:50 分享评论
- Jmhh247
- 会员
- 注册时间: 2018-12-21
- 已发帖子: 262
- 积分: 262
Re: 笔记-编译LittlevGL GUI demo支持tslib
应该是版本不一样了,发帖的时候是V5.3,现在是V6.0,导致一些文件不一样了。
官方已经有linux-fb版了,可以直接clone这个:https://github.com/littlevgl/lv_linux_frame_buffer,加上这里的tslib修改就可以了。(官方这个我还没用过~)
一步一步按照上面的来,出现了以下错误
In file included from /workdir/littlevgl/pc_simulator/lvgl/src/lv_core/lv_group.h:19:0,
                 from /workdir/littlevgl/pc_simulator/lvgl/src/lv_core/lv_group.c:9:
/workdir/littlevgl/pc_simulator/lvgl/src/lv_core/../../../lv_conf.h:388:10: fatal error: lvgl/lv_conf_checker.h: No such file or directory
 #include "lvgl/lv_conf_checker.h"
          ^~~~~~~~~~~~~~~~~~~~~~~~
compilation terminated.
make: *** [lv_group.o] Error 1

real    0m0.340s
user    0m0.052s
sys     0m0.048s
离线
#14 2019-10-24 09:39:14 分享评论
- a32425262
- 会员

- 注册时间: 2018-05-06
- 已发帖子: 104
- 积分: 401
Re: 笔记-编译LittlevGL GUI demo支持tslib
感谢回复,你的说法是对的,使用官方的这个
然后添加上tslib
应该是版本不一样了,发帖的时候是V5.3,现在是V6.0,导致一些文件不一样了。
官方已经有linux-fb版了,可以直接clone这个:https://github.com/littlevgl/lv_linux_frame_buffer,加上这里的tslib修改就可以了。(官方这个我还没用过~)
a32425262 说:一步一步按照上面的来,出现了以下错误
In file included from /workdir/littlevgl/pc_simulator/lvgl/src/lv_core/lv_group.h:19:0,
                 from /workdir/littlevgl/pc_simulator/lvgl/src/lv_core/lv_group.c:9:
/workdir/littlevgl/pc_simulator/lvgl/src/lv_core/../../../lv_conf.h:388:10: fatal error: lvgl/lv_conf_checker.h: No such file or directory
 #include "lvgl/lv_conf_checker.h"
          ^~~~~~~~~~~~~~~~~~~~~~~~
compilation terminated.
make: *** [lv_group.o] Error 1

real    0m0.340s
user    0m0.052s
sys     0m0.048s
离线
#15 2019-11-26 11:06:21 分享评论
- 范佩佩东
- 会员
- 注册时间: 2019-11-21
- 已发帖子: 2
- 积分: 2
Re: 笔记-编译LittlevGL GUI demo支持tslib
各位大佬好,我是按照littlevgl最新的framebuffer版本,再加上这里的笔记来移植tslib
tslib是1.4,然后再开发板上测试程序运行都没有问题的
链接库和头文件都设置好了,但是还是楼上的问题ts_read()函数的问题
离线
#18 2019-12-20 14:32:33 分享评论
- wlcccccc
- 会员
- 注册时间: 2019-12-06
- 已发帖子: 72
- 积分: 67.5
Re: 笔记-编译LittlevGL GUI demo支持tslib
感谢分享
离线
#19 2020-03-26 16:27:29 分享评论
- jerryzheng
- 会员
- 注册时间: 2020-03-25
- 已发帖子: 9
- 积分: 9
Re: 笔记-编译LittlevGL GUI demo支持tslib
我也是根据上面修改的,
但是编译到最后总是报错
./main.o: In function `main':
main.c:(.text.startup+0x70): undefined reference to `lv_theme_night_init'
main.c:(.text.startup+0x74): undefined reference to `lv_test_theme_1'
collect2: error: ld returned 1 exit status
Makefile:39: recipe for target 'default' failed
make: *** [default] Error 1
后来在main函数中就把 lv_test_theme_1 相关的内容都删除了,就运行demo
有没有人知道为什么会这样子呢,? 头文件都包含了呀。。。
感谢回复,你的说法是对的,使用官方的这个
然后添加上tslib
In file included from /workdir/littlevgl/pc_simulator/lvgl/src/lv_core/lv_group.h:19:0,
                 from /workdir/littlevgl/pc_simulator/lvgl/src/lv_core/lv_group.c:9:
/workdir/littlevgl/pc_simulator/lvgl/src/lv_core/../../../lv_conf.h:388:10: fatal error: lvgl/lv_conf_checker.h: No such file or directory
 #include "lvgl/lv_conf_checker.h"
          ^~~~~~~~~~~~~~~~~~~~~~~~
compilation terminated.
make: *** [lv_group.o] Error 1

real    0m0.340s
user    0m0.052s
sys     0m0.048s
离线
#20 2020-04-19 13:41:49 分享评论
- zhaoxu1887
- 会员
- 注册时间: 2020-02-23
- 已发帖子: 3
- 积分: 3
Re: 笔记-编译LittlevGL GUI demo支持tslib
找了好久,看看行不行。
离线
#21 2020-04-19 18:55:13 分享评论
- felix_zhou1618
- 会员
- 注册时间: 2020-01-14
- 已发帖子: 4
- 积分: 4
Re: 笔记-编译LittlevGL GUI demo支持tslib
前提,已经准备好交叉编译工具链和tslib,我用的是buildroot制作好的。
版主 tslib 与 buildroot 哪里可以下载了
离线
楼主 #22 2020-04-20 08:50:03 分享评论
- Jmhh247
- 会员
- 注册时间: 2018-12-21
- 已发帖子: 262
- 积分: 262
Re: 笔记-编译LittlevGL GUI demo支持tslib
离线
#23 2020-05-17 04:31:50 分享评论
- Kingcrum
- 会员
- 注册时间: 2019-11-22
- 已发帖子: 11
- 积分: 1
Re: 笔记-编译LittlevGL GUI demo支持tslib
感谢 下载下来测试一下 LittlevGL还是值得学习的
离线
#24 2020-08-04 14:09:40 分享评论
- green3002
- 会员
- 注册时间: 2020-08-04
- 已发帖子: 2
- 积分: 2
Re: 笔记-编译LittlevGL GUI demo支持tslib
很详细的笔记编译过程,试试再做评论。:(
离线
#25 2021-04-01 14:07:09 分享评论
- xfdr0805
- 会员
- 注册时间: 2020-07-23
- 已发帖子: 348
- 积分: 381
Re: 笔记-编译LittlevGL GUI demo支持tslib
最新版本LVGL测试成功
离线
#26 2021-08-17 17:01:37 分享评论
- 逍暗博
- 会员
- 注册时间: 2021-06-25
- 已发帖子: 9
- 积分: 4.5
Re: 笔记-编译LittlevGL GUI demo支持tslib
求助求助, 这个部分我使用tslib 1.4版本; 然后tslib移植成功, 并且ts_calibrate和ts_test 都可以测试通过;
但是运行lvgl后, 触摸就没有反应; 我尝试过没有在lvgl没有加入tslib的, 也尝试按照你的方式加入tslib后运行;
# ts_calibrate
xres = 800, yres = 480
Took 1 samples...
Top left : X =  400 Y =  672
Took 1 samples...
Top right : X = 3702 Y =  658
Took 2 samples...
Bot right : X = 3674 Y = 3478
Took 3 samples...
Bot left : X =  285 Y = 3479
Took 4 samples...
Center : X = 2067 Y = 2075
-34.692993 0.209173 0.005305
-40.521790 0.000298 0.135070
Calibration constants: -2273640 13708 347 -2655636 19 8851 65536
# ./lvgl_demo
The framebuffer device was opened successfully.
800x480, 32bpp
The framebuffer device was mapped to memory successfully.
[  174.892715] input input0: Poll touch data failed: -22
[  214.252723] input input0: Poll touch data failed: -22
[  264.092710] input input0: Poll touch data failed: -22
最近编辑记录 逍暗博 (2021-08-17 17:03:02)
离线
#27 2021-08-17 17:09:31 分享评论
离线
#28 2021-08-17 17:56:51 分享评论
- 逍暗博
- 会员
- 注册时间: 2021-06-25
- 已发帖子: 9
- 积分: 4.5
Re: 笔记-编译LittlevGL GUI demo支持tslib
[ 174.892715] input input0: Poll touch data failed: -22
错误22 EINVAL Invalid argument
所以提示是无效数值.;
配置对应的是/dev/input/event0 ; 点击会出现乱码的;
但是运行lvgl, ,触摸没反应 ,并且evdev_read函数的打印也没有出现, 说明函数都没有进入;
这个是我哪儿没有配置正确?
离线
#30 2021-08-18 09:37:55 分享评论
- 逍暗博
- 会员
- 注册时间: 2021-06-25
- 已发帖子: 9
- 积分: 4.5
Re: 笔记-编译LittlevGL GUI demo支持tslib
@逍暗博
evtest /dev/input/eventX
移植evtest后进行测试;
# ./evtest
No device specified, trying to scan all of /dev/input/event*
Available devices:
/dev/input/event0:      ns2009_ts
Select the device event number [0-0]: 0
Input driver version is 1.0.1
Input device ID: bus 0x18 vendor 0x0 product 0x0 version 0x0
Input device name: "ns2009_ts"
Supported events:
  Event type 0 (EV_SYN)
  Event type 1 (EV_KEY)
    Event code 330 (BTN_TOUCH)
  Event type 3 (EV_ABS)
    Event code 0 (ABS_X)
      Value    440
      Min        0
      Max     4095
      Fuzz      32
    Event code 1 (ABS_Y)
      Value    587
      Min        0
      Max     4095
      Fuzz      16
Properties:
Testing ... (interrupt to exit)
Event: time 104.591754, type 1 (EV_KEY), code 330 (BTN_TOUCH), value 1
Event: time 104.591754, type 3 (EV_ABS), code 0 (ABS_X), value 2651
Event: time 104.591754, type 3 (EV_ABS), code 1 (ABS_Y), value 2335
Event: time 104.591754, -------------- SYN_REPORT ------------
Event: time 104.631803, type 3 (EV_ABS), code 1 (ABS_Y), value 2337
Event: time 104.631803, -------------- SYN_REPORT ------------
Event: time 104.671762, type 3 (EV_ABS), code 1 (ABS_Y), value 2339
Event: time 104.671762, -------------- SYN_REPORT ------------
Event: time 104.710662, type 1 (EV_KEY), code 330 (BTN_TOUCH), value 0
Event: time 104.710662, -------------- SYN_REPORT ------------
最近编辑记录 逍暗博 (2021-08-18 09:44:15)
离线
#31 2021-08-18 11:54:02 分享评论
- 逍暗博
- 会员
- 注册时间: 2021-06-25
- 已发帖子: 9
- 积分: 4.5
Re: 笔记-编译LittlevGL GUI demo支持tslib
@逍暗博
evtest /dev/input/eventX
谢谢了; 问题解决了; 触摸没有反应是因为 indev 放在了 disp 的前面; 会导致lvgl的indev驱动注册不成功 ;
离线
#32 2021-08-18 12:15:44 分享评论
离线
#33 2021-11-27 22:02:07 分享评论
- TDA2030
- 会员
- 注册时间: 2019-10-17
- 已发帖子: 12
- 积分: 12
Re: 笔记-编译LittlevGL GUI demo支持tslib
终于有现成的了,我之前搞半天没搞成
离线
#34 2023-02-03 11:16:20 分享评论
- 落叶百枯
- 会员
- 注册时间: 2023-01-31
- 已发帖子: 2
- 积分: 2
Re: 笔记-编译LittlevGL GUI demo支持tslib
自己下载的,但是文件夹里好像配置和文件数都和这个对不上
离线
太原小智科技有限责任公司 - 东莞哇酷科技有限公司联合开发