楼主 #1 2018-04-27 22:14:52 分享评论
- 晕哥
- 管理员
- 所在地: wechat: whycan_cn
- 注册时间: 2017-09-06
- 已发帖子: 9,433
- 积分: 9202
LyraT 乐鑫官方ESP32开发板入坑记录 (百度AI dueros 演示成功!)
LyraT 乐鑫官方ESP32开发板入坑记录
官方文档: LyraT 开发板介绍
原理图: esp32-lyrat-v4-schematic.pdf
AP5056手册: AP5056.pdf
离线
楼主 #2 2018-04-27 22:14:58 分享评论
- 晕哥
- 管理员
- 所在地: wechat: whycan_cn
- 注册时间: 2017-09-06
- 已发帖子: 9,433
- 积分: 9202
Re: LyraT 乐鑫官方ESP32开发板入坑记录 (百度AI dueros 演示成功!)
Linux版本入坑步奏:
参考网址: https://github.com/espressif/esp-adf
1. 下载Linux版本SDK (选最新版本即可)
Linux Toolchain:
for 64-bit Linux: xtensa-esp32-elf-linux64-1.22.0-80-g6c4433a-5.2.0.tar.gz
for 32-bit Linux: xtensa-esp32-elf-linux32-1.22.0-80-g6c4433a-5.2.0.tar.gz
解压缩到 /usr/local 目录
tar xvf xtensa-esp32-elf-linux64-1.22.0-80-g6c4433a-5.2.0.tar.gz -C /usr/local/
2. 下载 ESP-ADF 源码
git clone --recursive https://github.com/espressif/esp-adf.git
3. 设置环境变量
export ADF_PATH=/opt/esp-adf/
export PATH=/usr/local/xtensa-esp32-elf/bin/:$PATH
可以把上面两行写入 ~/.bashrc 文件, 这样不用每次打开终端都要设置环境变量。
3. 编译
cd esp-adf/examples/get-started
make menuconfig
make flash monitor
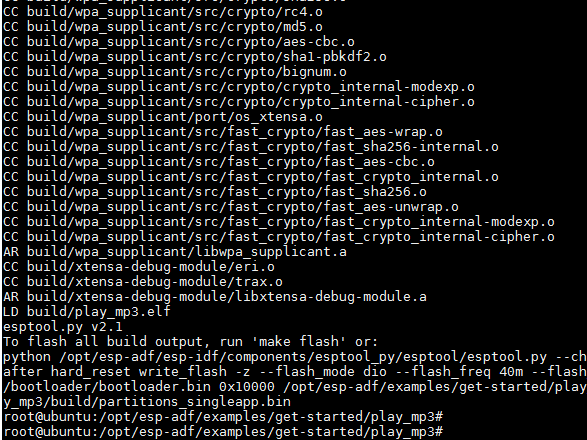
编译完成
4. 下载
make flash
5. 运行
按RST按键可以听到美妙的音乐。
离线
楼主 #3 2018-04-27 22:15:05 分享评论
- 晕哥
- 管理员
- 所在地: wechat: whycan_cn
- 注册时间: 2017-09-06
- 已发帖子: 9,433
- 积分: 9202
Re: LyraT 乐鑫官方ESP32开发板入坑记录 (百度AI dueros 演示成功!)
Windows编译步奏:
参考网址: https://github.com/espressif/esp-adf
1. 下载Windows版本SDK (选最新版本即可)
编译工具链下载: esp32_win32_msys2_environment_and_toolchain-20180110.zip
解压缩到本地硬盘,下面以解压到 d:\ 根目录为例。
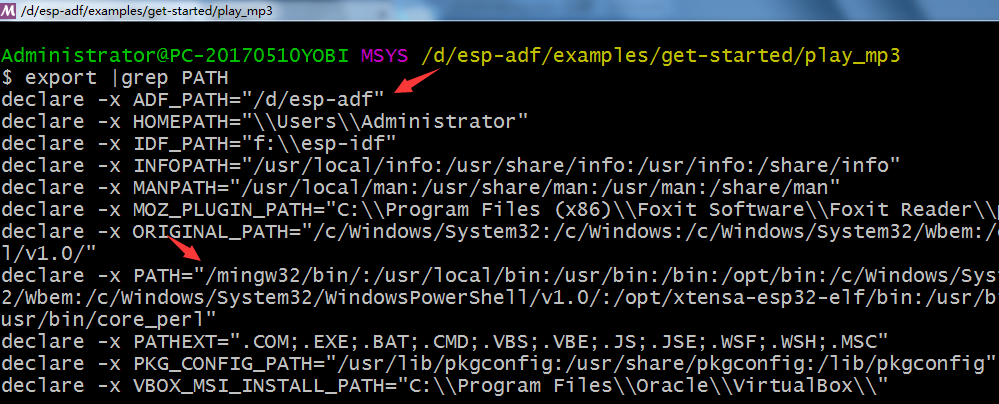
2. 设置环境变量 ADF_PATH, PATH
export ADF_PATH=/d/esp-adf
export PATH=/mingw32/bin/:$PATH
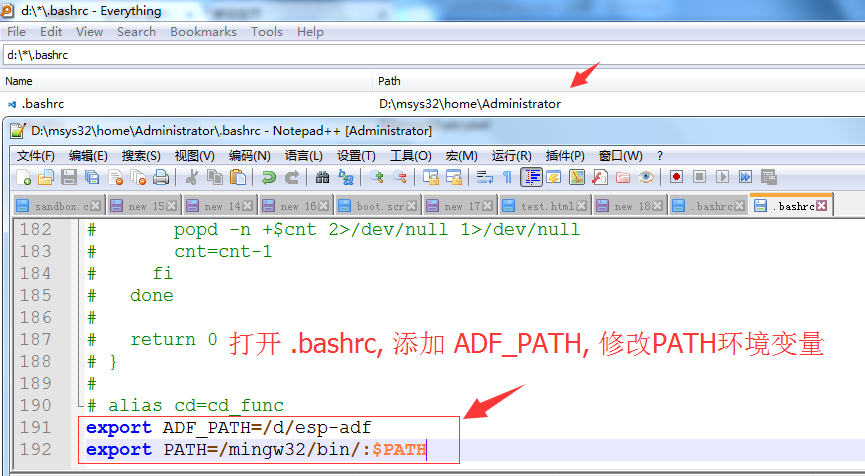
3. 双击打开 D:\msys32\msys2_shell.cmd
检查环境变量是否起作用:
export |grep PATH
4. 下载 ESP-ADF 源码
cd /d/ ###切换到 d 盘
git clone --recursive https://github.com/espressif/esp-adf.git
5. 编译
cd esp-adf/examples/get-started
make menuconfig
make
6. 下载
长按boot键不松手, 电源键打到ON,执行以下操作
make flash monitor
7. 运行
3.5mm 耳机插入 【PHONE JACK】, 按RST上电, 是不是听到了美妙的音乐!
后记:
由于mingw工具在Windows下执行make 等操作速度非常慢, 所以墙裂不建议在Windows下编译用mingw工具链做ESP32开发。
参考链接: What is the closest thing windows has to fork()?
Many "unixy" things on MinGW are painfully slow, because Windows has no fork(). Windows only has CreateProcess(), which is quite different. Unix shells and GNU Make do a lot of forking, so running these under MinGW results in "emulated" forks, which are really slow.
Another thing which suffers from this is GNU Autotools, so running ./configure scripts when building "unixy" applications from sources is also very slow. This can get really annoying if you need to do it many times (for example when having troubles with with getting configure to find all the libraries).
This answer explains in more detail how Cygwin and MinGW used to simulate fork(), and this answer has more up to date explanation.
不过有条件的朋友可以试一试 Windows 的 WSL.
离线
楼主 #4 2018-04-27 22:15:07 分享评论
- 晕哥
- 管理员
- 所在地: wechat: whycan_cn
- 注册时间: 2017-09-06
- 已发帖子: 9,433
- 积分: 9202
Re: LyraT 乐鑫官方ESP32开发板入坑记录 (百度AI dueros 演示成功!)
这篇文章讲得比较透彻: http://raylinn.iteye.com/blog/664024
相对于Unix,Windows的设计更有弹性,它是一个多层次的而且更加组件化的操作系统,Windows拥有许多子系统,我们通常说的Windows,只是它的子系统之一,称为WoW(Windows On Windows),其他子系统还包括Wow64,Posix和OS2。 Windows NT内核也支持COW fork,但是只为SFU(Microsoft's UNIX environment for Windows)所使用,SFU进程和Win32进程是不同的东西。
离线
楼主 #5 2018-04-27 22:15:09 分享评论
楼主 #6 2018-04-27 22:15:11 分享评论
楼主 #7 2018-04-27 22:15:16 分享评论
楼主 #8 2018-04-27 22:15:20 分享评论
楼主 #9 2018-04-27 22:15:23 分享评论
楼主 #10 2018-04-27 22:15:26 分享评论
楼主 #11 2018-04-27 22:15:28 分享评论
楼主 #13 2018-04-28 11:13:29 分享评论
楼主 #15 2018-04-30 18:00:01 分享评论
楼主 #17 2018-05-02 14:20:38 分享评论
- 晕哥
- 管理员
- 所在地: wechat: whycan_cn
- 注册时间: 2017-09-06
- 已发帖子: 9,433
- 积分: 9202
Re: LyraT 乐鑫官方ESP32开发板入坑记录 (百度AI dueros 演示成功!)
esp32 搭建 eclipse 环境:
【ESP32视频分享2】Window 平台使用 Eclipse开发ESP32程序
【ESP32视频分享3】Ubuntu使用 Eclipse开发ESP32程序
但是仍然解决不了 debug 问题,
据说可以用 JLink + openocd debug, 但是我没有试过。
you tu be.com 上面有视频。
离线
楼主 #20 2018-05-15 06:58:27 分享评论
楼主 #22 2018-05-15 14:39:40 分享评论
楼主 #24 2018-05-15 15:08:44 分享评论
楼主 #26 2018-05-15 15:38:32 分享评论
楼主 #29 2018-05-15 17:54:16 分享评论
- 晕哥
- 管理员
- 所在地: wechat: whycan_cn
- 注册时间: 2017-09-06
- 已发帖子: 9,433
- 积分: 9202
Re: LyraT 乐鑫官方ESP32开发板入坑记录 (百度AI dueros 演示成功!)
晕哥 说:扫了一下 gayhub https://github.com/espressif/esp-adf/tree/master/examples
貌似还没有唤醒的demo?在说明书里面说是刷上固件,可以用“alexa”唤醒。我找商务要,没有要到
也就是说唤醒的 demo 不开源?以后会开源吗?
离线
楼主 #31 2018-05-17 10:42:30 分享评论
楼主 #32 2018-05-26 15:14:18 分享评论
楼主 #33 2018-05-26 15:39:50 分享评论
楼主 #36 2018-05-30 17:18:49 分享评论
楼主 #38 2018-05-30 18:03:28 分享评论
楼主 #40 2018-06-19 20:12:52 分享评论
楼主 #43 2018-06-21 17:01:54 分享评论
- 晕哥
- 管理员
- 所在地: wechat: whycan_cn
- 注册时间: 2017-09-06
- 已发帖子: 9,433
- 积分: 9202
Re: LyraT 乐鑫官方ESP32开发板入坑记录 (百度AI dueros 演示成功!)
这个是百度语音合成的demo,
貌似识别的没有做,
你自己可以按照上面这个demo,对照百度API写一个。
离线
楼主 #47 2018-07-06 08:55:40 分享评论
- 晕哥
- 管理员
- 所在地: wechat: whycan_cn
- 注册时间: 2017-09-06
- 已发帖子: 9,433
- 积分: 9202
Re: LyraT 乐鑫官方ESP32开发板入坑记录 (百度AI dueros 演示成功!)
duerOs在github上更新了,求晕哥弄个帖子搞一下,是在是搞不了,就那个duer_profile需要怎么弄呢
https://github.com/dueros
这个移植到 esp32 ?
离线
楼主 #49 2018-07-06 12:03:05 分享评论
楼主 #51 2018-07-06 14:18:08 分享评论
- 晕哥
- 管理员
- 所在地: wechat: whycan_cn
- 注册时间: 2017-09-06
- 已发帖子: 9,433
- 积分: 9202
Re: LyraT 乐鑫官方ESP32开发板入坑记录 (百度AI dueros 演示成功!)
晕哥 说:那不错,以前还听说不开源,可以玩一玩。
那就催更了,其实看他们的readme还是不很懂
这个可以有.
https://github.com/espressif/esp-adf/tree/master/examples/dueros
DuerOS3.0 Example.
This example shows how to use ADF APIs to connect DuerOS3.0 To run this example you need ESP32 LyraT or compatible board:Setup Wi-Fi SSID and Password.
Connect speakers or headphone to the board.
Select your DuerOS device profile instead of ADF_APTH/examples/dueros/main/duer_profile. If you have not, please refer to DuerOS Developer Certification Guide apply for the DuerOS developer.Supported Features
Press [Rec] button to talk to DuerOS. The device will playback the DuerOS response. You can say anything what do you want, e.g."今天天气怎么样?" or "现在几点了?", what means "What's the weather?" or " what time is it?".
Wi-Fi Status indicate by green led. Wi-Fi connected green led turn on, disconnect with normal blink, setting will be fast blink.
Adjust volume by by touching [Vol-] or [Vol+]
Config Wi-Fi by [Set] button
Note:
DuerOS profile is device unique ID.
离线
楼主 #53 2018-07-07 08:09:56 分享评论
- 晕哥
- 管理员
- 所在地: wechat: whycan_cn
- 注册时间: 2017-09-06
- 已发帖子: 9,433
- 积分: 9202
Re: LyraT 乐鑫官方ESP32开发板入坑记录 (百度AI dueros 演示成功!)
https://raw.githubusercontent.com/Edragon/RC01/master/Firmware/R01-SD-File-DuerOS/profile
应该是一个类似这样的文件:
{"configures":"{}","bindToken":"0a55c632d873d7f29f746b29cfed8a5d","coapPort":443,"token":"EFG0X2V5","serverAddr":"device.iot.baidu.com","lwm2mPort":443,"uuid":"0800000000000c","rsaCaCrt":"-----BEGIN CERTIFICATE-----\nMIIDUDCCAjgCCQCmVPUErMYmCjANBgkqhkiG9w0BAQUFADBqMQswCQYDVQQGEwJD\nTjETMBEGA1UECAwKU29tZS1TdGF0ZTEOMAwGA1UECgwFYmFpZHUxGDAWBgNVBAMM\nDyouaW90LmJhaWR1LmNvbTEcMBoGCSqGSIb3DQEJARYNaW90QGJhaWR1LmNvbTAe\nFw0xNjAzMTEwMzMwNDlaFw0yNjAzMDkwMzMwNDlaMGoxCzAJBgNVBAYTAkNOMRMw\nEQYDVQQIDApTb21lLVN0YXRlMQ4wDAYDVQQKDAViYWlkdTEYMBYGA1UEAwwPKi5p\nb3QuYmFpZHUuY29tMRwwGgYJKoZIhvcNAQkBFg1pb3RAYmFpZHUuY29tMIIBIjAN\nBgkqhkiG9w0BAQEFAAOCAQ8AMIIBCgKCAQEAtbhIeiN7pznzuMwsLKQj2xB02+51\nOvCJ5d116ZFLjecp9qtllqOfN7bm+AJa5N2aAHJtsetcTHMitY4dtGmOpw4dlGqx\nluoz50kWJWQjVR+z6DLPnGE4uELOS8vbKHUoYPPQTT80eNVnl9S9h/l7DcjEAJYC\nIYJbf6+K9x+Ti9VRChvWcvgZQHMRym9j1g/7CKGMCIwkC+6ihkGD/XG40r7KRCyH\nbD53KnBjBO9FH4IL3rGlZWKWzMw3zC6RTS2ekfEsgAtYDvROKd4rNs+uDU9xaBLO\ndXTl5uxgudH2VnVzWtj09OUbBtXcQFD2IhmOl20BrckYul+HEIMR0oDibwIDAQAB\nMA0GCSqGSIb3DQEBBQUAA4IBAQCzTTH91jNh/uYBEFekSVNg1h1kPSujlwEDDf/W\npjqPJPqrZvW0w0cmYsYibNDy985JB87MJMfJVESG/v0Y/YbvcnRoi5gAenWXQNL4\nh2hf08A5wEQfLO/EaD1GTH3OIierKYZ6GItGrz4uFKHV5fTMiflABCdu37ALGjrA\nrIjwjxQG6WwLr9468hkKrWNG3dMBHKvmqO8x42sZOFRJMkqBbKzaBd1uW4xY5XwM\nS1QX56tVrgO0A3S+4dEg5uiLVN4YVP/Vqh4SMtYkL7ZZiZAxD9GtNnhRyFsWlC2r\nOVSdXs1ttZxEaEBGUl7tgsBte556BIvufZX+BXGyycVJdBu3\n-----END CERTIFICATE-----\n","macId":"","version":2872}
申请 duerOS开发者,应该可以获取到的.
离线
楼主 #54 2018-07-07 11:44:30 分享评论
楼主 #56 2018-07-10 10:19:29 分享评论
楼主 #58 2018-07-10 12:04:07 分享评论
楼主 #60 2018-07-10 13:44:37 分享评论
楼主 #63 2018-07-13 18:28:19 分享评论
楼主 #64 2018-07-13 21:35:19 分享评论
- 晕哥
- 管理员
- 所在地: wechat: whycan_cn
- 注册时间: 2017-09-06
- 已发帖子: 9,433
- 积分: 9202
Re: LyraT 乐鑫官方ESP32开发板入坑记录 (百度AI dueros 演示成功!)
rst:0x1 (POWERON_RESET),boot:0x3f (SPI_FAST_FLASH_BOOT)
configsip: 0, SPIWP:0xee
clk_drv:0x00,q_drv:0x00,d_drv:0x00,cs0_drv:0x00,hd_drv:0x00,wp_drv:0x00
mode:DIO, clock div:1
load:0x3fff0018,len:4
load:0x3fff001c,len:5764
load:0x40078000,len:0
load:0x40078000,len:14032
entry 0x40078ff0
I (28) boot: ESP-IDF v3.0.1 2nd stage bootloader
I (28) boot: compile time 21:16:03
I (30) boot: Enabling RNG early entropy source...
I (32) qio_mode: Enabling QIO for flash chip GD
I (38) boot: SPI Speed      : 80MHz
I (42) boot: SPI Mode       : QIO
I (46) boot: SPI Flash Size : 8MB
I (50) boot: Partition Table:
I (53) boot: ## Label            Usage          Type ST Offset   Length
I (61) boot:  0 nvs              WiFi data        01 02 00009000 00006000
I (68) boot:  1 phy_init         RF data          01 01 0000f000 00001000
I (76) boot:  2 factory          factory app      00 00 00010000 00100000
I (83) boot: End of partition table
I (87) esp_image: segment 0: paddr=0x00010020 vaddr=0x3f400020 size=0x43bb8 (277432) map
I (169) esp_image: segment 1: paddr=0x00053be0 vaddr=0x3ffb0000 size=0x0382c ( 14380) load
I (174) esp_image: segment 2: paddr=0x00057414 vaddr=0x40080000 size=0x00400 (  1024) load
0x40080000: _WindowOverflow4 at C:/projects/esp-adf/esp-idf/components/freertos/xtensa_vectors.S:1685

I (176) esp_image: segment 3: paddr=0x0005781c vaddr=0x40080400 size=0x087f4 ( 34804) load
I (196) esp_image: segment 4: paddr=0x00060018 vaddr=0x400d0018 size=0xfa5d4 (1025492) map
0x400d0018: _flash_cache_start at ??:?

I (467) esp_image: segment 5: paddr=0x0015a5f4 vaddr=0x40088bf4 size=0x08ce8 ( 36072) load
0x40088bf4: xTaskCreatePinnedToCore at C:/projects/esp-adf/esp-idf/components/freertos/tasks.c:4494 (discriminator 2)

I (479) esp_image: segment 6: paddr=0x001632e4 vaddr=0x400c0000 size=0x00000 (     0) load
E (479) esp_image: Image length 1389328 doesn't fit in partition length 1048576
E (484) boot: Factory app partition is not bootable
E (490) boot: No bootable app partitions in the partition table
user code done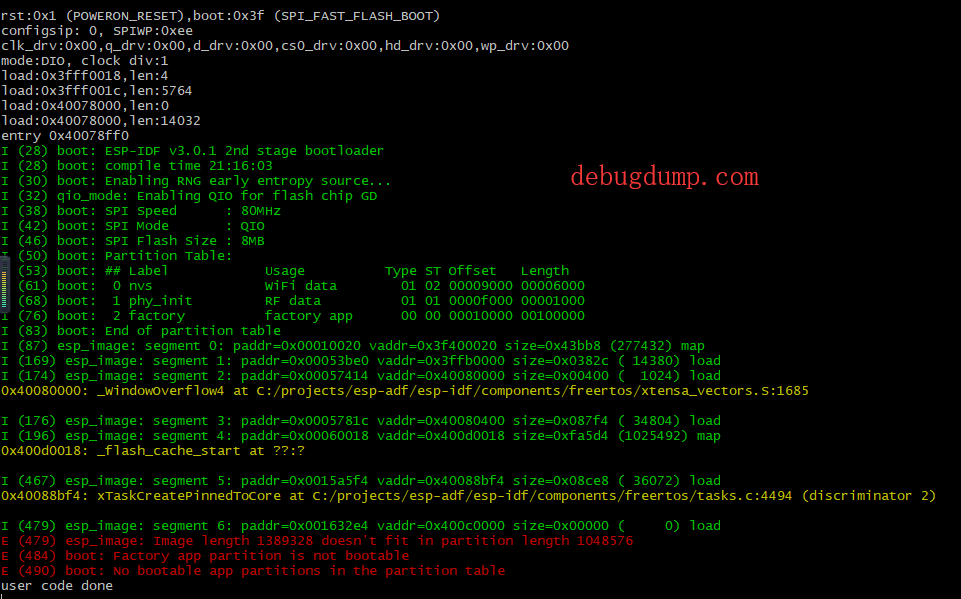
一番折腾之后,居然出错了。
离线
楼主 #66 2018-07-16 11:14:57 分享评论
楼主 #68 2018-07-16 11:41:42 分享评论
楼主 #72 2018-07-18 19:51:19 分享评论
楼主 #74 2018-07-18 22:29:15 分享评论
- 晕哥
- 管理员
- 所在地: wechat: whycan_cn
- 注册时间: 2017-09-06
- 已发帖子: 9,433
- 积分: 9202
Re: LyraT 乐鑫官方ESP32开发板入坑记录 (百度AI dueros 演示成功!)
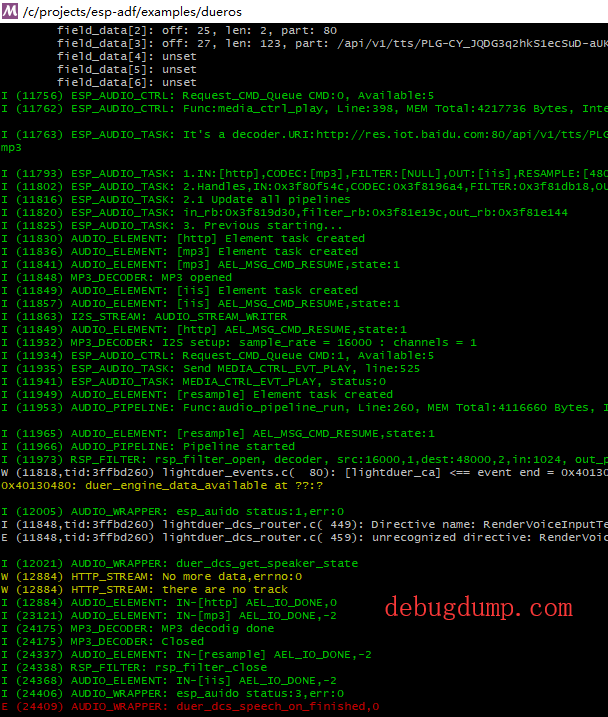
根据 @wenkumk 提醒,终于把dueros 跑起来了
http://esp-idf.readthedocs.io/en/latest/api-guides/partition-tables.html
可能是前面我只执行了 make flash,只写入了app, 而没有写入 partitions_singleapp.bin, 导致读入app大小出错.
正确的姿势是:
ESPPORT=COM23 make erase_flash
ESPPORT=COM23 make flash
或者单独写入分区数据:
ESPPORT=COM23 make partition_table-flash
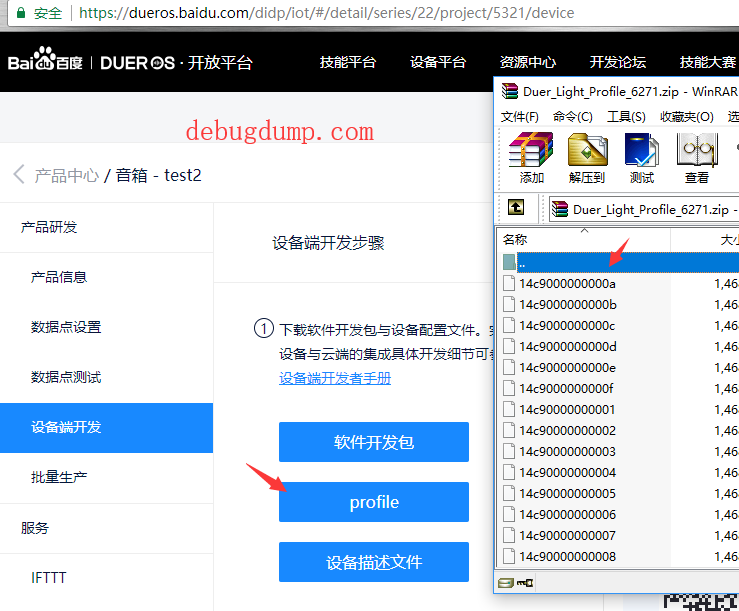
为了给大家省时间,可以直接使用我的dueros profile.
下载地址: Duer_Light_Profile_6271.zip
把上面压缩包里面任意一个文件拷贝到工程的 duer_profile,
make menuconfig 填入自己的ssid和password,
接上喇叭或者耳机,
上电启动ESP32 LyraT开发板,
按下Rec按钮(不用长按),
然后就可以直接说: 讲个笑话, 今天天气如何?
dueros会直接回答问题.
离线
楼主 #75 2018-07-25 08:06:07 分享评论
楼主 #81 2018-07-28 14:26:19 分享评论
楼主 #84 2018-07-28 14:45:08 分享评论
楼主 #86 2018-07-28 14:59:07 分享评论
- 晕哥
- 管理员
- 所在地: wechat: whycan_cn
- 注册时间: 2017-09-06
- 已发帖子: 9,433
- 积分: 9202
离线
楼主 #93 2019-09-25 22:37:17 分享评论
楼主 #103 2019-12-06 11:35:36 分享评论
- 晕哥
- 管理员
- 所在地: wechat: whycan_cn
- 注册时间: 2017-09-06
- 已发帖子: 9,433
- 积分: 9202
Re: LyraT 乐鑫官方ESP32开发板入坑记录 (百度AI dueros 演示成功!)
这个在哪个彩蛋里的?刚玩不知道
【ESP32视频分享2】Window 平台使用 Eclipse开发ESP32程序
【ESP32视频分享3】Ubuntu使用 Eclipse开发ESP32程序
根据很久以前的SDK做的, 现在不知道还能不能用,将就看吧。
离线
楼主 #106 2019-12-06 14:21:28 分享评论
楼主 #108 2019-12-06 14:35:07 分享评论
楼主 #120 2019-12-09 15:38:23 分享评论
太原小智科技有限责任公司 - 东莞哇酷科技有限公司联合开发
