- 首页
- » 搜索
- » bigbat 发表的帖子
页次: 1
#2 Re: 计算机图形/GUI/RTOS/FileSystem/OpenGL/DirectX/SDL2 » 用Keil环境体验STM32F746-Disco开发板LVGLDemo支持GUI Guider » 2023-12-06 16:15:32
#4 Re: 全志 SOC » 4寸LCD屏驱动是否需要负电压 » 2023-08-30 08:05:07
#10 Re: ESP32/ESP8266 » 乐鑫 ESP32-C3 功能介绍 » 2022-09-15 16:32:38
#15 Re: 感芯科技 » [XMG助力国产]MC3172核心板管脚图美化版 » 2022-09-15 16:17:04
#16 全志 SOC » 论坛里那个licheepi的LVGL的项目是正常的能够使用的吗 » 2022-05-02 09:18:01
- bigbat
- 回复: 1
我先后下载了lvgl移植到裸跑的f1c100s上、F1C100S裸奔framebuffer+PWM+GPIO驱动等项目,看到人家好在颜色是正常的,我的颜色都不正常,但是我的屏是没有问题的,在linuix是正常的。
#17 Re: 计算机图形/GUI/RTOS/FileSystem/OpenGL/DirectX/SDL2 » lvgl从模拟器移植到F1C100S上,卡到怀疑人生? » 2022-05-02 09:04:09
#18 Re: Nuvoton N32905/N32926/NUC972/N9H20/N9H26/N9H30 » step by step 全志 f1c100s MDK 裸奔各种外设(参考N3290x) » 2022-04-21 17:53:25
#20 Re: 全志 SOC » 又捡到个东西,来鉴定一下 » 2022-04-21 17:48:17
#22 Re: 全志 SOC » 荔枝派nano 编译后无法正常启动问题 » 2022-03-24 15:27:16
#23 Re: 全志 SOC » 分享个licheepi nano镜像,支持adb调试 » 2022-03-22 19:47:50
# #! /bin/sh
# modprobe g_ffs idVendor=0x18d1 idProduct=0x4e42 iSerialNumber="buildroot"
[   16.131986] file system registered
# mkdir -p /dev/usb-ffs/adb
# mount -t functionfs adb /dev/usb-ffs/adb -o uid=2000,gid=2000
# adbd &
#
# install_listener('tcp:5037','*smartsocket*')
[   19.849665] read descriptors
[   19.852638] read strings
[   19.855577] g_ffs gadget: g_ffs ready
[   20.163733] g_ffs gadget: high-speed config #1: FunctionFS
#
windows 10 系统显示为funcionfs设备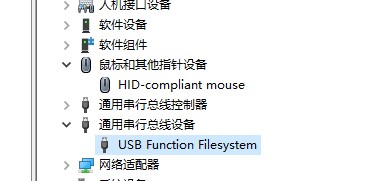
#24 Re: 全志 SOC » 分享个licheepi nano镜像,支持adb调试 » 2022-03-22 13:44:58
#25 Re: 全志 SOC » 分享个licheepi nano镜像,支持adb调试 » 2022-03-22 11:24:00
#26 Re: 全志 SOC » 荔枝派nano根文件系统编译找不见.config文件 » 2022-03-22 11:19:28
#27 全志 SOC » licheepi USB串口终于搞定 » 2022-03-21 09:27:23
- bigbat
- 回复: 1
前前后后弄了有20多次的实验,终于把f1c100s的两种linux gadget 串口驱动搞定了。下面就对这次的过程做个总结:
参考的贴子主要有
http://trac.gateworks.com/wiki/linux/OTG
https://whycan.com/t_2401.html
https://whycan.com/t_6242.html
用的linux版本是主线,http://nano.lichee.pro/build_sys/kernel.html 以及配置文件。
linux的gadget驱动有两个版本,原生驱动和configfs驱动,主要区别是原生驱动不灵活,而且组合固定,configfs比较灵活,组合任意。原生的驱动带g_头,configfs带usb_f头,但是原生驱动也有优势,就是可以编译成内核驱动,只要一开机上电就可以使用
比如:可以将console配置成USB串口。configfs驱动都是动态加载的,这个就需要开机脚本的。
1、不管使用什么驱动,都要修改ccu-suniv.c文件,补丁内容如下:
jiangming1399 说:
花了一点时间对Icenowy的patch和chong的patch进行了比较,结果发现chong的patch包基本上就是在Icenowy的基础上更改了下面的这个文件:
--- ../linux/drivers/clk/sunxi-ng/ccu-suniv.c 2019-01-15 22:48:18.824587965 +0800
+++ drivers/clk/sunxi-ng/ccu-suniv.c 2019-01-23 09:05:17.959348454 +0800
@@ -238,7 +238,7 @@
/* The BSP header file has a CIR_CFG, but no mod clock uses this definition */
static SUNXI_CCU_GATE(usb_phy0_clk, "usb-phy0", "osc24M",
- 0x0cc, BIT(8), 0);
+ 0x0cc, BIT(1), 0);
static SUNXI_CCU_GATE(dram_ve_clk, "dram-ve", "pll-ddr",
0x100, BIT(0), 0);
理论上将上面这个patch应用到Icenowy的4.14内核中,USB应该也就能跑了。
2、原生的内核驱动是和configfs驱动冲突的,但是原生驱动和动态加载的不冲突。对照whycan的帖子,根据需要修改配置文件,请参考相关的贴子
3、如果是原生驱动选择后,烧写到系统,上电就可以使用,如果是动态加载就要使用开机脚本了。
4、如果是原生动态的需要手动加载。
就是这里有个坑,加载g_serial时:
# modprobe g_serial
modprobe: module g_serial not found in modules.dep
可以有两种情况
一、没有选择对应的驱动。
二、没有在rootfs文件系统中安装模块。
5、configfs驱动安装贴子配置,参考 http://trac.gateworks.com/wiki/linux/OTG
# mount configfs
mount -t configfs none /sys/kernel/config
# load libcomposite module
modprobe libcomposite
# create a gadget
mkdir /sys/kernel/config/usb_gadget/g1
# cd to its configfs node
cd /sys/kernel/config/usb_gadget/g1
# configure it (vid/pid can be anything if USB Class is used for driver compat)
echo 0xabcd > idVendor
echo 0x1234 > idProduct
# configure its serial/mfg/product
mkdir strings/0x409
echo myserial > strings/0x409/serialnumber
echo mymfg > strings/0x409/manufacturer
echo myproduct > strings/0x409/product
# create a config
mkdir configs/c.1
# configure it with attributes if needed
echo 120 > configs/c.1/MaxPower
# ensure function is loaded
modprobe usb_f_acm
# create the function (name must match a usb_f_<name> module such as 'acm')
mkdir functions/acm.0
# associate function with config
ln -s functions/acm.0 configs/c.1
# enable gadget by binding it to a UDC from /sys/class/udc
echo 0000:01:00.0 > UDC
# to unbind it: echo "" UDC; sleep 1; rm -rf /sys/kernel/config/usb_gadget/g1
大坑:echo 0000:01:00.0 > UDC
总是出错,主要是理解 echo <udc name> > UDC出问题。
<udc name>中的内容是你用 ls /sys/class/udc/ 列出的文件名称,列出什么文件名称,只要加载该名称的文件,usb就驱动了!!!
#28 全志 SOC » 如何调换linux的终端设备 » 2022-03-14 08:52:44
#29 Re: 全志 SOC » 网站需要改革,放开文件下载权限(不需要与积分挂钩) » 2022-03-14 08:48:26
#31 Re: 全志 SOC » 网站需要改革,放开文件下载权限(不需要与积分挂钩) » 2022-03-13 19:29:16
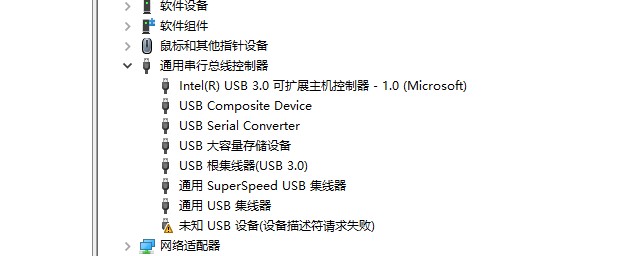
#34 Re: 全志 SOC » USB gadget驱动报:请求 USB 设备描述符失败 » 2022-03-08 23:33:53
[    0.886974] SCSI Media Changer driver v0.25
[    0.894580] m25p80 spi0.0: xt25f128b (16384 Kbytes)
[    0.899645] 4 ofpart partitions found on MTD device spi0.0
[    0.905130] Creating 4 MTD partitions on "spi0.0":
[    0.909995] 0x000000000000-0x000000100000 : "u-boot"
[    0.917644] 0x000000100000-0x000000110000 : "dtb"
[    0.924740] 0x000000110000-0x000000510000 : "kernel"
[    0.932229] 0x000000510000-0x000001000000 : "rootfs"
[    0.940264] ehci_hcd: USB 2.0 'Enhanced' Host Controller (EHCI) Driver
[    0.946916] ehci-platform: EHCI generic platform driver
[    0.952428] ohci_hcd: USB 1.1 'Open' Host Controller (OHCI) Driver
[    0.958725] ohci-platform: OHCI generic platform driver
[    0.965418] i2c /dev entries driver
[    1.025295] sunxi-mmc 1c0f000.mmc: base:0x8bc3d9cb irq:19
[    1.032664] usbcore: registered new interface driver usbhid
[    1.038351] usbhid: USB HID core driver
[    1.059849] NET: Registered protocol family 17
[    1.064526] Key type dns_resolver registered
[    1.071134] Loading compiled-in X.509 certificates
[    1.086388] sun4i-drm display-engine: bound 1e60000.display-backend (ops 0xc073a4b8)
[    1.095322] sun4i-drm display-engine: bound 1c0c000.lcd-controller (ops 0xc073979c)
[    1.103002] [drm] Supports vblank timestamp caching Rev 2 (21.10.2013).
[    1.109671] [drm] No driver support for vblank timestamp query.
[    1.163589] Console: switching to colour frame buffer device 60x34
[    1.186987] sun4i-drm display-engine: fb0:  frame buffer device
[    1.194159] [drm] Initialized sun4i-drm 1.0.0 20150629 for display-engine on minor 0
[    1.203328] usb_phy_generic usb_phy_generic.0.auto: usb_phy_generic.0.auto supply vcc not found, using dummy regulator
[    1.215355] musb-hdrc musb-hdrc.1.auto: MUSB HDRC host driver
[    1.221150] musb-hdrc musb-hdrc.1.auto: new USB bus registered, assigned bus number 1
[    1.231249] hub 1-0:1.0: USB hub found
[    1.235309] hub 1-0:1.0: 1 port detected
[    1.241624] cfg80211: Loading compiled-in X.509 certificates for regulatory database
[    1.259296] cfg80211: Loaded X.509 cert 'sforshee: 00b28ddf47aef9cea7'
[    1.266123] vcc3v3: disabling
[    1.269105] ALSA device list:
[    1.272071]   #0: Loopback 1
[    1.275955] platform regulatory.0: Direct firmware load for regulatory.db failed with error -2
[    1.284568] cfg80211: failed to load regulatory.db
[    1.386335] random: crng init done
[    2.705076] VFS: Mounted root (jffs2 filesystem) on device 31:3.
[    2.712845] devtmpfs: mounted
[    2.720588] Freeing unused kernel memory: 1024K
Starting logging: OK
Initializing random number generator... done.
Starting network: OK

Welcome to Buildroot
nano login:
我的启动信息
#38 全志 SOC » f1c100s的linux主线可以ft启动不能spi flash启动 » 2022-03-06 16:29:58
- bigbat
- 回复: 0
git clone https://github.com/Lichee-Pi/linux.git
cd linux
make ARCH=arm licheepi_zero_defconfig
make ARCH=arm menuconfig   #add bluethooth, etc.
make ARCH=arm CROSS_COMPILE=arm-linux-gnueabihf- -j16
make ARCH=arm CROSS_COMPILE=arm-linux-gnueabihf- -j16 INSTALL_MOD_PATH=out modules
make ARCH=arm CROSS_COMPILE=arm-linux-gnueabihf- -j16 INSTALL_MOD_PATH=out modules_install
按照上面的步骤编译,linux内核,可以放到ft卡里启动,但是不能spi启动 这两者有何不同
#40 Re: 全志 SOC » F1C100S裸奔framebuffer+PWM+GPIO驱动 » 2022-03-04 08:54:50
在大佬的裸机代码基础上移植了ZLG_GUI并显示了旋转立方体。
https://whycan.cn/files/members/1278/gifeditor_20181202_114251.gif
可惜大佬没写例子的外设都还没摸索会,不然就多加点功能了。
另外,我想以此写一篇新手裸机教程,可以吗?
我用这个代码改的lvgl的程序,可是就是颜色不对,对比荔枝派的代码,发现没有问题。颜色很正
#41 全志 SOC » 怎么理解设备树文件 » 2022-03-02 22:16:36
#42 Re: 全志 SOC » 为新设备构建主线u-boot » 2022-03-02 22:09:30
#44 Re: 哇酷地摊(跳蚤市场) » 周立功 i.mx283 开发板 » 2022-02-25 11:02:42
#45 Re: 全志 SOC » F1C100S Linux 内核编译出现问题 » 2022-02-25 11:00:19
#48 Re: 全志 SOC » F1C100S 串口 怎么 通过 DMA 收发数据 ? » 2022-02-25 09:17:30
#49 Re: 全志 SOC » FreeRTOS移植到F1C100S, 含GCC和keil版本 » 2022-02-25 09:14:40
#50 Re: 全志 SOC » FreeRTOS移植到F1C100S, 含GCC和keil版本 » 2022-02-25 09:07:45
#51 Re: 全志 SOC » F1C100S裸跑实现硬件多图层叠加和Alpha » 2022-02-24 12:04:02
       write32((virtual_addr_t)&debe->layer0_size, (((pdat->height) - 1) << 16) | (((pdat->width) - 1) << 0));     // Layer0 尺寸 pos默认0//
	write32((virtual_addr_t)&debe->layer0_stride, ((pdat->width) << 5));                                        // Layer0 帧缓存行尺寸 480*32//
	write32((virtual_addr_t)&debe->layer0_addr_low32b, (uint32_t)(pdat->vram[0]) << 3);                         // Layer0 帧缓存地址 //
	write32((virtual_addr_t)&debe->layer0_addr_high4b, (uint32_t)(pdat->vram[0]) >> 29);
	write32((virtual_addr_t)&debe->layer0_attr1_ctrl, 0x09 << 8);                                               // Layer0 32BPP//
	write32((virtual_addr_t)&debe->layer0_attr0_ctrl, (0x80 << 24) | (0 << 18) | (1 << 15) | (3 << 10) | (0) );// Layer0 Pipe1 优先级3/
write32((virtual_addr_t)&debe->layer0_addr_low32b, (uint32_t)(pdat->vram[0]) << 3);
帧缓存地址中的地址是DRAM地址吗?
#53 Re: 全志 SOC » 使用rust对arm9处理器进行裸机开发 » 2022-02-19 14:02:41
#55 Re: 全志 SOC » 连续多个晚上熬夜,终于搞定F1C100S裸奔(从SPI Flash启动) » 2022-02-19 11:52:13
看了楼主的贴子受益匪浅!但是有下面代码
h = (struct boot_head_t *)buffer;
p = (uint32_t *)h;
h->length = ALIGN(h->length, BLOCK_SIZE);//align block size
l = le32_to_cpu(h->length);
h->checksum = cpu_to_le32(0x5F0A6C39);
loop = l >> 2;
printf("bootloader size= %x\n", h->length);
for(i = 0, sum = 0; i < loop; i++)
sum += le32_to_cpu(p[r]);
h->checksum = cpu_to_le32(sum);
其中的h->checksum = cpu_to_le32(0x5F0A6C39);
这说明应该是前面有什么文件内容的校验sum吧,有朋友知道是什么文件吗?
#57 Re: 全志 SOC » licheepi的xt25f128B的坑怎么填 » 2022-02-16 20:14:24
#59 Re: 全志 SOC » [求助] 无法识别新买的 lichee nano 板子 » 2022-02-15 21:47:27
#61 Re: 全志 SOC » sunxi-fel.exe是否可以在windows 10 64bit下运行 » 2022-02-15 21:22:17
用exescope 或者 cff explorer打开 sunxi-fel.exe ,看是否依赖别的第三方(非windows自带)dll,
如:
libusb-1.0.dll
libwinpthread-1.dllhttps://whycan.com/files/members/3907/微信截图_20220215153026.png
是的就是这个原因,我拷贝了这两个dll就可以了
#62 Re: 全志 SOC » sunxi-fel.exe sid命令出错 » 2022-02-15 21:19:58
#64 Re: 全志 SOC » licheepi中如何将编译好的程序拷贝到linux系统中 » 2022-02-15 16:44:37
#65 计算机图形/GUI/RTOS/FileSystem/OpenGL/DirectX/SDL2 » LVGL的windows模拟器搭建 » 2022-02-15 14:15:59
- bigbat
- 回复: 0
最开始我以为lv_sim_visual_studio是一个插件,就像QT的vs插件一样呢。等跳坑了才知道就是一个vs下的工程样例。简单的说一下整个过程。
1、首相是下载源代码,git clone --recurse-submodules https://github.com/lvgl/lv_sim_visual_studio.git 使用git工具,重点是要不停的试,知道没有任何错误的下载完成。是没有任何错误的啊,这个命令可以将所有的相关代码下载到本地,包括truetype库和其他的库。
2、打开你的vs2019加载工程,选择运行目标为x64,编译执行就可以了。
3,运行就可以了
#70 Re: Nuvoton N32905/N32926/NUC972/N9H20/N9H26/N9H30 » NUC972裸奔,如何从A程序动态加载指定位置的B程序并使其运行? » 2022-01-30 12:47:28
#71 Re: Nuvoton N32905/N32926/NUC972/N9H20/N9H26/N9H30 » 请教关于NUC972开发项目需求,麻烦大佬给个评估和可行性 » 2022-01-30 12:43:56
页次: 1
- 首页
- » 搜索
- » bigbat 发表的帖子