楼主 #1 2020-02-02 21:13:28 分享评论
- 流氓兔
- 会员
- 注册时间: 2020-02-01
- 已发帖子: 121
- 积分: 109.5

全志A33 主线u-boot/Linux入坑记录
1. sunxi-tools
2. u-boot
3. linux
4. rootfs(buildroot)
5. package
离线
楼主 #2 2020-02-02 21:14:05 分享评论
- 流氓兔
- 会员
- 注册时间: 2020-02-01
- 已发帖子: 121
- 积分: 109.5
Re: 全志A33 主线u-boot/Linux入坑记录
1. sunxi-tools
mkdir /opt/a33 -p

git clone https://github.com/linux-sunxi/sunxi-tools

cd sunxi-tools

make
离线
楼主 #3 2020-02-02 21:15:10 分享评论
- 流氓兔
- 会员
- 注册时间: 2020-02-01
- 已发帖子: 121
- 积分: 109.5
Re: 全志A33 主线u-boot/Linux入坑记录
2. u-boot
git clone https://github.com/linux-sunxi/u-boot-sunxi u-boot-sunxi
#或者
git clone https://gitlab.denx.de/u-boot/u-boot.git u-boot-sunxi


cd u-boot-sunxi

ARCH=arm CROSS_COMPILE=arm-linux-gnueabihf- make Sinlinx_SinA33_defconfig
#或者
ARCH=arm CROSS_COMPILE=arm-linux-gnueabihf- make A33-OLinuXino_defconfig


#编译:
ARCH=arm CROSS_COMPILE=arm-linux-gnueabihf- make

/opt/a33/sunxi-tools/sunxi-fel uboot u-boot-sunxi-with-spl.bin
最近编辑记录 流氓兔 (2020-02-02 21:19:27)
离线
楼主 #5 2020-02-02 23:19:47 分享评论
- 流氓兔
- 会员
- 注册时间: 2020-02-01
- 已发帖子: 121
- 积分: 109.5
Re: 全志A33 主线u-boot/Linux入坑记录
#
# USB peripherals
#
CONFIG_USB_STORAGE=y
CONFIG_USB_KEYBOARD=y
# CONFIG_SYS_USB_EVENT_POLL is not set
CONFIG_SYS_USB_EVENT_POLL_VIA_INT_QUEUE=y
# CONFIG_SYS_USB_EVENT_POLL_VIA_CONTROL_EP is not set
CONFIG_USB_GADGET=y
CONFIG_USB_GADGET_MANUFACTURER="Allwinner Technology"
CONFIG_USB_GADGET_VENDOR_NUM=0x1f3a
CONFIG_USB_GADGET_PRODUCT_NUM=0x1010
# CONFIG_USB_GADGET_ATMEL_USBA is not set
# CONFIG_USB_GADGET_BCM_UDC_OTG_PHY is not set
# CONFIG_USB_GADGET_DWC2_OTG is not set
# CONFIG_CI_UDC is not set
CONFIG_USB_GADGET_VBUS_DRAW=2
CONFIG_USB_GADGET_DUALSPEED=y
CONFIG_USB_GADGET_DOWNLOAD=y
CONFIG_USB_FUNCTION_MASS_STORAGE=y
# CONFIG_USB_FUNCTION_ROCKUSB is not set
# CONFIG_USB_FUNCTION_SDP is not set
# CONFIG_USB_FUNCTION_THOR is not set
CONFIG_USB_ETHER=y
# CONFIG_USB_ETH_CDC is not set
CONFIG_USB_ETH_RNDIS=y
CONFIG_USBNET_DEVADDR="de:ad:be:ef:00:01"
CONFIG_USBNET_HOST_ADDR="de:ad:be:ef:00:00"
# CONFIG_USB_HOST_ETHER is not set
新版 u-boot 驱动越来越多了, 居然携带了这么多的usb驱动,就是还没学会怎么使用.
离线
楼主 #6 2020-02-02 23:30:50 分享评论
- 流氓兔
- 会员
- 注册时间: 2020-02-01
- 已发帖子: 121
- 积分: 109.5
Re: 全志A33 主线u-boot/Linux入坑记录
sunxi-fel启动u-boot, 用fatls 显示 TF 卡文件正常:
=> fatls mmc 0:1
            lost.dir/
            android/
 555152547   6a.mp4
 205590075   ardurino.mp4
但是把这个 u-boot 烧录到 TF卡, 启动不正常:
U-Boot SPL 2019.01-rc3-g829407b58f-dirty (Feb 02 2020 - 21:32:54 +0800)
DRAM: 256 MiB
Trying to boot from MMC1
MMC: no card present
spl: mmc init failed with error: -123
SPL: failed to boot from all boot devices
### ERROR ### Please RESET the board ###
看起来这个u-boot默认去找 emmc(MMC1), 而不是 TF卡(MMC0) ?
离线
楼主 #7 2020-02-03 13:08:43 分享评论
- 流氓兔
- 会员
- 注册时间: 2020-02-01
- 已发帖子: 121
- 积分: 109.5
Re: 全志A33 主线u-boot/Linux入坑记录

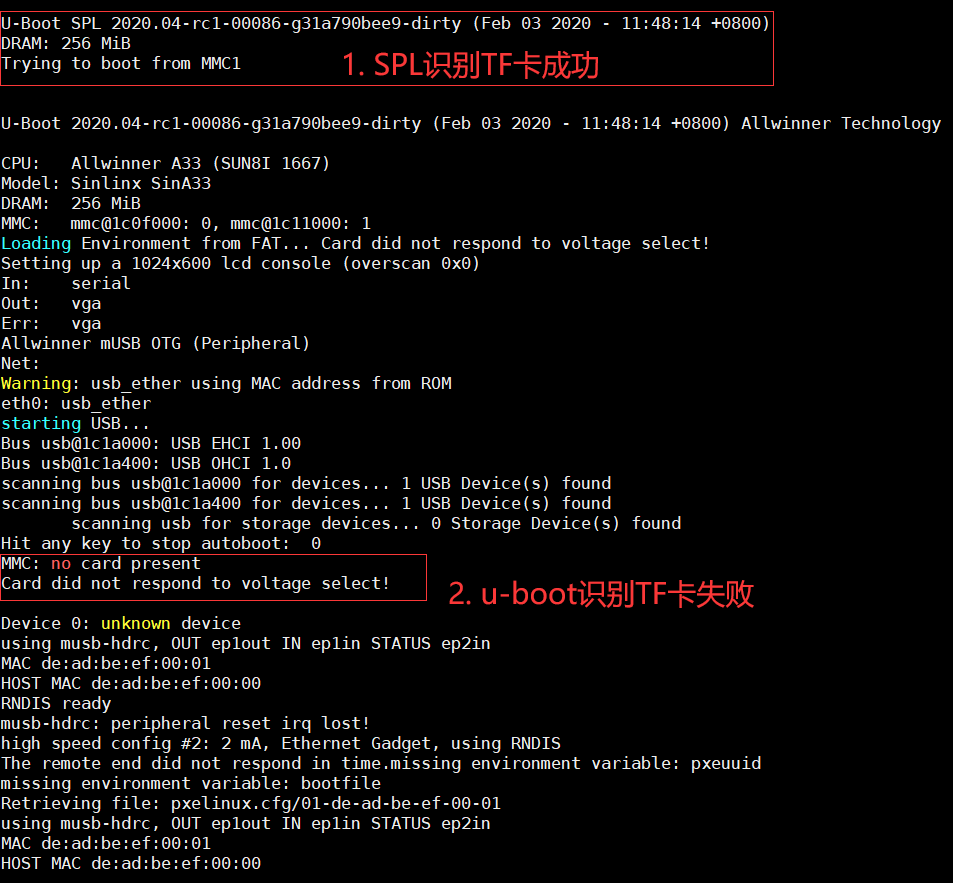
真折腾, spl 识别到了 TF 卡, 但是 u-boot 却没有识别到 TF 卡.
离线
楼主 #8 2020-02-03 21:31:04 分享评论
- 流氓兔
- 会员
- 注册时间: 2020-02-01
- 已发帖子: 121
- 积分: 109.5
Re: 全志A33 主线u-boot/Linux入坑记录

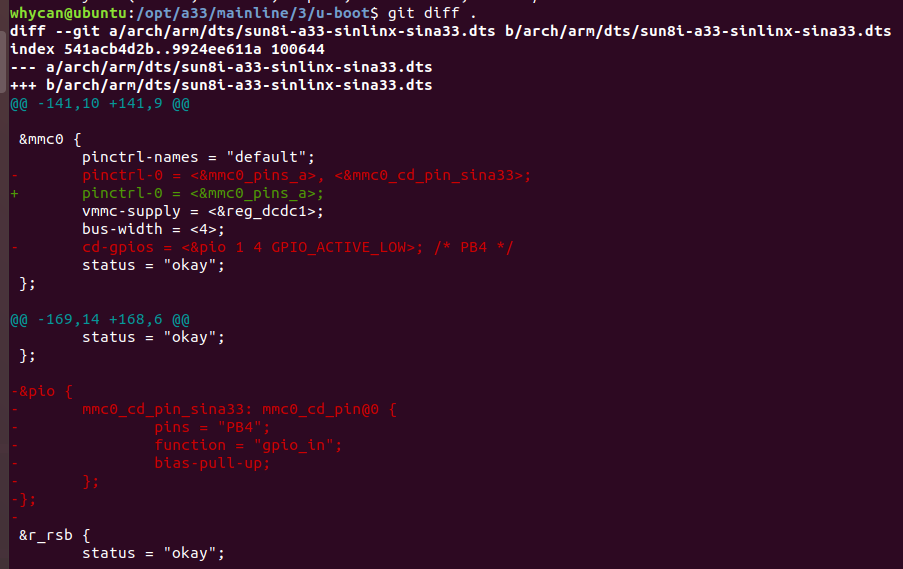
修改 arch/arm/dts/sun8i-a33-sinlinx-sina33.dts 搞定, 可能是 TF 卡检测引脚和我的板子并不匹配吧.
重新编译 u-boot:
ARCH=arm CROSS_COMPILE=arm-linux-gnueabihf- make
直接运行:
/opt/a33/sunxi-tools/sunxi-fel uboot u-boot-sunxi-with-spl.bin
烧录到TF卡:
sudo dd if=u-boot-sunxi-with-spl.bin of=/dev/sdb bs=1024 seek=8
离线
楼主 #9 2020-02-03 21:34:40 分享评论
- 流氓兔
- 会员
- 注册时间: 2020-02-01
- 已发帖子: 121
- 积分: 109.5
Re: 全志A33 主线u-boot/Linux入坑记录
克隆编译Linux:
#克隆
git clone https://github.com/torvalds/linux

cd linux

#配置
ARCH=arm CROSS_COMPILE=arm-linux-gnueabihf- make sunxi_defconfig

#编译
ARCH=arm CROSS_COMPILE=arm-linux-gnueabihf- make -j3
下面这两个就是你需要的文件了:
arch/arm/boot/zImage
arch/arm/boot/dts/sun8i-a33-sinlinx-sina33.dtb
离线
楼主 #10 2020-02-03 21:35:36 分享评论
- 流氓兔
- 会员
- 注册时间: 2020-02-01
- 已发帖子: 121
- 积分: 109.5
Re: 全志A33 主线u-boot/Linux入坑记录
u-boot 手动加载命令:
fatload mmc 0:1 0x46000000 zImage
fatload mmc 0:1 0x49000000 sun8i-a33-sinlinx-sina33.dtb

setenv bootargs console=ttyS0,115200 earlyprintk root=/dev/mmcblk0p2 rootwait panic=10

bootz 0x46000000 - 0x49000000
离线
楼主 #11 2020-02-03 21:39:21 分享评论
- 流氓兔
- 会员
- 注册时间: 2020-02-01
- 已发帖子: 121
- 积分: 109.5
Re: 全志A33 主线u-boot/Linux入坑记录
建立 boot.cmd 文件:
fatload mmc 0:1 0x46000000 zImage
fatload mmc 0:1 0x49000000 sun8i-a33-sinlinx-sina33.dtb

setenv bootargs console=ttyS0,115200 earlyprintk root=/dev/mmcblk0p2 rootwait panic=10

bootz 0x46000000 - 0x49000000
mkimage -C none -A arm -T script -d boot.cmd boot.scr
然后把 boot.scr, zImage, sun8i-a33-sinlinx-sina33.dtb 三个文件
一起拷贝到 TF 卡第一个分区, 这样就不用手动敲命令了.
离线
#12 2020-03-11 21:42:29 分享评论
- KevinS
- 会员
- 注册时间: 2020-01-18
- 已发帖子: 23
- 积分: 18
Re: 全志A33 主线u-boot/Linux入坑记录
这个帖子怎么不更新了,kernel rootfs 的内容怎么不更新了?
离线
#13 2020-03-12 08:56:10 分享评论
- staunchheart
- 会员
- 注册时间: 2019-12-17
- 已发帖子: 232
- 积分: 190
Re: 全志A33 主线u-boot/Linux入坑记录
支持一下,我等学渣,就跟在后面喊“666,666”
离线
#14 2020-05-11 15:27:50 分享评论
- tianjjff
- 会员
- 注册时间: 2018-12-24
- 已发帖子: 129
- 积分: 22
Re: 全志A33 主线u-boot/Linux入坑记录
sunxi-fel启动u-boot, 用fatls 显示 TF 卡文件正常:
=> fatls mmc 0:1
            lost.dir/
            android/
 555152547   6a.mp4
 205590075   ardurino.mp4
但是把这个 u-boot 烧录到 TF卡, 启动不正常:
U-Boot SPL 2019.01-rc3-g829407b58f-dirty (Feb 02 2020 - 21:32:54 +0800)
DRAM: 256 MiB
Trying to boot from MMC1
MMC: no card present
spl: mmc init failed with error: -123
SPL: failed to boot from all boot devices
### ERROR ### Please RESET the board ###
看起来这个u-boot默认去找 emmc(MMC1), 而不是 TF卡(MMC0) ?
请问楼主这个怎么解决的,我的uboot一上电也是打印这个错误
离线
#16 2020-05-11 15:34:41 分享评论
- tianjjff
- 会员
- 注册时间: 2018-12-24
- 已发帖子: 129
- 积分: 22
Re: 全志A33 主线u-boot/Linux入坑记录
貌似修改 dts里面的 mmc0的cd(card detected)引脚。
去掉了检测引脚还是一样的
离线
#17 2020-05-11 15:40:21 分享评论
离线
#18 2020-05-11 15:44:40 分享评论
- tianjjff
- 会员
- 注册时间: 2018-12-24
- 已发帖子: 129
- 积分: 22
Re: 全志A33 主线u-boot/Linux入坑记录
那把dts里面的cd脚删除(屏蔽):
&mmc0 { pinctrl-names = "default"; pinctrl-0 = <&mmc0_pins_a>; vmmc-supply = <®_dcdc1>; bus-width = <4>; status = "okay"; };
已经是这样改的,还是一样的效果
离线
#19 2020-05-11 15:53:24 分享评论
- tianjjff
- 会员
- 注册时间: 2018-12-24
- 已发帖子: 129
- 积分: 22
Re: 全志A33 主线u-boot/Linux入坑记录
已经是这样改的,还是一样的效果
解决了,UBOOT menuconfig把PB4也去掉就可以了
&mmc0 {
pinctrl-names = "default";
pinctrl-0 = <&mmc0_pins_a>;
vmmc-supply = <®_dcdc1>;
bus-width = <4>;
status = "okay";
};离线
#21 2020-05-13 18:24:24 分享评论
- CyrilTaylor
- 会员
- 注册时间: 2020-05-13
- 已发帖子: 5
- 积分: 5
Re: 全志A33 主线u-boot/Linux入坑记录
诶,我也在搞mainline的u-boot和linux,真是看不上全志的卡烧方式啊,移植太麻烦了
离线
#22 2020-05-17 22:32:50 分享评论
- grantho
- 会员
- 注册时间: 2020-03-21
- 已发帖子: 71
- 积分: 2.5
Re: 全志A33 主线u-boot/Linux入坑记录
主线fel烧写感觉为有点慢,不过算是走上了主线之路
离线
#23 2021-04-21 21:53:48 分享评论
- eloi
- 会员
- 注册时间: 2021-04-21
- 已发帖子: 1
- 积分: 0.5
Re: 全志A33 主线u-boot/Linux入坑记录
tianjjff 说:已经是这样改的,还是一样的效果
解决了,UBOOT menuconfig把PB4也去掉就可以了
&mmc0 { pinctrl-names = "default"; pinctrl-0 = <&mmc0_pins_a>; vmmc-supply = <®_dcdc1>; bus-width = <4>; status = "okay"; };
请问那个menuconfig那处具体怎么操作,我的也是卡在这里了
离线
#24 2022-05-30 13:13:47 分享评论
- 东哥
- 会员
- 注册时间: 2021-04-15
- 已发帖子: 11
- 积分: 0.5
Re: 全志A33 主线u-boot/Linux入坑记录
大佬,能分享一下你的固件吗,gnueabihf的太难找了
离线
#27 2023-06-21 10:34:45 分享评论
- mglx
- 会员
- 注册时间: 2023-06-21
- 已发帖子: 5
- 积分: 0
Re: 全志A33 主线u-boot/Linux入坑记录
价格没有优势,而且资料太乱了,有没有大神整理下的
离线
#28 2024-05-24 11:11:15 分享评论
- joeydeng
- 会员
- 注册时间: 2022-09-12
- 已发帖子: 9
- 积分: 84
Re: 全志A33 主线u-boot/Linux入坑记录

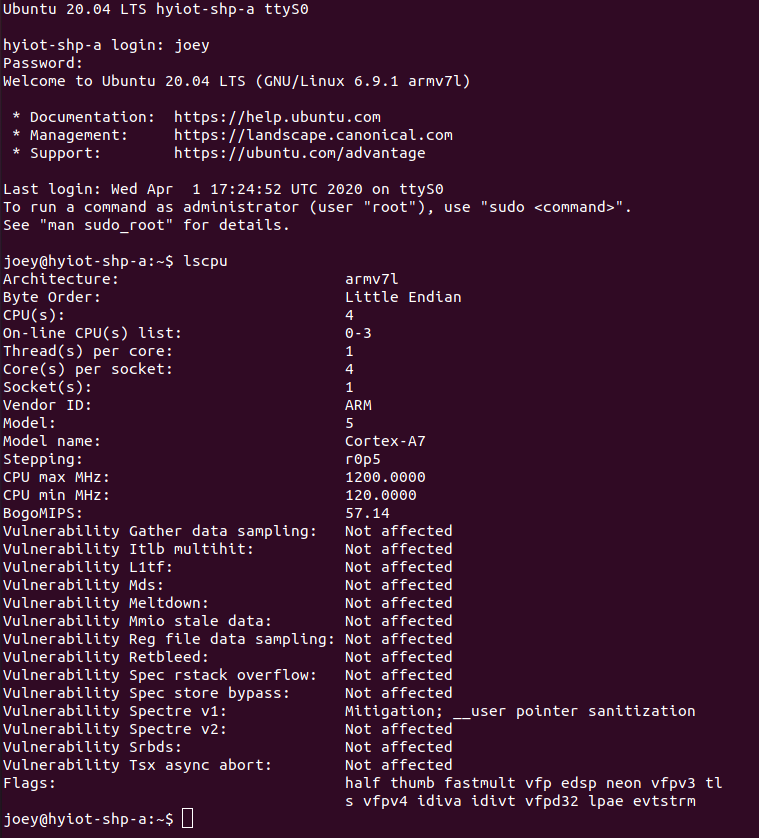
移植成功
以下是制作ubuntu20.04的rootfs的方法
Requirements
1. An x86_64 machine with Ubuntu or another Linux distribution installed.
2. `debootstrap` tool.
3. Internet connection.
4. Basic knowledge of using the terminal.
Steps to Create Ubuntu 20.04 Rootfs for ARMhf
1. Install Required Tools
First, ensure that `debootstrap` and `qemu-user-static` are installed. `qemu-user-static` allows you to run ARM binaries on your x86_64 machine.
sudo apt update
sudo apt install debootstrap qemu-user-static
2. Create a Directory for the Rootfs
Create a directory where the root filesystem will be built.
mkdir -p ~/ubuntu-armhf-rootfs3. Run Debootstrap
Use `debootstrap` to create the root filesystem. Specify the architecture (`armhf`), the Ubuntu release (`focal`), and the target directory.
sudo debootstrap --arch=armhf --foreign focal ./ubuntu-armhf-rootfs https://mirrors.bfsu.edu.cn/ubuntu-ports/4. Copy QEMU Binary
Copy the `qemu-arm-static` binary into the `usr/bin` directory of the new rootfs to enable emulation.
sudo cp /usr/bin/qemu-arm-static ./ubuntu-armhf-rootfs/usr/bin/5. Chroot into the New Rootfs
Change root into the new root filesystem to complete the second stage of debootstrap.
sudo chroot ./ubuntu-armhf-rootfs6. Complete Debootstrap Second Stage
Inside the chroot environment, run the second stage of debootstrap.
/debootstrap/debootstrap --second-stage7. Configure the Rootfs
Now configure the basic settings of your new root filesystem.
- Set the hostname:
echo "ubuntu-armhf" > /etc/hostname- Set up the hosts file:
cat <<EOL > /etc/hosts
127.0.0.1   localhost
127.0.1.1   ubuntu-armhf
EOL
- Create fstab:
cat <<EOL > /etc/fstab
proc            /proc           proc    defaults        0       0
sysfs           /sys            sysfs   defaults        0       0
devpts          /dev/pts        devpts  gid=5,mode=620  0       0
tmpfs           /run            tmpfs   defaults        0       0
tmpfs           /run/lock       tmpfs   nodev,nosuid,noexec 0   0
EOL
- Set up networking:
cat <<EOL > /etc/network/interfaces
auto lo
iface lo inet loopback

auto eth0
iface eth0 inet dhcp
EOL
- Set the root password:
passwd- Create a user:
adduser ubuntu
usermod -aG sudo ubuntu
- Install essential packages:
apt update
apt install sudo nano ssh
8. Exit the Chroot
Exit the chroot environment.
exit9. Clean Up
Remove the `qemu-arm-static` binary from the rootfs.
sudo rm ./ubuntu-armhf-rootfs/usr/bin/qemu-arm-static10. Package the Rootfs
Finally, create a tarball of the root filesystem.
sudo tar -czvf ubuntu-20.04-armhf-rootfs.tar.gz -C ./ubuntu-armhf-rootfs .在移植完后会发现会有readonly fs的问题,其实就是挂载的时候没给rw
bootargs改为
setenv bootargs console=ttyS0,115200 earlyprintk root=/dev/mmcblk0p2 rootwait rw panic=10就一切正常了
离线
#30 2024-10-08 13:33:30 分享评论
- 人才就是我
- 会员
- 注册时间: 2024-10-05
- 已发帖子: 18
- 积分: 13
Re: 全志A33 主线u-boot/Linux入坑记录
您好,这个编译的uboot能共享一下吗
离线
太原小智科技有限责任公司 - 东莞哇酷科技有限公司联合开发