楼主 #1 2020-02-02 21:13:28 分享评论
- 流氓兔
- 会员
- 注册时间: 2020-02-01
- 已发帖子: 121
- 积分: 109.5

全志A33 主线u-boot/Linux入坑记录
sunxi-tools
u-boot
linux
rootfs(buildroot)
package
离线
楼主 #2 2020-02-02 21:14:05 分享评论
- 流氓兔
- 会员
- 注册时间: 2020-02-01
- 已发帖子: 121
- 积分: 109.5
Re: 全志A33 主线u-boot/Linux入坑记录
sunxi-tools
mkdir /opt/a33 -p

git clone https://github.com/linux-sunxi/sunxi-tools

cd sunxi-tools

make
离线
楼主 #3 2020-02-02 21:15:10 分享评论
- 流氓兔
- 会员
- 注册时间: 2020-02-01
- 已发帖子: 121
- 积分: 109.5
Re: 全志A33 主线u-boot/Linux入坑记录
u-boot
git clone https://github.com/linux-sunxi/u-boot-sunxi u-boot-sunxi
#或者
git clone https://gitlab.denx.de/u-boot/u-boot.git u-boot-sunxi

cd u-boot-sunxi

ARCH=arm CROSS_COMPILE=arm-linux-gnueabihf- make Sinlinx_SinA33_defconfig
#或者
ARCH=arm CROSS_COMPILE=arm-linux-gnueabihf- make A33-OLinuXino_defconfig

#编译:
ARCH=arm CROSS_COMPILE=arm-linux-gnueabihf- make

/opt/a33/sunxi-tools/sunxi-fel uboot u-boot-sunxi-with-spl.bin
最近编辑记录 流氓兔 (2020-02-02 21:19:27)
离线

楼主 #5 2020-02-02 23:19:47 分享评论
- 流氓兔
- 会员
- 注册时间: 2020-02-01
- 已发帖子: 121
- 积分: 109.5
Re: 全志A33 主线u-boot/Linux入坑记录
#
# USB peripherals
#
CONFIG_USB_STORAGE=y
CONFIG_USB_KEYBOARD=y
# CONFIG_SYS_USB_EVENT_POLL is not set
CONFIG_SYS_USB_EVENT_POLL_VIA_INT_QUEUE=y
# CONFIG_SYS_USB_EVENT_POLL_VIA_CONTROL_EP is not set
CONFIG_USB_GADGET=y
CONFIG_USB_GADGET_MANUFACTURER="Allwinner Technology"
CONFIG_USB_GADGET_VENDOR_NUM=0x1f3a
CONFIG_USB_GADGET_PRODUCT_NUM=0x1010
# CONFIG_USB_GADGET_ATMEL_USBA is not set
# CONFIG_USB_GADGET_BCM_UDC_OTG_PHY is not set
# CONFIG_USB_GADGET_DWC2_OTG is not set
# CONFIG_CI_UDC is not set
CONFIG_USB_GADGET_VBUS_DRAW=2
CONFIG_USB_GADGET_DUALSPEED=y
CONFIG_USB_GADGET_DOWNLOAD=y
CONFIG_USB_FUNCTION_MASS_STORAGE=y
# CONFIG_USB_FUNCTION_ROCKUSB is not set
# CONFIG_USB_FUNCTION_SDP is not set
# CONFIG_USB_FUNCTION_THOR is not set
CONFIG_USB_ETHER=y
# CONFIG_USB_ETH_CDC is not set
CONFIG_USB_ETH_RNDIS=y
CONFIG_USBNET_DEVADDR="de:ad:be:ef:00:01"
CONFIG_USBNET_HOST_ADDR="de:ad:be:ef:00:00"
# CONFIG_USB_HOST_ETHER is not set
新版 u-boot 驱动越来越多了, 居然携带了这么多的usb驱动,就是还没学会怎么使用.
离线
楼主 #6 2020-02-02 23:30:50 分享评论
- 流氓兔
- 会员
- 注册时间: 2020-02-01
- 已发帖子: 121
- 积分: 109.5
Re: 全志A33 主线u-boot/Linux入坑记录
sunxi-fel启动u-boot, 用fatls 显示 TF 卡文件正常:
=> fatls mmc 0:1
            lost.dir/
            android/
 555152547   6a.mp4
 205590075   ardurino.mp4
但是把这个 u-boot 烧录到 TF卡, 启动不正常:
U-Boot SPL 2019.01-rc3-g829407b58f-dirty (Feb 02 2020 - 21:32:54 +0800)
DRAM: 256 MiB
Trying to boot from MMC1
MMC: no card present
spl: mmc init failed with error: -123
SPL: failed to boot from all boot devices
### ERROR ### Please RESET the board ###
看起来这个u-boot默认去找 emmc(MMC1), 而不是 TF卡(MMC0) ?
离线
楼主 #7 2020-02-03 13:08:43 分享评论
- 流氓兔
- 会员
- 注册时间: 2020-02-01
- 已发帖子: 121
- 积分: 109.5
Re: 全志A33 主线u-boot/Linux入坑记录
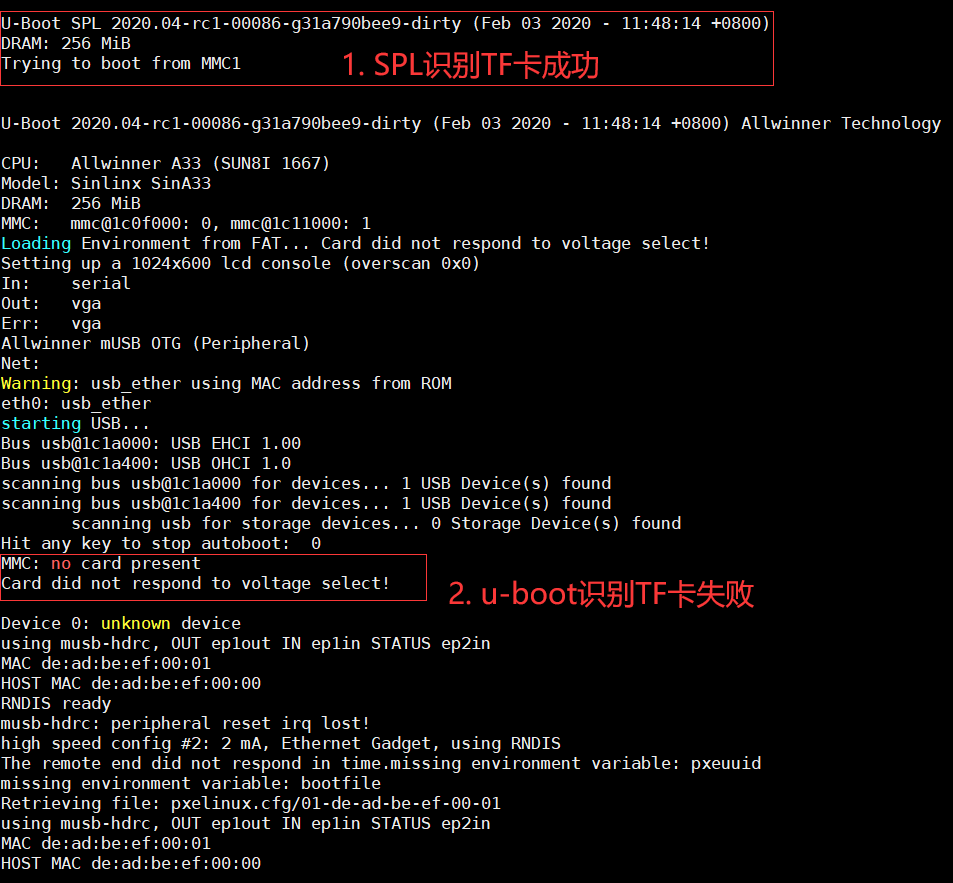
真折腾, spl 识别到了 TF 卡, 但是 u-boot 却没有识别到 TF 卡.
离线
楼主 #8 2020-02-03 21:31:04 分享评论
- 流氓兔
- 会员
- 注册时间: 2020-02-01
- 已发帖子: 121
- 积分: 109.5
Re: 全志A33 主线u-boot/Linux入坑记录

修改 arch/arm/dts/sun8i-a33-sinlinx-sina33.dts 搞定, 可能是 TF 卡检测引脚和我的板子并不匹配吧.
重新编译 u-boot:
ARCH=arm CROSS_COMPILE=arm-linux-gnueabihf- make
直接运行:
/opt/a33/sunxi-tools/sunxi-fel uboot u-boot-sunxi-with-spl.bin
烧录到TF卡:
sudo dd if=u-boot-sunxi-with-spl.bin of=/dev/sdb bs=1024 seek=8
离线
楼主 #9 2020-02-03 21:34:40 分享评论
- 流氓兔
- 会员
- 注册时间: 2020-02-01
- 已发帖子: 121
- 积分: 109.5
Re: 全志A33 主线u-boot/Linux入坑记录
克隆编译Linux:
#克隆
git clone https://github.com/torvalds/linux

cd linux

#配置
ARCH=arm CROSS_COMPILE=arm-linux-gnueabihf- make sunxi_defconfig

#编译
ARCH=arm CROSS_COMPILE=arm-linux-gnueabihf- make -j3
下面这两个就是你需要的文件了:
arch/arm/boot/zImage
arch/arm/boot/dts/sun8i-a33-sinlinx-sina33.dtb
离线
楼主 #10 2020-02-03 21:35:36 分享评论
- 流氓兔
- 会员
- 注册时间: 2020-02-01
- 已发帖子: 121
- 积分: 109.5
Re: 全志A33 主线u-boot/Linux入坑记录
u-boot 手动加载命令:
fatload mmc 0:1 0x46000000 zImage
fatload mmc 0:1 0x49000000 sun8i-a33-sinlinx-sina33.dtb

setenv bootargs console=ttyS0,115200 earlyprintk root=/dev/mmcblk0p2 rootwait panic=10

bootz 0x46000000 - 0x49000000
离线
楼主 #11 2020-02-03 21:39:21 分享评论
- 流氓兔
- 会员
- 注册时间: 2020-02-01
- 已发帖子: 121
- 积分: 109.5
Re: 全志A33 主线u-boot/Linux入坑记录
建立 boot.cmd 文件:
fatload mmc 0:1 0x46000000 zImage
fatload mmc 0:1 0x49000000 sun8i-a33-sinlinx-sina33.dtb

setenv bootargs console=ttyS0,115200 earlyprintk root=/dev/mmcblk0p2 rootwait panic=10

bootz 0x46000000 - 0x49000000
mkimage -C none -A arm -T script -d boot.cmd boot.scr
然后把 boot.scr, zImage, sun8i-a33-sinlinx-sina33.dtb 三个文件
一起拷贝到 TF 卡第一个分区, 这样就不用手动敲命令了.
离线
#12 2020-03-11 21:42:29 分享评论
- KevinS
- 会员
- 注册时间: 2020-01-18
- 已发帖子: 23
- 积分: 18
Re: 全志A33 主线u-boot/Linux入坑记录
这个帖子怎么不更新了,kernel rootfs 的内容怎么不更新了?
离线
#13 2020-03-12 08:56:10 分享评论
- staunchheart
- 会员
- 注册时间: 2019-12-17
- 已发帖子: 232
- 积分: 190
Re: 全志A33 主线u-boot/Linux入坑记录
支持一下,我等学渣,就跟在后面喊“666,666”
离线
#14 2020-05-11 15:27:50 分享评论
- tianjjff
- 会员
- 注册时间: 2018-12-24
- 已发帖子: 129
- 积分: 22
Re: 全志A33 主线u-boot/Linux入坑记录
流氓兔 wrote:
sunxi-fel启动u-boot, 用fatls 显示 TF 卡文件正常:
=> fatls mmc 0:1
            lost.dir/
            android/
 555152547   6a.mp4
 205590075   ardurino.mp4
但是把这个 u-boot 烧录到 TF卡, 启动不正常:
U-Boot SPL 2019.01-rc3-g829407b58f-dirty (Feb 02 2020 - 21:32:54 +0800)
DRAM: 256 MiB
Trying to boot from MMC1
MMC: no card present
spl: mmc init failed with error: -123
SPL: failed to boot from all boot devices
### ERROR ### Please RESET the board ###
看起来这个u-boot默认去找 emmc(MMC1), 而不是 TF卡(MMC0) ?
请问楼主这个怎么解决的,我的uboot一上电也是打印这个错误
离线
#16 2020-05-11 15:34:41 分享评论
- tianjjff
- 会员
- 注册时间: 2018-12-24
- 已发帖子: 129
- 积分: 22
Re: 全志A33 主线u-boot/Linux入坑记录
哇酷小二 wrote:
貌似修改 dts里面的 mmc0的cd(card detected)引脚。
去掉了检测引脚还是一样的
离线
#17 2020-05-11 15:40:21 分享评论
离线
#18 2020-05-11 15:44:40 分享评论
- tianjjff
- 会员
- 注册时间: 2018-12-24
- 已发帖子: 129
- 积分: 22
Re: 全志A33 主线u-boot/Linux入坑记录
哇酷小二 wrote:
那把dts里面的cd脚删除(屏蔽):
&mmc0 { pinctrl-names = "default"; pinctrl-0 = <&mmc0_pins_a>; vmmc-supply = <®_dcdc1>; bus-width = <4>; status = "okay"; };
已经是这样改的,还是一样的效果
离线
#19 2020-05-11 15:53:24 分享评论
- tianjjff
- 会员
- 注册时间: 2018-12-24
- 已发帖子: 129
- 积分: 22
Re: 全志A33 主线u-boot/Linux入坑记录
tianjjff wrote:
已经是这样改的,还是一样的效果
解决了,UBOOT menuconfig把PB4也去掉就可以了
&mmc0 {
pinctrl-names = "default";
pinctrl-0 = <&mmc0_pins_a>;
vmmc-supply = <®_dcdc1>;
bus-width = <4>;
status = "okay";
};离线
#21 2020-05-13 18:24:24 分享评论
- CyrilTaylor
- 会员
- 注册时间: 2020-05-13
- 已发帖子: 5
- 积分: 5
Re: 全志A33 主线u-boot/Linux入坑记录
诶,我也在搞mainline的u-boot和linux,真是看不上全志的卡烧方式啊,移植太麻烦了
离线
#22 2020-05-17 22:32:50 分享评论
- grantho
- 会员
- 注册时间: 2020-03-21
- 已发帖子: 71
- 积分: 2.5
Re: 全志A33 主线u-boot/Linux入坑记录
主线fel烧写感觉为有点慢,不过算是走上了主线之路
离线
#23 2021-04-21 21:53:48 分享评论
- eloi
- 会员
- 注册时间: 2021-04-21
- 已发帖子: 1
- 积分: 0.5
Re: 全志A33 主线u-boot/Linux入坑记录
tianjjff wrote:
tianjjff wrote:
已经是这样改的,还是一样的效果
解决了,UBOOT menuconfig把PB4也去掉就可以了
&mmc0 {
pinctrl-names = "default";
pinctrl-0 = <&mmc0_pins_a>;
vmmc-supply = <®_dcdc1>;
bus-width = <4>;
status = "okay";
};请问那个menuconfig那处具体怎么操作,我的也是卡在这里了
离线
#24 2022-05-30 13:13:47 分享评论
- 东哥
- 会员
- 注册时间: 2021-04-15
- 已发帖子: 11
- 积分: 0.5
Re: 全志A33 主线u-boot/Linux入坑记录
大佬,能分享一下你的固件吗,gnueabihf的太难找了
离线
#27 2023-06-21 10:34:45 分享评论
- mglx
- 会员
- 注册时间: 2023-06-21
- 已发帖子: 5
- 积分: 0
Re: 全志A33 主线u-boot/Linux入坑记录
价格没有优势,而且资料太乱了,有没有大神整理下的
离线
#28 2024-05-24 11:11:15 分享评论
- joeydeng
- 会员
- 注册时间: 2022-09-12
- 已发帖子: 9
- 积分: 84
Re: 全志A33 主线u-boot/Linux入坑记录
移植成功
以下是制作ubuntu20.04的rootfs的方法
Requirements
An x86_64 machine with Ubuntu or another Linux distribution installed.
debootstraptool.Internet connection.
Basic knowledge of using the terminal.
Steps to Create Ubuntu 20.04 Rootfs for ARMhf
1. Install Required Tools
First, ensure that debootstrap and qemu-user-static are installed. qemu-user-static allows you to run ARM binaries on your x86_64 machine.
sudo apt update
sudo apt install debootstrap qemu-user-static
2. Create a Directory for the Rootfs
Create a directory where the root filesystem will be built.
mkdir -p ~/ubuntu-armhf-rootfs3. Run Debootstrap
Use debootstrap to create the root filesystem. Specify the architecture (armhf), the Ubuntu release (focal), and the target directory.
sudo debootstrap --arch=armhf --foreign focal ./ubuntu-armhf-rootfs https://mirrors.bfsu.edu.cn/ubuntu-ports/4. Copy QEMU Binary
Copy the qemu-arm-static binary into the usr/bin directory of the new rootfs to enable emulation.
sudo cp /usr/bin/qemu-arm-static ./ubuntu-armhf-rootfs/usr/bin/5. Chroot into the New Rootfs
Change root into the new root filesystem to complete the second stage of debootstrap.
sudo chroot ./ubuntu-armhf-rootfs6. Complete Debootstrap Second Stage
Inside the chroot environment, run the second stage of debootstrap.
/debootstrap/debootstrap --second-stage7. Configure the Rootfs
Now configure the basic settings of your new root filesystem.
Set the hostname:
echo "ubuntu-armhf" > /etc/hostnameSet up the hosts file:
cat <<EOL > /etc/hosts
127.0.0.1   localhost
127.0.1.1   ubuntu-armhf
EOL
Create fstab:
cat <<EOL > /etc/fstab
proc            /proc           proc    defaults        0       0
sysfs           /sys            sysfs   defaults        0       0
devpts          /dev/pts        devpts  gid=5,mode=620  0       0
tmpfs           /run            tmpfs   defaults        0       0
tmpfs           /run/lock       tmpfs   nodev,nosuid,noexec 0   0
EOL
Set up networking:
cat <<EOL > /etc/network/interfaces
auto lo
iface lo inet loopback

auto eth0
iface eth0 inet dhcp
EOL
Set the root password:
passwdCreate a user:
adduser ubuntu
usermod -aG sudo ubuntu
Install essential packages:
apt update
apt install sudo nano ssh
8. Exit the Chroot
Exit the chroot environment.
exit9. Clean Up
Remove the qemu-arm-static binary from the rootfs.
sudo rm ./ubuntu-armhf-rootfs/usr/bin/qemu-arm-static10. Package the Rootfs
Finally, create a tarball of the root filesystem.
sudo tar -czvf ubuntu-20.04-armhf-rootfs.tar.gz -C ./ubuntu-armhf-rootfs .在移植完后会发现会有readonly fs的问题,其实就是挂载的时候没给rw
bootargs改为
setenv bootargs console=ttyS0,115200 earlyprintk root=/dev/mmcblk0p2 rootwait rw panic=10就一切正常了
离线
#30 2024-10-08 13:33:30 分享评论
- 人才就是我
- 会员
- 注册时间: 2024-10-05
- 已发帖子: 18
- 积分: 13
Re: 全志A33 主线u-boot/Linux入坑记录
您好,这个编译的uboot能共享一下吗
离线
东莞哇酷科技有限公司开发