楼主 #1 2018-09-25 22:55:50 分享评论
- 晕哥
- 管理员
- 所在地: wechat: whycan_cn
- 注册时间: 2017-09-06
- 已发帖子: 9,433
- 积分: 9202
risc-v gcc 工具链编译 与 qemu 虚拟机 (ubuntu等发行版linux平台搭建RISCV模拟环境)
risc-v gcc 工具链编译:
git clone --recursive https://github.com/riscv/riscv-gnu-toolchain.git
cd riscv-gnu-toolchain
mkdir build; cd build
../configure --prefix=$RISCV --enable-multilib
make -j4
make完成之后在 /bin 目录(因为$RISCV没有赋值导致安装到了默认目录/bin)安装了工具链文件:
/bin/riscv64-unknown-elf-ranlib
/bin/riscv64-unknown-elf-objdump
/bin/riscv64-unknown-elf-c++
/bin/riscv64-unknown-elf-c++filt
/bin/riscv64-unknown-elf-strings
/bin/riscv64-unknown-elf-ld
/bin/riscv64-unknown-elf-cpp
/bin/riscv64-unknown-elf-elfedit
/bin/riscv64-unknown-elf-as
/bin/riscv64-unknown-elf-nm
/bin/riscv64-unknown-elf-strip
/bin/riscv64-unknown-elf-gcov-tool
/bin/riscv64-unknown-elf-objcopy
/bin/riscv64-unknown-elf-size
/bin/riscv64-unknown-elf-gcc-ranlib
/bin/riscv64-unknown-elf-run
/bin/riscv64-unknown-elf-gprof
/bin/riscv64-unknown-elf-gcc-8.2.0
/bin/riscv64-unknown-elf-gcov
/bin/riscv64-unknown-elf-gcc
/bin/riscv64-unknown-elf-g++
/bin/riscv64-unknown-elf-gcc-ar
/bin/riscv64-unknown-elf-ld.bfd
/bin/riscv64-unknown-elf-gcc-nm
/bin/riscv64-unknown-elf-addr2line
/bin/riscv64-unknown-elf-readelf
/bin/riscv64-unknown-elf-gdb
/bin/riscv64-unknown-elf-ar
/bin/riscv64-unknown-elf-gcov-dump
参考1: https://www.librecores.org/codelec/riscv-sodor
参考2: https://www.cnblogs.com/javaIOException/p/7525828.html
参考3: https://purplepalmdash.github.io/2013/07/08/yong-qemumo-ni-arm-1/
离线
楼主 #2 2018-09-26 08:13:26 分享评论
- 晕哥
- 管理员
- 所在地: wechat: whycan_cn
- 注册时间: 2017-09-06
- 已发帖子: 9,433
- 积分: 9202
Re: risc-v gcc 工具链编译 与 qemu 虚拟机 (ubuntu等发行版linux平台搭建RISCV模拟环境)
编译qemu模拟器:
sudo apt-get install libpixman-1-dev
git clone https://github.com/riscv/riscv-qemu.git
cd riscv-qemu/
git checkout riscv-qemu-3.0
./configure
make -j4
make install ###安装
离线
#3 2018-09-26 09:42:15 分享评论
- msr06rr
- 会员
- 所在地: 苏州
- 注册时间: 2018-01-11
- 已发帖子: 181
- 积分: 171.5
Re: risc-v gcc 工具链编译 与 qemu 虚拟机 (ubuntu等发行版linux平台搭建RISCV模拟环境)
跟上晕哥,脱非入欧
离线
楼主 #4 2018-09-26 09:52:08 分享评论
楼主 #5 2018-09-26 11:21:07 分享评论
- 晕哥
- 管理员
- 所在地: wechat: whycan_cn
- 注册时间: 2017-09-06
- 已发帖子: 9,433
- 积分: 9202
Re: risc-v gcc 工具链编译 与 qemu 虚拟机 (ubuntu等发行版linux平台搭建RISCV模拟环境)
一个最简单的 RISC-V 汇编程序 test1.S:
loop:
j loop
编译指令:
riscv64-unknown-elf-gcc -save-temps -nostdlib -nostartfiles -ffreestanding -o test1 test1.S
模拟器运行:
qemu-riscv64 test1 -nographic
反汇编:
root@ubuntu:/opt/test# riscv64-unknown-elf-objdump -S test1
test1: file format elf64-littleriscv
Disassembly of section .text:
0000000000010078 <loop>:
10078: a001 j 10078 <loop>
离线
楼主 #6 2018-09-26 11:39:21 分享评论
- 晕哥
- 管理员
- 所在地: wechat: whycan_cn
- 注册时间: 2017-09-06
- 已发帖子: 9,433
- 积分: 9202
Re: risc-v gcc 工具链编译 与 qemu 虚拟机 (ubuntu等发行版linux平台搭建RISCV模拟环境)
test1.S
loop:
nop
nop
nop
nop
j loop
编译(带调试符号):
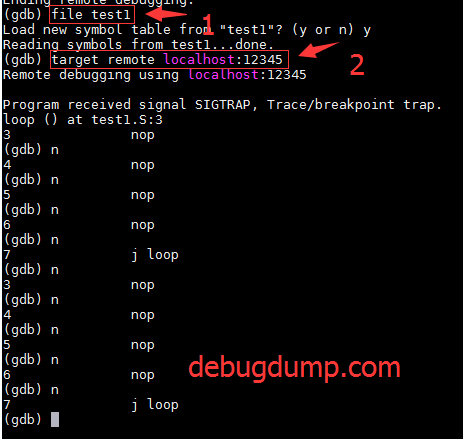
riscv64-unknown-elf-gcc -save-temps -nostdlib -nostartfiles -ffreestanding -o test1 test1.S -g
启动带调试虚拟机:
qemu-riscv64 -singlestep -g 12345 test1 -nographic
远程调试:
riscv64-unknown-elf-gdb

参考1: http://doppioandante.github.io/2015/07/10/Simple-ARM-programming-on-linux.html
离线
楼主 #7 2018-10-03 23:15:45 分享评论
- 晕哥
- 管理员
- 所在地: wechat: whycan_cn
- 注册时间: 2017-09-06
- 已发帖子: 9,433
- 积分: 9202
Re: risc-v gcc 工具链编译 与 qemu 虚拟机 (ubuntu等发行版linux平台搭建RISCV模拟环境)
为了把这个RISCV Linux 跑起来
需要先构建Linux工具链
git clone --recursive https://github.com/riscv/riscv-gnu-toolchain
cd riscv-gnu-toolchain
./configure --prefix=/usr/local/riscv-tools/
make
参考: https://github.com/riscv/riscv-gnu-toolchain/blob/master/README.md
离线
#8 2018-10-05 11:42:13 分享评论
- lilo
- 会员
- 注册时间: 2017-10-15
- 已发帖子: 215
- 积分: 215
Re: risc-v gcc 工具链编译 与 qemu 虚拟机 (ubuntu等发行版linux平台搭建RISCV模拟环境)
qemu-riscv64
qemu-system-riscv64
请教下这两个命令有什么区别?
为什么楼主的程序用 qemu-riscv64, 而 xboot 的程序用 qemu-system-riscv64 ?
lilo@ubuntu:/opt/# cat xboot/tools/qemu-system/linux/riscv64-virt-dbg.sh
#!/bin/sh
## The qemu's root directory.
export QEMU_DIR=$(cd `dirname $0` ; pwd)# Run qemu
exec qemu-system-riscv64 -M virt -m 512M -smp 2 -name "RiscV64 Virtual Machine" -S -gdb tcp::10000,ipv4 -show-cursor -rtc base=localtime -serial stdio -kernel ${QEMU_DIR}/../../../output/xboot
离线
#9 2018-10-05 14:40:43 分享评论
- smartcar
- 会员
- 注册时间: 2018-02-19
- 已发帖子: 735
- 积分: 735
Re: risc-v gcc 工具链编译 与 qemu 虚拟机 (ubuntu等发行版linux平台搭建RISCV模拟环境)
我新建的一个 test5.s 文件:
.global _start
_start:
addi a0, x0, 0x7FF ###这里立即数 用 0x000 - 0x7FF 都不会编译出错
j _start
编译指令:
riscv64-unknown-elf-gcc -o test5 test5.s -nostdlib -g --entry _start
如果立即数改成 0x800 或者以上就会出错:
#riscv64-unknown-elf-gcc -o test5 test5.s -nostdlib -g --entry _start
test5.s: Assembler messages:
test5.s:4: Error: illegal operands `addi a0,x0,0x800'
这是为什么呢?
离线
#10 2018-10-05 14:44:39 分享评论
- lilo
- 会员
- 注册时间: 2017-10-15
- 已发帖子: 215
- 积分: 215
Re: risc-v gcc 工具链编译 与 qemu 虚拟机 (ubuntu等发行版linux平台搭建RISCV模拟环境)
我新建的一个 test5.s 文件:
.global _start
_start:
addi a0, x0, 0x7FF ###这里立即数 用 0x000 - 0x7FF 都不会编译出错
j _start编译指令:
riscv64-unknown-elf-gcc -o test5 test5.s -nostdlib -g --entry _start
如果立即数改成 0x800 或者以上就会出错:
#riscv64-unknown-elf-gcc -o test5 test5.s -nostdlib -g --entry _start
test5.s: Assembler messages:
test5.s:4: Error: illegal operands `addi a0,x0,0x800'这是为什么呢?
在 RISCV手册里面,规定了 addi 指令的立即数是 12位有符号的, 所以表示范围是 -2048 - +2047(0x7FF)
所以明显你的 0x800 超过了立即数的范围.
0x800 及其之后已经是负数了.
看下手册, 我记得在 RISC-V指令集里面, 负数是补码形式存在了.
离线
#11 2018-10-05 15:21:55 分享评论
- smartcar
- 会员
- 注册时间: 2018-02-19
- 已发帖子: 735
- 积分: 735
Re: risc-v gcc 工具链编译 与 qemu 虚拟机 (ubuntu等发行版linux平台搭建RISCV模拟环境)
原来如此,谢谢解惑!
离线
楼主 #12 2018-10-06 16:54:28 分享评论
- 晕哥
- 管理员
- 所在地: wechat: whycan_cn
- 注册时间: 2017-09-06
- 已发帖子: 9,433
- 积分: 9202
Re: risc-v gcc 工具链编译 与 qemu 虚拟机 (ubuntu等发行版linux平台搭建RISCV模拟环境)
qemu-riscv64
qemu-system-riscv64请教下这两个命令有什么区别?
为什么楼主的程序用 qemu-riscv64, 而 xboot 的程序用 qemu-system-riscv64 ?lilo@ubuntu:/opt/# cat xboot/tools/qemu-system/linux/riscv64-virt-dbg.sh
#!/bin/sh
## The qemu's root directory.
export QEMU_DIR=$(cd `dirname $0` ; pwd)# Run qemu
exec qemu-system-riscv64 -M virt -m 512M -smp 2 -name "RiscV64 Virtual Machine" -S -gdb tcp::10000,ipv4 -show-cursor -rtc base=localtime -serial stdio -kernel ${QEMU_DIR}/../../../output/xboot
https://github.com/shihyu/Qemu/blob/master/uImage_qemu/QEMU%20and%20ARM%20Linux.md
qemu-arm和qemu-system-arm的區別:
qemu-arm是用戶模式的模擬器(更精確的表述應該是系統調用模擬器),而qemu-system-arm則是系統模擬器,它可以模擬出整個機器並運行操作系統
qemu-arm僅可用來運行二進制文件,因此你可以交叉編譯完例如hello world之類的程序然後交給qemu-arm來運行,簡單而高效。而qemu-system-arm則需要你把hello world程序下載到客戶機操作系統能訪問到的硬盤裡才能運行
离线
#13 2019-05-12 11:17:11 分享评论
- Learning
- 会员
- 注册时间: 2019-05-10
- 已发帖子: 12
- 积分: 12
Re: risc-v gcc 工具链编译 与 qemu 虚拟机 (ubuntu等发行版linux平台搭建RISCV模拟环境)
网络比较慢,linux版本的git一晚上没下好,下了官网链接win版本的eclipse ide
导入工程makefile指定平台后编译,发现make失败了,有用过windos的模拟器的大神没
makefile修改:
#
# Makefile for xboot
#
#
# You must pass CROSS_COMPILE and PLATFORM variable.
#
CROSS_COMPILE ?=arm-linux-gnueabihf-
PLATFORM ?=arm32-realview
----------------------------------------------------------
错误提示:
make all
Usage:
make [-AeEhiknpqrsStTuvVx] [-P#] [-f file] [macro[][+][:]=value ...] [target ...]
make: Error code 255, while making 'all'
11:05:56 Build Finished. 0 errors, 0 warnings. (took 158ms)
最近编辑记录 Learning (2019-05-12 11:18:20)
学无止境,回头无岸
离线
#14 2021-05-16 22:49:48 分享评论
- 明月照我沟渠
- 会员
- 注册时间: 2020-07-09
- 已发帖子: 121
- 积分: 115
Re: risc-v gcc 工具链编译 与 qemu 虚拟机 (ubuntu等发行版linux平台搭建RISCV模拟环境)
ubuntu20.04 自带的 qemu 还是没有 riscv 得自己编译.
wget https://download.qemu.org/qemu-6.0.0.tar.xz
tar xvJf qemu-6.0.0.tar.xz
cd qemu-6.0.0
./configure
make离线
#15 2021-06-20 12:35:55 分享评论
- cube
- 会员
- 注册时间: 2021-03-11
- 已发帖子: 288
- 积分: 202.5
Re: risc-v gcc 工具链编译 与 qemu 虚拟机 (ubuntu等发行版linux平台搭建RISCV模拟环境)
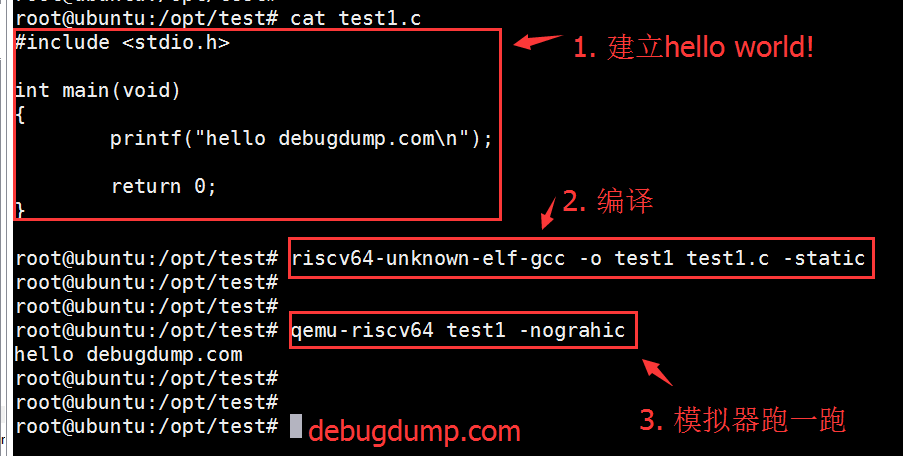
好像一定要用静态链接, 否则会这样:
$ riscv64-linux-gnu-gcc -o hello hello.c
$
$ qemu-riscv64 hello
qemu-riscv64: Could not open '/lib/ld-linux-riscv64-lp64d.so.1': No such file or directory
$
离线
#16 2021-06-20 12:38:49 分享评论
- cube
- 会员
- 注册时间: 2021-03-11
- 已发帖子: 288
- 积分: 202.5
Re: risc-v gcc 工具链编译 与 qemu 虚拟机 (ubuntu等发行版linux平台搭建RISCV模拟环境)
https://askubuntu.com/questions/1144537/arm-32-bit-elf-does-not-execute-using-qemu-arm
按这个加上 LD_LIBRARY_PATH 没用?
$ LD_LIBRARY_PATH=/usr/riscv64-linux-gnu/ qemu-riscv64 hello
qemu-riscv64: Could not open '/lib/ld-linux-riscv64-lp64d.so.1': No such file or directory
$
$ LD_LIBRARY_PATH=/usr/riscv64-linux-gnu/lib/ qemu-riscv64 hello
qemu-riscv64: Could not open '/lib/ld-linux-riscv64-lp64d.so.1': No such file or directory
$
离线
#17 2021-06-20 12:40:10 分享评论
- cube
- 会员
- 注册时间: 2021-03-11
- 已发帖子: 288
- 积分: 202.5
Re: risc-v gcc 工具链编译 与 qemu 虚拟机 (ubuntu等发行版linux平台搭建RISCV模拟环境)
终于搞定, 不是设置LD_LIBRARY_PATH环境变量, 而是加 -L 参数:
$qemu-riscv64 -L /usr/riscv64-linux-gnu/ hello
hello
$
或者用 QEMU_LD_PREFIX 环境变量:
QEMU_LD_PREFIX=/usr/riscv64-linux-gnu/ qemu-riscv64 hello离线
太原小智科技有限责任公司 - 东莞哇酷科技有限公司联合开发
