楼主 # 2023-08-19 17:50:24 分享评论
- DBinary
- 会员
- 注册时间: 2023-08-02
- 已发帖子: 1
- 积分: 11
荔枝派Zero 一键烧录/编译/上载/运行工具
最近入手了荔枝派Zero,不过官方的教程大多都在教你怎么编译UBoot,Linux内核和文件系统,但是对于我们很多人来说,我们既不想知道Uboot Linux怎么编译的,也不想又是下载虚拟机搭建开发环境,更不想再移植一堆三方库然后碰上一堆找合适编译器的问题,总之就是不想折腾,所以,我给它做了PainterEngine的适配并用PainterEngine开发了一个一键烧录,一键编译,一键上载,一键运行
总之就是一键,青春苦短,懒得折腾。
首先先准备一张TF卡用于固件系统的烧录,把它插在电脑上,然后运行一键烧录软件并点击插件-->烧录SD卡映像
然后选择你的SD卡
更改你用的屏幕分辨率,比如我的是800x480,也就是默认的大小
之后就是等待烧录完成了
把SD卡拔下来,插到荔枝派上面,然后再把屏幕插上,连接电脑,等待启动
最后,点击一键烧录运行,即可看到效果了
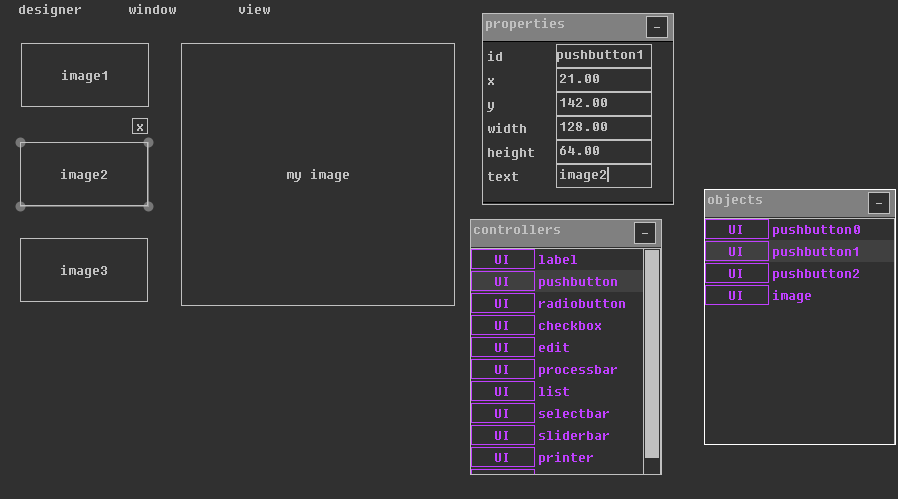
之后,只需要按照PainterEngine的编程方式,就可以直接在荔枝派上制作应用了,举个例子,比如我们要做个图像框的程序,可以直接到PainterEngine官网的设计器中设计图像

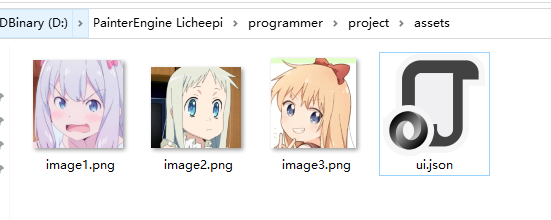
保存UI布局,然后将它们放在project/assets目录下,然后随便找3个图片
编写PainterEngine代码
#include "PainterEngine_Application.h"

PX_Application App;
PX_Object *root=PX_NULL;//根对象
px_texture tex1, tex2, tex3;//三个图片
PX_Object* Image,*button1,*button2,*button3,*printer;


px_void PX_ApplicationOnButton1(PX_Object* pObject, PX_Object_Event e, px_void* ptr)
{
	//设置图像控件的纹理
	PX_Object_PushButtonSetTexture(Image, &tex1);
}

px_void PX_ApplicationOnButton2(PX_Object* pObject, PX_Object_Event e, px_void* ptr)
{
	//设置图像控件的纹理
	PX_Object_PushButtonSetTexture(Image, &tex2);
}

px_void PX_ApplicationOnButton3(PX_Object* pObject, PX_Object_Event e, px_void* ptr)
{
	//设置图像控件的纹理
	PX_Object_PushButtonSetTexture(Image, &tex3);
}

px_bool PX_ApplicationInitialize(PX_Application *pApp,px_int screen_width,px_int screen_height)
{
	PX_ApplicationInitializeDefault(&pApp->runtime, screen_width, screen_height);
	//加载图片
	PX_LoadTextureFromFile(&pApp->runtime.mp_resources,&tex1, "assets/image1.png");
	PX_LoadTextureFromFile(&pApp->runtime.mp_resources,&tex2, "assets/image2.png");
	PX_LoadTextureFromFile(&pApp->runtime.mp_resources,&tex3, "assets/image3.png");

	//创建根对象
	root=PX_ObjectCreate(&pApp->runtime.mp_ui,PX_NULL,0,0,0,0,0,0);

	//加载UI界面
	PX_LoadUIFormFile(&pApp->runtime.mp_ui,root,PX_NULL,"assets/ui.json");

	//取得图像控件(其实也是个按钮,刷背景图就是了)
	Image = PX_ObjectGetObject(root, ".image");
	PX_Object_PushButtonSetText(Image, "");
	//设置图像控件的纹理
	button1=PX_ObjectGetObject(root, ".pushbutton0");
	button2=PX_ObjectGetObject(root, ".pushbutton1");
	button3=PX_ObjectGetObject(root, ".pushbutton2");
	printer=PX_ObjectGetObject(root, ".printer4");

	PX_ObjectRegisterEvent(button1, PX_OBJECT_EVENT_EXECUTE, PX_ApplicationOnButton1, PX_NULL);
	PX_ObjectRegisterEvent(button2, PX_OBJECT_EVENT_EXECUTE, PX_ApplicationOnButton2, PX_NULL);
	PX_ObjectRegisterEvent(button3, PX_OBJECT_EVENT_EXECUTE, PX_ApplicationOnButton3, PX_NULL);


	return PX_TRUE;
}

px_void PX_ApplicationUpdate(PX_Application *pApp,px_dword elpased)
{

}

px_void PX_ApplicationRender(PX_Application *pApp,px_dword elpased)
{
	px_surface *pRenderSurface=&pApp->runtime.RenderSurface;
	PX_RuntimeRenderClear(&pApp->runtime,PX_OBJECT_UI_DEFAULT_BACKGROUNDCOLOR);
	PX_ObjectRender(pRenderSurface,root,elpased);

}

px_void PX_ApplicationPostEvent(PX_Application *pApp,PX_Object_Event e)
{
	px_char content[64];
	px_float x, y;
	PX_ObjectPostEvent(root,e);
	switch (e.Event)
	{
	case PX_OBJECT_EVENT_CURSORDOWN:
		x = PX_Object_Event_GetCursorX(e);
		y = PX_Object_Event_GetCursorY(e);
		PX_sprintf2(content,sizeof(content),"cursor down:%1,%2",PX_STRINGFORMAT_FLOAT(x),PX_STRINGFORMAT_FLOAT(y));
		PX_Object_PrinterPrintText(printer, content);
	break;
	case PX_OBJECT_EVENT_CURSORUP:
		x = PX_Object_Event_GetCursorX(e);
		y = PX_Object_Event_GetCursorY(e);
		PX_sprintf2(content,sizeof(content),"cursor up:%1,%2",PX_STRINGFORMAT_FLOAT(x),PX_STRINGFORMAT_FLOAT(y));
		PX_Object_PrinterPrintText(printer, content);
	break;
	case PX_OBJECT_EVENT_CURSORDRAG:
		x = PX_Object_Event_GetCursorX(e);
		y = PX_Object_Event_GetCursorY(e);
		PX_sprintf2(content,sizeof(content),"cursor move:%1,%2",PX_STRINGFORMAT_FLOAT(x),PX_STRINGFORMAT_FLOAT(y));
		PX_Object_PrinterPrintText(printer, content);
	break;
	default:
		break;
	}

}
最后,烧录运行
工具约700M,就不传附件传网盘了,工具源码一并在压缩包内
离线
感谢为中文互联网持续输出优质内容的各位老铁们。
QQ: 516333132, 微信(wechat): whycan_cn (哇酷网/挖坑网/填坑网) service@whycan.cn
太原小智科技有限责任公司 - 东莞哇酷科技有限公司联合开发
太原小智科技有限责任公司 - 东莞哇酷科技有限公司联合开发