楼主 #1 2020-09-15 20:40:17 分享评论
- 秦皇岛岛主
- 会员
- 注册时间: 2020-05-22
- 已发帖子: 59
- 积分: 38

第一篇贡献帖:TINY200使用RTL8723BS SDIO 网卡上网
由于没有找到稳定的esp8089驱动,加上自己后期想用蓝牙,于是选择RTL8723BS网卡
这个教程基于commitid:e9c4c40e9f0d402c5ae84c2e1f40017674a2c489
其他版本可能需要做一些变化
这个教程有点过于详细,主要是为了帮助一下像我一样的小白尽快上手
步骤
1. 下载tiny200 r3的buildroot,并执行一次编译
    git clone https://github.com/aodzip/buildroot-tiny200
    cd buildroot-tiny200
    make widora_tiny200_defconfig
2. 添加内核中的rfkill节点
修改/board/widora/tiny200/linux.defconfig
CONFIG_MAC80211_STA_HASH_MAX_SIZE=0
# CONFIG_WIMAX is not set
CONFIG_RFKILL=y
# CONFIG_NET_9P is not set
3. 添加rtl8723bs_nic.bin文件
https://whycan.com/files/members/4245/rtl8723bs_nic.zip
放在这个地方
$ pwd
/buildroot-tiny200-nor/board/widora/tiny200/rootfs_overlay/lib/firmware/rtlwifi
$ ls
rtl8723bs_nic.bin
4. 添加jffs2文件系统支持
修改分区表,为rootfs预留更大空间
修改board/widora/tiny200/devicetree/linux/devicetree.dts
 partitions {
                        compatible = "fixed-partitions";
                        #address-cells = <1>;
                        #size-cells = <1>;

                        partition@0 {
                                label = "u-boot";
                                reg = <0x000000 0x80000>;
                                read-only;
                        };

                        partition@100000 {
                                label = "dtb";
                                reg = <0x80000 0x10000>;
                                read-only;
                        };

                        partition@110000 {
                                label = "kernel";
                                reg = <0x100000 0x500000>;
                                read-only;
                        };

                        partition@510000 {
                                label = "rootfs";
                                reg = <0x600000 0xa00000>;
                        };
                };
修改linux.defconfig文件,支持JFFS2文件系统,支持RTL8723BS网卡
# CONFIG_BEFS_FS is not set
# CONFIG_BFS_FS is not set
# CONFIG_EFS_FS is not set
CONFIG_JFFS2_FS=y
# CONFIG_CRAMFS is not set
CONFIG_SQUASHFS=y
CONFIG_SQUASHFS_FILE_CACHE=y

# CONFIG_PRISM2_USB is not set
# CONFIG_COMEDI is not set
# CONFIG_RTLLIB is not set
CONFIG_RTL8723BS=m
# CONFIG_R8712U is not set
# CONFIG_R8188EU is not set
# CONFIG_VT6656 is not set
buildroot输出jffs2二进制包

修改board/widora/tiny200/uboot.env,指定根文件系统格式,感觉这里不需要改,但是如果不该的话内核不会去尝试jffs2文件系统,由知道的大佬求指教
genbootargs=setenv bootargs ${bootargs_common} root=${rootdev} rw rootfstype=jffs2修改genimage-flash.cfg文件,使用jffs2格式的根文件系统
        partition dtb {
                image = "devicetree.dtb"
                offset = 0x80000
                size = 64K
        }

        partition kernel {
                image = "zImage"
                offset = 0x100000
                size = 5M
        }

        partition rootfs {
                image = "rootfs.jffs2"
        }
制作一个补丁包,修正spi-nor驱动
https://whycan.com/files/members/4245/0007.rar
把这个文件放在/board/widora/tiny200/patch/linux这个目录下
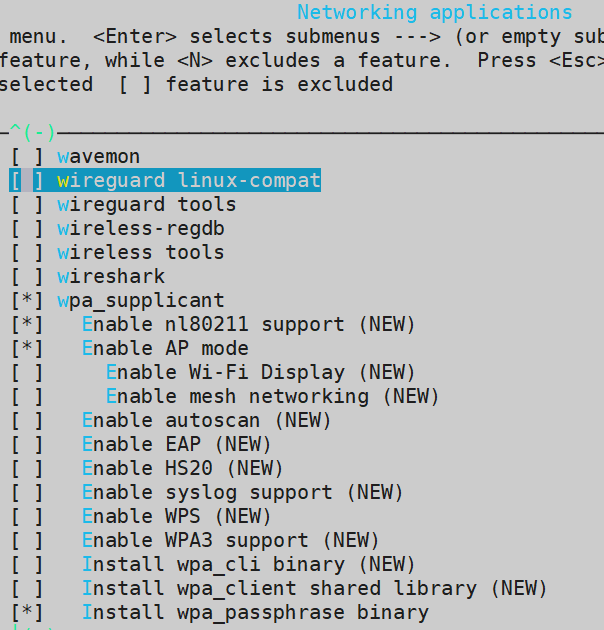
5. 添加 iw 和 wpa_supplicant 工具
在make menuconfig中选中

6. 开始编译固件 make -j4
时间太久了,睡个觉吧,一觉醒来,这个文件就是我们想要的了output/image/sysimage-flash.img
7. 烧录到nor flash中
sunxi-fel.exe -p spiflash-write 0x00 ./sysimage-flash.img
8. 开始上网吧
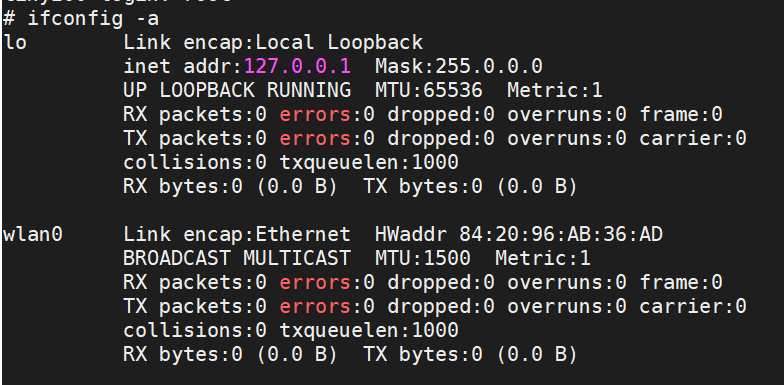
先插入sdio网卡,查看所有网卡
ifconfig -a

ifconfig wlan0 up

使用iw dev wlan0 scan扫描下周边热点,扫出来好多,截图中只选了一个

使用wpa_passphrase存储用户名和密码
wpa_passphrase yourSSID yourPassword > /etc/wpa_supplicant.conf 连接网络
wpa_supplicant -B -i wlan0 -c /etc/wpa_supplicant.conf

获取ip
udhcpc -i wlan0

得到了ip,ping baidu成功

最近编辑记录 秦皇岛岛主 (2020-09-15 22:01:18)
离线
太原小智科技有限责任公司 - 东莞哇酷科技有限公司联合开发