楼主 #1 2020-10-10 09:56:11 分享评论
使用[Aodzip]的buildroot资源为tiny-200s-r3构建linux运行环境
使用[Aodzip]的buildroot资源为tiny-200s-r3构建linux运行环境
buildroot-tiny200 (F1C100/200s) 开发包近期更新内容 * 已支持DVP摄像头 *
(1)安装ubuntu,如果看过这篇文章,可以直接使用这个教程里的虚拟机
https://whycan.com/t_3138.html
https://pan.baidu.com/s/17vk0_QWRNRuxwi5EZ_P-Xg 提取码:54pb
虚拟机:账号:book 密码:linjie (本来想123456的,但构建手快了)
已有系统忽略此项。
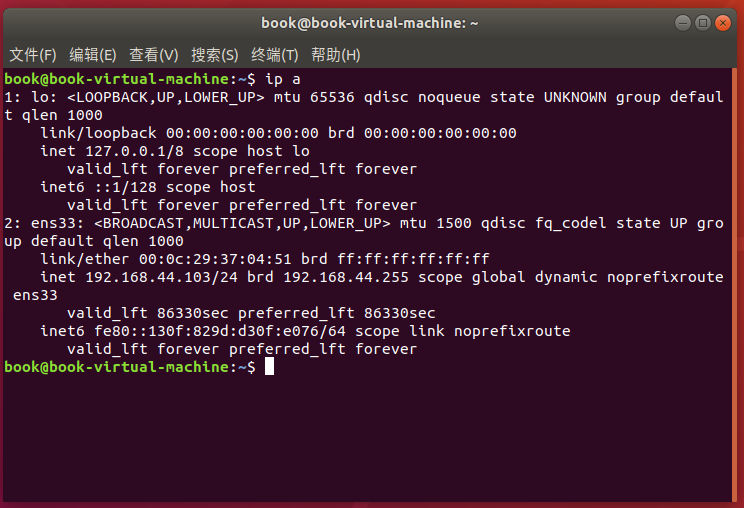
(2)查看ubuntu 的工作ip,使用ssh工具连接上去
①查看虚拟机的工作ip:
ip a
②使用ssh工具,连上ubuntu
(3)git buildroot资源
①新建工作目录
mkdir tiny-200s②进入工作目录并查看当前文件夹
cd tiny-200spwd打印结果如下:
book@book-virtual-machine:~/tiny-200s$ pwd
/home/book/tiny-200s
③根据git上面的教程,安装相关的库文件
sudo apt install wget unzip build-essential git bc swig libncurses-dev libpython3-dev libssl-dev
sudo apt install pkg-config zlib1g-dev libusb-dev libusb-1.0-0-dev
sudo apt install python3-distutils
sudo apt install dfu-util
④拉取新鲜的资源
git clone https://hub.fastgit.org/aodzip/buildroot-tiny200.git 如果失效,则使用原来的链接:
git clone https://github.com/aodzip/buildroot-tiny200.git (4)编译动作
①进入buildroot工程目录
cd buildroot-tiny200/②根据作者的教程,一步步来
make widora_mangopi_r3_defconfig
make -j12
-j12表示多线程编译的意思,如果不知道自己平台多少核,直接make即可。
(5)处理buildroot过程中的异常
若是这个过程中,有什么资源下不动,可以使用迅雷下载,然后上传到buildroot的工作目录下./buildroot-tiny200/dl文件夹的对应名字的目录中。
例如,uboot资源下载太慢。
--2020-10-10 09:58:42--  ftp://ftp.denx.de/pub/u-boot/u-boot-2020.01.tar.bz2
           => “/home/book/tiny-200s/buildroot-tiny200/output/build/.u-boot-2020.01.tar.bz2.TkMJ9l/output”
正在解析主机 ftp.denx.de (ftp.denx.de)... 85.214.49.3, 2a01:238:43f4:4600:bc64:4f44:381f:1163
正在连接 ftp.denx.de (ftp.denx.de)|85.214.49.3|:21... 已连接。
正在以 anonymous 登录 ... 登录成功!
==> SYST ... 完成。    ==> PWD ... 完成。
==> TYPE I ... 完成。  ==> CWD (1) /pub/u-boot ... 完成。
==> SIZE u-boot-2020.01.tar.bz2 ... 14716125
==> PASV ... 完成。    ==> RETR u-boot-2020.01.tar.bz2 ... 完成。
长度:14716125 (14M) (非正式数据)

u-boot-2020.01.tar.bz2                            11%[===========>                                                                                               ]   1.60M  6.40KB/s    剩余 27m 4s
可以看出速度,实在是太慢了,我们可以Crrl+C结束当前make,
复制链接ftp://ftp.denx.de/pub/u-boot/u-boot-2020.01.tar.bz2,
使用迅雷将他下载好,然后上传到/home/book/tiny-200s/buildroot-tiny200/dl/uboot-tools目录
(怎么知道是那个文件夹呢?看到文件夹名字和资源相近的,怼进去就可以了)
继续make: make -j12
--2020-10-10 10:26:40--  https://cdn.kernel.org/pub/linux/kernel/v5.x/linux-5.4.66.tar.xz
正在解析主机 cdn.kernel.org (cdn.kernel.org)... 151.101.109.176, 2a04:4e42:1a::432
正在连接 cdn.kernel.org (cdn.kernel.org)|151.101.109.176|:443... 已连接。
已发出 HTTP 请求,正在等待回应... 200 OK
长度: 109584352 (105M) [application/x-xz]
正在保存至: “/home/book/tiny-200s/buildroot-tiny200/output/build/.linux-5.4.66.tar.xz.bzVSR9/output”

/.linux-5.4.66.tar.xz.bzVSR9/output               15%[================>                                                                                          ]  16.62M  42.4KB/s    剩余 46m 13
linux内核资源下载太慢,Crrl+C结束当前make,
复制链接https://cdn.kernel.org/pub/linux/kernel/v5.x/linux-5.4.66.tar.xz,
使用迅雷将他下载好,然后上传到/home/book/tiny-200s/buildroot-tiny200/dl/linux目录
继续make:make -j12
如果是git上面的资源下载太慢,甚至下载不动,使用迅雷也很慢,修改git的域名前缀为https://hub.fastgit.org/,应该能增加速度。
(6)漫长的buildroot等待过程
(7)成功后,可以目录./buildroot-tiny200/output/images下看到以下文件
 ll output/images/
总用量 661345
drwxrwxrwx 1 root root      4096 10月  8 22:12 ./
drwxrwxrwx 1 root root      4096 10月  8 22:12 ../
-rwxrwxrwx 1 root root   8388608 10月  8 22:12 bootfs.vfat*
-rwxrwxrwx 1 root root     15533 10月  8 21:49 devicetree.dtb*
-rwxrwxrwx 1 root root 167772160 10月  8 22:12 flasher.vfat*
-rwxrwxrwx 1 root root  19373568 10月  8 22:11 rootfs.cpio*
-rwxrwxrwx 1 root root   6373990 10月  8 22:11 rootfs.cpio.gz*
-rwxrwxrwx 1 root root   6374054 10月  8 22:12 rootfs.cpio.uboot*
-rwxrwxrwx 1 root root 104857600 10月  8 22:12 rootfs.ext2*
lrwxrwxrwx 1 root root        11 10月  8 22:12 rootfs.ext4 -> rootfs.ext2*
-rwxrwxrwx 1 root root   6422528 10月  8 22:12 rootfs.squashfs*
-rwxrwxrwx 1 root root  20490240 10月  8 22:12 rootfs.tar*
-rwxrwxrwx 1 root root 168820736 10月  8 22:12 sysimage-flasher.img*
-rwxrwxrwx 1 root root 134217728 10月  8 22:12 sysimage-nand.img*
-rwxrwxrwx 1 root root  16777216 10月  8 22:12 sysimage-nor.img*
-rwxrwxrwx 1 root root 114294784 10月  8 22:12 sysimage-sdcard.img*
-rwxrwxrwx 1 root root    408239 10月  8 21:26 u-boot.bin*
-rwxrwxrwx 1 root root    461551 10月  8 22:12 u-boot-sunxi-with-nand-spl.bin*
-rwxrwxrwx 1 root root    441071 10月  8 21:26 u-boot-sunxi-with-spl.bin*
-rwxrwxrwx 1 root root   4317544 10月  8 21:49 zImage*
(8)卡刷
复制sysimage-sdcard.img,使用winimg32烧写SD卡。
参考链接:如何用Win32 Disk Imager烧录镜像到SD卡
https://jingyan.baidu.com/article/f96699bbea3181894e3c1be8.html
(8)dfu线刷spi-nand
插入tiny-200s-r3,(usb连接)
执行以下命令:
./fel-uboot.sh && ./dfu-nand-all.sh即可完成spi-nand线刷。
最近编辑记录 LinjieGuo (2020-10-10 11:58:28)
离线
太原小智科技有限责任公司 - 东莞哇酷科技有限公司联合开发
