楼主 #1 2019-11-03 13:34:50 分享评论


楼主 #2 2019-11-03 13:35:22 分享评论
Re: 尝试从零构建F1C100s开发环境
1、使用虚拟机安装ubuntu
链接:获取ubuntu
链接:获取虚拟机应用
1.1 新建虚拟机向导
(1) [勾选]安装程序光盘映像文件
(2) 个性化linux:填写自己的linux机器名称,用户名,密码,确认密码
我这里填写为:book,book,linjie,linjie
(3) 选择安装位置
(4) 根据自己情况,分配磁盘容量
我这里分配32GB
(5) 根据自己机器性能,自定义硬件
内存:
处理器:
网络适配器:
(1)桥接模式,ubuntu相当于一台独立的电脑,可以通过路由器连接外网。
(2)NAT模式:ubuntu连接windows的网络,可通过windows电脑分享的网络,连接外网。
(6) 进入ubuntu安装界面,按照向导随意配置。
1.2 安装一些便捷的工具
(1) 切换到root
sudo -i
(2) 更新源:
apt-get update
(3) 安装ssh服务器
apt-get install ssh
(4) 命令行输入观察ubuntu的ip:
ifconfig (没这个工具的话apt-get install net-tools)
或
ip -a
(5) windows端下载远程工具:putty
链接:获取putty
(6) 使用putty登陆ubuntu验证ssh服务是否正常
最近编辑记录 LinjieGuo (2019-11-03 15:51:03)
离线
楼主 #3 2019-11-03 16:40:25 分享评论
Re: 尝试从零构建F1C100s开发环境
2 根据荔枝派教程搭建开发环境
链接:荔枝派nano的教程链接
2.1 安装交叉编译工具链
(1)新建一个文件夹存放f1c100s的开发工具
mkdir f1c100s
进入该文件夹
cd f1c100s
(2)获取交叉编译工具链
wget http://releases.linaro.org/components/toolchain/binaries/7.2-2017.11/arm-linux-gnueabi/gcc-linaro-7.2.1-2017.11-x86_64_arm-linux-gnueabi.tar.xz
(3)解压
tar -vxJf gcc-linaro-7.2.1-2017.11-x86_64_arm-linux-gnueabi.tar.xz
(4)安装
sudo cp -r ./gcc-linaro-7.2.1-2017.11-x86_64_arm-linux-gnueabi /opt/
(5)修改环境变量
-->1.安装vim:
sudo apt-get install vim
-->2.使用vim编辑
sudo vim /etc/bash.bashrc
-->3.在文件末尾 添加以下内容:
PATH="$PATH:/opt/gcc-linaro-7.2.1-2017.11-x86_64_arm-linux-gnueabi/bin"
-->4.使路径生效
source /etc/bash.bashrc
-->5.测试
arm-linux-gnueabi-gcc -v
最近编辑记录 LinjieGuo (2019-11-03 16:58:33)
离线
楼主 #4 2019-11-03 17:37:43 分享评论
Re: 尝试从零构建F1C100s开发环境
3 编译uboot
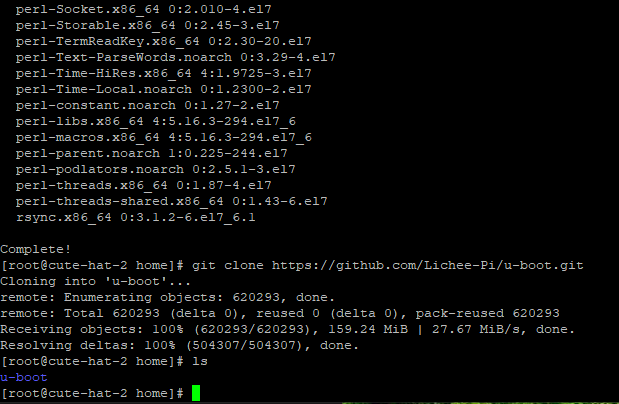
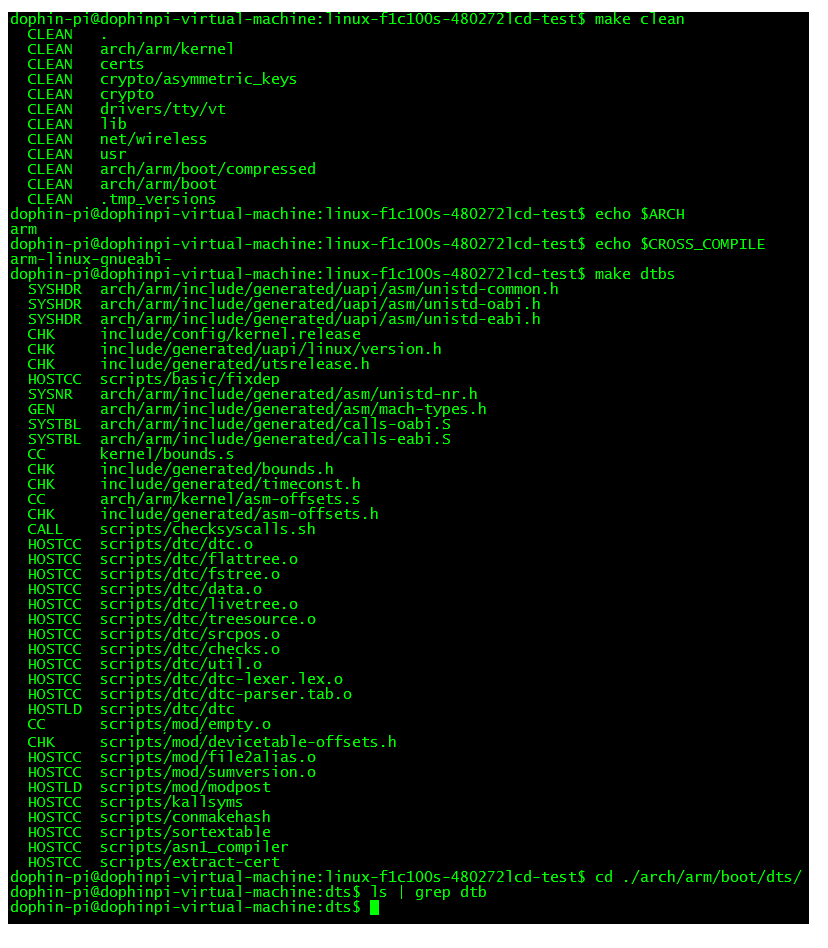
-->安装git工具
sudo apt-get install git
3.1 获取uboot源码
荔枝派官方教程里,源码位于git站上,因为国内git过于慢,建议使用下载工具打包下载。
(1)打开链接 https://github.com/Lichee-Pi/u-boot
(2)选择分支:点击Branch->nano-lcd800480
(3)使用下载工具打包下载
3.2 uboot.zip解压
(1)新建文件夹uboot
mkdir uboot
(2)解压zip文件
unzip uboot.zip
(3)进入目录
cd u-boot
(4)查看分支
git branch -a
(5)切换到 Nano 分支
git checkout nano-v2018.01
(6)编译uboot
-->1 安装make
sudo apt install make
-->2 使用nano配置
make ARCH=arm CROSS_COMPILE=arm-linux-gnueabi- licheepi_nano_spiflash_defconfig
出现错误提示:
①recipe for target 'scripts/basic/fixdep' failed
②/bin/sh: 1: cc: not found
安装如下工具:
sudo apt-get install libncurses5-dev
sudo apt-get install gcc
继续配置命令
make ARCH=arm CROSS_COMPILE=arm-linux-gnueabi- licheepi_nano_spiflash_defconfig
-->3 体验可视化配置
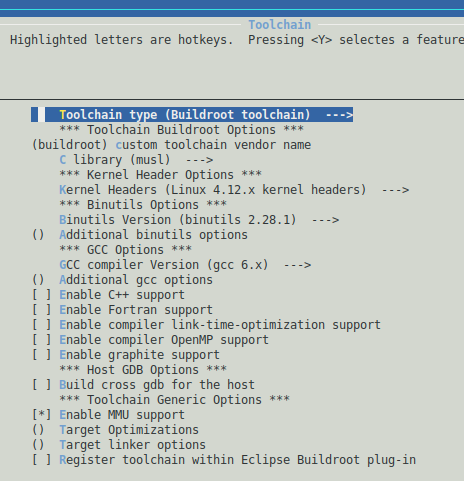
make ARCH=arm menuconfig
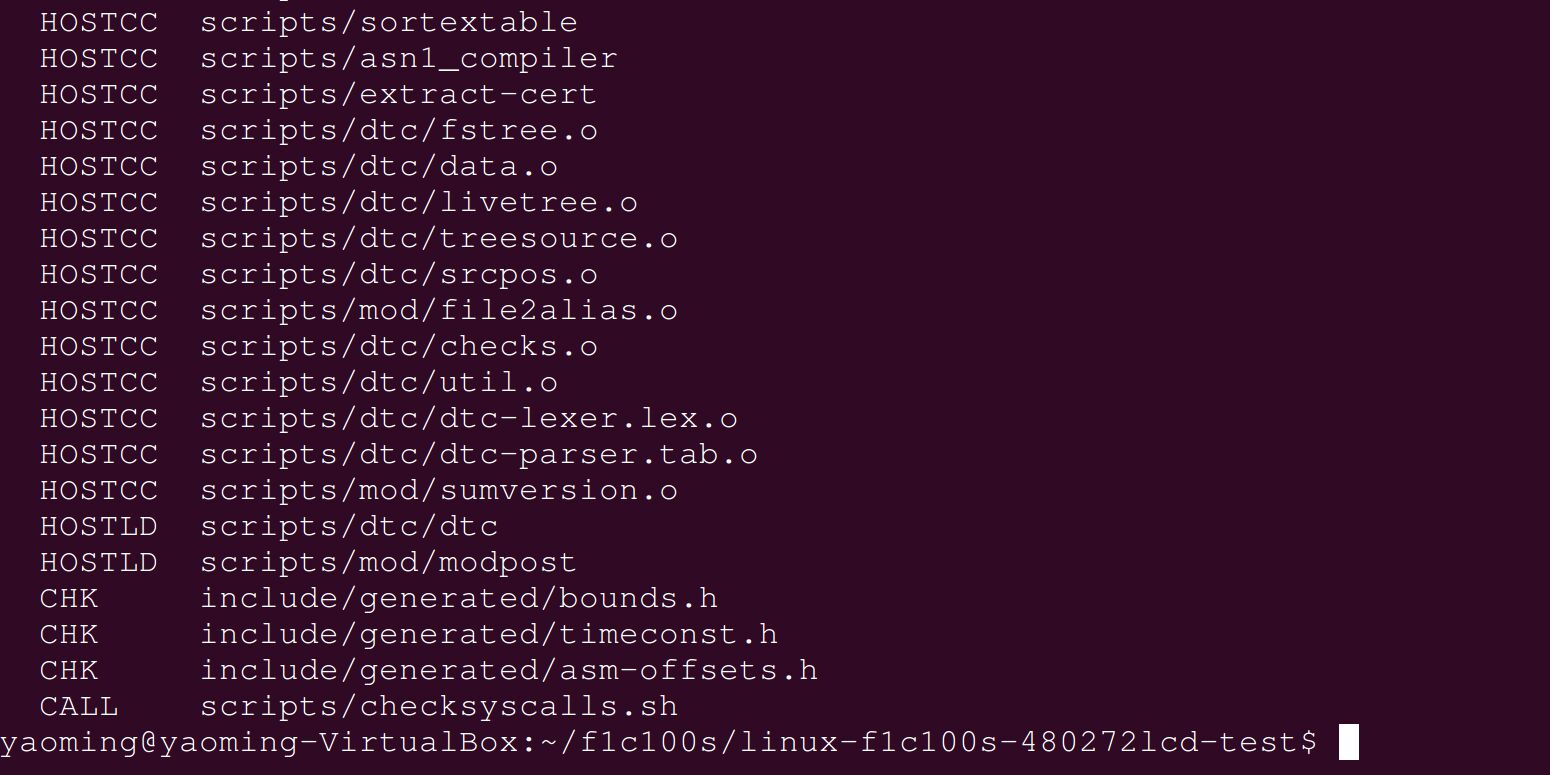
-->4 编译
make ARCH=arm CROSS_COMPILE=arm-linux-gnueabi- -j4
如果你的CPU支持8线程,则-j4可以修改为-j8,提高编译速度。
-----------------------------------------------
出现错误:
①recipe for target 'scripts/dtc' failed
②recipe for target 'scripts' failed
-----------------------------------------------
安装如下工具:
apt-get install device-tree-compiler
-----------------------------------------------
继续编译:
make ARCH=arm CROSS_COMPILE=arm-linux-gnueabi- -j4
-----------------------------------------------
依然出现错误,瞎安装:
sudo apt-get install libncurses5-dev libncursesw5-dev
sudo apt-get install swig python-dev python3-dev
-----------------------------------------------
继续编译:
make ARCH=arm CROSS_COMPILE=arm-linux-gnueabi- -j4
居然好了。
得到u-boot-sunxi-with-spl.bin文件。
离线
楼主 #5 2019-11-03 18:04:43 分享评论
Re: 尝试从零构建F1C100s开发环境
4 编译linux内核
4.1 获取linux内核源码
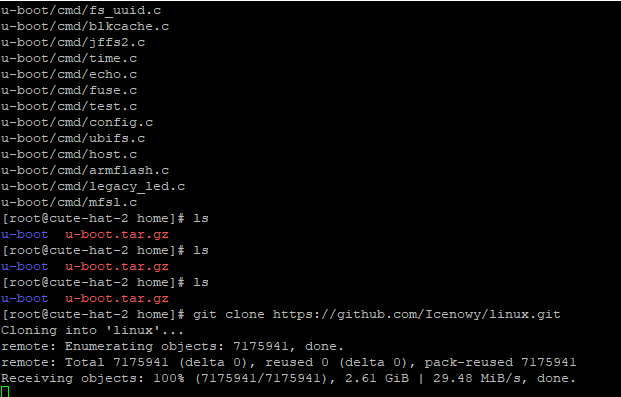
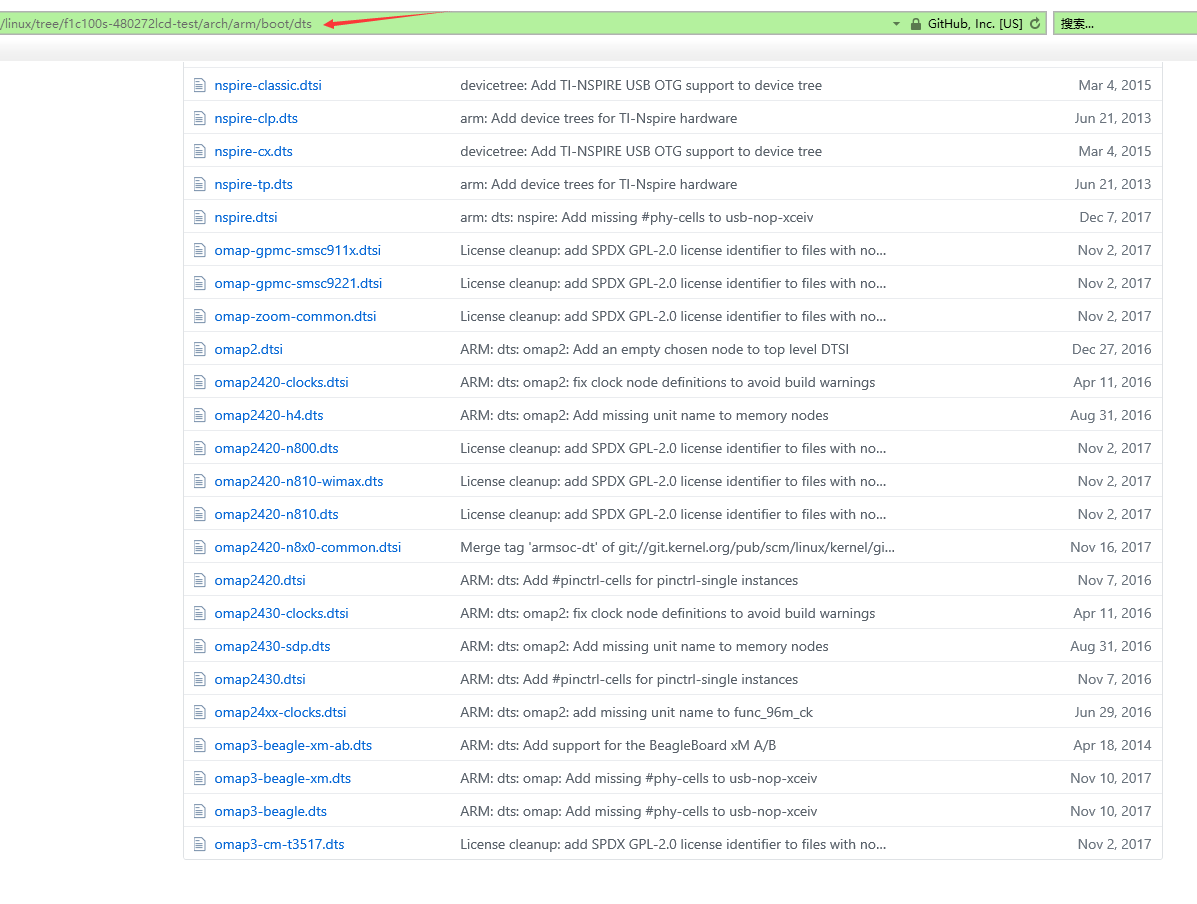
(1)打开链接:https://github.com/Icenowy/linux.git
(2)选择分支:点击Branch->f1c100s-480272
(3)打包下载
(4)传到ubuntu中,解压
unzip f1c100s-480272lcd-test.zip
(5)下载别人配置好的配置文件
http://dl.sipeed.com/LICHEE/Nano/SDK/config
复制下载的文件到linux源码根目录,并改名字为".config"
(6)体验可视化配置
make ARCH=arm menuconfig
(7)编译
make ARCH=arm CROSS_COMPILE=arm-linux-gnueabi- -j4
-----------------------------------------------
出现错误:
scripts/extract-cert.c:21:10: fatal error: openssl/bio.h: 没有那个文件或目录
安装工具:
sudo apt-get install libssl-dev
-----------------------------------------------
继续编译:
make ARCH=arm CROSS_COMPILE=arm-linux-gnueabi- -j4
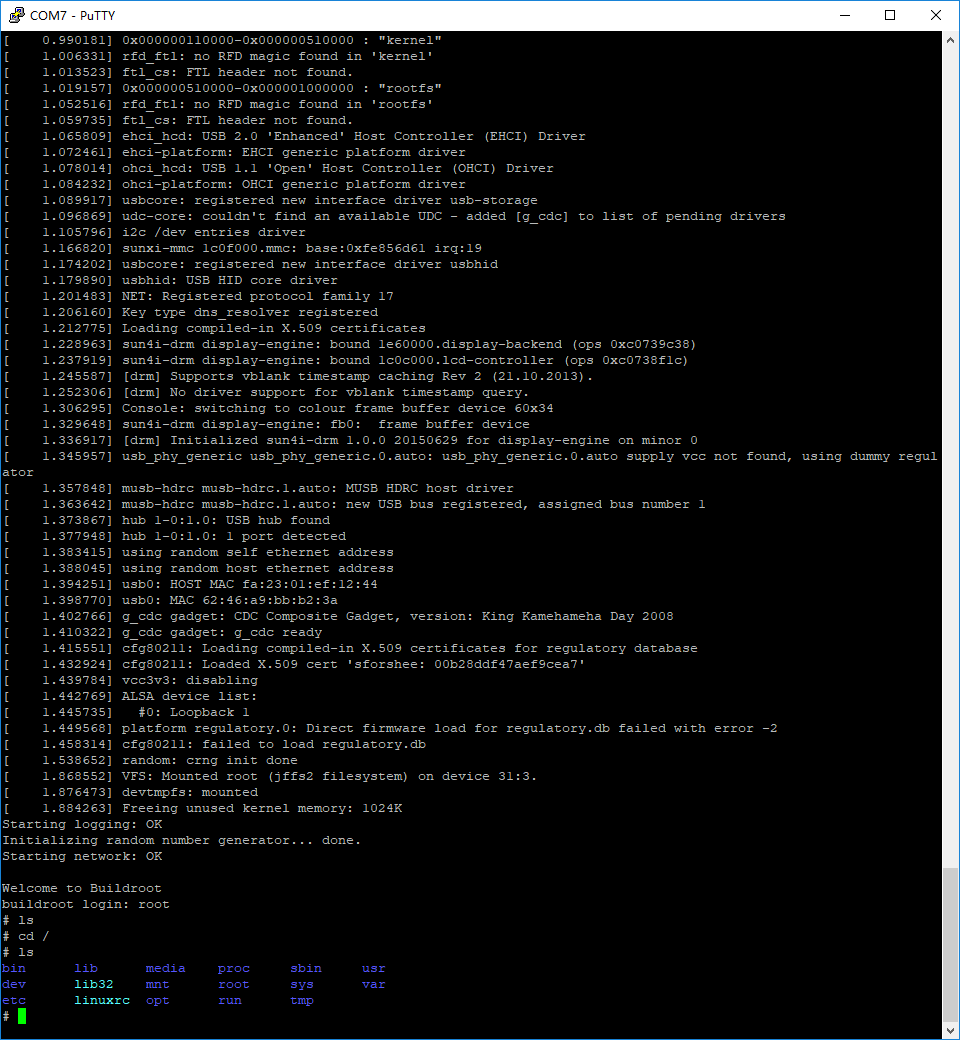
成功编译,生成的 zImage 在 arch ‣ arm ‣ boot 目录下
离线
楼主 #6 2019-11-03 18:53:25 分享评论
Re: 尝试从零构建F1C100s开发环境
5 编译根文件系统
5.1 安装依赖
apt-get install linux-headers-$(uname -r)
5.2 使用buildroot编译根文件系统
(1)获取buildroot源码
wget https://buildroot.org/downloads/buildroot-2017.08.tar.gz
tar xvf buildroot-2017.08.tar.gz
cd buildroot-2017.08/
(2) 配置bulidroot
make menuconfig
-----------------------------------------------
Target options --->
Target Architecture Variant (arm926t) ---> // arm926ejs架构
Enable VFP extension support // Nano 没有 VFP单元,勾选会导致某些应用无法运行
Target ABI (EABI) --->
Floating point strategy (Soft float) ---> // 软浮点
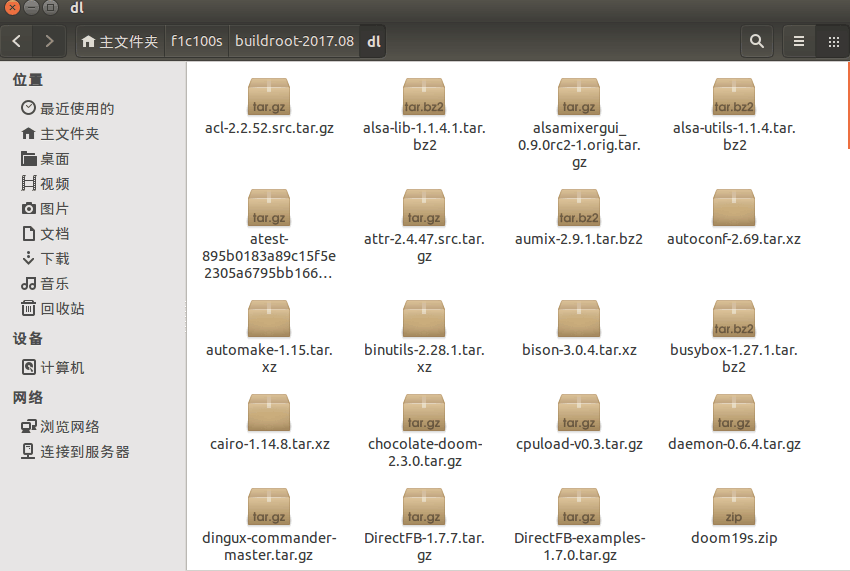
(2)下载依赖工具包
https://pan.baidu.com/s/1_tBdX9K7fOkH9JdXZ_MdiQ
下载完之后,解压后复制到"buildroot-2017.08/dl/"下,没有dl文件夹可自行创建。
也可以不下载此工具包,但是buildroot自动更具需求下载这些工具包也许很慢。
(3)编译
make
-----------------------------------------------
出现错误:
make[2]: g++: Command not found
安装G++工具:
sudo apt-get install g++
-----------------------------------------------
继续编译:
编译成功!
-----------------------------------------------
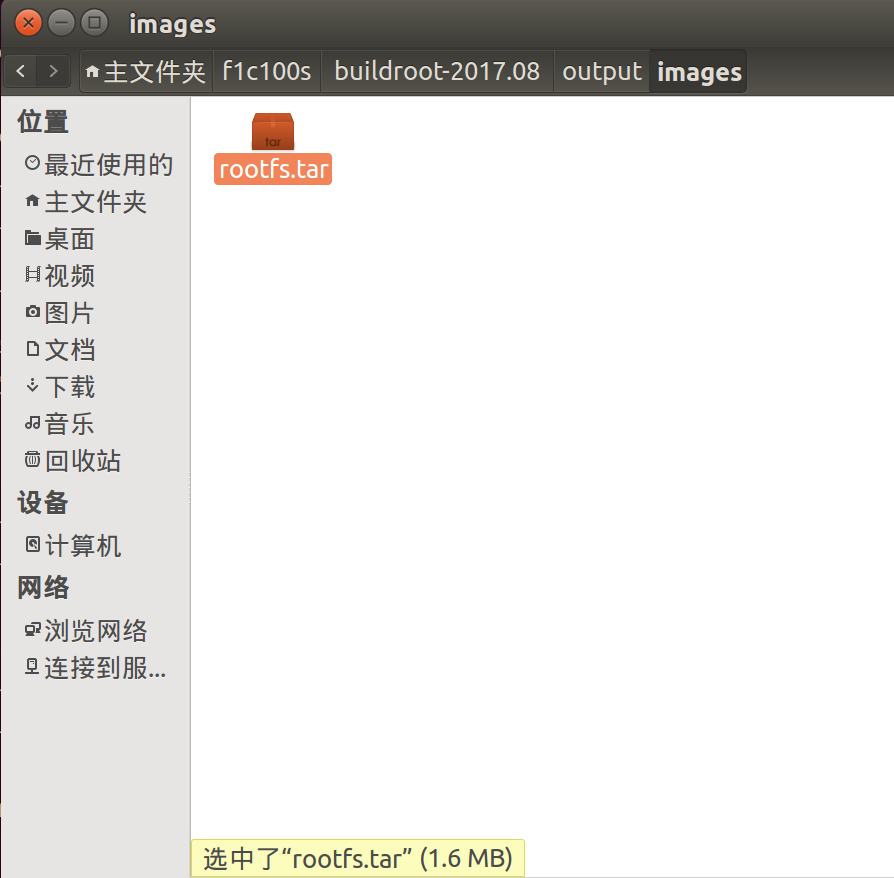
(4)查看rootfs文件的大小
ls -l output/images/rootfs.tar
离线
楼主 #7 2019-11-04 00:09:21 分享评论
Re: 尝试从零构建F1C100s开发环境
6 打包出烧写spi flash的bin文件
先将已经被解压过的文件,统统存放在一个文件夹里,防止干扰视线。
mkdir Pack
mv buildroot-2017.08.tar.gz Pack
mv f1c100s-480272lcd-test.zip Pack
mv gcc-linaro-7.2.1-2017.11-x86_64_arm-linux-gnueabi.tar.xz Pack
mv uboot.tar Pack
如果想保持官方路线,将当前根据官方操作流程而产生的文件打包,备用
tar -cf UKB.tar buildroot-2017.08 gcc-linaro-7.2.1-2017.11-x86_64_arm-linux-gnueabi linux-f1c100s-480272lcd-test u-boot
mv UKB.tar Pack
6.1 修改uboot以适配spi flashd
(1)修改源码
在uboot源码目录下 进入 ./include/configs/,修改 suniv.h
#define CONFIG_BOOTCOMMAND "sf probe 0:50000000; " \
"sf read 0x80C00000 0x100000 0x4000; " \
"sf read 0x80008000 0x110000 0x400000; " \
"bootz 0x80008000 - 0x80C00000"
(2)更改配置
回到 uboot 源码一级目录, 进入TUI配置
make ARCH=arm menuconfig
取消勾选 [] Enable a default value for bootcmd
勾选 [v] Enable boot arguments;
在下方一项中填入 bootargs 参数:
console=ttyS0,115200 panic=5 rootwait root=/dev/mtdblock3 rw rootfstype=jffs2
(3)回到根目录重新编译
make ARCH=arm CROSS_COMPILE=arm-linux-gnueabi- -j4
6.2 修改dts以适配spi flash
(1)修改源码
修改内核源码目录下的 ./arch/arm/boot/dts/suniv-f1c100s-licheepi-nano.dts
将原来的&spi0{...}替换为:
&spi0 {
pinctrl-names = "default";
pinctrl-0 = <&spi0_pins_a>;
status = "okay";
spi-max-frequency = <50000000>;
flash: w25q128@0 {
#address-cells = <1>;
#size-cells = <1>;
compatible = "winbond,w25q128", "jedec,spi-nor";
reg = <0>;
spi-max-frequency = <50000000>;
partitions {
compatible = "fixed-partitions";
#address-cells = <1>;
#size-cells = <1>;
partition@0 {
label = "u-boot";
reg = <0x000000 0x100000>;
read-only;
};
partition@100000 {
label = "dtb";
reg = <0x100000 0x10000>;
read-only;
};
partition@110000 {
label = "kernel";
reg = <0x110000 0x400000>;
read-only;
};
partition@510000 {
label = "rootfs";
reg = <0x510000 0xAF0000>;
};
};
};
};
(2)重新编译设备树
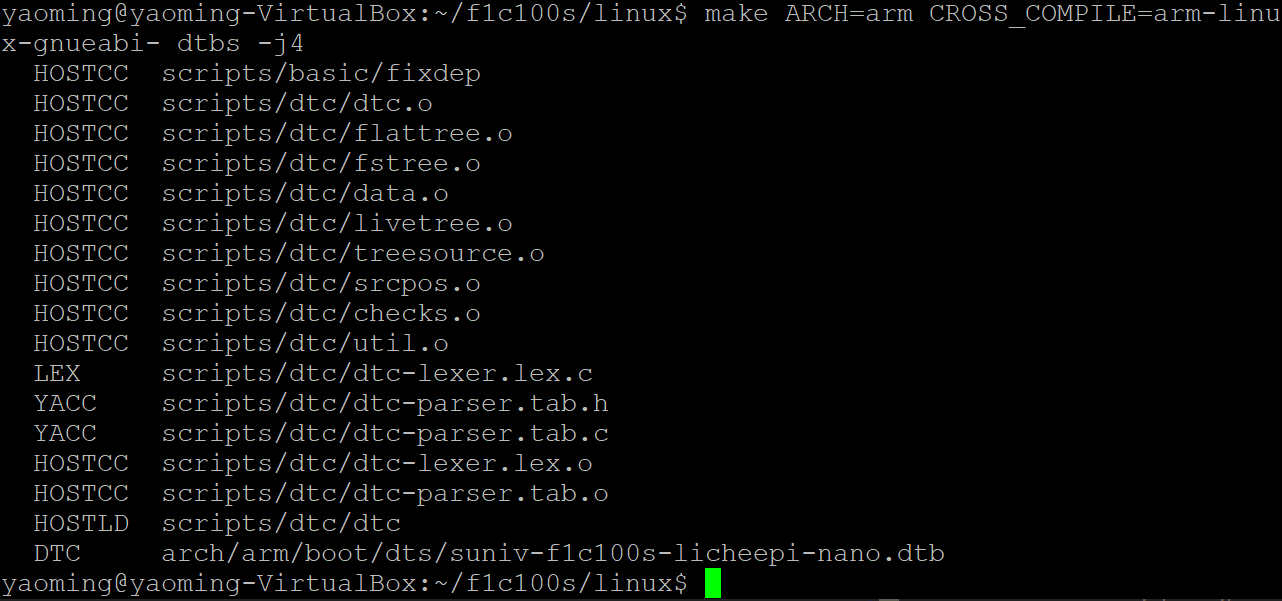
make ARCH=arm CROSS_COMPILE=arm-linux-gnueabi- dtbs -j4
6.3 修改内核配置
(1)make ARCH=arm menuconfig
(2)勾选 File systems ‣ Miscellaneous filesystems ‣ Journalling Flash File System v2 (JFFS2) support
(3)修改源码下的 ./drivers/mtd/spi-nor.c
vi ./drivers/mtd/spi-nor/spi-nor.c
注释掉以下一行:
//{ "w25q128", INFO(0xef4018, 0, 64 * 1024, 256, SECT_4K) },
在这一行下面增加一项:
{ "w25q128", INFO(0xef4018, 0, 64 * 1024, 256, 0) },
(4)重新编译内核
make ARCH=arm CROSS_COMPILE=arm-linux-gnueabi- -j4
6.4 打包生成用于少些spiflash的bin文件
(1)在f1c100s目录下,新建文件夹rootfs
mkdir rootfs
(2)复制rootfs.tar到rootfs文件夹中
cp buildroot-2017.08/output/images/rootfs.tar rootfs/
(3)解压rootfs目录下的rootfs.tar
cd rootfs
sudo tar -xvf rootfs.tar
(4)删除rootfs.tar
sudo rm rootfs.tar
(5)回到f1c100s目录,编写打包命令
cd ..
vim BuildMyImage.sh
填写如下内容:
#!/bin/sh
dd if=/dev/zero of=f1c100s_spiflash_16M.bin bs=1M count=16 &&\
dd if=u-boot/u-boot-sunxi-with-spl.bin of=f1c100s_spiflash_16M.bin bs=1K conv=notrunc &&\
dd if=linux-f1c100s-480272lcd-test/arch/arm/boot/dts/suniv-f1c100s-licheepi-nano.dtb of=f1c100s_spiflash_16M.bin bs=1K seek=1024 conv=notrunc &&\
dd if=linux-f1c100s-480272lcd-test/arch/arm/boot/zImage of=f1c100s_spiflash_16M.bin bs=1K seek=1088 conv=notrunc &&\
mkfs.jffs2 -s 0x100 -e 0x10000 --pad=0xAF0000 -d rootfs/ -o rootfs.jffs2 &&\
dd if=rootfs.jffs2 of=f1c100s_spiflash_16M.bin bs=1k seek=5184 conv=notrunc &&\
sync
(6)运行打包脚本
sudo sh BuildMyImage.sh
-----------------------------------------------
提示错误:
BuildMyImage.sh: 6: BuildMyImage.sh: mkfs.jffs2: not found
安装mtd-utils工具:
sudo apt-get install mtd-utils
安装过程中,有可能出现超时情况,多尝试几遍或者更换源试试。
-----------------------------------------------
继续运行打包脚本:
sudo sh BuildMyImage.sh
稍等片刻,打包便能完成。
打包完成后,在当前目录,生成一个名为f1c100s_spiflash_16M.bin的文件。
最近编辑记录 LinjieGuo (2019-11-04 00:55:16)
离线
楼主 #8 2019-11-04 00:39:54 分享评论
Re: 尝试从零构建F1C100s开发环境
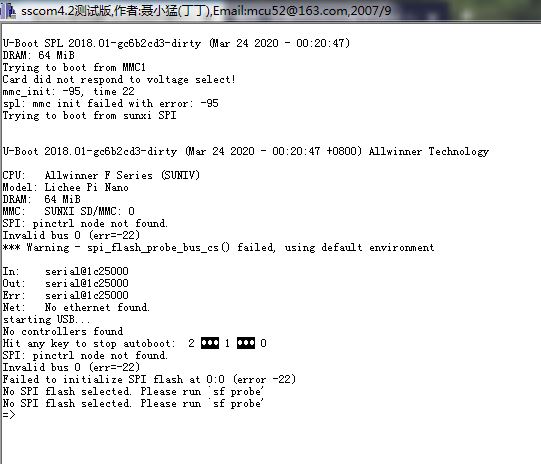
7 烧写验证
(1)参考文章:https://whycan.cn/t_444.html
编译、安装Windows版本sunxi-fel步骤 (32M spi flash补丁,支持W25Q256/MX25L256)
安装好驱动,烧写bin文件到单板上。
(2)观察串口输出: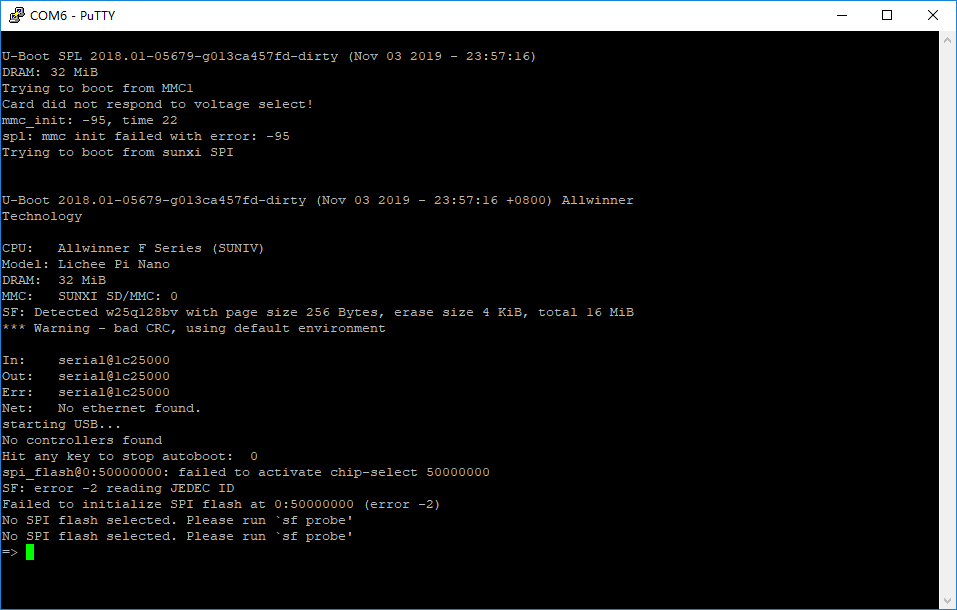
明显是存在问题,但是不知道问题出在哪里,太晚了,只能先睡觉。
最近编辑记录 LinjieGuo (2019-11-04 00:46:59)
离线
#9 2019-11-04 09:39:08 分享评论
- dgtg
- 会员
- 注册时间: 2017-11-08
- 已发帖子: 275
- 积分: 229.5
Re: 尝试从零构建F1C100s开发环境
支持楼主!
离线
#11 2019-11-04 14:30:25 分享评论
- 我思故我在
- 会员
- 注册时间: 2019-09-03
- 已发帖子: 244
- 积分: 243.5
Re: 尝试从零构建F1C100s开发环境
好贴, 写得很详细, 适合入门。
离线
楼主 #12 2019-11-04 21:05:35 分享评论
Re: 尝试从零构建F1C100s开发环境
非常感谢晕哥的指导:
回到6.26.2 修改dts以适配spi flash
(1)修改源码
在uboot源码目录下 进入 ./include/configs/,修改 suniv.h
#define CONFIG_BOOTCOMMAND "sf probe 0 50000000; " \
"sf read 0x80C00000 0x100000 0x4000; " \
"sf read 0x80008000 0x110000 0x400000; " \
"bootz 0x80008000 - 0x80C00000"
重新编译uboot。
重新打包出bin文件,并烧写。
出现以下情况,很明显,还是存在问题,贴图,: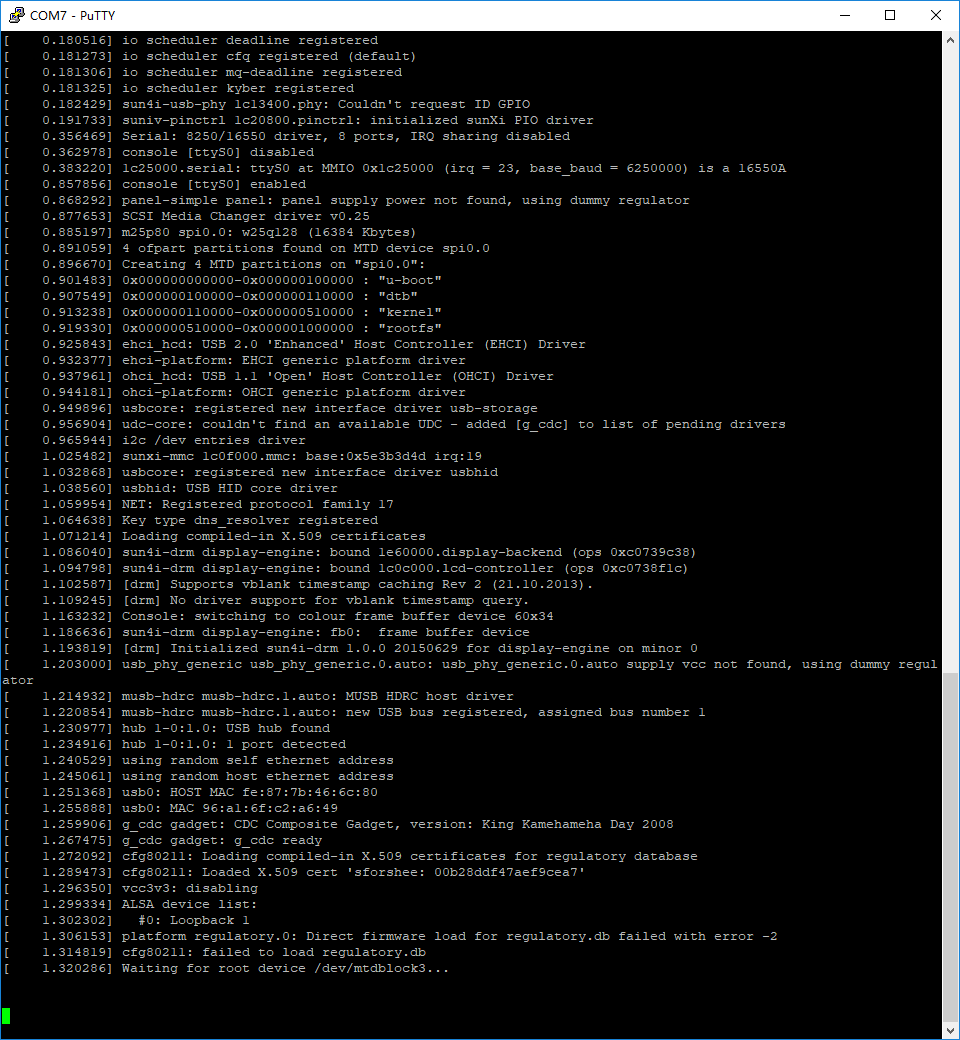
最近编辑记录 LinjieGuo (2019-11-04 21:10:10)
离线
楼主 #14 2019-11-04 23:21:35 分享评论
Re: 尝试从零构建F1C100s开发环境
再次感谢晕哥的指导:可能是CONFIG_MTD_BLOCK没有勾上。
在linux内核根目录: make ARCH=arm menuconfig
进入配置界面后:
按/
输入CONFIG_MTD_BLOCK
进行搜索,得到以下界面。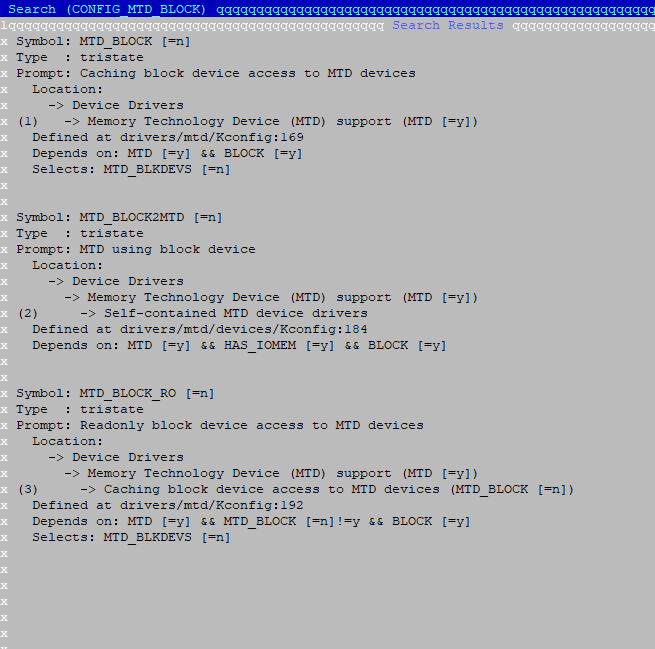
进入→ Device Drivers,发现 已经勾选上
<*> Memory Technology Device (MTD) support --->
回车进入Memory Technology Device (MTD) support --->
看着好像有关的选项都给勾选上。贴图: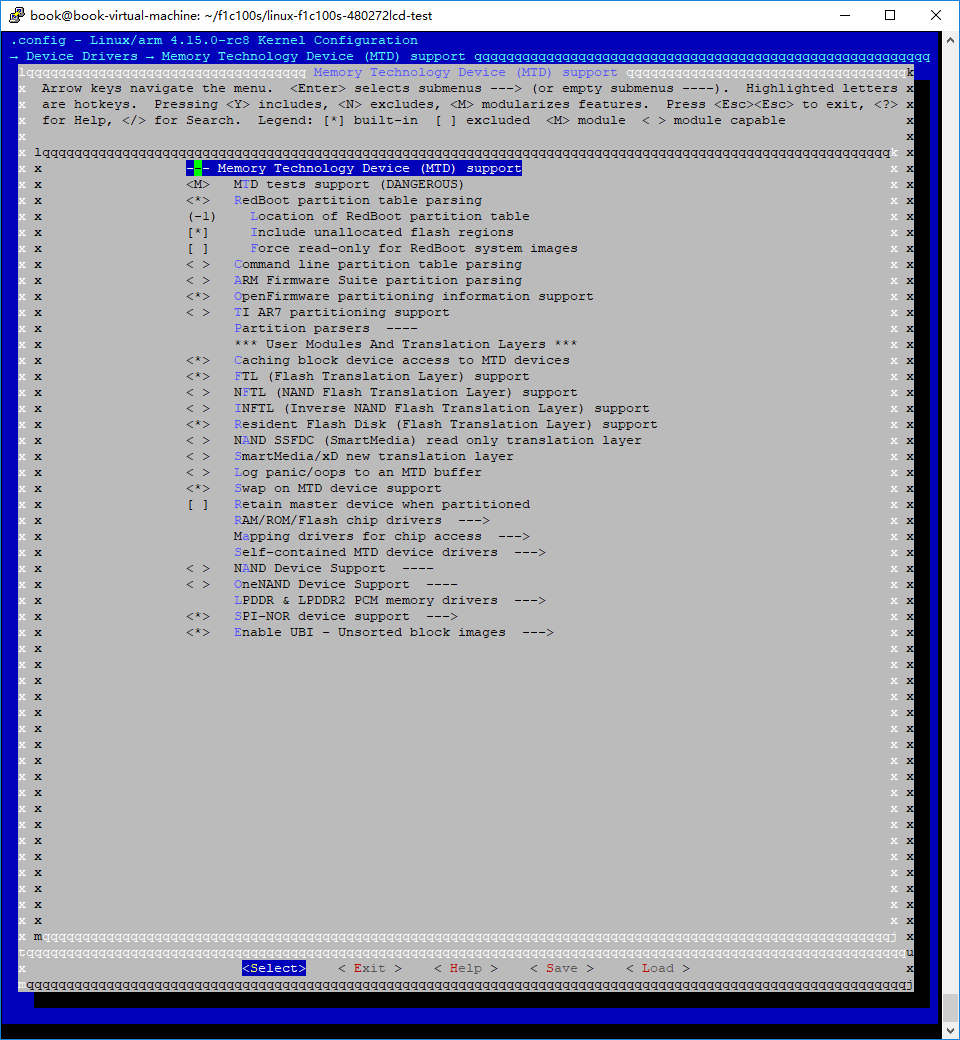
继续回车进入 Self-contained MTD device drivers
看着好像有关的选项都给勾选上。贴图: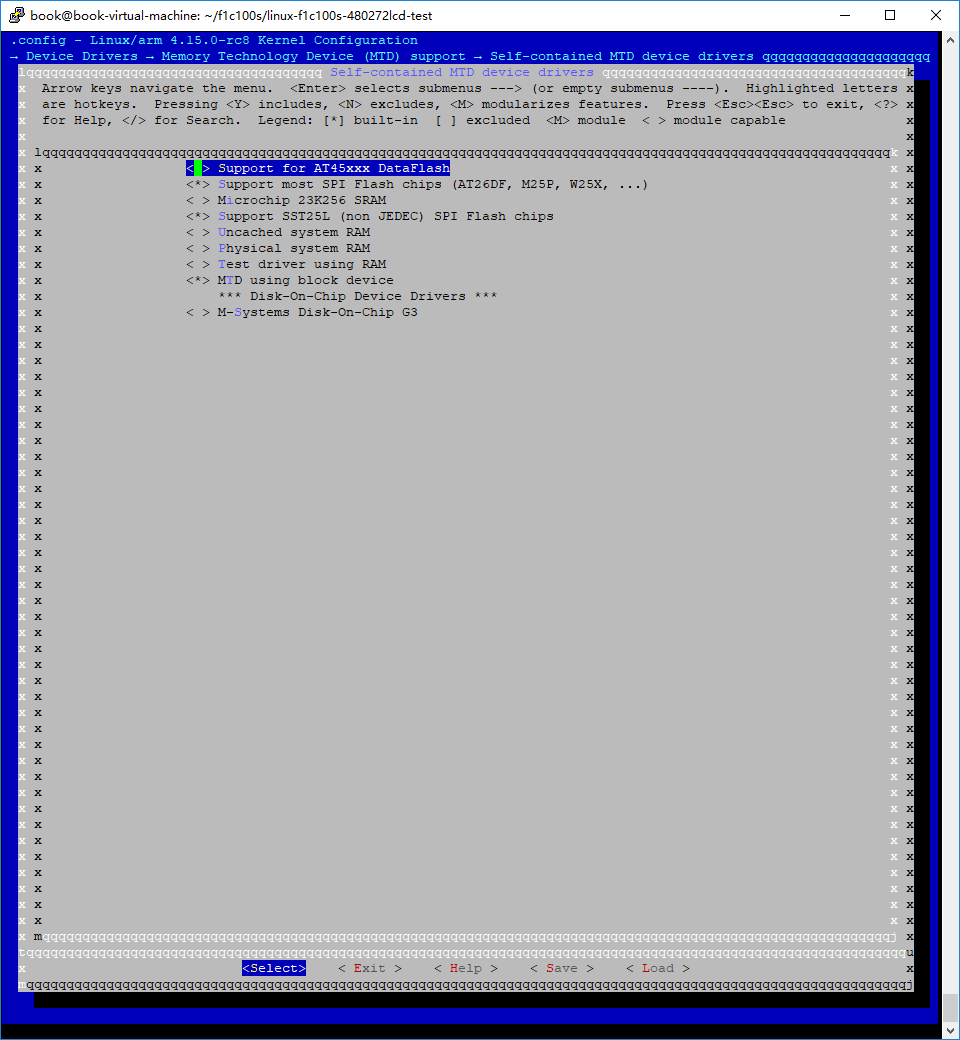
保存退出,继续编译。
make ARCH=arm CROSS_COMPILE=arm-linux-gnueabi- -j4
最近编辑记录 LinjieGuo (2019-11-04 23:22:40)
离线
楼主 #15 2019-11-04 23:25:42 分享评论
Re: 尝试从零构建F1C100s开发环境
编译完毕,打包后烧写bin文件。非常遗憾,结果依旧!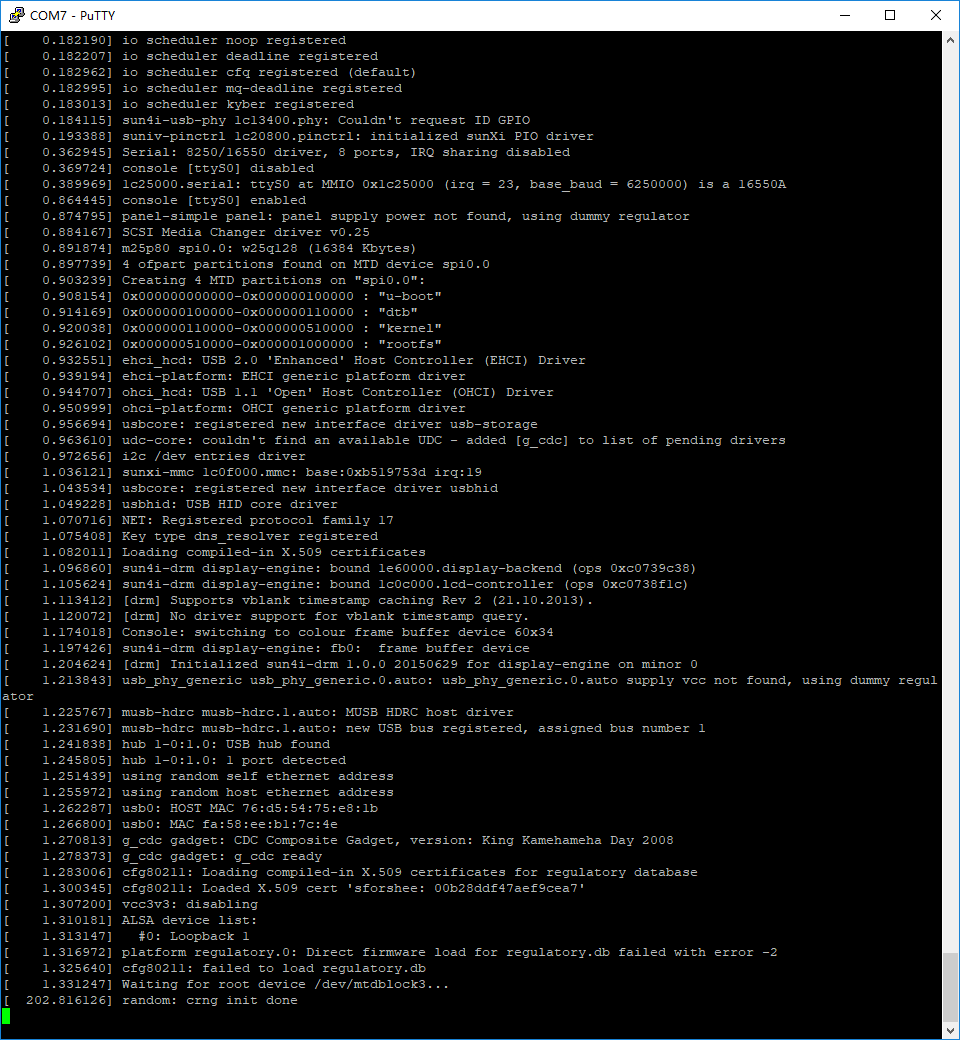
观察.config里的配置项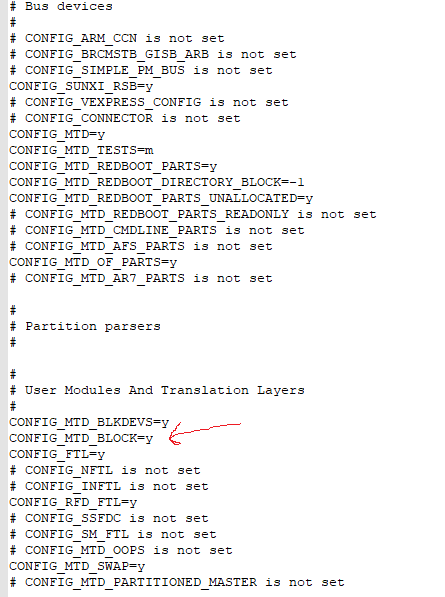
文件中,可以看出,MTD_BLOCK已经配置为y,但依然没能成功启动。
我怀疑也许是根文件系统配置的问题。夜深了,明日继续。
算了,还是再搞搞把,这么早休息实在没劲,继续折腾。
观察启动log,发现,卡住的地方,有一条记录: #0: Loopback 1
再次进入配置界面:make ARCH=arm menuconfig
Device Drivers --->Block devices --->
[v]Loopback device support,勾选,看到其他有的选项,也勾上吧,相信也无妨,贴图:
保存配置,继续编译。
make ARCH=arm CROSS_COMPILE=arm-linux-gnueabi- -j4
打包后烧录验证。
最近编辑记录 LinjieGuo (2019-11-04 23:44:30)
离线
楼主 #16 2019-11-04 23:49:17 分享评论
Re: 尝试从零构建F1C100s开发环境
夜已深,凭借着12线程的能力,很快就编译完成,打包烧录进单板上。
上电后,观察log,非常遗憾,唉,我要睡觉了。因为linux跑起来了...贴图:
在这紧要关头,我居然忘记了登陆账号密码,无奈之下,只能去buildroot目录下看看账号密码了。
make menuconfig
System configuration --->
贴图: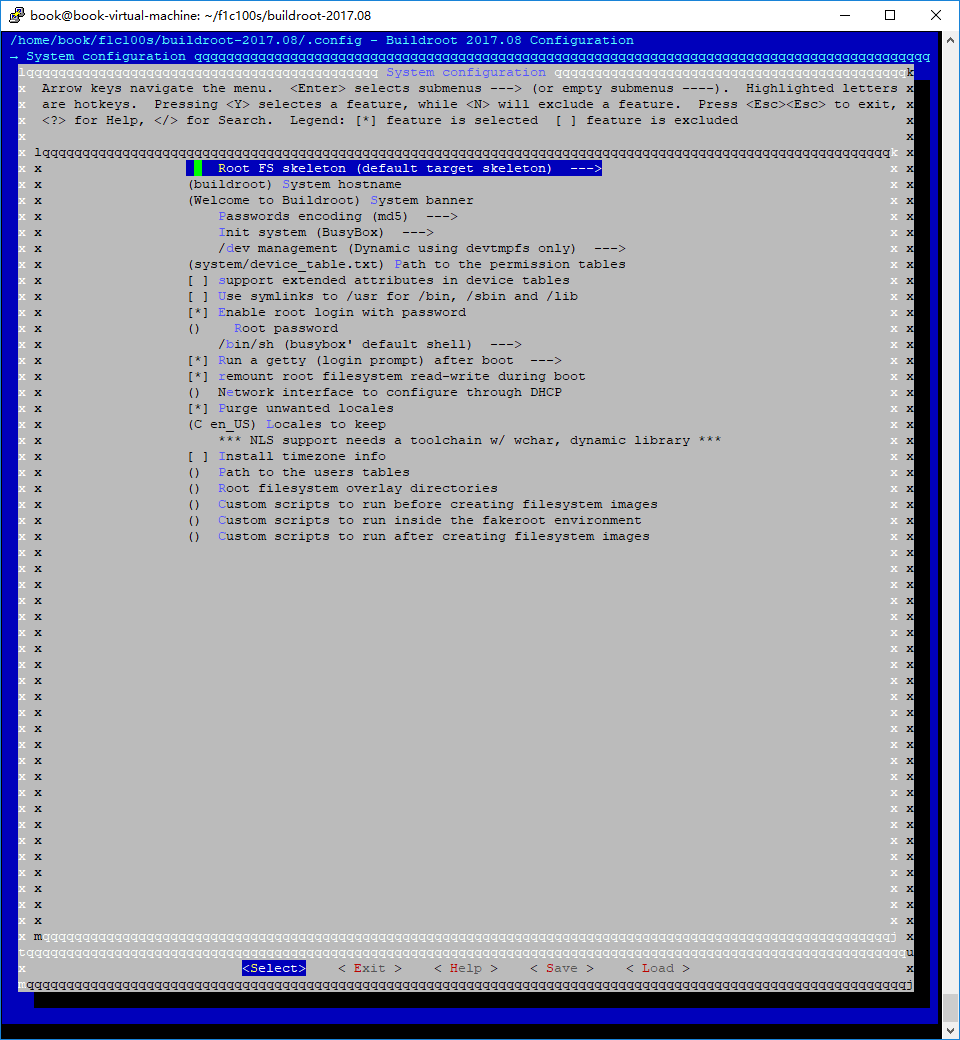
原来还没有设置密码,算了,真的要休息了,明日继续。
最近编辑记录 LinjieGuo (2019-11-05 00:04:40)
离线
#17 2019-11-05 11:20:27 分享评论
- aaayao
- 会员
- 注册时间: 2019-10-30
- 已发帖子: 85
- 积分: 55
Re: 尝试从零构建F1C100s开发环境
楼主加油,正在按前面的教程一步一步来!
离线
#18 2019-11-05 11:26:21 分享评论
- 三哥
- 会员
- 注册时间: 2018-08-03
- 已发帖子: 72
- 积分: 44.5
Re: 尝试从零构建F1C100s开发环境
![]()
哈哈,等着学习,楼主厉害了
离线
楼主 #19 2019-11-05 21:56:32 分享评论
楼主 #22 2019-11-06 11:15:22 分享评论
Re: 尝试从零构建F1C100s开发环境
晕哥 wrote:
@aaayao 这个文件下载失败: https://cdn.kernel.org/pub/linux/kernel/v4.x/linux-4.12.10.tar.xz
你可以手动下载拷贝到 dl/ 目录。
是的,这个文件复制链接,用迅雷下载,非常快,十来秒就OK了。
离线
#23 2019-11-06 13:41:45 分享评论
- aaayao
- 会员
- 注册时间: 2019-10-30
- 已发帖子: 85
- 积分: 55
Re: 尝试从零构建F1C100s开发环境
我这里下载非常的慢
离线
#25 2019-11-06 16:47:04 分享评论
- aaayao
- 会员
- 注册时间: 2019-10-30
- 已发帖子: 85
- 积分: 55
Re: 尝试从零构建F1C100s开发环境
看来真的要试试在VPS上搭开发环境了。
离线
#26 2019-11-06 16:48:46 分享评论
- aaayao
- 会员
- 注册时间: 2019-10-30
- 已发帖子: 85
- 积分: 55
Re: 尝试从零构建F1C100s开发环境
现在编译了3个小时,还在编译,这根文件系统为什么要编译这么久的?
离线
#27 2019-11-06 16:57:40 分享评论
- aaayao
- 会员
- 注册时间: 2019-10-30
- 已发帖子: 85
- 积分: 55
Re: 尝试从零构建F1C100s开发环境
晕哥 wrote:
@aaayao 这个文件下载失败: https://cdn.kernel.org/pub/linux/kernel/v4.x/linux-4.12.10.tar.xz
你可以手动下载拷贝到 dl/ 目录。
下载了linux-4.12.10.tar.xz,放到dl目录里,现在还一直在编译,不知道还要编译多久?
离线
#29 2019-11-06 17:20:21 分享评论
- aaayao
- 会员
- 注册时间: 2019-10-30
- 已发帖子: 85
- 积分: 55
Re: 尝试从零构建F1C100s开发环境
QT不是需要的,能不能简单说说只编译根文件系统,需要些什么配置?
离线
#30 2019-11-06 18:14:31 分享评论
- aaayao
- 会员
- 注册时间: 2019-10-30
- 已发帖子: 85
- 积分: 55
Re: 尝试从零构建F1C100s开发环境
终于编译完成
离线
楼主 #31 2019-11-06 20:15:45 分享评论
Re: 尝试从零构建F1C100s开发环境
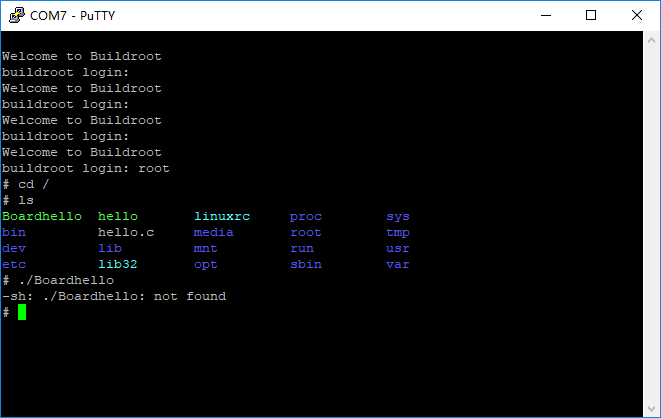
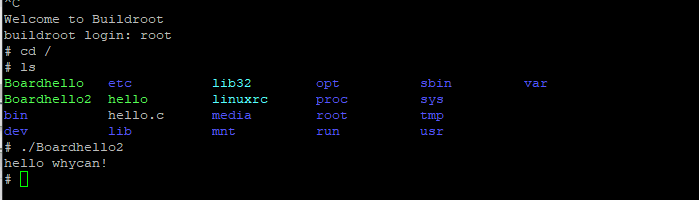
(3) 测试程序
既然linux已经能跑起来了,我们编写一个hello.c,编译看能否执行。
cd ./rootfs
vi hello.c
#include <stdio.h>
int main(void)
{
printf("hello whycan!\r\n");
return 0;
}
gcc编译:gcc -o hello hello.c
ubuntu中执行:./hello
输出:hello whycan!

编译到目标板:arm-linux-gnueabi-gcc -o Boardhello hello.c
因为现在没又什么方便得调试工具,直接打包进根文件系统。
sudo sh BuildMyImage.sh
烧录到spiflash中。
执行程序Boardhello。提示失败,如下图:
离线
楼主 #33 2019-11-06 20:30:42 分享评论

#35 2019-11-07 09:25:07 分享评论
- xgui
- 会员
- 注册时间: 2019-09-07
- 已发帖子: 224
- 积分: 224
Re: 尝试从零构建F1C100s开发环境
听说搬瓦工今年双十一没有促销了,真是遗憾,我去年双十一买的vps还有几天就到期了,找了好几天也没找到续费菜单。刚刚给客服发了一个Ticket看看能不能以去年的优惠价续费。
离线
#36 2019-11-07 09:55:45 分享评论
- aaayao
- 会员
- 注册时间: 2019-10-30
- 已发帖子: 85
- 积分: 55
Re: 尝试从零构建F1C100s开发环境
搬瓦工现在全部升级到KVM,不能显示续费的,都需要重新购买,旧的VPS都要报废。
离线
#37 2019-11-07 10:36:12 分享评论
- xgui
- 会员
- 注册时间: 2019-09-07
- 已发帖子: 224
- 积分: 224
Re: 尝试从零构建F1C100s开发环境
aaayao wrote:
搬瓦工现在全部升级到KVM,不能显示续费的,都需要重新购买,旧的VPS都要报废。
原理如此,多谢提醒。
离线
楼主 #38 2019-11-07 13:09:01 分享评论
Re: 尝试从零构建F1C100s开发环境
aaayao wrote:
xgui wrote:
双十一搬瓦工bwh可能有促销的VPS, 在这上面速度比起墙内快多了。克隆torvalds的Linux仓库最多1分钟搞定。
这个方法真好,在VPS上克隆真的非常的快啊!
/files/members/2261/QQ图片20191107090703.png
/files/members/2261/QQ图片20191107090823.png
/files/members/2261/QQ图片20191107082435.png但是要传回本地就非常的慢了,看来要在VPS上进行编译才行了。编译好之处只传回目标文件。
/files/members/2261/QQ图片20191107090158.png可惜现在的搬瓦工都没有以前19刀一年的了,最便宜都要49刀一年。
我的uboot是直接在腾讯云的服务器上面执行指令获取的,还算比较快,一下子就好了。
离线
#39 2019-11-07 13:20:03 分享评论
- msr06rr
- 会员
- 所在地: 苏州
- 注册时间: 2018-01-11
- 已发帖子: 181
- 积分: 171.5
Re: 尝试从零构建F1C100s开发环境
可以用GitHub Action编译,然后下载最终的固件,超级爽,还不要钱
离线
#40 2019-11-07 13:39:10 分享评论
- xgui
- 会员
- 注册时间: 2019-09-07
- 已发帖子: 224
- 积分: 224
Re: 尝试从零构建F1C100s开发环境
msr06rr wrote:
可以用GitHub Action编译,然后下载最终的固件,超级爽,还不要钱
还有这种操作 ^_^
http://www.ruanyifeng.com/blog/2019/09/getting-started-with-github-actions.html
最近编辑记录 xgui (2019-11-07 13:39:18)
离线
#41 2019-11-07 14:05:01 分享评论
- aaayao
- 会员
- 注册时间: 2019-10-30
- 已发帖子: 85
- 积分: 55
Re: 尝试从零构建F1C100s开发环境
楼主,你好:
按照你的连接下载的内核源码目录里没有 ./arch/arm/boot/dts/suniv-f1c100s-licheepi-nano.dts 这个文件啊?
离线
楼主 #42 2019-11-07 17:53:27 分享评论
Re: 尝试从零构建F1C100s开发环境
aaayao wrote:
楼主,你好:
按照你的连接下载的内核源码目录里没有 ./arch/arm/boot/dts/suniv-f1c100s-licheepi-nano.dts 这个文件啊?
稍等,我先看看呢!我搜索了一下,这个文件是存在的,你是不是搞错了呢?dts目录下文件太多,网页里只能显示一部分文件的。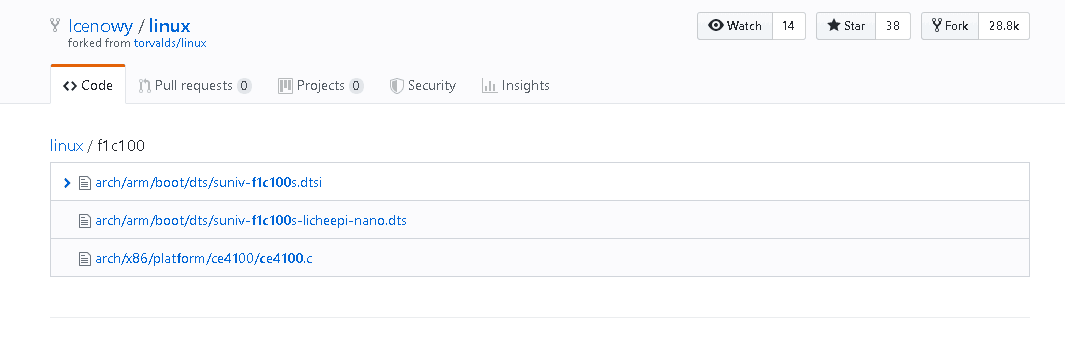
最近编辑记录 LinjieGuo (2019-11-07 18:17:53)
离线
#43 2019-11-07 21:00:49 分享评论
- aaayao
- 会员
- 注册时间: 2019-10-30
- 已发帖子: 85
- 积分: 55
Re: 尝试从零构建F1C100s开发环境
我这个suniv-f1c100s-licheepi-nano.dts没有找到&spi0{...}段落,应该在那个位置加上去呢?
// SPDX-License-Identifier: (GPL-2.0+ OR X11)
/*
* Copyright 2018 Icenowy Zheng <icenowy@aosc.io>
*/
/dts-v1/;
#include "suniv-f1c100s.dtsi"
#include <dt-bindings/gpio/gpio.h>
/ {
model = "Lichee Pi Nano";
compatible = "licheepi,licheepi-nano", "allwinner,suniv-f1c100s";
aliases {
serial0 = &uart0;
};
chosen {
stdout-path = "serial0:115200n8";
};
panel: panel {
compatible = "qiaodian,qd43003c0-40", "simple-panel";
#address-cells = <1>;
#size-cells = <0>;
enable-gpios = <&pio 4 6 GPIO_ACTIVE_HIGH>;
power-supply = <®_vcc3v3>;
port@0 {
reg = <0>;
#address-cells = <1>;
#size-cells = <0>;
panel_input: endpoint@0 {
reg = <0>;
remote-endpoint = <&tcon0_out_lcd>;
};
};
};
reg_vcc3v3: vcc3v3 {
compatible = "regulator-fixed";
regulator-name = "vcc3v3";
regulator-min-microvolt = <3300000>;
regulator-max-microvolt = <3300000>;
};
};
&be0 {
status = "okay";
};
&de {
status = "okay";
};
&tcon0 {
pinctrl-names = "default";
pinctrl-0 = <&lcd_rgb666_pins>;
status = "okay";
};
&tcon0_out {
tcon0_out_lcd: endpoint@0 {
reg = <0>;
remote-endpoint = <&panel_input>;
};
};
&mmc0 {
vmmc-supply = <®_vcc3v3>;
bus-width = <4>;
broken-cd;
status = "okay";
};
&uart0 {
pinctrl-names = "default";
pinctrl-0 = <&uart0_pe_pins>;
status = "okay";
};
&otg_sram {
status = "okay";
};
&usb_otg {
dr_mode = "otg";
status = "okay";
};
&usbphy {
usb0_id_det-gpio = <&pio 4 2 GPIO_ACTIVE_HIGH>; /* PE2 */
status = "okay";
};离线
楼主 #44 2019-11-07 21:46:09 分享评论
Re: 尝试从零构建F1C100s开发环境
aaayao wrote:
我这个suniv-f1c100s-licheepi-nano.dts没有找到&spi0{...}段落,应该在那个位置加上去呢?
// SPDX-License-Identifier: (GPL-2.0+ OR X11) /* * Copyright 2018 Icenowy Zheng <icenowy@aosc.io> */ /dts-v1/; #include "suniv-f1c100s.dtsi" #include <dt-bindings/gpio/gpio.h> / { model = "Lichee Pi Nano"; compatible = "licheepi,licheepi-nano", "allwinner,suniv-f1c100s"; aliases { serial0 = &uart0; }; chosen { stdout-path = "serial0:115200n8"; }; panel: panel { compatible = "qiaodian,qd43003c0-40", "simple-panel"; #address-cells = <1>; #size-cells = <0>; enable-gpios = <&pio 4 6 GPIO_ACTIVE_HIGH>; power-supply = <®_vcc3v3>; port@0 { reg = <0>; #address-cells = <1>; #size-cells = <0>; panel_input: endpoint@0 { reg = <0>; remote-endpoint = <&tcon0_out_lcd>; }; }; }; reg_vcc3v3: vcc3v3 { compatible = "regulator-fixed"; regulator-name = "vcc3v3"; regulator-min-microvolt = <3300000>; regulator-max-microvolt = <3300000>; }; }; &be0 { status = "okay"; }; &de { status = "okay"; }; &tcon0 { pinctrl-names = "default"; pinctrl-0 = <&lcd_rgb666_pins>; status = "okay"; }; &tcon0_out { tcon0_out_lcd: endpoint@0 { reg = <0>; remote-endpoint = <&panel_input>; }; }; &mmc0 { vmmc-supply = <®_vcc3v3>; bus-width = <4>; broken-cd; status = "okay"; }; &uart0 { pinctrl-names = "default"; pinctrl-0 = <&uart0_pe_pins>; status = "okay"; }; &otg_sram { status = "okay"; }; &usb_otg { dr_mode = "otg"; status = "okay"; }; &usbphy { usb0_id_det-gpio = <&pio 4 2 GPIO_ACTIVE_HIGH>; /* PE2 */ status = "okay"; };
其实你只要稍微观察一下就知道结构了。&xx{}都放在大括号外面。
最近编辑记录 LinjieGuo (2019-11-07 21:47:06)
离线
#45 2019-11-07 22:35:03 分享评论
- aaayao
- 会员
- 注册时间: 2019-10-30
- 已发帖子: 85
- 积分: 55
Re: 尝试从零构建F1C100s开发环境
加在下面这个位置,但是编译出错了。
// SPDX-License-Identifier: (GPL-2.0+ OR X11)
/*
* Copyright 2018 Icenowy Zheng <icenowy@aosc.io>
*/
/dts-v1/;
#include "suniv-f1c100s.dtsi"
#include <dt-bindings/gpio/gpio.h>
/ {
model = "Lichee Pi Nano";
compatible = "licheepi,licheepi-nano", "allwinner,suniv-f1c100s";
aliases {
serial0 = &uart0;
};
chosen {
stdout-path = "serial0:115200n8";
};
panel: panel {
compatible = "qiaodian,qd43003c0-40", "simple-panel";
#address-cells = <1>;
#size-cells = <0>;
enable-gpios = <&pio 4 6 GPIO_ACTIVE_HIGH>;
power-supply = <®_vcc3v3>;
port@0 {
reg = <0>;
#address-cells = <1>;
#size-cells = <0>;
panel_input: endpoint@0 {
reg = <0>;
remote-endpoint = <&tcon0_out_lcd>;
};
};
};
reg_vcc3v3: vcc3v3 {
compatible = "regulator-fixed";
regulator-name = "vcc3v3";
regulator-min-microvolt = <3300000>;
regulator-max-microvolt = <3300000>;
};
};
&be0 {
status = "okay";
};
&de {
status = "okay";
};
&tcon0 {
pinctrl-names = "default";
pinctrl-0 = <&lcd_rgb666_pins>;
status = "okay";
};
&tcon0_out {
tcon0_out_lcd: endpoint@0 {
reg = <0>;
remote-endpoint = <&panel_input>;
};
};
&mmc0 {
vmmc-supply = <®_vcc3v3>;
bus-width = <4>;
broken-cd;
status = "okay";
};
&uart0 {
pinctrl-names = "default";
pinctrl-0 = <&uart0_pe_pins>;
status = "okay";
};
&otg_sram {
status = "okay";
};
&usb_otg {
dr_mode = "otg";
status = "okay";
};
&spi0 {
pinctrl-names = "default";
pinctrl-0 = <&spi0_pins_a>;
status = "okay";
spi-max-frequency = <50000000>;
flash: w25q128@0 {
#address-cells = <1>;
#size-cells = <1>;
compatible = "winbond,w25q128", "jedec,spi-nor";
reg = <0>;
spi-max-frequency = <50000000>;
partitions {
compatible = "fixed-partitions";
#address-cells = <1>;
#size-cells = <1>;
partition@0 {
label = "u-boot";
reg = <0x000000 0x100000>;
read-only;
};
partition@100000 {
label = "dtb";
reg = <0x100000 0x10000>;
read-only;
};
partition@110000 {
label = "kernel";
reg = <0x110000 0x400000>;
read-only;
};
partition@510000 {
label = "rootfs";
reg = <0x510000 0xAF0000>;
};
};
};
};
&usbphy {
usb0_id_det-gpio = <&pio 4 2 GPIO_ACTIVE_HIGH>; /* PE2 */
status = "okay";
};离线
楼主 #46 2019-11-07 23:37:40 分享评论
Re: 尝试从零构建F1C100s开发环境
aaayao wrote:
加在下面这个位置,但是编译出错了。
/files/members/2261/QQ图片20191107223200.png
// SPDX-License-Identifier: (GPL-2.0+ OR X11) /* * Copyright 2018 Icenowy Zheng <icenowy@aosc.io> */ /dts-v1/; #include "suniv-f1c100s.dtsi" #include <dt-bindings/gpio/gpio.h> / { model = "Lichee Pi Nano"; compatible = "licheepi,licheepi-nano", "allwinner,suniv-f1c100s"; aliases { serial0 = &uart0; }; chosen { stdout-path = "serial0:115200n8"; }; panel: panel { compatible = "qiaodian,qd43003c0-40", "simple-panel"; #address-cells = <1>; #size-cells = <0>; enable-gpios = <&pio 4 6 GPIO_ACTIVE_HIGH>; power-supply = <®_vcc3v3>; port@0 { reg = <0>; #address-cells = <1>; #size-cells = <0>; panel_input: endpoint@0 { reg = <0>; remote-endpoint = <&tcon0_out_lcd>; }; }; }; reg_vcc3v3: vcc3v3 { compatible = "regulator-fixed"; regulator-name = "vcc3v3"; regulator-min-microvolt = <3300000>; regulator-max-microvolt = <3300000>; }; }; &be0 { status = "okay"; }; &de { status = "okay"; }; &tcon0 { pinctrl-names = "default"; pinctrl-0 = <&lcd_rgb666_pins>; status = "okay"; }; &tcon0_out { tcon0_out_lcd: endpoint@0 { reg = <0>; remote-endpoint = <&panel_input>; }; }; &mmc0 { vmmc-supply = <®_vcc3v3>; bus-width = <4>; broken-cd; status = "okay"; }; &uart0 { pinctrl-names = "default"; pinctrl-0 = <&uart0_pe_pins>; status = "okay"; }; &otg_sram { status = "okay"; }; &usb_otg { dr_mode = "otg"; status = "okay"; }; &spi0 { pinctrl-names = "default"; pinctrl-0 = <&spi0_pins_a>; status = "okay"; spi-max-frequency = <50000000>; flash: w25q128@0 { #address-cells = <1>; #size-cells = <1>; compatible = "winbond,w25q128", "jedec,spi-nor"; reg = <0>; spi-max-frequency = <50000000>; partitions { compatible = "fixed-partitions"; #address-cells = <1>; #size-cells = <1>; partition@0 { label = "u-boot"; reg = <0x000000 0x100000>; read-only; }; partition@100000 { label = "dtb"; reg = <0x100000 0x10000>; read-only; }; partition@110000 { label = "kernel"; reg = <0x110000 0x400000>; read-only; }; partition@510000 { label = "rootfs"; reg = <0x510000 0xAF0000>; }; }; }; }; &usbphy { usb0_id_det-gpio = <&pio 4 2 GPIO_ACTIVE_HIGH>; /* PE2 */ status = "okay"; };
代码比较工具对比了一下,一模一样,我上我这边的源码给你看看把。能力有限,你多折腾几遍,/笑/哈
linux内核源码链接: https://pan.baidu.com/s/1YpbDNFXn_2QdTh8YIcF_jg 提取码:bc35
最近编辑记录 LinjieGuo (2019-11-07 23:45:47)
离线
#48 2019-11-08 10:19:49 分享评论
- aaayao
- 会员
- 注册时间: 2019-10-30
- 已发帖子: 85
- 积分: 55
Re: 尝试从零构建F1C100s开发环境
LinjieGuo wrote:
aaayao wrote:
加在下面这个位置,但是编译出错了。
/files/members/2261/QQ图片20191107223200.png
// SPDX-License-Identifier: (GPL-2.0+ OR X11) /* * Copyright 2018 Icenowy Zheng <icenowy@aosc.io> */ /dts-v1/; #include "suniv-f1c100s.dtsi" #include <dt-bindings/gpio/gpio.h> / { model = "Lichee Pi Nano"; compatible = "licheepi,licheepi-nano", "allwinner,suniv-f1c100s"; aliases { serial0 = &uart0; }; chosen { stdout-path = "serial0:115200n8"; }; panel: panel { compatible = "qiaodian,qd43003c0-40", "simple-panel"; #address-cells = <1>; #size-cells = <0>; enable-gpios = <&pio 4 6 GPIO_ACTIVE_HIGH>; power-supply = <®_vcc3v3>; port@0 { reg = <0>; #address-cells = <1>; #size-cells = <0>; panel_input: endpoint@0 { reg = <0>; remote-endpoint = <&tcon0_out_lcd>; }; }; }; reg_vcc3v3: vcc3v3 { compatible = "regulator-fixed"; regulator-name = "vcc3v3"; regulator-min-microvolt = <3300000>; regulator-max-microvolt = <3300000>; }; }; &be0 { status = "okay"; }; &de { status = "okay"; }; &tcon0 { pinctrl-names = "default"; pinctrl-0 = <&lcd_rgb666_pins>; status = "okay"; }; &tcon0_out { tcon0_out_lcd: endpoint@0 { reg = <0>; remote-endpoint = <&panel_input>; }; }; &mmc0 { vmmc-supply = <®_vcc3v3>; bus-width = <4>; broken-cd; status = "okay"; }; &uart0 { pinctrl-names = "default"; pinctrl-0 = <&uart0_pe_pins>; status = "okay"; }; &otg_sram { status = "okay"; }; &usb_otg { dr_mode = "otg"; status = "okay"; }; &spi0 { pinctrl-names = "default"; pinctrl-0 = <&spi0_pins_a>; status = "okay"; spi-max-frequency = <50000000>; flash: w25q128@0 { #address-cells = <1>; #size-cells = <1>; compatible = "winbond,w25q128", "jedec,spi-nor"; reg = <0>; spi-max-frequency = <50000000>; partitions { compatible = "fixed-partitions"; #address-cells = <1>; #size-cells = <1>; partition@0 { label = "u-boot"; reg = <0x000000 0x100000>; read-only; }; partition@100000 { label = "dtb"; reg = <0x100000 0x10000>; read-only; }; partition@110000 { label = "kernel"; reg = <0x110000 0x400000>; read-only; }; partition@510000 { label = "rootfs"; reg = <0x510000 0xAF0000>; }; }; }; }; &usbphy { usb0_id_det-gpio = <&pio 4 2 GPIO_ACTIVE_HIGH>; /* PE2 */ status = "okay"; };代码比较工具对比了一下,一模一样,我上我这边的源码给你看看把。能力有限,你多折腾几遍,/笑/哈
linux内核源码链接: https://pan.baidu.com/s/1YpbDNFXn_2QdTh8YIcF_jg 提取码:bc35
感谢楼主提供的内核,编译通过了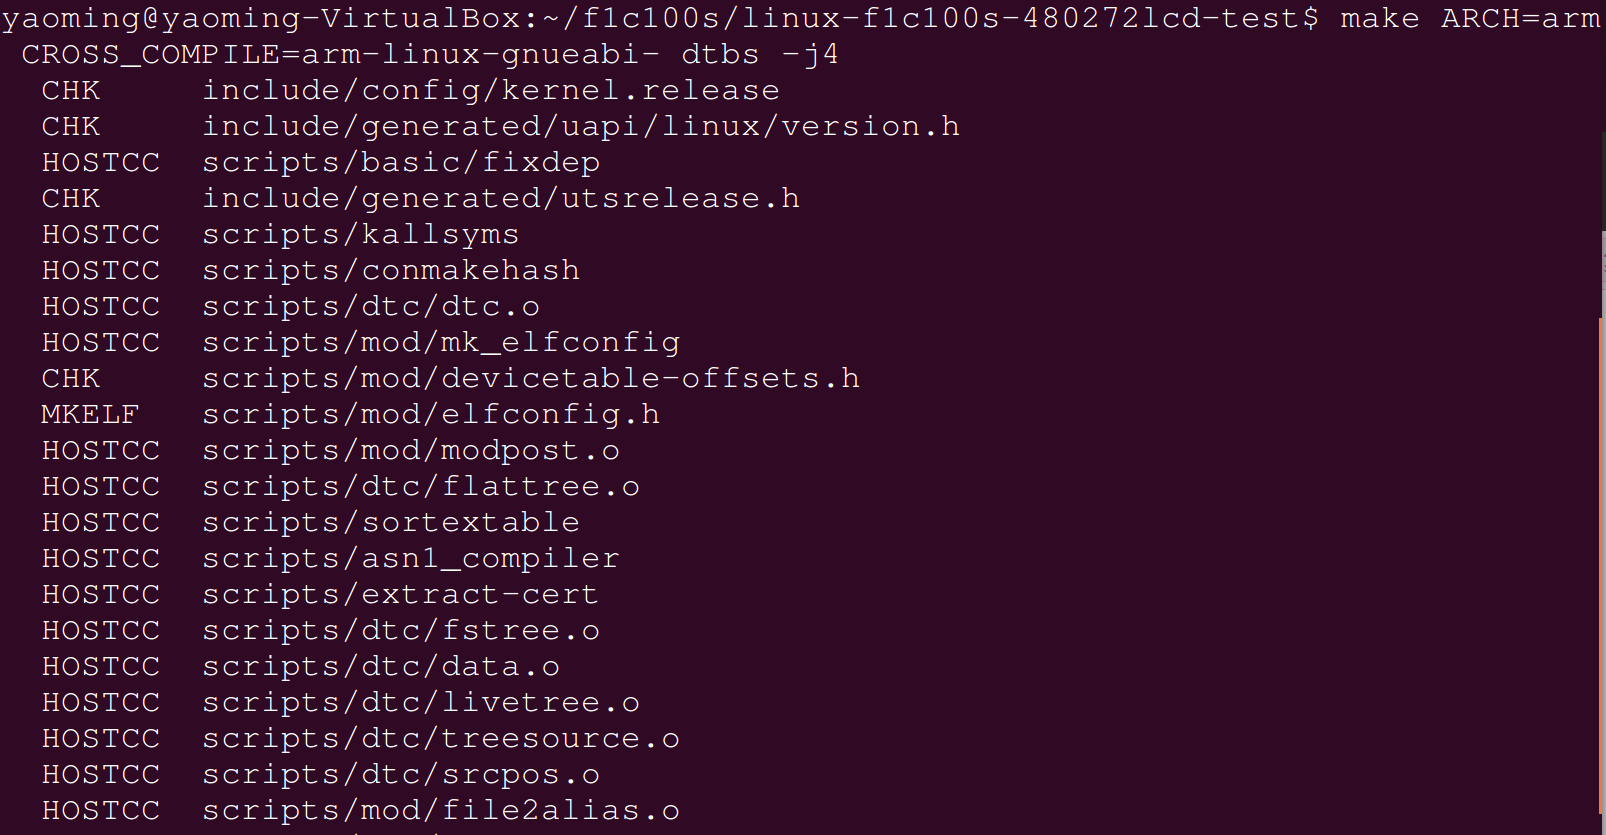
代码不同的地方是在suniv.dtsi里还有相关的SPI配置代码:
spi0: spi@1c05000 {
compatible = "allwinner,suniv-spi",
"allwinner,sun8i-h3-spi";
reg = <0x01c05000 0x1000>;
interrupts = <10>;
clocks = <&ccu CLK_BUS_SPI0>, <&ccu CLK_BUS_SPI0>;
clock-names = "ahb", "mod";
resets = <&ccu RST_BUS_SPI0>;
status = "disabled";
#address-cells = <1>;
#size-cells = <0>;
};
spi1: spi@1c06000 {
compatible = "allwinner,suniv-spi",
"allwinner,sun8i-h3-spi";
reg = <0x01c06000 0x1000>;
interrupts = <11>;
clocks = <&ccu CLK_BUS_SPI1>, <&ccu CLK_BUS_SPI1>;
clock-names = "ahb", "mod";
resets = <&ccu RST_BUS_SPI1>;
status = "disabled";
#address-cells = <1>;
#size-cells = <0>;
};
离线
#49 2019-11-08 10:34:38 分享评论
- aaayao
- 会员
- 注册时间: 2019-10-30
- 已发帖子: 85
- 积分: 55
Re: 尝试从零构建F1C100s开发环境
晕哥 wrote:
检查 "suniv-f1c100s.dtsi" 等包含文件里面有没有关于 spi0 的定义.
谢谢晕哥提醒,原来的这个内核在suniv-f1c100s.dtsi里没有发现SPI0的定义,增加定义后代码如下:
// SPDX-License-Identifier: (GPL-2.0+ OR X11)
/*
 * Copyright 2018 Icenowy Zheng <icenowy@aosc.io>
 * Copyright 2018 Mesih Kilinc <mesihkilinc@gmail.com>
 */

#include <dt-bindings/clock/suniv-ccu-f1c100s.h>
#include <dt-bindings/reset/suniv-ccu-f1c100s.h>

/ {
	#address-cells = <1>;
	#size-cells = <1>;
	interrupt-parent = <&intc>;

	clocks {
		osc24M: clk-24M {
			#clock-cells = <0>;
			compatible = "fixed-clock";
			clock-frequency = <24000000>;
			clock-output-names = "osc24M";
		};

		osc32k: clk-32k {
			#clock-cells = <0>;
			compatible = "fixed-clock";
			clock-frequency = <32768>;
			clock-output-names = "osc32k";
		};
	};

	cpus {
		cpu {
			compatible = "arm,arm926ej-s";
			device_type = "cpu";
		};
	};

	de: display-engine {
		compatible = "allwinner,suniv-f1c100s-display-engine";
		allwinner,pipelines = <&fe0>;
		status = "disabled";
	};

	soc {
		compatible = "simple-bus";
		#address-cells = <1>;
		#size-cells = <1>;
		ranges;

		sram-controller@1c00000 {
			compatible = "allwinner,suniv-f1c100s-system-control",
				     "allwinner,sun4i-a10-system-control";
			reg = <0x01c00000 0x30>;
			#address-cells = <1>;
			#size-cells = <1>;
			ranges;

			sram_d: sram@10000 {
				compatible = "mmio-sram";
				reg = <0x00010000 0x1000>;
				#address-cells = <1>;
				#size-cells = <1>;
				ranges = <0 0x00010000 0x1000>;

				otg_sram: sram-section@0 {
					compatible = "allwinner,suniv-f1c100s-sram-d",
						     "allwinner,sun4i-a10-sram-d";
					reg = <0x0000 0x1000>;
					status = "disabled";
				};
			};
		};

		spi0: spi@1c05000 {
			compatible = "allwinner,suniv-spi",
				     "allwinner,sun8i-h3-spi";
			reg = <0x01c05000 0x1000>;
			interrupts = <10>;
			clocks = <&ccu CLK_BUS_SPI0>, <&ccu CLK_BUS_SPI0>;
			clock-names = "ahb", "mod";
			resets = <&ccu RST_BUS_SPI0>;
			status = "disabled";
			#address-cells = <1>;
			#size-cells = <0>;
		};

		spi1: spi@1c06000 {
			compatible = "allwinner,suniv-spi",
				     "allwinner,sun8i-h3-spi";
			reg = <0x01c06000 0x1000>;
			interrupts = <11>;
			clocks = <&ccu CLK_BUS_SPI1>, <&ccu CLK_BUS_SPI1>;
			clock-names = "ahb", "mod";
			resets = <&ccu RST_BUS_SPI1>;
			status = "disabled";
			#address-cells = <1>;
			#size-cells = <0>;
		};
		tcon0: lcd-controller@1c0c000 {
			compatible = "allwinner,suniv-f1c100s-tcon";
			reg = <0x01c0c000 0x1000>;
			interrupts = <29>;
			clocks = <&ccu CLK_BUS_LCD>,
				 <&ccu CLK_TCON>;
			clock-names = "ahb",
				      "tcon-ch0";
			clock-output-names = "tcon-pixel-clock";
			resets = <&ccu RST_BUS_LCD>;
			reset-names = "lcd";
			status = "disabled";

			ports {
				#address-cells = <1>;
				#size-cells = <0>;

				tcon0_in: port@0 {
					#address-cells = <1>;
					#size-cells = <0>;
					reg = <0>;

					tcon0_in_be0: endpoint@0 {
						reg = <0>;
						remote-endpoint = <&be0_out_tcon0>;
					};
				};

				tcon0_out: port@1 {
					#address-cells = <1>;
					#size-cells = <0>;
					reg = <1>;
				};
			};
		};

		ccu: clock@1c20000 {
			compatible = "allwinner,suniv-f1c100s-ccu";
			reg = <0x01c20000 0x400>;
			clocks = <&osc24M>, <&osc32k>;
			clock-names = "hosc", "losc";
			#clock-cells = <1>;
			#reset-cells = <1>;
		};

		intc: interrupt-controller@1c20400 {
			compatible = "allwinner,suniv-f1c100s-ic";
			reg = <0x01c20400 0x400>;
			interrupt-controller;
			#interrupt-cells = <1>;
		};

		pio: pinctrl@1c20800 {
			compatible = "allwinner,suniv-f1c100s-pinctrl";
			reg = <0x01c20800 0x400>;
			interrupts = <38>, <39>, <40>;
			clocks = <&ccu CLK_BUS_PIO>, <&osc24M>, <&osc32k>;
			clock-names = "apb", "hosc", "losc";
			gpio-controller;
			interrupt-controller;
			#interrupt-cells = <3>;
			#gpio-cells = <3>;

			uart0_pe_pins: uart0-pe-pins {
				pins = "PE0", "PE1";
				function = "uart0";
			};

			lcd_rgb666_pins: lcd-rgb666-pins {
				pins = "PD0", "PD1", "PD2", "PD3", "PD4",
				       "PD5", "PD6", "PD7", "PD8", "PD9",
				       "PD10", "PD11", "PD12", "PD13", "PD14",
				       "PD15", "PD16", "PD17", "PD18", "PD19",
				       "PD20", "PD21";
				function = "lcd";
			};

			mmc0_pins: mmc0-pins {
				pins = "PF0", "PF1", "PF2", "PF3", "PF4", "PF5";
				function = "mmc0";
			};
		};

		timer@1c20c00 {
			compatible = "allwinner,suniv-f1c100s-timer";
			reg = <0x01c20c00 0x90>;
			interrupts = <13>;
			clocks = <&osc24M>;
		};

		mmc0: mmc@1c0f000 {
			compatible = "allwinner,suniv-f1c100s-mmc",
				     "allwinner,sun7i-a20-mmc";
			reg = <0x01c0f000 0x1000>;
			clocks = <&ccu CLK_BUS_MMC0>,
				 <&ccu CLK_MMC0>,
				 <&ccu CLK_MMC0_OUTPUT>,
				 <&ccu CLK_MMC0_SAMPLE>;
			clock-names = "ahb",
					      "mmc",
					      "output",
				    	  "sample";
			resets = <&ccu RST_BUS_MMC0>;
			reset-names = "ahb";
			interrupts = <23>;
			pinctrl-names = "default";
			pinctrl-0 = <&mmc0_pins>;
			status = "disabled";
			#address-cells = <1>;
			#size-cells = <0>;
		};

		wdt: watchdog@1c20ca0 {
			compatible = "allwinner,suniv-f1c100s-wdt",
				     "allwinner,sun4i-a10-wdt";
			reg = <0x01c20ca0 0x20>;
		};

		uart0: serial@1c25000 {
			compatible = "snps,dw-apb-uart";
			reg = <0x01c25000 0x400>;
			interrupts = <1>;
			reg-shift = <2>;
			reg-io-width = <4>;
			clocks = <&ccu CLK_BUS_UART0>;
			resets = <&ccu RST_BUS_UART0>;
			status = "disabled";
		};

		uart1: serial@1c25400 {
			compatible = "snps,dw-apb-uart";
			reg = <0x01c25400 0x400>;
			interrupts = <2>;
			reg-shift = <2>;
			reg-io-width = <4>;
			clocks = <&ccu CLK_BUS_UART1>;
			resets = <&ccu RST_BUS_UART1>;
			status = "disabled";
		};

		uart2: serial@1c25800 {
			compatible = "snps,dw-apb-uart";
			reg = <0x01c25800 0x400>;
			interrupts = <3>;
			reg-shift = <2>;
			reg-io-width = <4>;
			clocks = <&ccu CLK_BUS_UART2>;
			resets = <&ccu RST_BUS_UART2>;
			status = "disabled";
		};
		usb_otg: usb@1c13000 {
			compatible = "allwinner,suniv-musb";
			reg = <0x01c13000 0x0400>;
			clocks = <&ccu CLK_BUS_OTG>;
			resets = <&ccu RST_BUS_OTG>;
			interrupts = <26>;
			interrupt-names = "mc";
			phys = <&usbphy 0>;
			phy-names = "usb";
			extcon = <&usbphy 0>;
			allwinner,sram = <&otg_sram 1>;
			status = "disabled";
		};

		usbphy: phy@1c13400 {
			compatible = "allwinner,suniv-usb-phy";
			reg = <0x01c13400 0x10>;
			reg-names = "phy_ctrl";
			clocks = <&ccu CLK_USB_PHY0>;
			clock-names = "usb0_phy";
			resets = <&ccu RST_USB_PHY0>;
			reset-names = "usb0_reset";
			#phy-cells = <1>;
			status = "disabled";
		};
		fe0: display-frontend@1e00000 {
			compatible = "allwinner,suniv-f1c100s-display-frontend";
			reg = <0x01e00000 0x20000>;
			interrupts = <30>;
			clocks = <&ccu CLK_BUS_DE_FE>, <&ccu CLK_DE_FE>,
				 <&ccu CLK_DRAM_DE_FE>;
			clock-names = "ahb", "mod",
				      "ram";
			resets = <&ccu RST_BUS_DE_FE>;
			status = "disabled";

			ports {
				#address-cells = <1>;
				#size-cells = <0>;

				fe0_out: port@1 {
					#address-cells = <1>;
					#size-cells = <0>;
					reg = <1>;

					fe0_out_be0: endpoint@0 {
						reg = <0>;
						remote-endpoint = <&be0_in_fe0>;
					};
				};
			};
		};

		be0: display-backend@1e60000 {
			compatible = "allwinner,suniv-f1c100s-display-backend";
			reg = <0x01e60000 0x10000>;
			reg-names = "be";
			interrupts = <31>;
			clocks = <&ccu CLK_BUS_DE_BE>, <&ccu CLK_DE_BE>,
				 <&ccu CLK_DRAM_DE_BE>;
			clock-names = "ahb", "mod",
				      "ram";
			resets = <&ccu RST_BUS_DE_BE>;
			reset-names = "be";
			assigned-clocks = <&ccu CLK_DE_BE>;
			assigned-clock-rates = <300000000>;

			ports {
				#address-cells = <1>;
				#size-cells = <0>;

				be0_in: port@0 {
					#address-cells = <1>;
					#size-cells = <0>;
					reg = <0>;

					be0_in_fe0: endpoint@0 {
						reg = <0>;
						remote-endpoint = <&fe0_out_be0>;
					};
				};

				be0_out: port@1 {
					#address-cells = <1>;
					#size-cells = <0>;
					reg = <1>;

					be0_out_tcon0: endpoint@0 {
						reg = <0>;
						remote-endpoint = <&tcon0_in_be0>;
					};
				};
			};
		};
	};
};
但是编译还是出错:
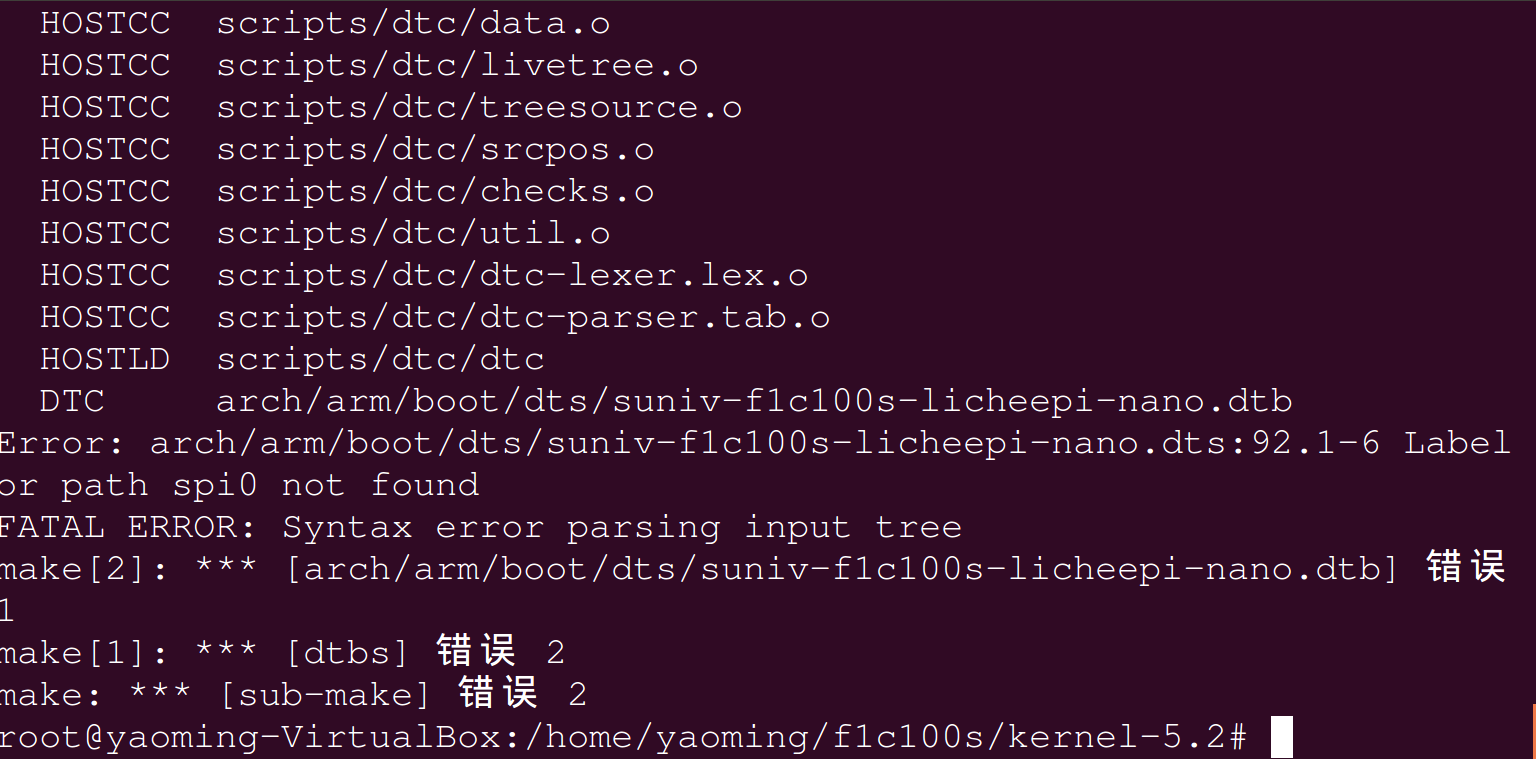
yaoming@yaoming-VirtualBox:~/f1c100s/linux$ make ARCH=arm CROSS_COMPILE=arm-linux-gnueabi- dtbs -j4
  DTC     arch/arm/boot/dts/suniv-f1c100s-licheepi-nano.dtb
arch/arm/boot/dts/suniv-f1c100s.dtsi:74.21-85.5: ERROR (phandle_references): /soc/spi@1c05000: Reference to non-existent node or label "spi0_pins_a"

  also defined at arch/arm/boot/dts/suniv-f1c100s-licheepi-nano.dts:92.7-132.3
ERROR: Input tree has errors, aborting (use -f to force output)
make[2]: *** [arch/arm/boot/dts/suniv-f1c100s-licheepi-nano.dtb] 错误 2
make[1]: *** [dtbs] 错误 2
make: *** [sub-make] 错误 2
离线
#50 2019-11-08 10:50:12 分享评论
- smartcar
- 会员
- 注册时间: 2018-02-19
- 已发帖子: 735
- 积分: 735
Re: 尝试从零构建F1C100s开发环境
看错误提示, 缺 SPI 的引脚定义: spi0_pins_a
离线
#51 2019-11-08 14:28:15 分享评论
- aaayao
- 会员
- 注册时间: 2019-10-30
- 已发帖子: 85
- 积分: 55
Re: 尝试从零构建F1C100s开发环境
smartcar wrote:
看错误提示, 缺 SPI 的引脚定义: spi0_pins_a
谢谢提醒,补上了引脚定义,编译通过了
spi0_pins_a: spi0-pins-pc {
pins = "PC0", "PC1", "PC2", "PC3";
function = "spi0";
};
离线
#52 2019-11-08 16:14:50 分享评论
- xrff_z
- 会员
- 注册时间: 2019-10-10
- 已发帖子: 26
- 积分: 26
Re: 尝试从零构建F1C100s开发环境
楼主你好。能不能把那个交叉编译工具链 转发一下,下了一天都没有弄下来。
离线
楼主 #53 2019-11-09 00:33:35 分享评论
#54 2019-11-09 11:14:16 分享评论
- aaayao
- 会员
- 注册时间: 2019-10-30
- 已发帖子: 85
- 积分: 55
Re: 尝试从零构建F1C100s开发环境
烧录又遇到问题了,在WIN10下安装了USB驱动,但是烧录时提示找不到设备?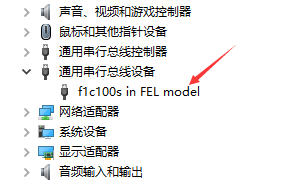
离线
#55 2019-11-09 11:17:56 分享评论
- aaayao
- 会员
- 注册时间: 2019-10-30
- 已发帖子: 85
- 积分: 55
Re: 尝试从零构建F1C100s开发环境
Zadig显示的USB ID是对的,驱动也装上了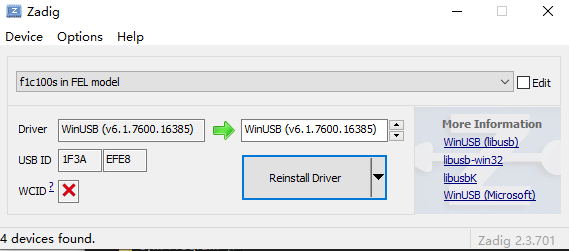
离线
#56 2019-11-09 14:59:45 分享评论
- 大帅
- 会员

- 注册时间: 2019-01-17
- 已发帖子: 169
- 积分: 128.5
Re: 尝试从零构建F1C100s开发环境
谢谢分享,可以制作成一个教材了。
最近编辑记录 大帅 (2019-11-09 15:00:06)
离线
#58 2019-11-09 16:58:54 分享评论
- aaayao
- 会员
- 注册时间: 2019-10-30
- 已发帖子: 85
- 积分: 55
Re: 尝试从零构建F1C100s开发环境
晕哥 wrote:
@aaayao 换win7 电脑试一试
谢谢晕哥提醒,换了另一台WIN10 64位电脑,烧录正常了,但是烧写速度实在也太慢啦!SPIFLASH是W25Q128

离线
#60 2019-11-09 21:27:13 分享评论
- aaayao
- 会员
- 注册时间: 2019-10-30
- 已发帖子: 85
- 积分: 55
Re: 尝试从零构建F1C100s开发环境
启动不了,烧录显示正常的,但FLASH读出来全是0,这个是使用32M的烧录程序,我的FLASH是W25Q128,16M的,可能是这样引起出错了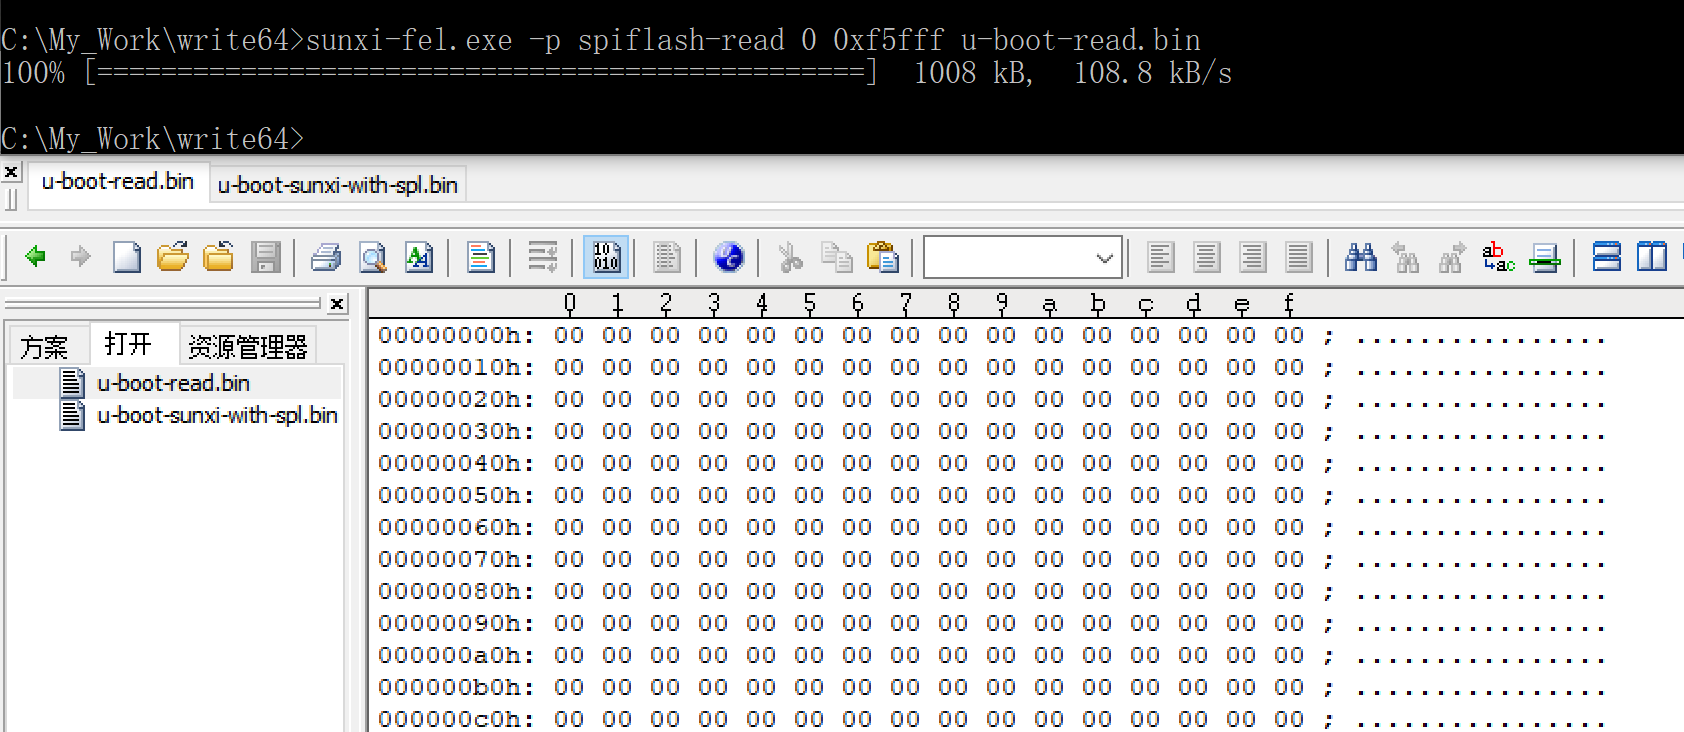
另外,如果使用16M的烧录程序,就会出错,烧录不了,读也不行,能测试一下16M的烧录程序是那里有问题吗?
最后还发现一个问题,就是外接了USB HUB之后,烧录会提示找不到USB设备,但在WIN的设备管理器里是能看到USB设备的,这个有办法解决吗?
离线
#61 2019-11-09 21:33:09 分享评论
- aaayao
- 会员
- 注册时间: 2019-10-30
- 已发帖子: 85
- 积分: 55
Re: 尝试从零构建F1C100s开发环境
楼主,请问是用25Q128吗?也是用那个16M的烧录程序吗?
离线
#62 2019-11-09 21:57:44 分享评论
- 晕哥
- 管理员

- 所在地: wechat: whycan_cn
- 注册时间: 2017-09-06
- 已发帖子: 9,492
- 积分: 9207
Re: 尝试从零构建F1C100s开发环境
@aaayao https://whycan.cn/t_444.html 下载1楼最底下那个
----------------------------------------------------------------------
以下是 2018-12-19 更新 (16楼):为了不再给大家造成困扰,我把文件重新整理了 V3s 和 F1C100s 两个文件夹,
离线
#63 2019-11-10 08:27:37 分享评论
- aaayao
- 会员
- 注册时间: 2019-10-30
- 已发帖子: 85
- 积分: 55
Re: 尝试从零构建F1C100s开发环境
晕哥 wrote:
@aaayao https://whycan.cn/t_444.html 下载1楼最底下那个
----------------------------------------------------------------------
以下是 2018-12-19 更新 (16楼):为了不再给大家造成困扰,我把文件重新整理了 V3s 和 F1C100s 两个文件夹,
这个接USB HUB之后可以读写了,但是写入之后读出来,还是全0? 难道要换个W25Q256吗?
离线
#64 2019-11-10 08:39:10 分享评论
- aaayao
- 会员
- 注册时间: 2019-10-30
- 已发帖子: 85
- 积分: 55
Re: 尝试从零构建F1C100s开发环境
这个程序能烧32M的,那也可以烧16M的吗?
我试了烧W25Q128,烧进去正常,但是读出来全部为0。
离线
#66 2019-11-10 12:23:51 分享评论
- aaayao
- 会员
- 注册时间: 2019-10-30
- 已发帖子: 85
- 积分: 55
Re: 尝试从零构建F1C100s开发环境
不用短路FLASH 1、2脚,插上USB就可以烧录和读取,当短路1、2脚再插USB,也是一样的结果
离线
楼主 #67 2019-11-10 13:27:02 分享评论
Re: 尝试从零构建F1C100s开发环境
8 编译裸机程序
获取大神网友(达克罗德)的项目:
帖子: https://whycan.cn/t_1457.html
8.1 获取裸机工程包
下载: /files/members/729/minimal_f1c100s_framebuffer.zip
上传到ubuntu的f1c100s目录下。
8.2 解压
unzip minimal_f1c100s_framebuffer.zip
8.3 编译
cd minimal_f1c100s
make
产生以下log:
-------------------------------------------------------
book@book-virtual-machine:~/f1c100s/minimal_f1c100s$ make
mkdir -p build/
mkdir -p build/arch/arm32/lib/
mkdir -p build/driver/
mkdir -p build/lib/
mkdir -p build/machine/
CC main.c
arm-eabi-gcc -Imachine/include -Iarch/arm32/include -Idriver/include -Ilib -march=armv5te -mtune=arm926ej-s -mfloat-abi=soft -marm -mno-thumb-interwork -g -ggdb -Wall -O3 -ffreestanding -std=gnu99 -D__ARM32_ARCH__=5 -D__ARM926EJS__ -c -MD -o build/main.o main.c
make: arm-eabi-gcc: Command not found
Makefile:104: recipe for target 'build/main.o' failed
make: *** [build/main.o] Error 127
book@book-virtual-machine:~/f1c100s/minimal_f1c100s$
-------------------------------------------------------
处理方法
(1)安装编译工具
sudo apt-get install gcc-arm-none-eabi
(2)修改Makefile
vi Makefile
修改"CROSS_COMPILE = arm-enbi-" --> "CROSS_COMPILE ?= arm-enbi-"
(3) 再次编译
CROSS_COMPILE=arm-none-eabi- make
看起来编译出bin文件了,但是仍然有提示错误。
-------------------------------------------------------
copy from build/firmware.elf' [elf32-littlearm] to build/firmware.bin' [binary]
Make header information for brom booting
make: execvp: tools/mksunxi/mksunxi: 权限不够
Makefile:73: recipe for target 'build/firmware.bin' failed
make: *** [build/firmware.bin] Error 127
-------------------------------------------------------
既然权限不够,就给他权限:
cd tools/mksunxi
sudo chmod 777 mksunxi
继续编译:
CROSS_COMPILE=arm-none-eabi- make
-------------------------------------------------------
book@book-virtual-machine:~/f1c100s/minimal_f1c100s$ CROSS_COMPILE=arm-none-eabi- make
arm-none-eabi-objcopy -v -O binary build/firmware.elf build/firmware.bin
copy from build/firmware.elf' [elf32-littlearm] to build/firmware.bin' [binary]
Make header information for brom booting
bootloader size= 1800
The bootloader head has been fixed
-------------------------------------------------------
8.4 烧写验证
离线
#68 2019-11-10 22:36:13 分享评论
- aaayao
- 会员
- 注册时间: 2019-10-30
- 已发帖子: 85
- 积分: 55
Re: 尝试从零构建F1C100s开发环境
楼主,你好:
能提供一下你的SPI FLASH的型号和规格书吗?我这板子估计是FLASH出问题了。
离线
楼主 #69 2019-11-11 09:11:21 分享评论
#70 2019-11-11 09:48:35 分享评论
- aaayao
- 会员
- 注册时间: 2019-10-30
- 已发帖子: 85
- 积分: 55
Re: 尝试从零构建F1C100s开发环境
晕哥 wrote:
可以烧, 你是不是 spi flash 引脚一直都下拉了?进入FEL 就不能下拉.
晕哥,我这个NANO板子,SPI FLASH引脚不短接,插上USB就直接识别为FEL模式,这个会是什么问题?
离线
#71 2019-11-11 09:51:35 分享评论
- aaayao
- 会员
- 注册时间: 2019-10-30
- 已发帖子: 85
- 积分: 55
Re: 尝试从零构建F1C100s开发环境
LinjieGuo wrote:
aaayao wrote:
楼主,你好:
能提供一下你的SPI FLASH的型号和规格书吗?我这板子估计是FLASH出问题了。我这里用的是winband 25Q128JV50,容量为16MB,应该跟flash无关,淘宝随便买两片,容量一样即可。
我的也是在淘宝是购买的,型号和楼主的一样。
楼主你这个能正常启动的NANO板子,只插上USB到电脑,电脑会识别成FEL模式吗?不短接FLASH引脚的情况下。
离线
#73 2019-11-11 15:10:10 分享评论
- aaayao
- 会员
- 注册时间: 2019-10-30
- 已发帖子: 85
- 积分: 55
Re: 尝试从零构建F1C100s开发环境
晕哥 wrote:
那是因为你的程序没烧进去,所以再次插入,按流程又进入了usb fel,你现在需要解决为什么没有烧录进去
整到无办法了,能读写,但是读出来全是0。

现在只能试试在LINUX下面烧写。
最近编辑记录 aaayao (2019-11-11 15:10:38)
离线
#74 2019-11-11 15:14:43 分享评论
- weiyongwill
- 会员
- 注册时间: 2019-08-08
- 已发帖子: 65
- 积分: 28.5
Re: 尝试从零构建F1C100s开发环境
一次性过了,应该是成功了,串口还没接,显示屏上显示了一个光标在闪烁
离线
#75 2019-11-11 16:11:45 分享评论
- aaayao
- 会员
- 注册时间: 2019-10-30
- 已发帖子: 85
- 积分: 55
Re: 尝试从零构建F1C100s开发环境
楼主,你的是NANO板子吗?FLASH是买回来就焊好的吗?
我这个是买回来要自己焊的FLASH,不知道硬件上会不会有问题?
离线
#77 2019-11-11 17:34:22 分享评论
- aaayao
- 会员
- 注册时间: 2019-10-30
- 已发帖子: 85
- 积分: 55
Re: 尝试从零构建F1C100s开发环境
晕哥 wrote:
注意引脚,不要反了,芯片有个小凹槽的是第一脚。
如果你实在不确定的话,可以买widora的板子,今天包邮,自带了TTL调试,boot键,reset键,焊好了flash。
晕哥,刚刚拍了一套,等收到看看是不是硬件的问题了。
离线
楼主 #78 2019-11-11 19:05:04 分享评论
Re: 尝试从零构建F1C100s开发环境
aaayao wrote:
楼主,你的是NANO板子吗?FLASH是买回来就焊好的吗?
我这个是买回来要自己焊的FLASH,不知道硬件上会不会有问题?
/files/members/2261/QQ图片20191111160826.jpg
我这里有2个板子,自己做的,还有荔枝派nano,测试都是成功的呢。
离线
#79 2019-11-12 11:26:13 分享评论
- wps_90
- 会员
- 注册时间: 2019-11-10
- 已发帖子: 10
- 积分: 0
Re: 尝试从零构建F1C100s开发环境
能重新打包一个放上来吗,完整能路起来的
离线
#80 2019-11-12 15:29:02 分享评论
- xrff_z
- 会员
- 注册时间: 2019-10-10
- 已发帖子: 26
- 积分: 26
Re: 尝试从零构建F1C100s开发环境
LinjieGuo wrote:
xrff_z wrote:
楼主你好。能不能把那个交叉编译工具链 转发一下,下了一天都没有弄下来。
链接:https://pan.baidu.com/s/1j7KIMbqPl8o1zI-VtAu2KQ 提取码:zopc
非常感谢:)
离线
楼主 #81 2019-11-13 10:44:58 分享评论
#83 2019-11-13 17:34:08 分享评论
- aaayao
- 会员
- 注册时间: 2019-10-30
- 已发帖子: 85
- 积分: 55
Re: 尝试从零构建F1C100s开发环境
原来的板子果然是有问题,现在新的板子可以读写,终于能见到串口启到到U-BOOT了,但是卡在最前面。

离线
#84 2019-11-13 17:46:18 分享评论
- 超级萌新
- 会员
- 注册时间: 2018-05-04
- 已发帖子: 408
- 积分: 407
Re: 尝试从零构建F1C100s开发环境
这个是什么板子呢?
离线
#85 2019-11-13 20:53:56 分享评论
- aaayao
- 会员
- 注册时间: 2019-10-30
- 已发帖子: 85
- 积分: 55
Re: 尝试从零构建F1C100s开发环境
换回W25Q128,启动终于成成了!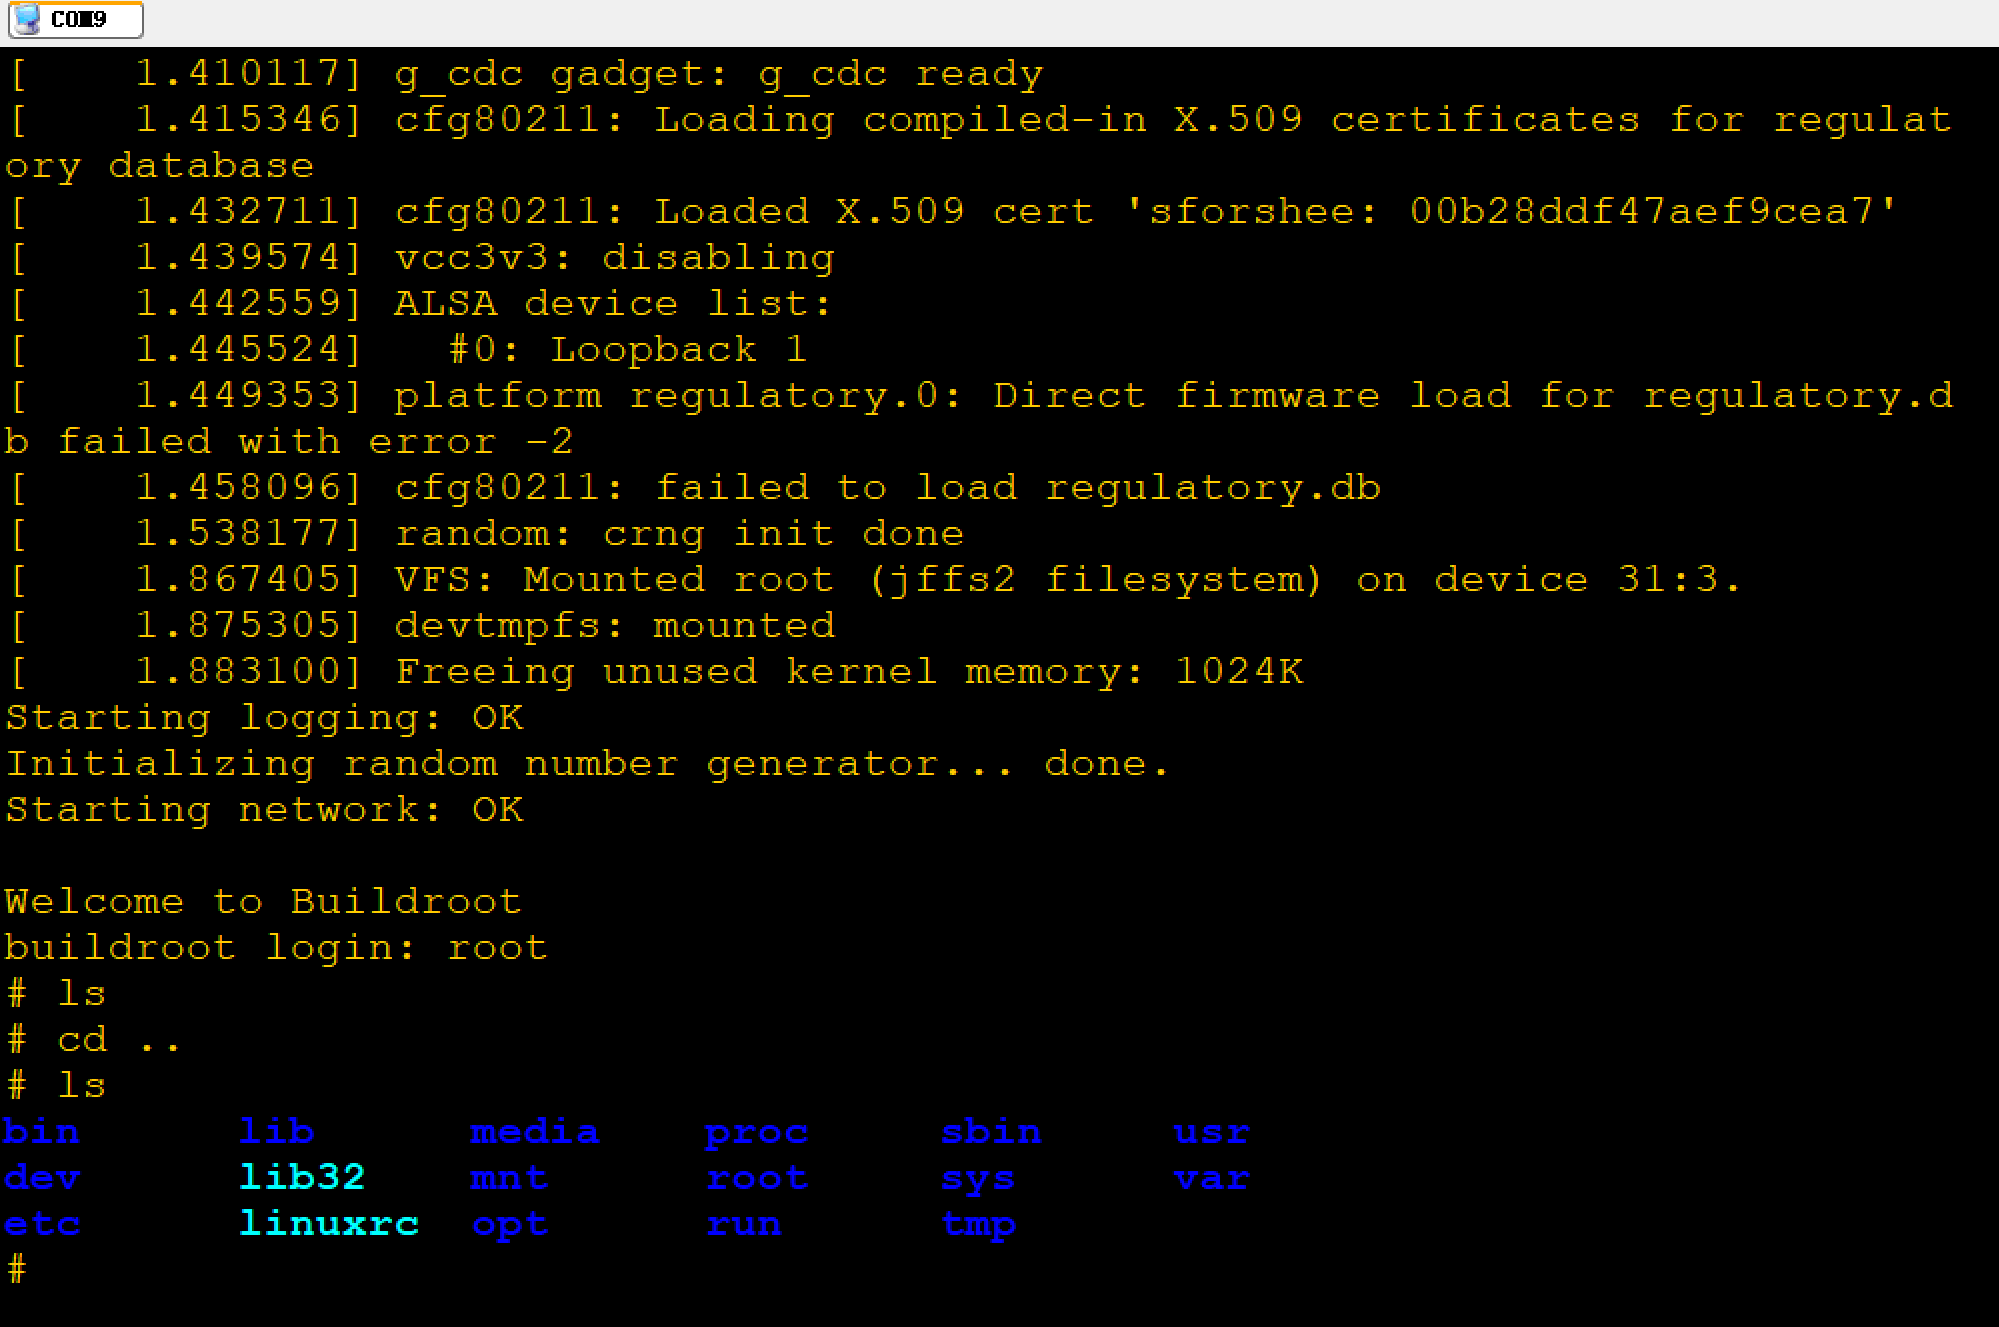
离线
#86 2019-11-13 21:26:33 分享评论
- aaayao
- 会员
- 注册时间: 2019-10-30
- 已发帖子: 85
- 积分: 55
Re: 尝试从零构建F1C100s开发环境
查看CPU实时运行频率,用什么命令呢?
离线
楼主 #87 2019-11-14 10:31:36 分享评论
#88 2019-11-17 22:12:10 分享评论
- surmountliu
- 会员
- 注册时间: 2019-11-04
- 已发帖子: 8
- 积分: 3
Re: 尝试从零构建F1C100s开发环境
这个要成熟的应用,估计得要小半年的跟新,?
离线
#89 2019-11-19 16:03:14 分享评论
- ned
- 会员
- 注册时间: 2019-11-15
- 已发帖子: 7
- 积分: 7
Re: 尝试从零构建F1C100s开发环境
我已经按照LinjieGuo的挖坑步骤 走到烧录这一步了,已经生成f1c100s_spiflash_16M.bin 但是卡壳在如何通过sunxi-fel 烧录了。恳请大家指点帮忙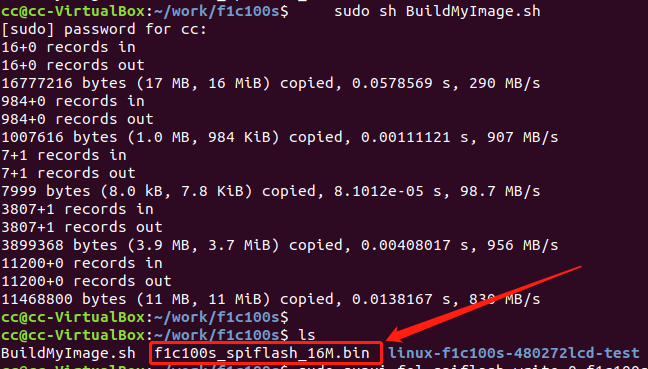
最近编辑记录 ned (2019-11-19 16:09:51)
离线
#91 2019-11-19 16:20:30 分享评论
- ned
- 会员
- 注册时间: 2019-11-15
- 已发帖子: 7
- 积分: 7
Re: 尝试从零构建F1C100s开发环境
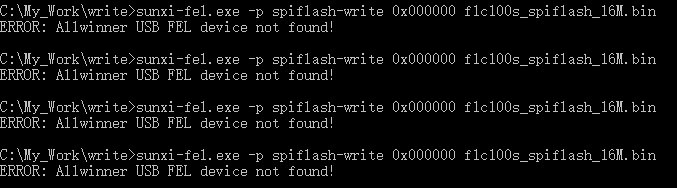
测试了 ./sunxi-fel -p spiflash-info指令:
好像是有返回的
离线
#93 2019-11-19 16:49:35 分享评论
- ned
- 会员
- 注册时间: 2019-11-15
- 已发帖子: 7
- 积分: 7
Re: 尝试从零构建F1C100s开发环境
嗯嗯 感谢晕哥!刚刚我也使用这个指令烧录成功了!复位看一下控制台 哈哈
离线
#94 2019-11-19 17:57:02 分享评论
- ned
- 会员
- 注册时间: 2019-11-15
- 已发帖子: 7
- 积分: 7
Re: 尝试从零构建F1C100s开发环境
经过几天的奋战,貌似已经成功启动啦!!!
480*272的TFT上有个光标在闪烁,难道是已经有TFT的驱动在里面了?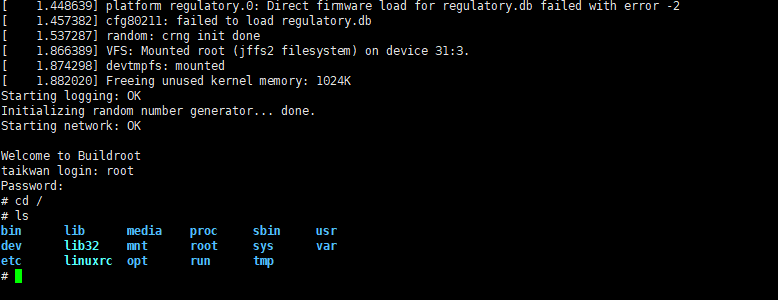
离线
#96 2019-11-20 22:11:23 分享评论
- aaayao
- 会员
- 注册时间: 2019-10-30
- 已发帖子: 85
- 积分: 55
Re: 尝试从零构建F1C100s开发环境
重新生成BIN文件,再烧录,到VFS系统这里就出错了;重做了rootfs系统,再生成BIN文件,还是一样的出错,不知道那里出问题了?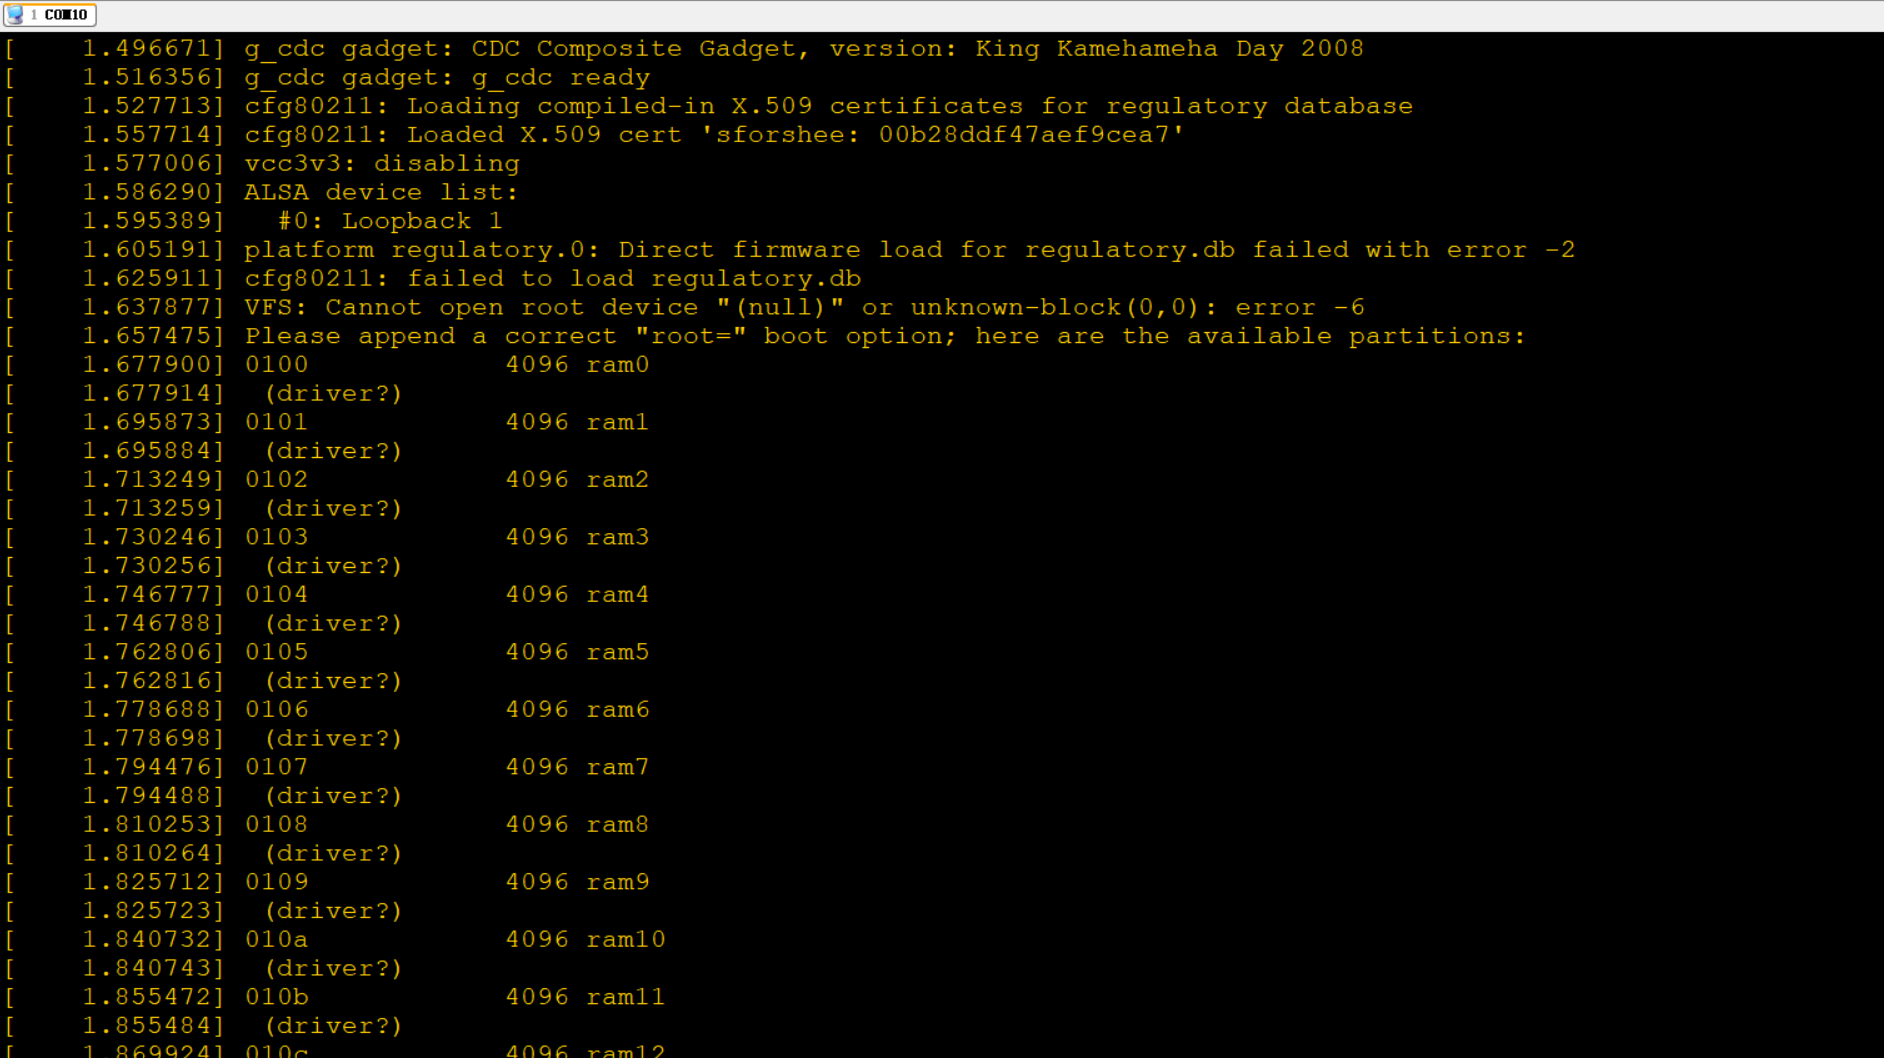
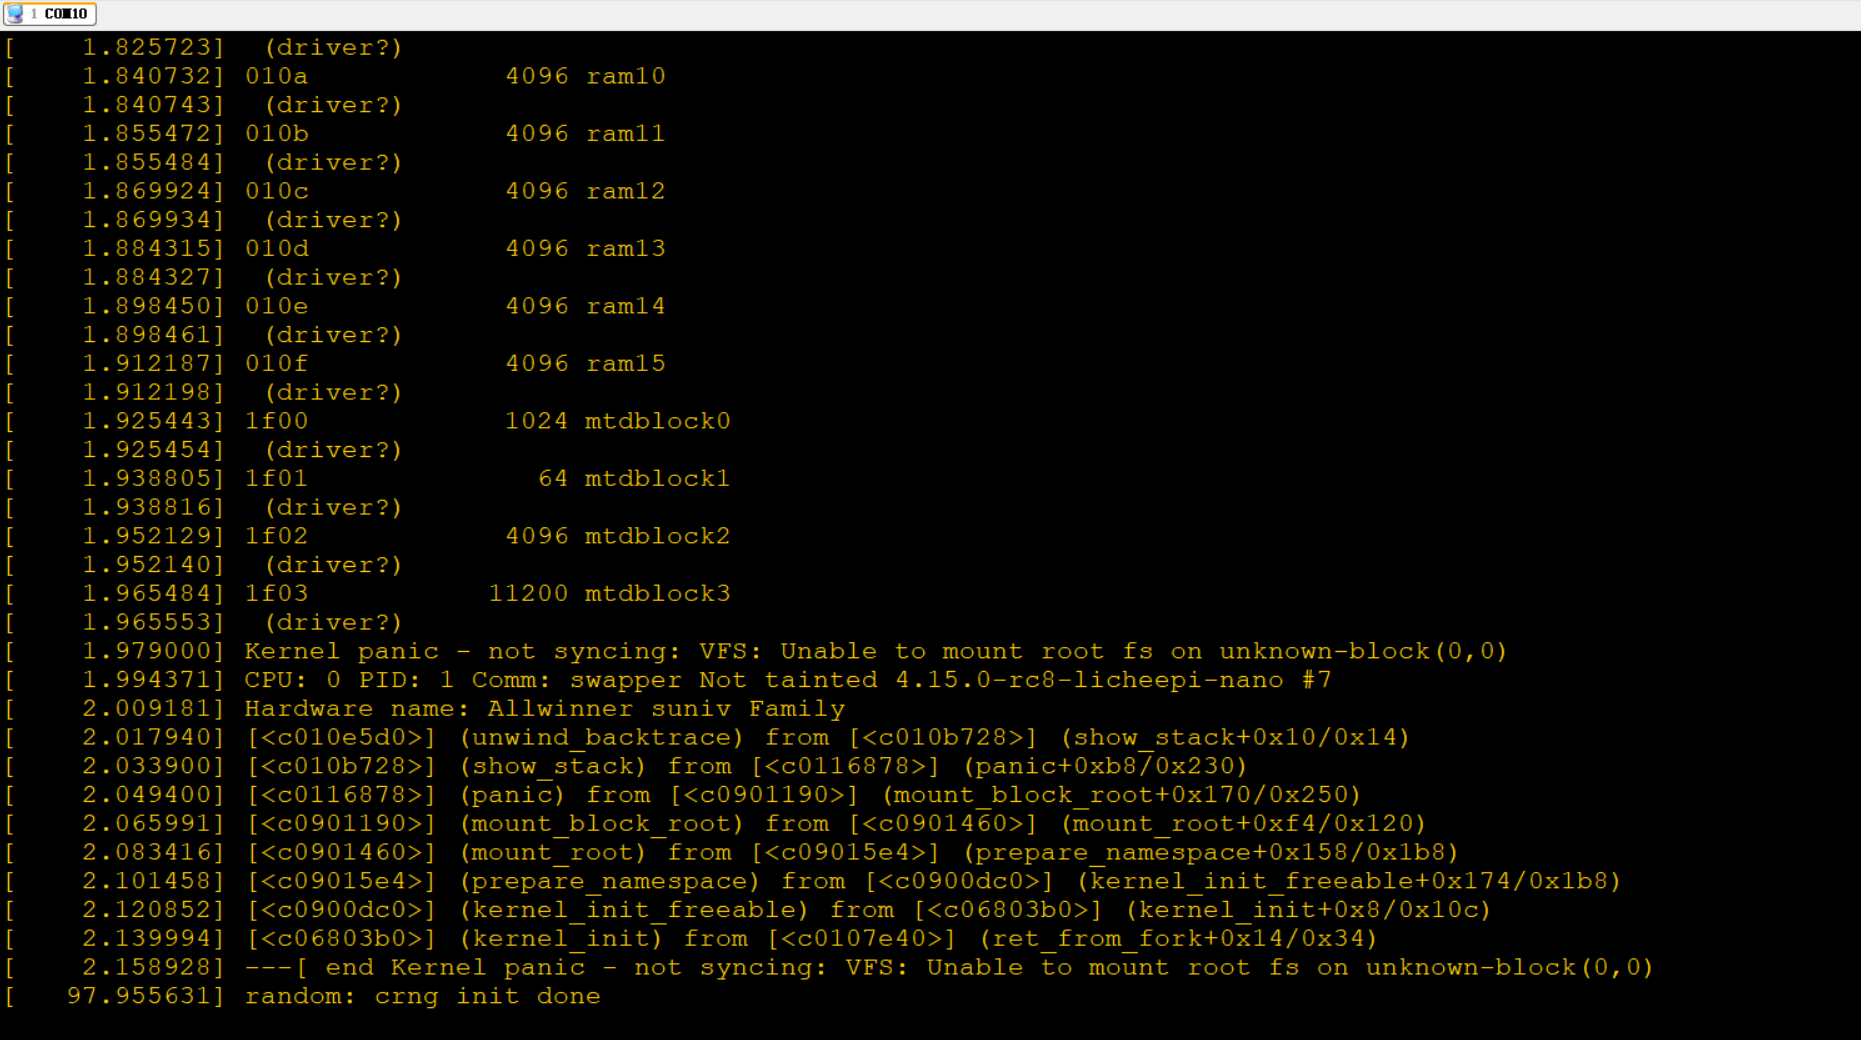
在LCD上也可以看到出错信息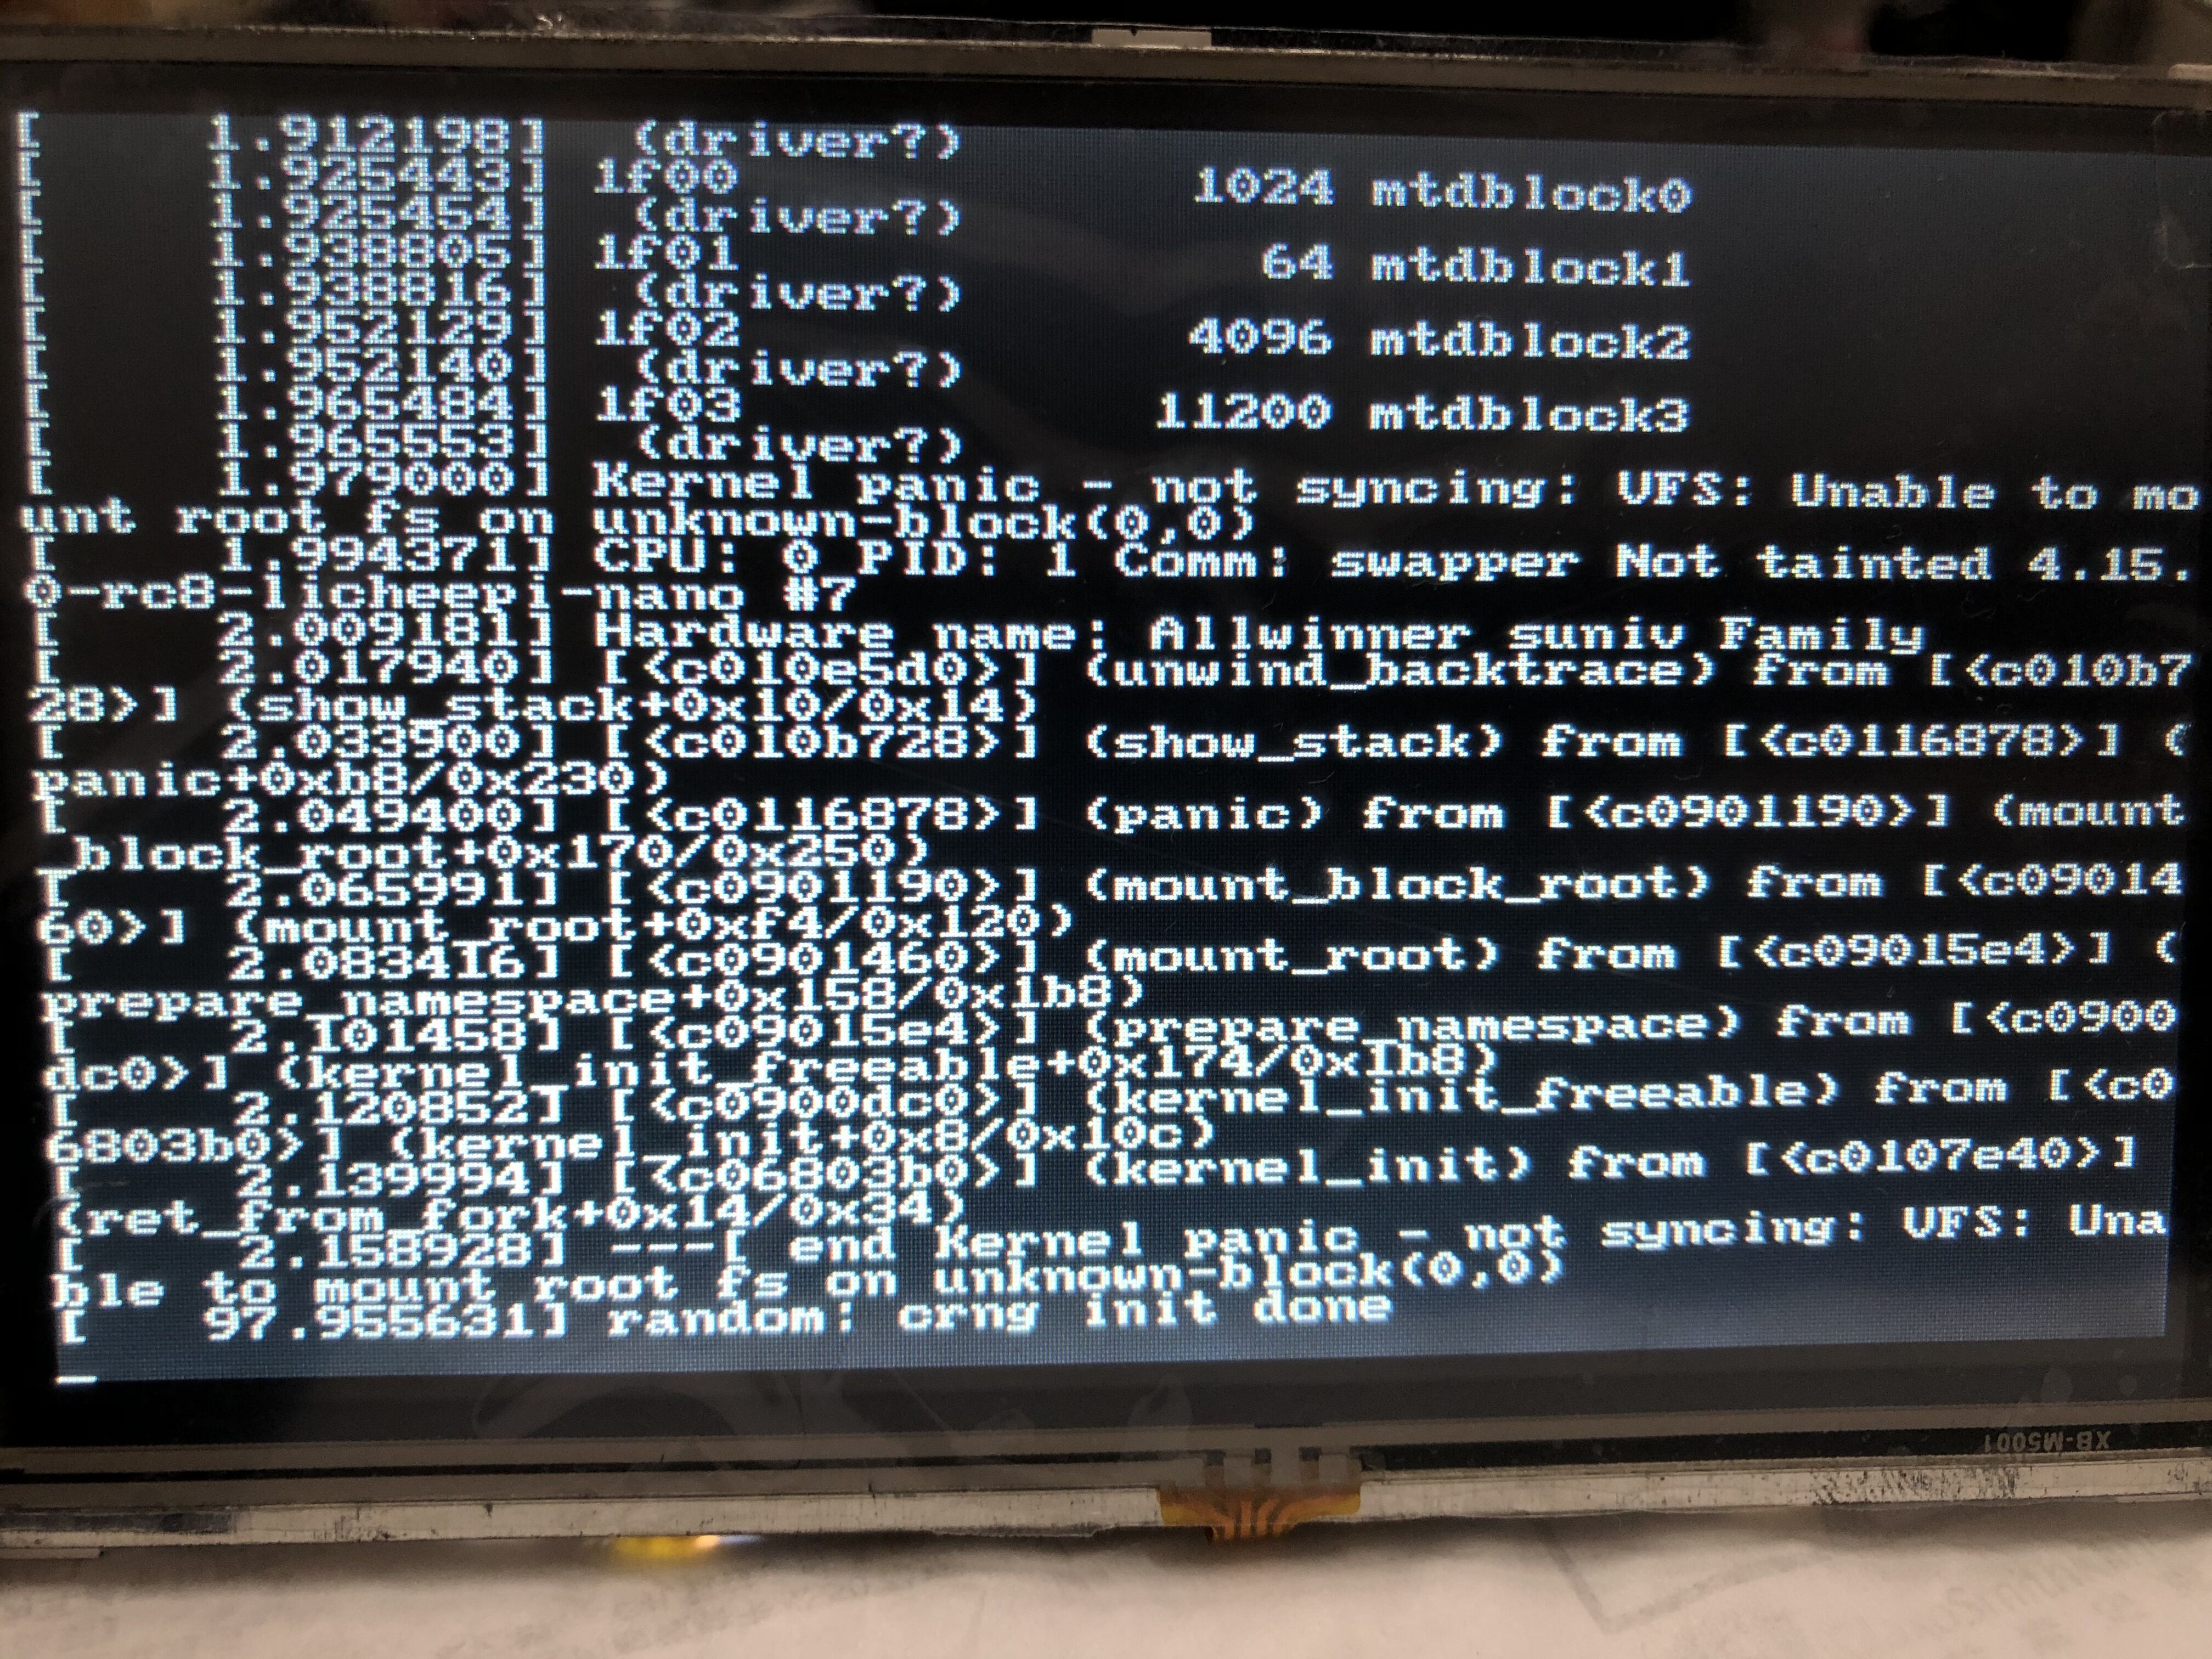
离线
#98 2019-11-20 23:02:34 分享评论
- aaayao
- 会员
- 注册时间: 2019-10-30
- 已发帖子: 85
- 积分: 55
Re: 尝试从零构建F1C100s开发环境
晕哥 wrote:
你的 bootargs 是什么? root=???
按照楼主这个来的:
(2)更改配置
回到 uboot 源码一级目录, 进入TUI配置
make ARCH=arm menuconfig
取消勾选 [] Enable a default value for bootcmd
勾选 [v] Enable boot arguments;
在下方一项中填入 bootargs 参数:
console=ttyS0,115200 panic=5 rootwait root=/dev/mtdblock3 rw rootfstype=jffs2
这个是要和buildroot的那个参数要对应呢?
离线
#99 2019-11-20 23:06:11 分享评论
- aaayao
- 会员
- 注册时间: 2019-10-30
- 已发帖子: 85
- 积分: 55
Re: 尝试从零构建F1C100s开发环境
uboot启动时,输入print命令查看打印:
Hit any key to stop autoboot: 0
=>
=>
=>
=>
=> printf
Unknown command 'printf' - try 'help'
=> print
arch=arm
baudrate=115200
board=sunxi
board_name=sunxi
boot_a_script=load ${devtype} ${devnum}:${distro_bootpart} ${scriptaddr} ${prefix}${script}; source ${scriptaddr}
boot_efi_binary=if fdt addr ${fdt_addr_r}; then bootefi bootmgr ${fdt_addr_r};else bootefi bootmgr ${fdtcontroladdr};fi;load ${devtype} ${devnum}:${distro_bootpart} ${kernel_addr_r} efi/boot/bootarm.efi; if fdt addr ${fdt_addr_r}; then bootefi ${kernel_addr_r} ${fdt_addr_r};else bootefi ${kernel_addr_r} ${fdtcontroladdr};fi
boot_extlinux=sysboot ${devtype} ${devnum}:${distro_bootpart} any ${scriptaddr} ${prefix}extlinux/extlinux.conf
boot_net_usb_start=usb start
boot_prefixes=/ /boot/
boot_script_dhcp=boot.scr.uimg
boot_scripts=boot.scr.uimg boot.scr
boot_targets=fel mmc0 usb0 pxe dhcp
bootcmd=sf probe 0 50000000; sf read 0x80C00000 0x100000 0x4000; sf read 0x80008000 0x110000 0x400000; bootz 0x80008000 - 0x80C00000
bootcmd_dhcp=run boot_net_usb_start; if dhcp ${scriptaddr} ${boot_script_dhcp}; then source ${scriptaddr}; fi;setenv efi_fdtfile ${fdtfile}; if test -z "${fdtfile}" -a -n "${soc}"; then setenv efi_fdtfile ${soc}-${board}${boardver}.dtb; fi; setenv efi_old_vci ${bootp_vci};setenv efi_old_arch ${bootp_arch};setenv bootp_vci PXEClient:Arch:00010:UNDI:003000;setenv bootp_arch 0xa;if dhcp ${kernel_addr_r}; then tftpboot ${fdt_addr_r} dtb/${efi_fdtfile};if fdt addr ${fdt_addr_r}; then bootefi ${kernel_addr_r} ${fdt_addr_r}; else bootefi ${kernel_addr_r} ${fdtcontroladdr};fi;fi;setenv bootp_vci ${efi_old_vci};setenv bootp_arch ${efi_old_arch};setenv efi_fdtfile;setenv efi_old_arch;setenv efi_old_vci;
bootcmd_fel=if test -n ${fel_booted} && test -n ${fel_scriptaddr}; then echo '(FEL boot)'; source ${fel_scriptaddr}; fi
bootcmd_mmc0=setenv devnum 0; run mmc_boot
bootcmd_pxe=run boot_net_usb_start; dhcp; if pxe get; then pxe boot; fi
bootcmd_usb0=setenv devnum 0; run usb_boot
bootdelay=2
bootm_size=0x1700000
console=ttyS0,115200
cpu=arm926ejs
dfu_alt_info_ram=kernel ram 0x80500000 0x1000000;fdt ram 0x80C00000 0x100000;ramdisk ram 0x80D50000 0x4000000
distro_bootcmd=for target in ${boot_targets}; do run bootcmd_${target}; done
efi_dtb_prefixes=/ /dtb/ /dtb/current/
fdt_addr_r=0x80C00000
fdtcontroladdr=83e6ada8
fdtfile=suniv-f1c100s-licheepi-nano.dtb
fel_booted=1
kernel_addr_r=0x80500000
load_efi_dtb=load ${devtype} ${devnum}:${distro_bootpart} ${fdt_addr_r} ${prefix}${efi_fdtfile}
mmc_boot=if mmc dev ${devnum}; then setenv devtype mmc; run scan_dev_for_boot_part; fi
partitions=name=loader1,start=8k,size=32k,uuid=${uuid_gpt_loader1};name=loader2,size=984k,uuid=${uuid_gpt_loader2};name=esp,size=128M,bootable,uuid=${uuid_gpt_esp};name=system,size=-,uuid=${uuid_gpt_system};
preboot=usb start
pxefile_addr_r=0x80D00000
ramdisk_addr_r=0x80D50000
scan_dev_for_boot=echo Scanning ${devtype} ${devnum}:${distro_bootpart}...; for prefix in ${boot_prefixes}; do run scan_dev_for_extlinux; run scan_dev_for_scripts; done;run scan_dev_for_efi;
scan_dev_for_boot_part=part list ${devtype} ${devnum} -bootable devplist; env exists devplist || setenv devplist 1; for distro_bootpart in ${devplist}; do if fstype ${devtype} ${devnum}:${distro_bootpart} bootfstype; then run scan_dev_for_boot; fi; done
scan_dev_for_efi=setenv efi_fdtfile ${fdtfile}; if test -z "${fdtfile}" -a -n "${soc}"; then setenv efi_fdtfile ${soc}-${board}${boardver}.dtb; fi; for prefix in ${efi_dtb_prefixes}; do if test -e ${devtype} ${devnum}:${distro_bootpart} ${prefix}${efi_fdtfile}; then run load_efi_dtb; fi;done;if test -e ${devtype} ${devnum}:${distro_bootpart} efi/boot/bootarm.efi; then echo Found EFI removable media binary efi/boot/bootarm.efi; run boot_efi_binary; echo EFI LOAD FAILED: continuing...; fi; setenv efi_fdtfile
scan_dev_for_extlinux=if test -e ${devtype} ${devnum}:${distro_bootpart} ${prefix}extlinux/extlinux.conf; then echo Found ${prefix}extlinux/extlinux.conf; run boot_extlinux; echo SCRIPT FAILED: continuing...; fi
scan_dev_for_scripts=for script in ${boot_scripts}; do if test -e ${devtype} ${devnum}:${distro_bootpart} ${prefix}${script}; then echo Found U-Boot script ${prefix}${script}; run boot_a_script; echo SCRIPT FAILED: continuing...; fi; done
scriptaddr=0x80C50000
soc=sunxi
stderr=serial@1c25000
stdin=serial@1c25000
stdout=serial@1c25000
usb_boot=usb start; if usb dev ${devnum}; then setenv devtype usb; run scan_dev_for_boot_part; fi
uuid_gpt_esp=c12a7328-f81f-11d2-ba4b-00a0c93ec93b
uuid_gpt_system=69dad710-2ce4-4e3c-b16c-21a1d49abed3
Environment size: 4560/32764 bytes
=>
离线
#100 2019-11-21 00:59:51 分享评论
- Gbear
- 会员
- 注册时间: 2019-11-15
- 已发帖子: 34
- 积分: 53
Re: 尝试从零构建F1C100s开发环境
感谢晕哥~
sudo apt-get install swig python-dev python3-dev这个包补充上之后u-boot顺利编译通过!
离线
#101 2019-11-21 22:57:49 分享评论
- aaayao
- 会员
- 注册时间: 2019-10-30
- 已发帖子: 85
- 积分: 55
Re: 尝试从零构建F1C100s开发环境
全部重新来一次,又可以启动了,之前那个错误应该是JFFS2文件系统加载失败。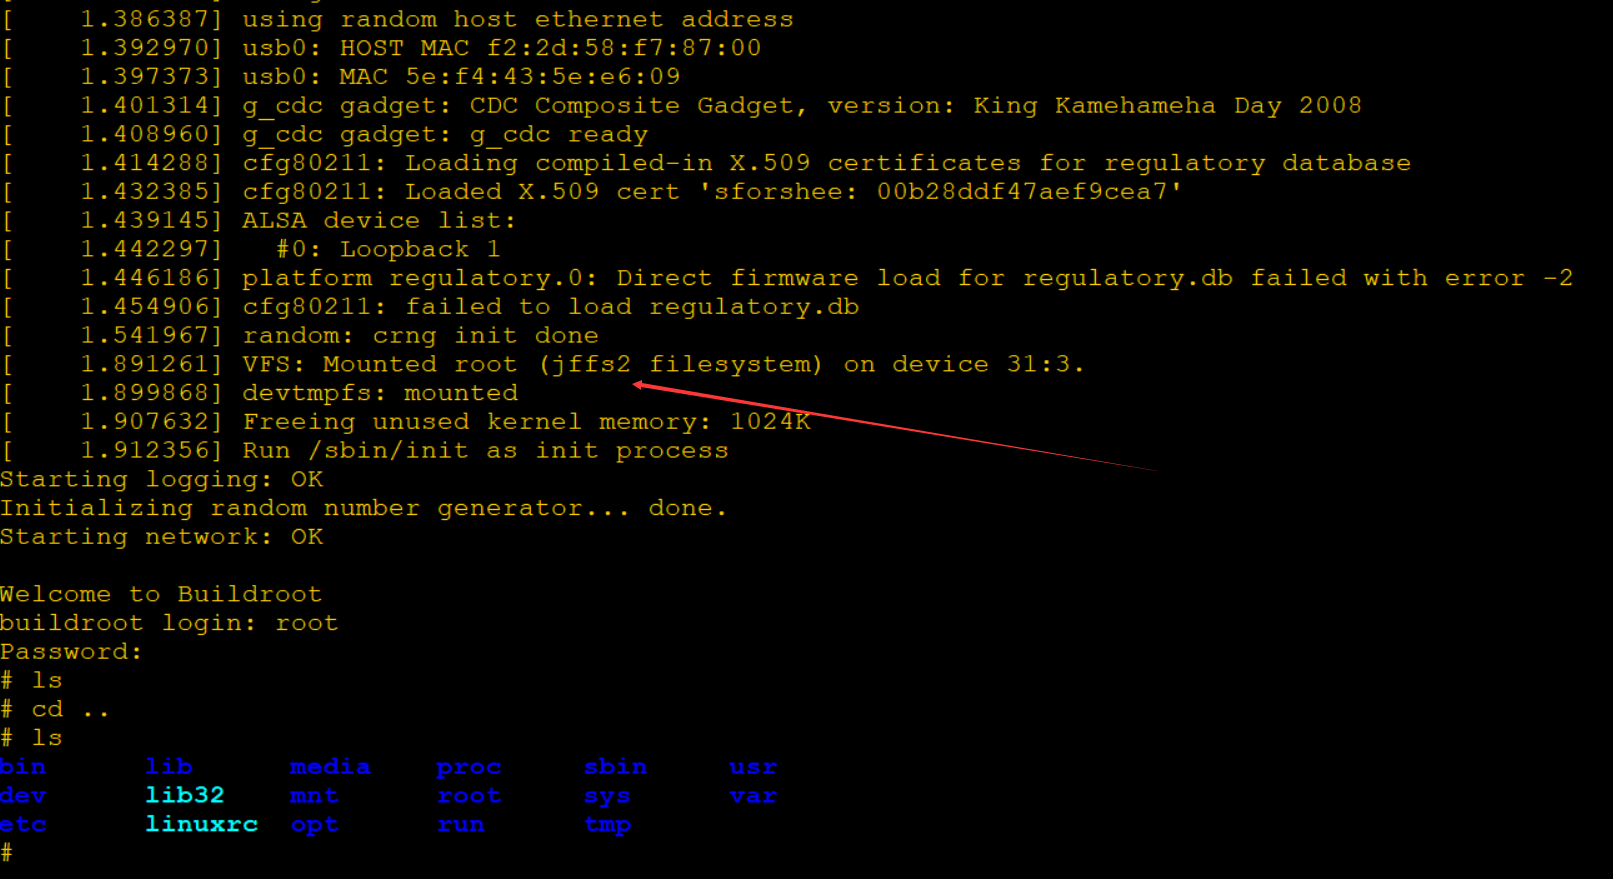
这次是把内核换成5.2,修改还是成功的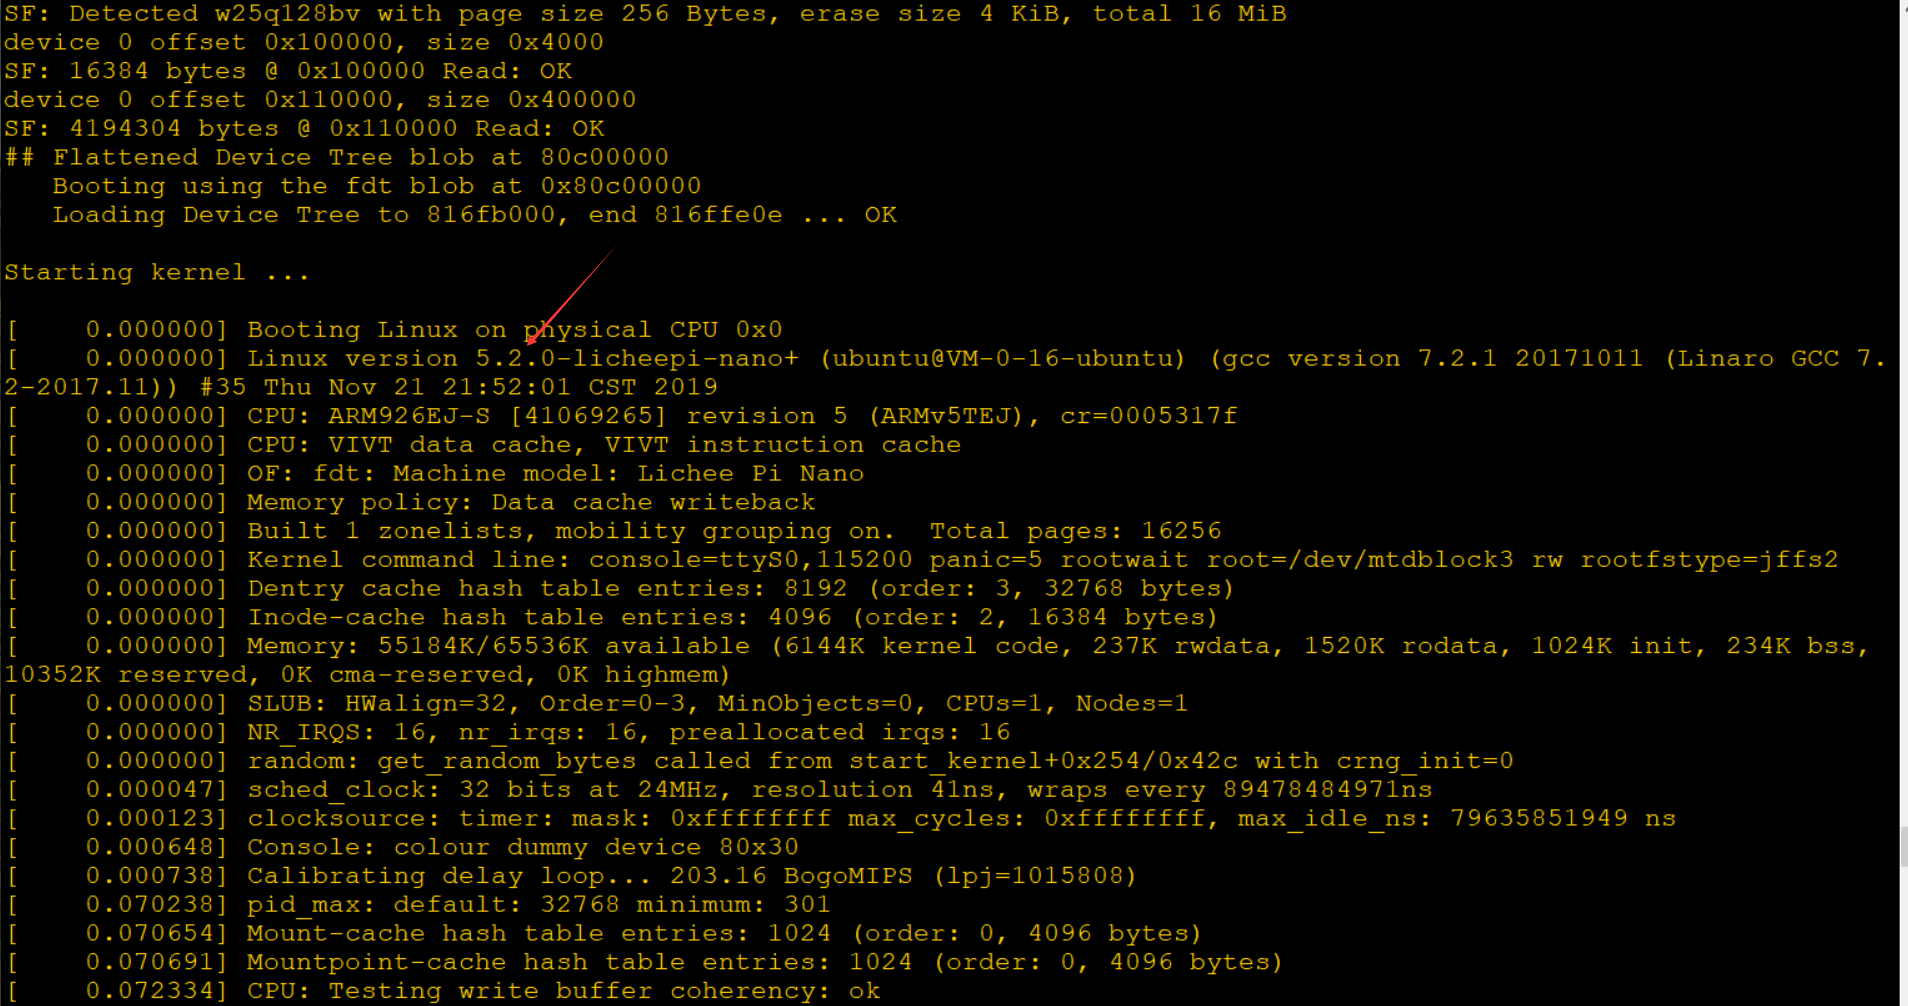
离线
#102 2019-11-22 19:22:48 分享评论
- ned
- 会员
- 注册时间: 2019-11-15
- 已发帖子: 7
- 积分: 7
Re: 尝试从零构建F1C100s开发环境
晕哥 ,求教一下如何修改屏幕的参数 ,我现在用的屏是800480 这个例子好像是 480272的 我尝试过修改U-BOOT失败了
离线
#103 2019-11-22 19:53:39 分享评论
#104 2019-11-25 14:12:46 分享评论
- ned
- 会员
- 注册时间: 2019-11-15
- 已发帖子: 7
- 积分: 7
Re: 尝试从零构建F1C100s开发环境
晕哥 wrote:
linux里面的 dts 还要改一次, 关于 lcd 部分的.
晕哥 ,您可以截图一下 我需要如何修改吗,我硬是找了许久,不知道如何下手啊
离线
#105 2019-11-25 14:22:01 分享评论
#106 2019-11-25 23:38:54 分享评论
- 演技担当黄晓明
- 会员
- 注册时间: 2017-10-17
- 已发帖子: 189
- 积分: 112.5
Re: 尝试从零构建F1C100s开发环境
@晕哥 什么时候出收藏功能啊.这个好帖要收藏
离线
#107 2019-11-26 08:05:27 分享评论
- 晕哥
- 管理员
- 所在地: wechat: whycan_cn
- 注册时间: 2017-09-06
- 已发帖子: 9,492
- 积分: 9207
Re: 尝试从零构建F1C100s开发环境
演技担当黄晓明 wrote:
@晕哥 什么时候出收藏功能啊.这个好帖要收藏
有这个功能, 但是会比较难用, 首先点 订阅该主题
然后就在你的订阅夹里面: https://whycan.cn/search.php?action=show_subscriptions&user_id=338
离线
#108 2019-11-27 17:11:56 分享评论
- 郁郁葱葱
- 会员
- 注册时间: 2019-11-15
- 已发帖子: 25
- 积分: 25
Re: 尝试从零构建F1C100s开发环境
我按照流程走了,编译也没报错,就是不能启动,不知道是哪个出来问题,各位大佬帮忙看看。
最近编辑记录 郁郁葱葱 (2019-11-27 17:13:29)
离线
#109 2019-11-28 10:01:56 分享评论
#110 2019-11-28 11:24:25 分享评论
- 郁郁葱葱
- 会员
- 注册时间: 2019-11-15
- 已发帖子: 25
- 积分: 25
Re: 尝试从零构建F1C100s开发环境
晕哥 wrote:
根文件系统出错了,init进程执行出错。
那就是我配置系统文件的那个地方错了,还在找那个地方出了问题导致根系统文件出错。
离线
#111 2019-11-28 15:51:47 分享评论
- 郁郁葱葱
- 会员
- 注册时间: 2019-11-15
- 已发帖子: 25
- 积分: 25
Re: 尝试从零构建F1C100s开发环境
晕哥 wrote:
根文件系统出错了,init进程执行出错。
果然是根文件系统的选项有关。
离线
#112 2019-11-28 15:55:46 分享评论
- 郁郁葱葱
- 会员
- 注册时间: 2019-11-15
- 已发帖子: 25
- 积分: 25
Re: 尝试从零构建F1C100s开发环境
郁郁葱葱 wrote:
那就是我配置系统文件的那个地方错了,还在找那个地方出了问题导致根系统文件出错。
找到地方了,第五大步的第二小步得这样设置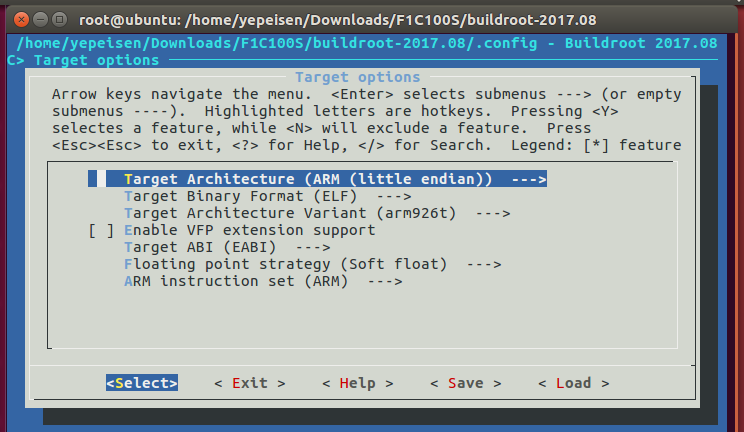
系统已经成功在F1C200S的板子上运行,现在开始纠结怎么联网。
离线
#113 2019-11-28 16:31:00 分享评论
- 晕哥
- 管理员
- 所在地: wechat: whycan_cn
- 注册时间: 2017-09-06
- 已发帖子: 9,492
- 积分: 9207
离线
#114 2019-11-29 10:34:34 分享评论
- 郁郁葱葱
- 会员
- 注册时间: 2019-11-15
- 已发帖子: 25
- 积分: 25
Re: 尝试从零构建F1C100s开发环境
晕哥 wrote:
是有线以太网?
这个要取决你是开发的时候临时传文件, 还是产品需要联网,
如果临时传文件可以用 adbd 方式解决,
如果产品需要联网, 不建议用 f1c100s,
加了网卡之后, 价格与 V3s 相差无几。
wifi 不差钱可以用台湾正基的 AP62xx 模组, 软硬件稳定性都比较好。
晕哥,F1C100接AP62XX是不是还得自己移植驱动?V3S我也在考虑。主要是wifi无线联网。
离线
#115 2019-11-29 10:36:36 分享评论
#116 2019-11-29 10:46:25 分享评论
- 郁郁葱葱
- 会员
- 注册时间: 2019-11-15
- 已发帖子: 25
- 积分: 25
Re: 尝试从零构建F1C100s开发环境
晕哥 wrote:
AP62XX 在很早已经 Linux 自带驱动了。配置一下即可。
好的,我试试,我用AP6256试试。
离线
楼主 #117 2019-11-30 14:10:17 分享评论
Re: 尝试从零构建F1C100s开发环境
郁郁葱葱 wrote:
找到地方了,第五大步的第二小步得这样设置
/files/members/2409/_15749275588763.png
系统已经成功在F1C200S的板子上运行,现在开始纠结怎么联网。
不好意思,那时候还不知道怎么上图,/捂脸
离线
楼主 #118 2019-12-01 13:01:39 分享评论
#119 2020-01-02 10:02:32 分享评论
- 三哥
- 会员
- 注册时间: 2018-08-03
- 已发帖子: 72
- 积分: 44.5
Re: 尝试从零构建F1C100s开发环境
LinjieGuo wrote:
配置好的VM虚拟机Ubuntu系统 链接:https://pan.baidu.com/s/17vk0_QWRNRuxwi5EZ_P-Xg 提取码:54pb
非常感谢楼主,可是这个ubuntu密码多少呀?快哭了
离线
#120 2020-01-02 10:24:23 分享评论
- 三哥
- 会员
- 注册时间: 2018-08-03
- 已发帖子: 72
- 积分: 44.5
Re: 尝试从零构建F1C100s开发环境
123456进不去
离线
楼主 #121 2020-01-02 14:35:09 分享评论
#122 2020-01-02 14:52:34 分享评论
- 三哥
- 会员
- 注册时间: 2018-08-03
- 已发帖子: 72
- 积分: 44.5
Re: 尝试从零构建F1C100s开发环境
是的,谢谢楼主
离线
楼主 #123 2020-01-02 15:07:55 分享评论
#124 2020-01-02 15:21:14 分享评论
- 三哥
- 会员
- 注册时间: 2018-08-03
- 已发帖子: 72
- 积分: 44.5
Re: 尝试从零构建F1C100s开发环境
由于我不会在linux下烧程序到板子,我都是在windows下操作。所以我找了宿主机和客户机之间互换文件的方法,希望把编译的文件拿倒windows下烧写。具体方法见这个网页: https://www.cnblogs.com/sunev/archive/2012/03/16/2400887.html
离线
#125 2020-01-02 15:22:14 分享评论
- 三哥
- 会员
- 注册时间: 2018-08-03
- 已发帖子: 72
- 积分: 44.5
Re: 尝试从零构建F1C100s开发环境
LinjieGuo wrote:
嗯嗯,实在不好意思,因为帖子发出来一阵子之后,无法修改了。
你这话说得,谢谢大佬了
离线
楼主 #126 2020-01-02 15:30:35 分享评论
Re: 尝试从零构建F1C100s开发环境
三哥 wrote:
由于我不会在linux下烧程序到板子,我都是在windows下操作。所以我找了宿主机和客户机之间互换文件的方法,希望把编译的文件拿倒windows下烧写。具体方法见这个网页:https://www.cnblogs.com/sunev/archive/2012/03/16/2400887.html
方法很多:
(1)VMtools
(2)FTP/SFTP
(3)nfs,这个比较方便,编译完,win端刷新,写个bat命令脚本,使用sunxi-tools,相对路径烧写bin文件。
这方面的话,自行科普比较好一些。
离线
#127 2020-01-03 22:50:47 分享评论
- 晕哥
- 管理员
- 所在地: wechat: whycan_cn
- 注册时间: 2017-09-06
- 已发帖子: 9,492
- 积分: 9207
Re: 尝试从零构建F1C100s开发环境
三哥 wrote:
由于我不会在linux下烧程序到板子,我都是在windows下操作。所以我找了宿主机和客户机之间互换文件的方法,希望把编译的文件拿倒windows下烧写。具体方法见这个网页: https://www.cnblogs.com/sunev/archive/2012/03/16/2400887.html
离线
#128 2020-01-05 22:46:48 分享评论
- sea18c
- 会员
- 注册时间: 2019-08-05
- 已发帖子: 230
- 积分: 222.5
Re: 尝试从零构建F1C100s开发环境
好贴, 写得很详细,对新手很有帮助
离线
#129 2020-01-06 02:45:27 分享评论
- xiao.huang
- 会员
- 注册时间: 2020-01-02
- 已发帖子: 4
- 积分: 4
Re: 尝试从零构建F1C100s开发环境
$ ls -lh output/images/
total 95M
-rw-r--r-- 1 ted ted 95M 1月 6 02:41 rootfs.tar
大神指点一下,为什么我编出来的根文件系统有 95MB?
我是想烧录到16MB spiflash,解压出来发现 gdb 和 mplayer 占了几十M;
.config文件
最近编辑记录 xiao.huang (2020-01-06 03:03:12)
离线
#130 2020-01-06 08:26:20 分享评论
- 红白机
- 会员
- 注册时间: 2020-01-02
- 已发帖子: 133
- 积分: 133
Re: 尝试从零构建F1C100s开发环境
@xiao.huang 你上传 buildroot 根目录下面的 .config, 不是 kernel 的 .config
离线
楼主 #131 2020-01-06 08:59:21 分享评论
Re: 尝试从零构建F1C100s开发环境
xiao.huang wrote:
$ ls -lh output/images/
total 95M
-rw-r--r-- 1 ted ted 95M 1月 6 02:41 rootfs.tar大神指点一下,为什么我编出来的根文件系统有 95MB?
我是想烧录到16MB spiflash,解压出来发现 gdb 和 mplayer 占了几十M;
.config文件
可能我在写帖子时,忽略了一些东西取消了某些选项,晚点传配置文件上来
离线
#132 2020-01-06 10:29:18 分享评论
- Wangtake
- 会员
- 注册时间: 2019-12-05
- 已发帖子: 2
- 积分: 2
Re: 尝试从零构建F1C100s开发环境
楼主生成的rootfs.tar 文件大小是多少 我的是91M 合成bin烧录文件更大200多M
离线
#133 2020-01-06 20:52:17 分享评论
- xiao.huang
- 会员
- 注册时间: 2020-01-02
- 已发帖子: 4
- 积分: 4
Re: 尝试从零构建F1C100s开发环境
红白机 wrote:
@xiao.huang 你上传 buildroot 根目录下面的 .config, 不是 kernel 的 .config
这个就是 buildroot 下的 .config 了
离线
楼主 #134 2020-01-07 09:55:26 分享评论
Re: 尝试从零构建F1C100s开发环境
LinjieGuo wrote:
可能我在写帖子时,忽略了一些东西取消了某些选项,晚点传配置文件上来
现在传上来。包里面存在两个文件".config"以及"config.in"
buildroot配置文件
下载后解包看看。
最近编辑记录 LinjieGuo (2020-01-07 10:25:57)
离线
#135 2020-01-09 08:58:50 分享评论
- xiao.huang
- 会员
- 注册时间: 2020-01-02
- 已发帖子: 4
- 积分: 4
Re: 尝试从零构建F1C100s开发环境
感谢@LinjieGuo
下载最新的 buildroot-2019.02.8,然后重新按上述配置就没有问题,rootfs 编出来 2MB,已经能启动到 shell 了;
接下来在想 f1c200s 能做什么呢 ![]()
离线
楼主 #136 2020-01-09 12:35:28 分享评论
#137 2020-01-24 11:38:46 分享评论
- joyhope
- 会员
- 注册时间: 2020-01-16
- 已发帖子: 39
- 积分: 39
Re: 尝试从零构建F1C100s开发环境
感觉F1C100S 的 SPI FLASH 要搞出来,坑还真不少。 谢谢提供那么详细的记录,给我们有好的参考。
离线
#138 2020-02-08 09:40:02 分享评论
- sea18c
- 会员
- 注册时间: 2019-08-05
- 已发帖子: 230
- 积分: 222.5
Re: 尝试从零构建F1C100s开发环境
xiao.huang wrote:
感谢@LinjieGuo
下载最新的 buildroot-2019.02.8,然后重新按上述配置就没有问题,rootfs 编出来 2MB,已经能启动到 shell 了;
接下来在想 f1c200s 能做什么呢
想做啥就做啥呗,看你掌握到什么程度
离线
#139 2020-02-21 16:54:01 分享评论
- 54anson
- 会员
- 注册时间: 2020-02-21
- 已发帖子: 18
- 积分: 1.5
Re: 尝试从零构建F1C100s开发环境
很完整详细,谢谢!
离线
#140 2020-02-22 19:48:50 分享评论
- mcu1234mcu
- 会员
- 注册时间: 2020-02-22
- 已发帖子: 18
- 积分: 18
Re: 尝试从零构建F1C100s开发环境
很详细,对于我这个计划跳坑的人来说是一针兴奋剂,感谢
离线
#141 2020-02-25 10:04:31 分享评论
- 王佳伟
- 会员
- 注册时间: 2020-02-25
- 已发帖子: 10
- 积分: 10
Re: 尝试从零构建F1C100s开发环境
首先谢谢大佬的分享。本人萌新刚刚接触这个行业,按照楼主大佬的操作步骤走到创建分支的一步了,但是输入git branch -a的时候显示不出分支,然后输入git checkout nano-v2018.01的时候出现error: pathspec 'nano-v2018.01' did not match any file(s) known to git,本人用的是f1c100s直接连上屏幕。
离线
#142 2020-02-25 10:24:50 分享评论
- 我心飞翔
- 会员
- 注册时间: 2019-12-25
- 已发帖子: 82
- 积分: 82
Re: 尝试从零构建F1C100s开发环境
王佳伟 wrote:
首先谢谢大佬的分享。本人萌新刚刚接触这个行业,按照楼主大佬的操作步骤走到创建分支的一步了,但是输入git branch -a的时候显示不出分支,然后输入git checkout nano-v2018.01的时候出现error: pathspec 'nano-v2018.01' did not match any file(s) known to git,本人用的是f1c100s直接连上屏幕。
很可能你 git clone 没完成, 现在 github 访问有点困难, 用widora搭的这个再试一试:
https://whycan.cn/t_3683.html
离线
#143 2020-02-25 22:03:53 分享评论
- sk222
- 会员
- 注册时间: 2020-02-25
- 已发帖子: 2
- 积分: 2
Re: 尝试从零构建F1C100s开发环境
好贴, 写得很详细, 适合入门。
离线
#144 2020-02-26 16:51:19 分享评论
- 王佳伟
- 会员
- 注册时间: 2020-02-25
- 已发帖子: 10
- 积分: 10
Re: 尝试从零构建F1C100s开发环境
我心飞翔 wrote:
很可能你 git clone 没完成, 现在 github 访问有点困难, 用widora搭的这个再试一试:
https://whycan.cn/t_3683.html
谢谢你的链接,我用连接下了压缩包,然后在unbuntu上解压了,但是我打开文件夹输入git branch -a的时候出现了
master
remotes/origin/HEAD -> origin/master
remotes/origin/master
的现象,然后也没找到 nano-v2018.01 这一个分支
离线
#145 2020-02-26 17:01:09 分享评论
- 红白机
- 会员
- 注册时间: 2020-01-02
- 已发帖子: 133
- 积分: 133
Re: 尝试从零构建F1C100s开发环境
王佳伟 wrote:
谢谢你的链接,我用连接下了压缩包,然后在unbuntu上解压了,但是我打开文件夹输入git branch -a的时候出现了
master
remotes/origin/HEAD -> origin/master
remotes/origin/master
的现象,然后也没找到 nano-v2018.01 这一个分支
再执行: git pull origin nano-v2018.01
估计是widora 那个加速器不支持拉取分支。
离线
#146 2020-02-26 22:11:32 分享评论
- ghosoft
- 会员

- 注册时间: 2020-02-16
- 已发帖子: 31
- 积分: 10.5
Re: 尝试从零构建F1C100s开发环境
LinjieGuo wrote:
5 编译根文件系统
5.1 安装依赖
apt-get install linux-headers-$(uname -r)
5.2 使用buildroot编译根文件系统
(1)获取buildroot源码
wget https://buildroot.org/downloads/buildroot-2017.08.tar.gz
tar xvf buildroot-2017.08.tar.gz
cd buildroot-2017.08/
(2) 配置bulidroot
make menuconfig
-----------------------------------------------
Target options --->
Target Architecture Variant (arm926t) ---> // arm926ejs架构
Enable VFP extension support // Nano 没有 VFP单元,勾选会导致某些应用无法运行
Target ABI (EABI) --->
Floating point strategy (Soft float) ---> // 软浮点(2)下载依赖工具包
https://pan.baidu.com/s/1_tBdX9K7fOkH9JdXZ_MdiQ
下载完之后,解压后复制到"buildroot-2017.08/dl/"下,没有dl文件夹可自行创建。也可以不下载此工具包,但是buildroot自动更具需求下载这些工具包也许很慢。
(3)编译
make
-----------------------------------------------
出现错误:
make[2]: g++: Command not found
安装G++工具:
sudo apt-get install g++
-----------------------------------------------
继续编译:
编译成功!
-----------------------------------------------(4)查看rootfs文件的大小
ls -l output/images/rootfs.tar
编译根文件系统时候遇到问题了, 没想好怎么解决, 因为apt安装不了4.12版本的linux-header, 我是在ubuntu18.04的虚拟机中尝试编译的
zt@ubuntu:~/buildroot$ make
>>> linux-headers custom Installing to staging directory
(cd /home/zt/buildroot/output/build/linux-headers-custom; PATH="/home/zt/buildroot/output/host/bin:/home/zt/buildroot/output/host/sbin:/home/zt/.local/bin:/usr/local/sbin:/usr/local/bin:/usr/sbin:/usr/bin:/sbin:/bin:/usr/games:/usr/local/games:/snap/bin:/home/zt/crosstool-ng:/home/zt/LicheePi/gcc-linaro-7.2.1-2017.11-x86_64_arm-linux-gnueabi/bin" /usr/bin/make -j5 ARCH=arm HOSTCC="/usr/bin/gcc" HOSTCFLAGS="" HOSTCXX="/usr/bin/g++" INSTALL_HDR_PATH=/home/zt/buildroot/output/host/arm-buildroot-linux-uclibcgnueabi/sysroot/usr headers_install)
make[1]: Entering directory '/home/zt/buildroot/output/build/linux-headers-custom'
make[1]: Leaving directory '/home/zt/buildroot/output/build/linux-headers-custom'
if ! support/scripts/check-kernel-headers.sh  /home/zt/buildroot/output/host/arm-buildroot-linux-uclibcgnueabi/sysroot  4.12; then exit 1; fi
Incorrect selection of kernel headers: expected 4.12.x, got 4.19.x
package/pkg-generic.mk:266: recipe for target '/home/zt/buildroot/output/build/linux-headers-custom/.stamp_staging_installed' failed
make: *** [/home/zt/buildroot/output/build/linux-headers-custom/.stamp_staging_installed] Error 1
离线
#147 2020-03-02 13:03:53 分享评论
- 房地产
- 会员
- 注册时间: 2020-03-02
- 已发帖子: 27
- 积分: 27
Re: 尝试从零构建F1C100s开发环境
感谢大神分享,入坑F1C指南
离线
#148 2020-03-09 15:38:29 分享评论
- 打老虎
- 会员
- 注册时间: 2019-04-03
- 已发帖子: 16
- 积分: 36
Re: 尝试从零构建F1C100s开发环境
mark
离线
楼主 #149 2020-03-10 10:10:52 分享评论
Re: 尝试从零构建F1C100s开发环境
ghosoft wrote:
编译根文件系统时候遇到问题了, 没想好怎么解决, 因为apt安装不了4.12版本的linux-header, 我是在ubuntu18.04的虚拟机中尝试编译的
zt@ubuntu:~/buildroot$ make
>>> linux-headers custom Installing to staging directory
(cd /home/zt/buildroot/output/build/linux-headers-custom; PATH="/home/zt/buildroot/output/host/bin:/home/zt/buildroot/output/host/sbin:/home/zt/.local/bin:/usr/local/sbin:/usr/local/bin:/usr/sbin:/usr/bin:/sbin:/bin:/usr/games:/usr/local/games:/snap/bin:/home/zt/crosstool-ng:/home/zt/LicheePi/gcc-linaro-7.2.1-2017.11-x86_64_arm-linux-gnueabi/bin" /usr/bin/make -j5 ARCH=arm HOSTCC="/usr/bin/gcc" HOSTCFLAGS="" HOSTCXX="/usr/bin/g++" INSTALL_HDR_PATH=/home/zt/buildroot/output/host/arm-buildroot-linux-uclibcgnueabi/sysroot/usr headers_install)
make[1]: Entering directory '/home/zt/buildroot/output/build/linux-headers-custom'
make[1]: Leaving directory '/home/zt/buildroot/output/build/linux-headers-custom'
if ! support/scripts/check-kernel-headers.sh  /home/zt/buildroot/output/host/arm-buildroot-linux-uclibcgnueabi/sysroot  4.12; then exit 1; fi
Incorrect selection of kernel headers: expected 4.12.x, got 4.19.x
package/pkg-generic.mk:266: recipe for target '/home/zt/buildroot/output/build/linux-headers-custom/.stamp_staging_installed' failed
make: *** [/home/zt/buildroot/output/build/linux-headers-custom/.stamp_staging_installed] Error 1
恐怕让您失望了,我也不知道这是什么情况!/无奈
离线
#150 2020-03-10 19:53:15 分享评论
- 王佳伟
- 会员
- 注册时间: 2020-02-25
- 已发帖子: 10
- 积分: 10
Re: 尝试从零构建F1C100s开发环境
谢谢楼主的分享,很详细。但是我在编译make ARCH=arm CROSS_COMPILE=arm-linux-gnueabi- -j4的时候出现了
binman: Node '/binman/u-boot-img': Entry contents size is 0xa6fa9 (683945) but entry size is 0x7e000 (516096)
Makefile:1148: recipe for target 'u-boot-sunxi-with-spl.bin' failed
make: *** [u-boot-sunxi-with-spl.bin] Error 1
这个错误。我也不知道是什么原因,是之前配置可视化出错了吗?
离线
楼主 #151 2020-03-10 23:49:52 分享评论
Re: 尝试从零构建F1C100s开发环境
王佳伟 wrote:
谢谢楼主的分享,很详细。但是我在编译make ARCH=arm CROSS_COMPILE=arm-linux-gnueabi- -j4的时候出现了
binman: Node '/binman/u-boot-img': Entry contents size is 0xa6fa9 (683945) but entry size is 0x7e000 (516096)
Makefile:1148: recipe for target 'u-boot-sunxi-with-spl.bin' failed
make: *** [u-boot-sunxi-with-spl.bin] Error 1
这个错误。我也不知道是什么原因,是之前配置可视化出错了吗?
你去打开Makefile文件,看看1148行驶什么内容呢
离线
#152 2020-03-11 09:06:59 分享评论
- 晕哥
- 管理员
- 所在地: wechat: whycan_cn
- 注册时间: 2017-09-06
- 已发帖子: 9,492
- 积分: 9207
Re: 尝试从零构建F1C100s开发环境
王佳伟 wrote:
谢谢楼主的分享,很详细。但是我在编译make ARCH=arm CROSS_COMPILE=arm-linux-gnueabi- -j4的时候出现了
binman: Node '/binman/u-boot-img': Entry contents size is 0xa6fa9 (683945) but entry size is 0x7e000 (516096)
Makefile:1148: recipe for target 'u-boot-sunxi-with-spl.bin' failed
make: *** [u-boot-sunxi-with-spl.bin] Error 1
这个错误。我也不知道是什么原因,是之前配置可视化出错了吗?
参考: https://whycan.cn/t_3631.html#p33896
可能是: 编译出来的uboot体积太大了,使用空间和env环境的地址冲突了,将env环境的地址调大一点
离线
#153 2020-03-20 16:56:20 分享评论
- MK-2020
- 会员
- 注册时间: 2020-01-02
- 已发帖子: 51
- 积分: 46
Re: 尝试从零构建F1C100s开发环境
感谢LinjieGuo分享,我是一个超级新手,以前全在windows上开发没怎么接触linux,最近画了个F1c200s想跟下linux,刚好过来跟楼主学一学。弄了两天终于把U-boot、linux-f1c100s-480272lcd-test和buildroot-2017.08三个编译完成。我PCB板上用的是32M的(w25q32),想问一下是不是把suniv-f1c100s-licheepi-nano.dts里配置为w25q32重新编译就可以?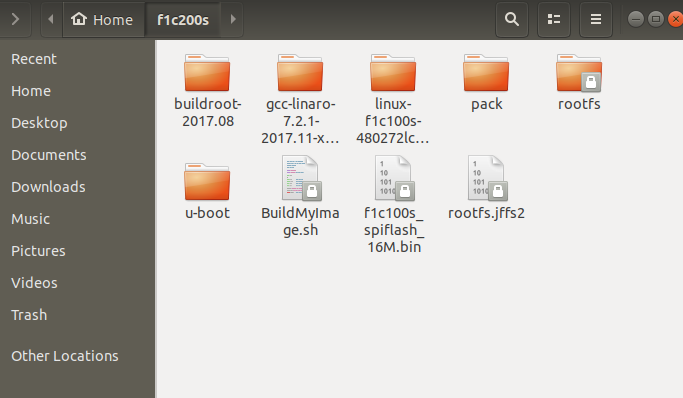
离线
楼主 #154 2020-03-21 22:43:28 分享评论
Re: 尝试从零构建F1C100s开发环境
MK-2020 wrote:
感谢LinjieGuo分享,我是一个超级新手,以前全在windows上开发没怎么接触linux,最近画了个F1c200s想跟下linux,刚好过来跟楼主学一学。弄了两天终于把U-boot、linux-f1c100s-480272lcd-test和buildroot-2017.08三个编译完成。我PCB板上用的是32M的(w25q32),想问一下是不是把suniv-f1c100s-licheepi-nano.dts里配置为w25q32重新编译就可以?/files/members/2850/none.png
引用晕哥的话:"不用修改,驱动检测flash id自动识别容量!"
离线
#155 2020-03-25 02:08:56 分享评论
- willX
- 会员
- 注册时间: 2019-09-06
- 已发帖子: 48
- 积分: 28
Re: 尝试从零构建F1C100s开发环境
麻烦请问,更新了dts之后,使用make ARCH=arm CROSS_COMPILE=arm-linux-gnueabi- dtbs -j4
始终无法在arch/arm/boot/dts/下生成suniv-f1c100s-licheepi-nano.dts
为了保证dts是新生成的,我将旧的suniv-f1c100s-licheepi-nano.dts删除了,使用make命令再也无法生成dts了。
折腾了两天了,感谢大神帮助。
离线
楼主 #156 2020-03-25 10:09:01 分享评论
Re: 尝试从零构建F1C100s开发环境
willX wrote:
麻烦请问,更新了dts之后,使用make ARCH=arm CROSS_COMPILE=arm-linux-gnueabi- dtbs -j4
始终无法在arch/arm/boot/dts/下生成suniv-f1c100s-licheepi-nano.dts为了保证dts是新生成的,我将旧的suniv-f1c100s-licheepi-nano.dts删除了,使用make命令再也无法生成dts了。
折腾了两天了,感谢大神帮助。
把提示截屏放上来看看。
离线
#157 2020-03-25 22:13:18 分享评论
#158 2020-03-26 19:22:26 分享评论
#159 2020-03-27 00:31:25 分享评论
- willX
- 会员
- 注册时间: 2019-09-06
- 已发帖子: 48
- 积分: 28
Re: 尝试从零构建F1C100s开发环境
晕哥 wrote:
@willX 是不是你的板子flash离cpu比较远, 或者有干扰造成的,
把spi的频率降下来试一试.因为 brom 能读出spi flash 数据, 但是 u-boot 却不能初始化 spi flash.
多谢晕哥,我用的是widora的tiny200板。
通过不断的重测,原来是kernel下的.config文件闹出的问题,而且还有一个,我自作主张把ARCH和CROSS_COMPILE
放到编译系统的环境变量里了,我发现这样经常出问题。
反而是老老实实的写make命令,make ARCH=arm CROSS_COMPILE=arm-linux-gnueabi- -j4这样,倒是一点毛病没有了。
不知道是不是我的Ubuntu环境问题,又或者是我在使用menuconfig时有差异。
总之,板子现在已经跑起来了,非常感谢晕哥和楼主的大力支持。严格按照楼主操作是可以编译出能用的镜像来的。非常赞!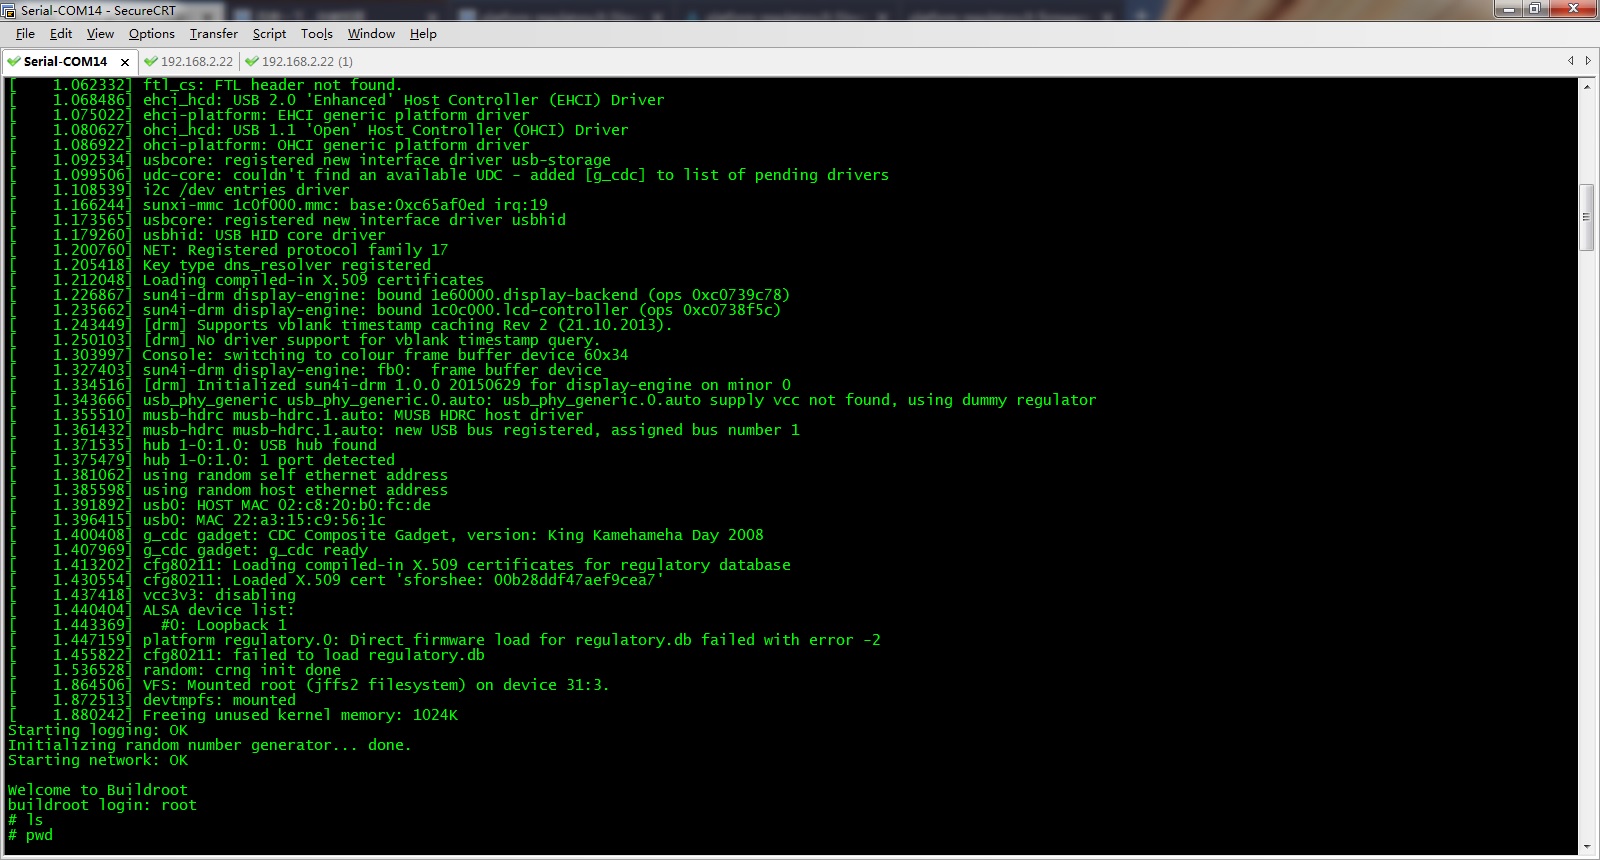
这个是我的串口日志:
none.txt
这个是我在用的镜像:16MB
f1c100s_spiflash_16M.zip
最近编辑记录 willX (2020-03-27 00:50:06)
离线
#160 2020-03-27 08:47:17 分享评论
- jambogo
- 会员
- 注册时间: 2020-03-27
- 已发帖子: 7
- 积分: 7
Re: 尝试从零构建F1C100s开发环境
按着楼主的步骤一步一步走,发现编译出来的buildroot 达到98MB,不知道有没有类似问题。
root@eedccd40ec5a:~/buildroot/buildroot-2017.08/output/images# ll
-rw-r--r-- 1 root root 98119680 Mar 26 19:13 rootfs.tar
离线
#161 2020-03-27 10:24:39 分享评论
- 晕哥
- 管理员
- 所在地: wechat: whycan_cn
- 注册时间: 2017-09-06
- 已发帖子: 9,492
- 积分: 9207
Re: 尝试从零构建F1C100s开发环境
jambogo wrote:
按着楼主的步骤一步一步走,发现编译出来的buildroot 达到98MB,不知道有没有类似问题。
root@eedccd40ec5a:~/buildroot/buildroot-2017.08/output/images# ll
-rw-r--r-- 1 root root 98119680 Mar 26 19:13 rootfs.tar
a) 打开 ~/buildroot/buildroot-2017.08/.config 文件, 把里面的 QT/MPLAYER 等相关行删掉,
b) make menuconfig 里面把 Qt/mplayer 相关软件包删除
上面两步操作等效。
然后按这个操作重新做一次即可: https://whycan.cn/t_3781.html#p36600
离线
#162 2020-03-27 18:06:13 分享评论
- IT界吴彦祖
- 会员
- 注册时间: 2020-02-25
- 已发帖子: 1
- 积分: 1
Re: 尝试从零构建F1C100s开发环境
楼主写的非常详细,对新手很友好,新手难得的教程
离线
楼主 #163 2020-03-28 09:02:41 分享评论
#164 2020-03-28 21:21:33 分享评论
- ap321
- 会员
- 注册时间: 2020-03-28
- 已发帖子: 10
- 积分: 5
Re: 尝试从零构建F1C100s开发环境
上次来 好像还没弄完 ,今天心血来潮 也准备弄下 。 感谢楼主 总结那么多 。sipeed的文档写的就是渣渣 。没一点流程性
离线
#165 2020-03-29 11:26:53 分享评论
- kaixxss
- 会员
- 注册时间: 2019-11-18
- 已发帖子: 30
- 积分: 0
Re: 尝试从零构建F1C100s开发环境
按照操作短接了1 4脚 怎么找不到设备呀 上电的时候看设备管理器也不会刷新 是不是硬件有问题
离线
楼主 #166 2020-03-29 12:23:33 分享评论
#167 2020-03-29 13:28:48 分享评论
- kaixxss
- 会员
- 注册时间: 2019-11-18
- 已发帖子: 30
- 积分: 0
Re: 尝试从零构建F1C100s开发环境
我短接了14脚上电后在zadig上面检测到的是未知USB设备(设备描述符请求失败) 大哥你知道这是什么原因不
离线
楼主 #168 2020-03-29 14:29:10 分享评论
Re: 尝试从零构建F1C100s开发环境
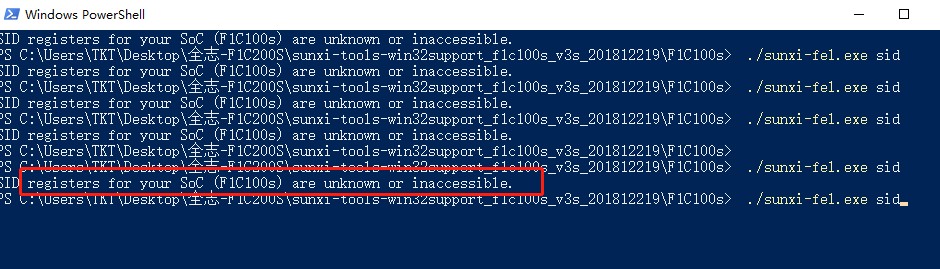
下载 sunxi-tools-win32support_f1c100s(20180329).7z,解压缩, 运行 zadig-2.3.exe
点击 Options -> List All Devices:(即使你的设备显示未识别设备也可以,只要装上驱动能下载就可以了)
/files/members/3/QQ20180416161704.png
选择 WinUSB (v6.1.7600.16385)
点击 【Install WCID Driver】
/files/members/3/QQ20180416161712.png
按上面步奏装好驱动
/files/members/3/QQ20180416161717.png
装完后,sunxi-fel.exe 运行一切正常。
接下来烧录一个spi flash试一试。
最近编辑记录 LinjieGuo (2020-03-29 14:34:22)
离线
#169 2020-03-29 14:35:56 分享评论
- kaixxss
- 会员
- 注册时间: 2019-11-18
- 已发帖子: 30
- 积分: 0
Re: 尝试从零构建F1C100s开发环境
LinjieGuo wrote:
下载 sunxi-tools-win32support_f1c100s(20180329).7z,解压缩, 运行 zadig-2.3.exe
点击 Options -> List All Devices:(即使你的设备显示未识别设备也可以,只要装上驱动能下载就可以了)
/files/members/3/QQ20180416161704.png
选择 WinUSB (v6.1.7600.16385)
点击 【Install WCID Driver】/files/members/3/QQ20180416161712.png
按上面步奏装好驱动/files/members/3/QQ20180416161717.png
装完后,sunxi-fel.exe 运行一切正常。接下来烧录一个spi flash试一试。
谢谢楼主分享 我去试试
离线
#170 2020-03-29 15:20:37 分享评论
- ap321
- 会员
- 注册时间: 2020-03-28
- 已发帖子: 10
- 积分: 5
Re: 尝试从零构建F1C100s开发环境
上来感谢楼主 ,按照楼主操作下来 没任何问题 ,顺利启动亮屏 。接下来就是看怎么玩的了 !
离线
#171 2020-03-29 15:33:54 分享评论
- kaixxss
- 会员
- 注册时间: 2019-11-18
- 已发帖子: 30
- 积分: 0
Re: 尝试从零构建F1C100s开发环境
kaixxss wrote:
谢谢楼主分享 我去试试
按照步骤试了 还是不行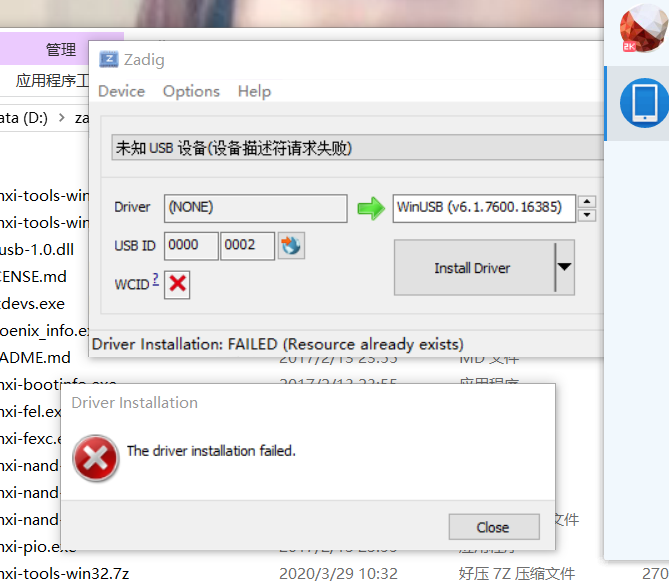
离线
楼主 #172 2020-03-29 23:40:26 分享评论
Re: 尝试从零构建F1C100s开发环境
kaixxss wrote:
按照步骤试了 还是不行
/files/members/2435/qqq.png
基本操作呢,可以关掉杀毒软件再试试,不行就换个电脑试试。
离线
#173 2020-03-29 23:53:12 分享评论
- 有梦的地方
- 会员
- 注册时间: 2020-03-17
- 已发帖子: 284
- 积分: 284
Re: 尝试从零构建F1C100s开发环境
kaixxss wrote:
按照步骤试了 还是不行
/files/members/2435/qqq.png
这是win10 吗,感觉你好像也选错usb设备了。
离线
#174 2020-04-05 22:58:23 分享评论
- willX
- 会员
- 注册时间: 2019-09-06
- 已发帖子: 48
- 积分: 28
Re: 尝试从零构建F1C100s开发环境
系统启动了,但是发现f1c200s暂时成了一个孤岛,没有网口,没有usb,
大家是怎么把测试软件、文件上传到正在f1c200s里运行的文件系统里的?
离线
#175 2020-04-19 17:02:08 分享评论
- lignin
- 会员
- 注册时间: 2020-03-21
- 已发帖子: 139
- 积分: 128.5
Re: 尝试从零构建F1C100s开发环境
我也想玩F1C100S了,正在找相关原理图看看怎么设计,支持楼主
离线
楼主 #176 2020-04-19 18:16:31 分享评论
#177 2020-04-21 16:13:46 分享评论

#178 2020-04-24 13:30:28 分享评论
- tam2907
- 会员
- 注册时间: 2020-03-29
- 已发帖子: 45
- 积分: 59.5
Re: 尝试从零构建F1C100s开发环境
好教程,不知道对外设驱动支持怎样。
离线
#179 2020-04-29 21:54:58 分享评论
- Space
- 会员
- 注册时间: 2020-04-29
- 已发帖子: 8
- 积分: 8
Re: 尝试从零构建F1C100s开发环境
大佬有没有RTT的教程呢?
离线
楼主 #180 2020-04-30 21:55:58 分享评论
Re: 尝试从零构建F1C100s开发环境
Space wrote:
大佬有没有RTT的教程呢?
RTT教程没有,但是开源加群交流,QQ群686338051
不是我的群,加不进不关我事喔。
不过其实很简单。开发流程是这样:
(1)下载ENV并安装,参考链接如下:
①ENV使用教程:
https://www.rt-thread.org/page/video.html
②ENV下载:
https://www.rt-thread.org/page/download.html
自己进去找,很容易找到的。
(2)下载RTT官方源码:
①官方下载页:
https://www.rt-thread.org/page/download.html
②git页面:
https://github.com/RT-Thread/rt-thread
使用歪朵拉的加速服务下载git:
https://g.widora.cn/
(3)直接在win下解压RTT,使用ENV进入RTT_3_1_3\bsp\allwinner_tina\
(4)输入scons进行编译。(注意,只能直接编译,不能像STM32一样建议keil工程)
(5)其余自行参考这个帖子的最终结果。
https://whycan.cn/t_3877.html
最近编辑记录 LinjieGuo (2020-04-30 23:52:39)
离线
#181 2020-05-01 12:06:22 分享评论
- kq851211
- 会员
- 注册时间: 2020-05-01
- 已发帖子: 49
- 积分: 34.5
Re: 尝试从零构建F1C100s开发环境
请问全志是怎么回事,官网上什么技术资料都找不到,找全志的开发资料好难呀
离线
楼主 #182 2020-05-01 14:39:06 分享评论
楼主 #183 2020-05-01 16:40:24 分享评论
Re: 尝试从零构建F1C100s开发环境
willX wrote:
系统启动了,但是发现f1c200s暂时成了一个孤岛,没有网口,没有usb,
大家是怎么把测试软件、文件上传到正在f1c200s里运行的文件系统里的?
解决你的孤岛问题:https://whycan.cn/t_4266.html
离线
#184 2020-05-02 12:44:50 分享评论
- andrewchen175
- 会员
- 注册时间: 2020-04-26
- 已发帖子: 24
- 积分: 24
Re: 尝试从零构建F1C100s开发环境
这才是我开始的地方,一路顺风
离线
楼主 #185 2020-05-02 15:27:51 分享评论
#186 2020-05-03 19:38:07 分享评论
- jiangshan00000
- 会员
- 注册时间: 2019-12-05
- 已发帖子: 10
- 积分: 0
Re: 尝试从零构建F1C100s开发环境
请教个问题,开发环境是在linux下好配置,还是在windows下好配置?
离线
#187 2020-05-04 10:02:45 分享评论
- wenunit
- 会员
- 注册时间: 2020-04-22
- 已发帖子: 31
- 积分: 1
Re: 尝试从零构建F1C100s开发环境
求一个VMware的安装好的Nano镜像,用了十几年的单片机,发现linux是白的不能再白了,没安装成功。
离线
楼主 #188 2020-05-05 10:53:00 分享评论
楼主 #189 2020-05-05 10:53:40 分享评论
#190 2020-05-05 12:28:12 分享评论
- wenunit
- 会员
- 注册时间: 2020-04-22
- 已发帖子: 31
- 积分: 1
Re: 尝试从零构建F1C100s开发环境
LinjieGuo wrote:
配置好的VM虚拟机Ubuntu系统 链接:https://pan.baidu.com/s/17vk0_QWRNRuxwi5EZ_P-Xg 提取码:54pb
感谢!!!!!
离线
#191 2020-05-05 15:40:45 分享评论
- zhangxm_0701
- 会员
- 注册时间: 2020-05-05
- 已发帖子: 7
- 积分: 7
Re: 尝试从零构建F1C100s开发环境
请教个问题,开发环境是在linux下好配置,还是在windows下好配置?
离线
楼主 #192 2020-05-05 17:06:23 分享评论
#193 2020-05-07 22:40:27 分享评论
- kaixxss
- 会员
- 注册时间: 2019-11-18
- 已发帖子: 30
- 积分: 0
Re: 尝试从零构建F1C100s开发环境
现在电脑能检测到设备了 使用烧录命令也没啥问题 烧录的进度条也正常显示 但每次都没烧进去 都还是之前的内容 这是什么情况啊
离线
#194 2020-05-07 23:55:06 分享评论
离线
#195 2020-05-08 00:23:32 分享评论
- long169
- 会员
- 注册时间: 2020-05-07
- 已发帖子: 2
- 积分: 2
Re: 尝试从零构建F1C100s开发环境
先看一下应该还不错
离线
#196 2020-05-08 21:59:45 分享评论
- txl
- 会员
- 注册时间: 2018-12-08
- 已发帖子: 13
- 积分: 12
Re: 尝试从零构建F1C100s开发环境
楼主给力,很详细,准备入手开发。
离线
#197 2020-05-08 22:56:28 分享评论
- jxcclij
- 会员
- 注册时间: 2020-04-02
- 已发帖子: 4
- 积分: 4
Re: 尝试从零构建F1C100s开发环境
写的很详细,学习中
离线
#198 2020-05-09 15:53:32 分享评论
- gzc1017
- 会员
- 注册时间: 2020-05-09
- 已发帖子: 7
- 积分: 7
Re: 尝试从零构建F1C100s开发环境
谢谢楼主分享 学习了
离线
#199 2020-05-09 22:55:13 分享评论
- jiass
- 会员
- 所在地: 济南
- 注册时间: 2020-03-13
- 已发帖子: 7
- 积分: 7
Re: 尝试从零构建F1C100s开发环境
刚刚入坑,帮助很大
离线
#200 2020-05-11 14:25:00 分享评论
- 虾兵蟹将
- 会员
- 注册时间: 2020-04-24
- 已发帖子: 7
- 积分: 7
Re: 尝试从零构建F1C100s开发环境
持续观望学习中。
离线
东莞哇酷科技有限公司开发