楼主 # 2022-01-03 12:20:53 分享评论
- LinuxGo
- 会员
- 注册时间: 2021-01-07
- 已发帖子: 88
- 积分: 120

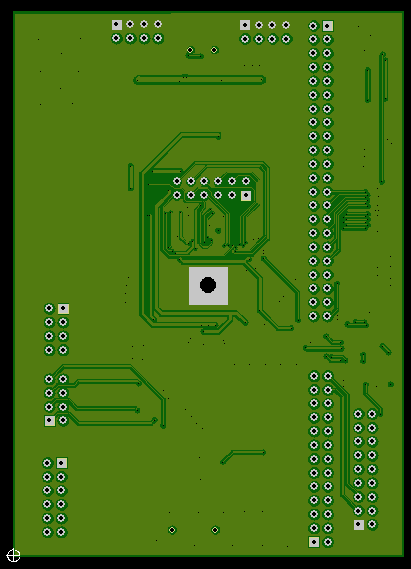
开源 全志f1c100s(200s)所有IO都引出
新年第一帖,开源 全志f1c100s(200s)所有IO都引出,直接上图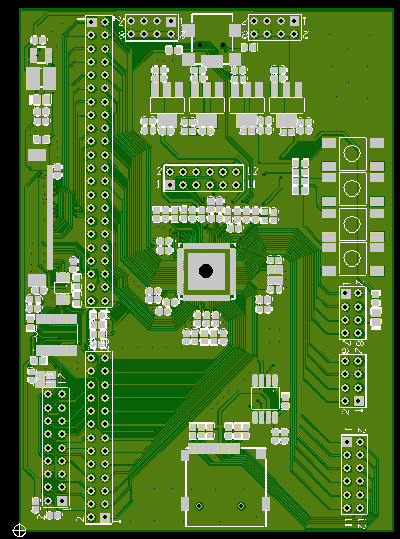
F1C100s.zip
离线
#1 2022-01-03 16:39:35 分享评论
- OliverLuo1986
- 会员
- 注册时间: 2022-01-03
- 已发帖子: 3
- 积分: 3
Re: 开源 全志f1c100s(200s)所有IO都引出
离线
- 不通过:其他
#2 2022-01-03 20:24:24 分享评论
- yobbo
- 会员
- 注册时间: 2019-12-09
- 已发帖子: 84
- 积分: 177.5
Re: 开源 全志f1c100s(200s)所有IO都引出
直接用LDO来做稳压?发热有点大啊,而且输入电压下线有点高(LDO最低压差比DCDC大),之前也用LDO做过,发现偶尔输入电压低会导致flash不正常,致使F1C100启动失败
离线
#3 2022-01-03 22:30:14 分享评论
- unturned3
- 会员
- 注册时间: 2020-07-01
- 已发帖子: 272
- 积分: 301
Re: 开源 全志f1c100s(200s)所有IO都引出
yobbo wrote:
直接用LDO来做稳压?发热有点大啊,而且输入电压下线有点高(LDO最低压差比DCDC大),之前也用LDO做过,发现偶尔输入电压低会导致flash不正常,致使F1C100启动失败
我也是这么想,不过我看好多F1C的板子都是直接用LDO,貌似没出啥问题啊
离线
楼主 #4 2022-01-04 05:35:58 分享评论
- LinuxGo
- 会员
- 注册时间: 2021-01-07
- 已发帖子: 88
- 积分: 120
Re: 开源 全志f1c100s(200s)所有IO都引出
先不考虑发热量和输入电压下限问题,先实现功能.
最近编辑记录 LinuxGo (2022-01-04 05:36:15)
离线
#5 2022-01-05 14:38:02 分享评论
- mapleft
- 会员
- 注册时间: 2021-09-10
- 已发帖子: 6
- 积分: 1
Re: 开源 全志f1c100s(200s)所有IO都引出
F1C 中间那个大洞是用老散热的么?, 我看很多人画的PCB中间的洞都是这么大的
离线
#6 2022-01-05 14:57:49 分享评论
- cube
- 会员
- 注册时间: 2021-03-11
- 已发帖子: 288
- 积分: 202.5
Re: 开源 全志f1c100s(200s)所有IO都引出
mapleft wrote:
F1C 中间那个大洞是用老散热的么?, 我看很多人画的PCB中间的洞都是这么大的
散热的功能是其次的,主要是节省引脚用,你看他四周都没有gnd脚,只有肚子上那个引脚是gnd。
离线
#7 2022-01-05 15:39:08 分享评论
- duqiang
- 会员
- 注册时间: 2019-01-23
- 已发帖子: 6
- 积分: 6
Re: 开源 全志f1c100s(200s)所有IO都引出
这个图片是导入DFM软件后的效果?怎么感觉怪怪的。
离线
楼主 #8 2022-01-05 15:46:01 分享评论
- LinuxGo
- 会员
- 注册时间: 2021-01-07
- 已发帖子: 88
- 积分: 120
Re: 开源 全志f1c100s(200s)所有IO都引出
mapleft wrote:
F1C 中间那个大洞是用老散热的么?, 我看很多人画的PCB中间的洞都是这么大的
中间的大洞是画封装的时候,引用了一开始某大佬的封装。
而大佬用了个带孔的焊盘。
离线
#9 2022-01-05 16:37:20 分享评论
- sunxiang
- 会员
- 注册时间: 2021-05-05
- 已发帖子: 222
- 积分: 116
Re: 开源 全志f1c100s(200s)所有IO都引出
我也喜欢挖洞,因为比较好焊接
离线
楼主 #10 2022-01-08 11:04:47 分享评论
- LinuxGo
- 会员
- 注册时间: 2021-01-07
- 已发帖子: 88
- 积分: 120
Re: 开源 全志f1c100s(200s)所有IO都引出
最小系统装上,就迫不及待调试吧。其余等系统起来后再说
离线
楼主 #11 2022-01-08 11:28:27 分享评论
- LinuxGo
- 会员
- 注册时间: 2021-01-07
- 已发帖子: 88
- 积分: 120
Re: 开源 全志f1c100s(200s)所有IO都引出
果然,上电没反应,连fel模式都进不去。
离线
楼主 #12 2022-01-08 16:02:04 分享评论
- LinuxGo
- 会员
- 注册时间: 2021-01-07
- 已发帖子: 88
- 积分: 120
Re: 开源 全志f1c100s(200s)所有IO都引出
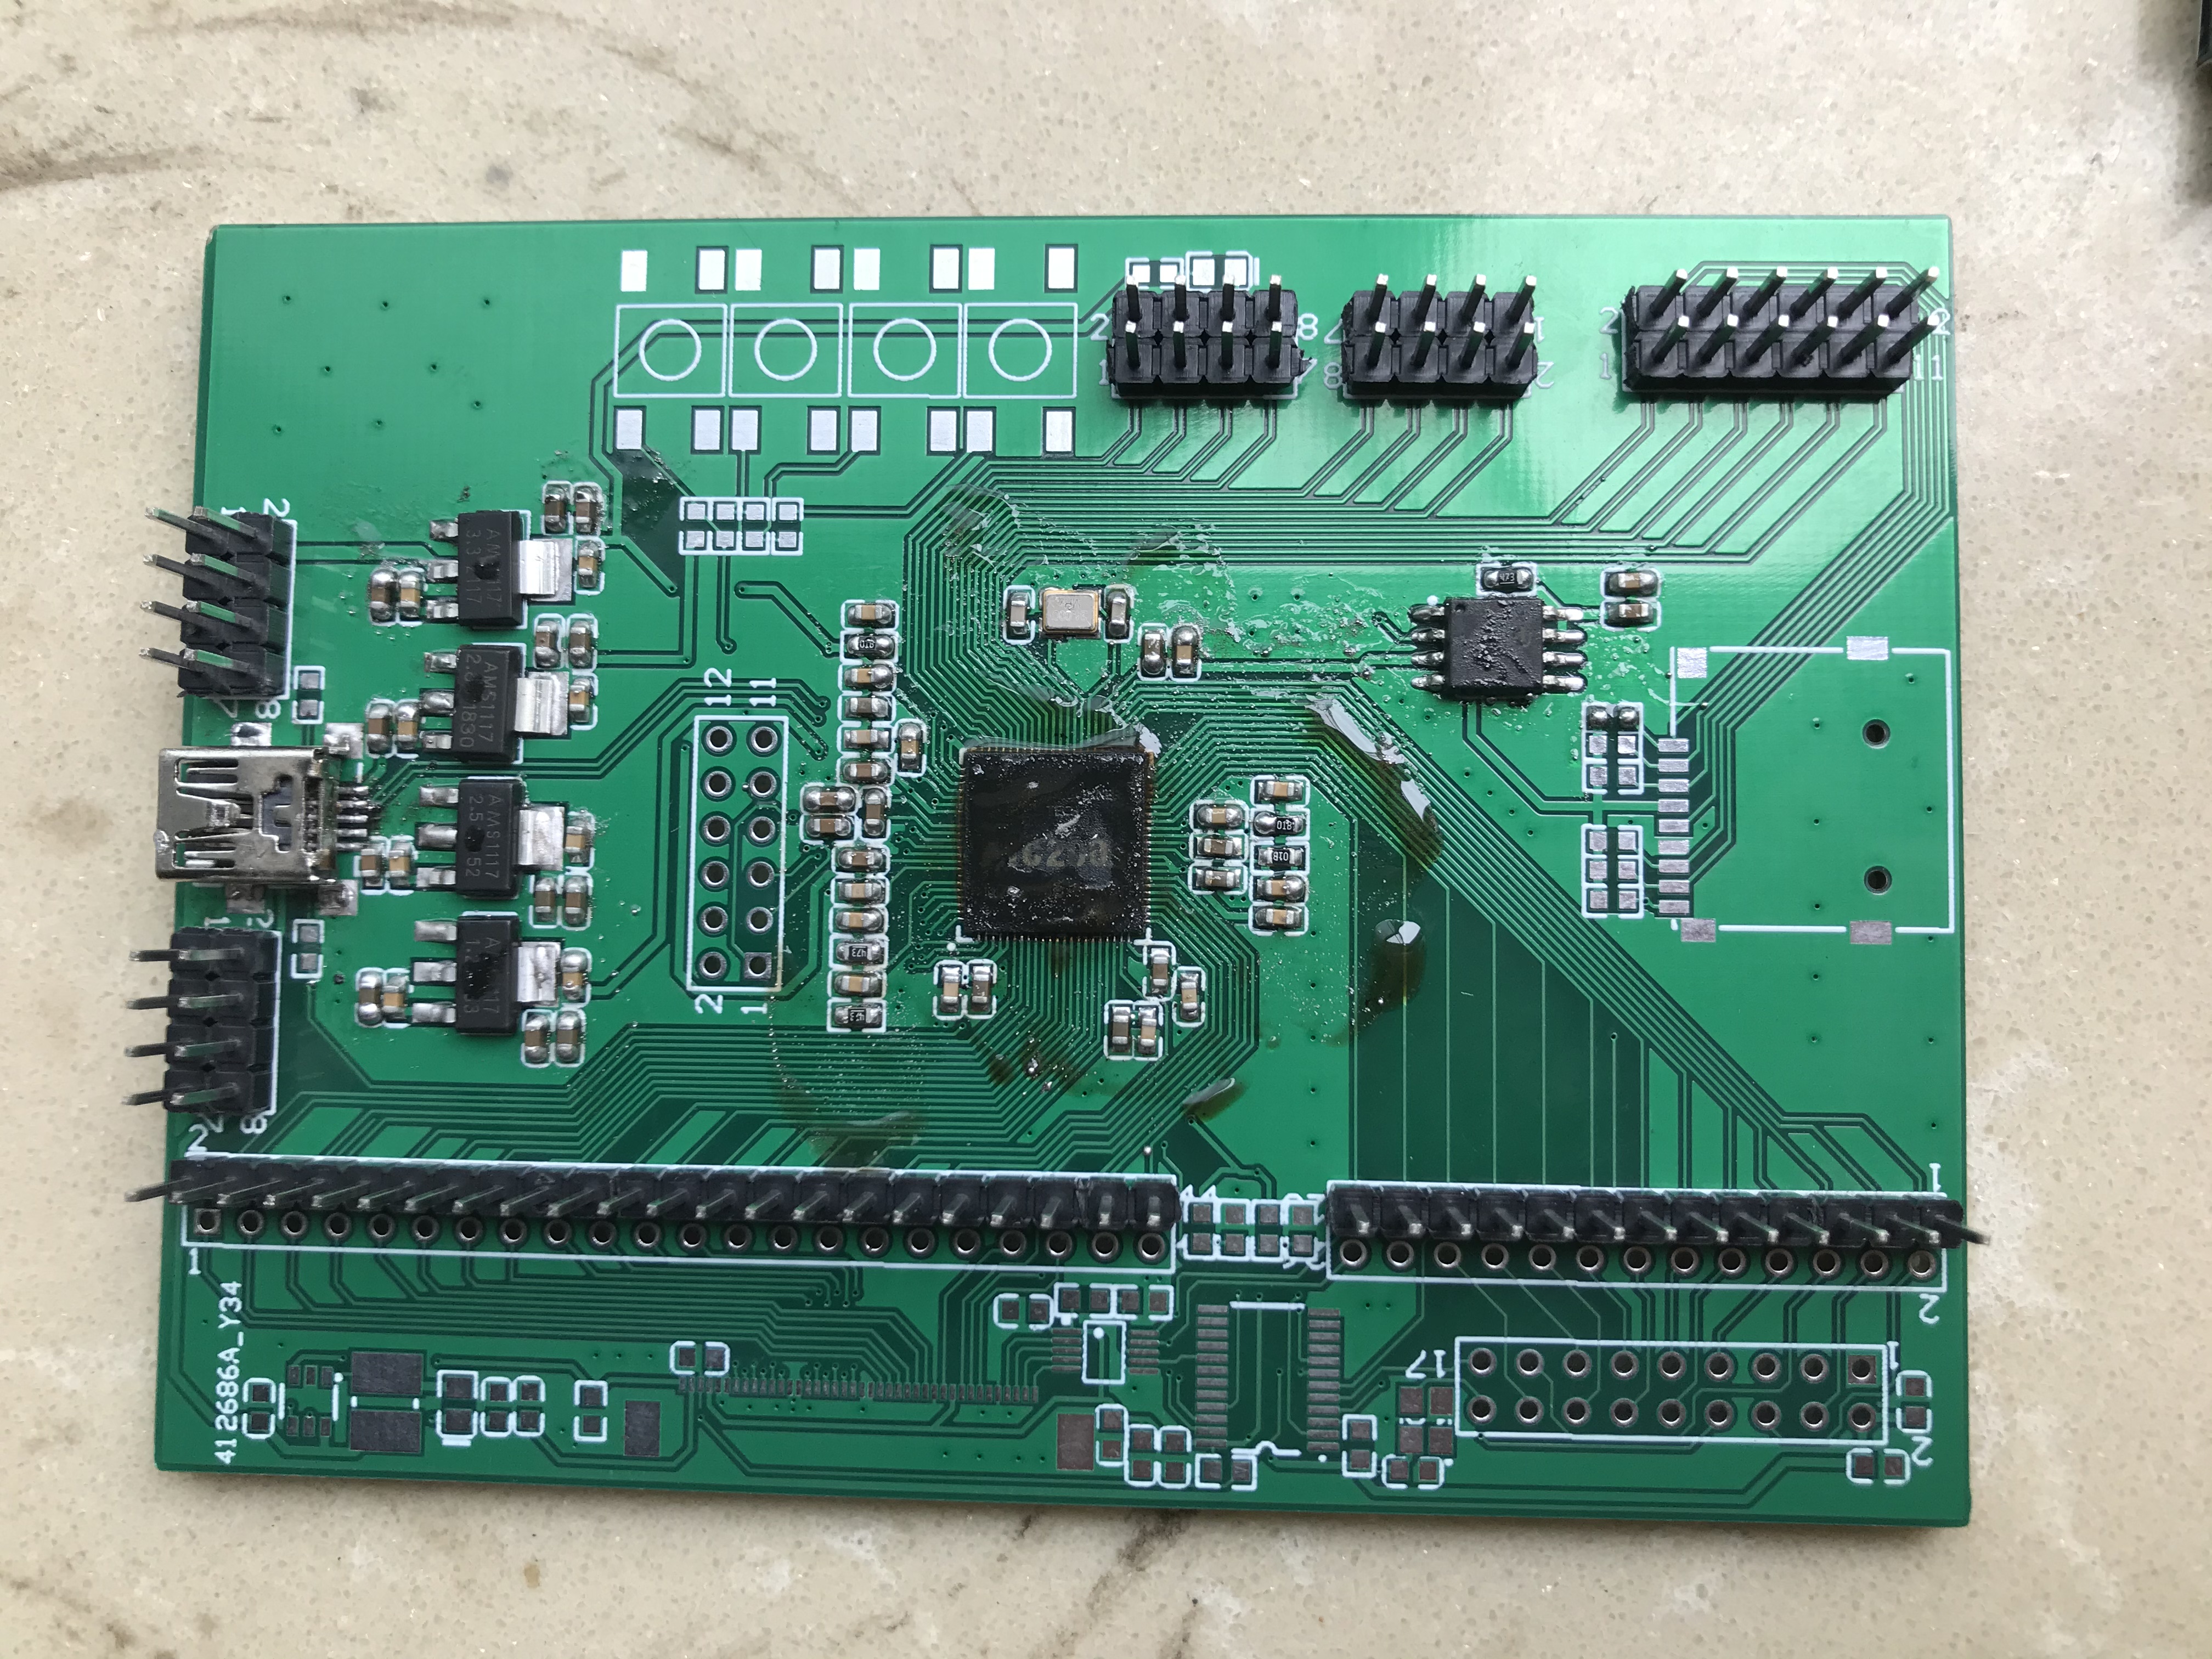
芯片吹下来 重焊,发现,,,,,,查电 -----开机 --------竟然进不了 fel模式,,,,,,发现 usb DM DP 短路. ......
底座吹下来 重焊,,,,顺利进入fel模式
离线
楼主 #13 2022-01-08 16:13:12 分享评论
- LinuxGo
- 会员
- 注册时间: 2021-01-07
- 已发帖子: 88
- 积分: 120
Re: 开源 全志f1c100s(200s)所有IO都引出
一顿操作,成功进入根目录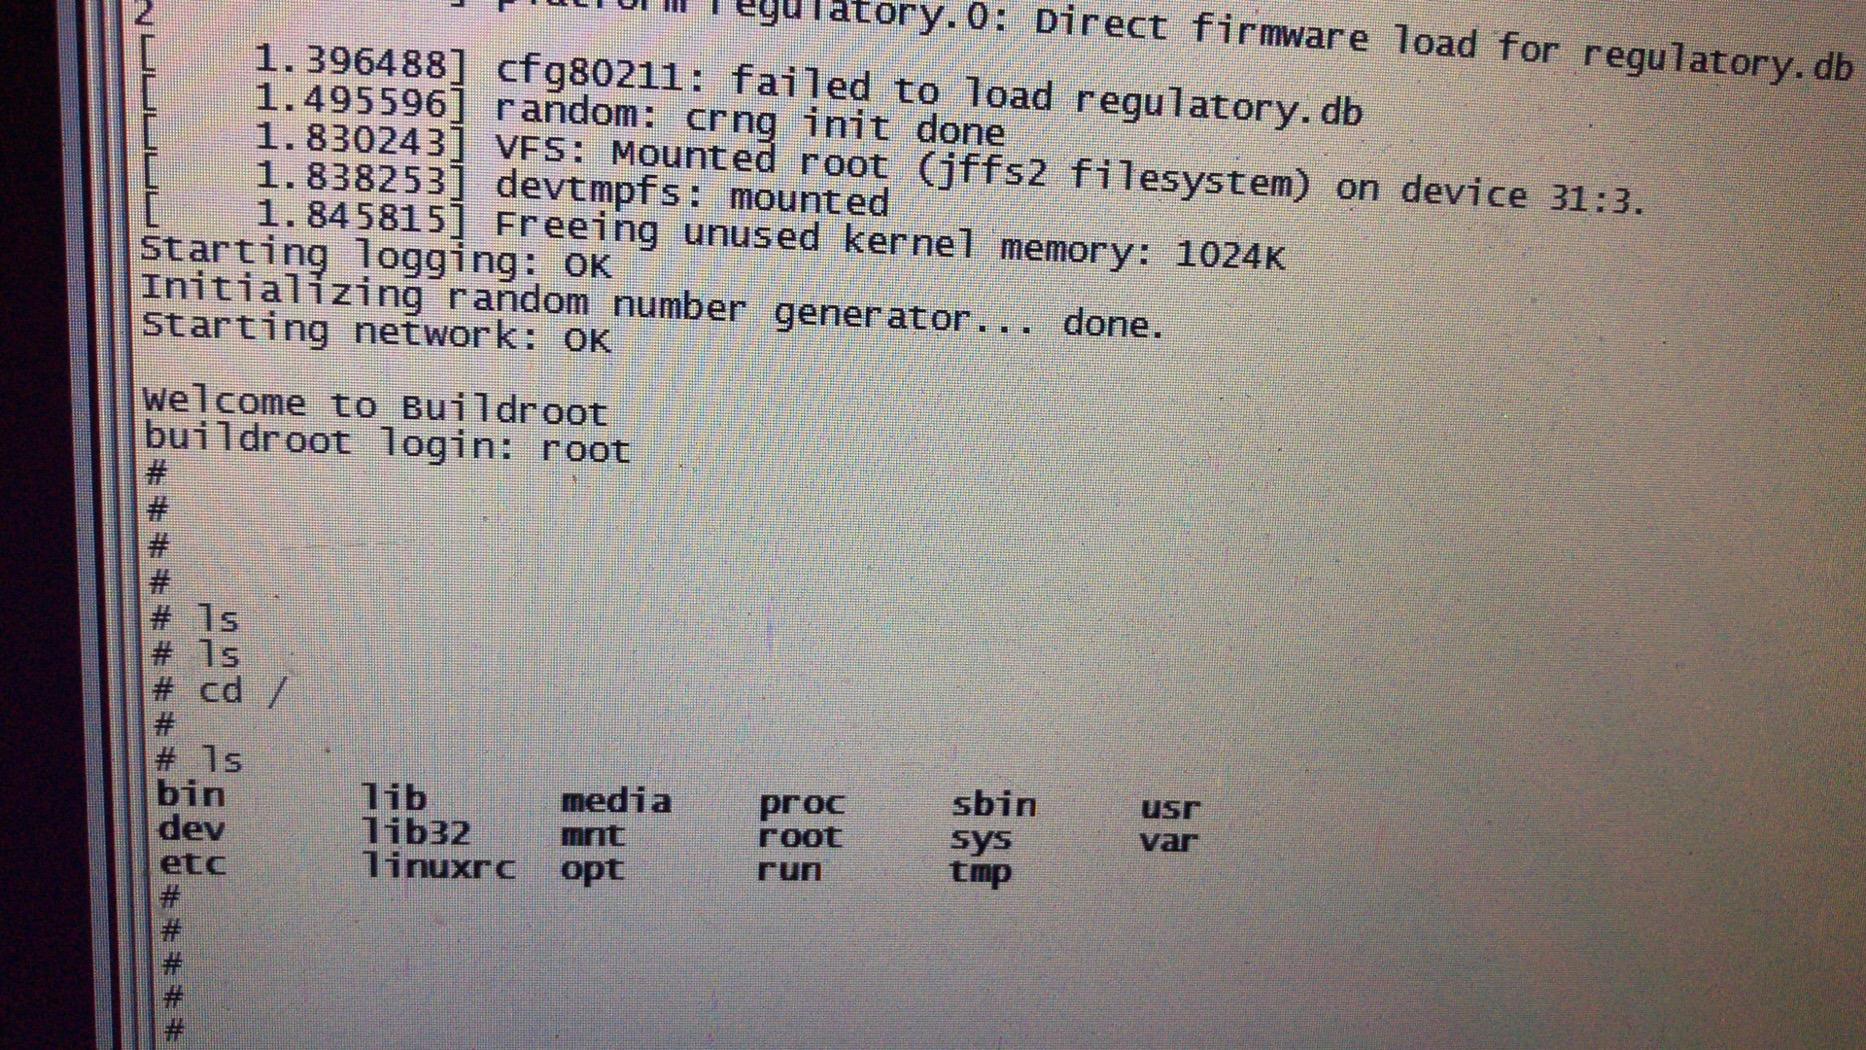
开启点灯之路
离线
楼主 #14 2022-01-08 19:30:00 分享评论
- LinuxGo
- 会员
- 注册时间: 2021-01-07
- 已发帖子: 88
- 积分: 120
Re: 开源 全志f1c100s(200s)所有IO都引出
修改设备树 设置成心跳灯, PA - PE 对应 0 1 2 3 4
	dtsleds {
		compatible = "gpio-leds";
		status = "okay";
		led0 {
				label = "red";
				gpios = <&pio 0 0 GPIO_ACTIVE_LOW>;
				default-state = "off";
				linux,default-trigger = "heartbeat";
		};

	};
最近编辑记录 LinuxGo (2022-01-08 20:28:45)
离线
楼主 #15 2022-01-10 13:58:57 分享评论
- LinuxGo
- 会员
- 注册时间: 2021-01-07
- 已发帖子: 88
- 积分: 120
Re: 开源 全志f1c100s(200s)所有IO都引出
lcd适配
修改uboot
LCD上输出显示,请通过配置 ARM architecture ‣ Enable graphical uboot console on HDMI, LCD or VGA 为 Y
接着配置同级的 LCD panel timing details 为:
x:800,y:480,depth:18,pclk_khz:33000,le:87,ri:40,up:31,lo:13,hs:1,vs:1,sync:3,vmode:0
注:此块屏为为 800480 规格,如为 480272 请尝试如下配置 x:480,y:272,depth:18,pclk_khz:10000,le:42,ri:8,up:11,lo:4,hs:1,vs:1,sync:3,vmode:0
并将 LCD panel backlight pwm pin 设为:
PE6 (查自 Nano 原理图)
烧录到ram 测试
sudo sunxi-fel uboot u-boot-nano-lcd800480/u-boot-sunxi-with-spl.bin
sudo sunxi-fel -p spiflash-write 0 u-boot-nano-lcd800480/u-boot-sunxi-with-spl.bin
修改linux kernel
suniv-f1c100s-licheepi-nano.dts 修改
panel: panel {
//当前默认的 LCD配置 为480X272大小的屏幕,
compatible = "qiaodian,qd43003c0-40", "simple-panel";
若要修改为适配800X480的屏,此处应当:
/ { } 所包裹的根节点目录下,panel属性下的compatible,应修改为:
“lg,lb070wv8”, “simple-panel”
终端输入echo "123333" > /dev/tty0 屏幕有字符出现
重启进入uboot
print bootargs观察默认参数
bootargs=console=ttyS0,115200 panic=5 rootwait root=/dev/mtdblock3 rw rootfstype=jffs2
设置lcd 作为 终端控制台
setenv bootargs 'console=tty1 console=ttyS0,115200 panic=5 rootwait root=/dev/mtdblock3 rw rootfstype=jffs2'
保存
saveenv
修改/etc/inittab 文件 在里面加入下面这一行:
tty1::askfirst:-/bin/sh
修改完成以后保存/etc/inittab 并退出,然后重启开发板,重启以后开发板 LCD 屏幕最后一行会显示下面一行语句:
Please press Enter to activate this console
echo "Hello" > /dev/tty1
cat /dev/random > /dev/tty1
随机像素
cat /dev/urandom > /dev/fb0
离线
楼主 #16 2022-01-10 14:02:41 分享评论
- LinuxGo
- 会员
- 注册时间: 2021-01-07
- 已发帖子: 88
- 积分: 120
Re: 开源 全志f1c100s(200s)所有IO都引出

离线
楼主 #17 2022-01-10 17:09:13 分享评论
- LinuxGo
- 会员
- 注册时间: 2021-01-07
- 已发帖子: 88
- 积分: 120
Re: 开源 全志f1c100s(200s)所有IO都引出
感谢 晕哥,给了个优秀,还发了两颗芯片的红包!!
继续
离线
楼主 #18 2022-01-10 17:10:31 分享评论
- LinuxGo
- 会员
- 注册时间: 2021-01-07
- 已发帖子: 88
- 积分: 120
Re: 开源 全志f1c100s(200s)所有IO都引出
LittlevGL 使用 lvgl
LittlevGL 是一个开源免费的GUI,支持触摸屏操作,LittlevGL 自带了丰富的控件:窗口、按键、标签、list、图表等,还可以自定义控件;支持很多特效:透明、阴影、自动显示隐藏滚动条、界面切换动画、图标打开关闭动画、平滑的拖拽控件、分层显示、反锯齿、仅耗少量内存的字体等等。
git clone --recursive
把demo 连同 工程一起下来
git clone --recursive https://github.com/lvgl/lv_port_linux_frame_buffer
使用cmake构建makefile 安装cmake
apt-get install cmake
这步可以不要,下载的工程里有了makefil文件了
修改makefile 里cc = [--------] //自己编译器的 路径。。。编译后 生成 demo文件
rz
到板子运行。。
离线
楼主 #19 2022-01-10 17:11:40 分享评论
- LinuxGo
- 会员
- 注册时间: 2021-01-07
- 已发帖子: 88
- 积分: 120
Re: 开源 全志f1c100s(200s)所有IO都引出

离线
#20 2022-01-10 17:20:19 分享评论
- 菜鸟
- 会员
- 注册时间: 2021-12-01
- 已发帖子: 1
- 积分: 1
Re: 开源 全志f1c100s(200s)所有IO都引出
优秀
离线
楼主 #21 2022-01-11 17:40:15 分享评论
- LinuxGo
- 会员
- 注册时间: 2021-01-07
- 已发帖子: 88
- 积分: 120
Re: 开源 全志f1c100s(200s)所有IO都引出
合并编译器
由于之前的操作中buildroot 采用的默认编译器,与,linux kernel 和 uboot 不一样。导致应用程序 需要用buildroot 中的编译器才能 正常执行。
接下来统一采用buildroot中的工具链 ,重新编译 linux kernel 和uboot
打包烧录
先把arm-linux-gcc 的环境变量改成buildroot中的位置,同步好
编译linux
make ARCH=arm CROSS_COMPILE=arm-linux- -j4
编译uboot
make ARCH=arm CROSS_COMPILE=arm-linux- -j4
编译root
make
打包
整体烧录
sudo sh BuildMyImage.sh
sudo sunxi-fel -p spiflash-write 0 f1c100s_spiflash_16M.bin
又是5分钟漫长的等待,,,,,,,,,,不知道情况怎么样
最近编辑记录 LinuxGo (2022-01-11 17:42:26)
离线
楼主 #22 2022-01-12 09:51:34 分享评论
- LinuxGo
- 会员
- 注册时间: 2021-01-07
- 已发帖子: 88
- 积分: 120
Re: 开源 全志f1c100s(200s)所有IO都引出
合并编译器-采用bulidroot中的编译器
由于之前的操作中buildroot 采用的默认编译器,与,linux kernel 和 uboot 不一样。导致应用程序 需要用buildroot 中的编译器才能 正常执行。
接下来统一采用buildroot中的工具链 ,重新编译 linux kernel 和uboot
打包烧录
先把arm-linux-gcc 的环境变量改成buildroot中的位置,同步好
编译linu
make ARCH=arm CROSS_COMPILE=arm-linux- -j4
编译uboot
make ARCH=arm CROSS_COMPILE=arm-linux- -j4
编译root
make
打包
整体烧录
sudo sh BuildMyImage.sh
sudo sunxi-fel -p spiflash-write 0 f1c100s_spiflash_16M.bin
2022/1/12
合并编译器-采用buildroot外部编译器
进入buildroot 目录,make menuconfig
设置如下:
Toolchain --->
Toolchain type (External toolchain) ---> //选择外部工具链
Toolchain (Custom toolchain) ---> //定制工具链
(/opt/gcc-linaro-7.2.1-2017.11-x86_64_arm-linux-gnueabi) Toolchain path
($(ARCH)-linux-gnueabi) Toolchain prefix
External toolchain gcc version (7.x) --->//根据实际外部工具链gcc 定
查看下gcc 版本
External toolchain kernel headers series (2.6.x) 先不改
External toolchain C library (glibc/eglibc) --->
make 看下效果
toolchain-external-custom Extracting
toolchain-external-custom Patching
toolchain-external-custom Configuring
Incorrect selection of kernel headers: expected 2.6.x, got 4.10.x
make[1]: *** [package/pkg-generic.mk:220: /home/jonsen/f1c100s/buildroot-2017.08/output/build/toolchain-external-custom/.stamp_configured] Error 1
make: *** [Makefile:79: _all] Error 2
提示内核选择错误,重新make menuconfig 修改目标内核版本 改成
External toolchain kernel headers series (4.10.x)
/usr/bin/make -j1 O=/home/jonsen/f1c100s/buildroot-2017.08/output HOSTCC="/usr/bin/gcc" HOSTCXX="/usr/bin/g++" silentoldconfig
toolchain-external-custom Configuring
toolchain-external-custom Building
/usr/bin/gcc -O2 -I/home/jonsen/f1c100s/buildroot-2017.08/output/host/include -DBR_CPU='"arm926ej-s"' -DBR_ABI='"aapcs-linux"' -DBR_FLOAT_ABI='"soft"' -DBR_MODE='"arm"' -DBR_SOFTFLOAT=1 -DBR_CROSS_PATH_SUFFIX='""' -DBR_CROSS_PATH_ABS='"/opt/gcc-linaro-7.2.1-2017.11-x86_64_arm-linux-gnueabi/bin"' -DBR_SYSROOT='"arm-buildroot-linux-gnueabi/sysroot"' -DBR_ADDITIONAL_CFLAGS='' -s -Wl,--hash-style=both toolchain/toolchain-wrapper.c -o /home/jonsen/f1c100s/buildroot-2017.08/output/build/toolchain-external-custom/toolchain-wrapper
toolchain-external-custom Installing to staging directory
/usr/bin/install -D -m 0755 /home/jonsen/f1c100s/buildroot-2017.08/output/build/toolchain-external-custom/toolchain-wrapper /home/jonsen/f1c100s/buildroot-2017.08/output/host/bin/toolchain-wrapper
ln: failed to create symbolic link '/home/jonsen/f1c100s/buildroot-2017.08/output/host/arm-buildroot-linux-gnueabi/sysroot/usr/lib': No such file or directory
make[1]: *** [package/pkg-generic.mk:269: /home/jonsen/f1c100s/buildroot-2017.08/output/build/toolchain-external-custom/.stamp_staging_installed] Error 1
make: *** [Makefile:79: _all] Error 2
提示 没有路径 ,尝试 sudo make
toolchain-external-custom Installing to staging directory
/usr/bin/install -D -m 0755 /home/jonsen/f1c100s/buildroot-2017.08/output/build/toolchain-external-custom/toolchain-wrapper /home/jonsen/f1c100s/buildroot-2017.08/output/host/bin/toolchain-wrapper
ln: failed to create symbolic link '/home/jonsen/f1c100s/buildroot-2017.08/output/host/arm-buildroot-linux-gnueabi/sysroot/usr/lib': No such file or directory
make: *** [package/pkg-generic.mk:269: /home/jonsen/f1c100s/buildroot-2017.08/output/build/toolchain-external-custom/.stamp_staging_installed] Error 1
还是提示No such file or directory
手动到该目录下 建立路径
cd output/host/arm-buildroot-linux-gnueabi/sysroot/
ls
mkdir usr
再回到buildroot根目录 make
看到 发现编译成功了
Generating root filesystem image rootfs.tar
ls -al ./output/images/
total 1680
drwxr-xr-x 2 jonsen jonsen 4096 Jan 5 12:11 .
drwxrwxr-x 6 jonsen jonsen 4096 Jan 12 09:21 ..
-rw-r--r-- 1 jonsen jonsen 1710080 Jan 12 09:25 rootfs.tar
最新生成的.
复制rootfs.tar 到 打包目录
sudo cp buildroot-2017.08/output/images/rootfs.tar rootfs/
解压
sudo tar -xvf rootfs.tar
随便把 uboot 和linux 重新编译以下然后打包烧录
编译linu
make ARCH=arm CROSS_COMPILE=arm-linux-gnueabi- -j4
编译uboot
make ARCH=arm CROSS_COMPILE=arm-linux-gnueabi- -j4
打包
sudo ./BuildMyImage.sh
烧录
sudo sunxi-fel -p spiflash-write 0 f1c100s_spiflash_16M.bin
离线
楼主 #23 2022-01-18 15:41:32 分享评论
- LinuxGo
- 会员
- 注册时间: 2021-01-07
- 已发帖子: 88
- 积分: 120
Re: 开源 全志f1c100s(200s)所有IO都引出
usb 虚拟串口 CDC 测试
USB 有关的网址
http://trac.gateworks.com/wiki/linux/OTG
https://openwrt.org/docs/guide-user/hardware/usb_gadget
相关知识补充
一些驱动被指定为M 编译。但是没有安装。这些模块可以放到rootfs里面去。等真正需要的时候再加载。这些就是通过make modules和modules_install完成的
insmod是把模块加载进内核,加载之后才能运行。
make modules_install 只是把编译好的模块拷贝到系统目录下(一般是/lib/modules/)
也可自己指定ko安装路径:
make modules_install INSTALL_MOD_PATH=/home/luther/gliethttp_dir
拷贝到系统目录下的目的是方便使用。一般加载驱动使用modprobe XXX命令,该命令从系统目录下查找名为XXX的模块。其实你也可以不做make modules_install,但是这样的话你就需要每次手动从编译目录里运行insmod.
运行modules_install的另一个作用是会运行depmod去生成modules.dep文件,该文件记录了模块之间的依赖关系。这样当你modprobe XXX的时候就能够把XXX所依赖的模块一并加载了
https://whycan.com/t_2401.html
进入linux 内核目录
make ARCH=arm menuconfig
对应的 gadget 驱动程序.Device Driver -> USB support -> USB Gadget support
<*> USB Gadget precomposed configurations (Serial Gadget (with CDC ACM and CDC OBEX support)) --->
编译 ,这里可以 编译成模块加载 ,也可以编译到内核。
如果选编译到内核就可以上电 直接将USB 虚拟成 串口。
注意 USB 工作在从机模式 USB ID 应该是高电平,内核代码里是PE2 。需要上拉。
电脑端 Zadig 驱动下载
https://zadig.akeo.ie/#google_vignette
最近编辑记录 LinuxGo (2022-01-18 15:43:24)
离线
楼主 #24 2022-01-18 15:43:31 分享评论
- LinuxGo
- 会员
- 注册时间: 2021-01-07
- 已发帖子: 88
- 积分: 120
Re: 开源 全志f1c100s(200s)所有IO都引出
板子运行 执行echo "123" > /dev/ttyGS0 发送数据到 电脑
执行 cat /dev/ttyGS0 ,,电脑端发送数据 可以看到回显
离线
楼主 #25 2022-01-18 16:03:27 分享评论
- LinuxGo
- 会员
- 注册时间: 2021-01-07
- 已发帖子: 88
- 积分: 120
Re: 开源 全志f1c100s(200s)所有IO都引出
特别提醒:电脑如果使用usb3.0 hub 的话可能不稳定,串口一直在叮咚
需要改成usb 2.0 hub
将usb转串口作为console
如果编译为usb g_serial 模块 则需要增加 开机加载
开机增加加载usb转串口驱动
vi /etc/init.d/S10udev 通过vi编辑S10udev文件,并在文件结尾中添加
modprobe g_serial
在 /etc/inittab 文件中添加
ttyGS0::respawn:/sbin/getty -L ttyGS0 57600 vt100
最近编辑记录 LinuxGo (2022-01-18 16:19:57)
离线
#26 2022-01-18 20:04:38 分享评论
- markjok
- 会员
- 注册时间: 2022-01-18
- 已发帖子: 0
- 积分: 0
Re: 开源 全志f1c100s(200s)所有IO都引出
离线
- 不通过:其他
楼主 #27 2022-01-27 16:37:14 分享评论
- LinuxGo
- 会员
- 注册时间: 2021-01-07
- 已发帖子: 88
- 积分: 120
Re: 开源 全志f1c100s(200s)所有IO都引出
关于lradc 调试
lradc是低精度adc,可以用来做按键检测.sunxi-keyboard.c中被调用
1)\linux-3.4\drivers\input\keyboard\sunxi-keyboard.c 用ADC实现的按钮动作驱动。
2)\linux-3.4\drivers\char\sunxi_ir_cut\ir-cut.c 用ADC读出ir cut的位置。
内核配置项路径如下:
Device Driver -> Input device support -> Keyboards -> <*> Allwinner sun4i low res adc attached tablet keys support
默认是打开的,
设备树中
lradc: lradc@1C23400 {
compatible = "allwinner,sun4i-a10-lradc-keys";
reg = <0x01C23400 0x400>;
interrupts = <22>;
status = "disabled";
};
&lradc {
vref-supply = <®_vcc3v0>;
status = "okay";
button-200 {
label = "Volume Up";
linux,code = <KEY_VOLUMEUP>;
channel = <0>;
voltage = <200000>;
};
button-400 {
label = "Volume Down";
linux,code = <KEY_VOLUMEDOWN>;
channel = <0>;
voltage = <400000>;
};
button-600 {
label = "Select";
linux,code = <KEY_SELECT>;
channel = <0>;
voltage = <600000>;
};
button-800 {
label = "Start";
linux,code = <KEY_OK>;
channel = <0>;
voltage = <800000>;
};
};
默认也有,
开机启动后 执行
cat /proc/interrupts
cat /proc/interrupts
CPU0
16: 183732 sun4i_irq 13 Edge timer@1c20c00
17: 259564 sun4i_irq 10 Edge sun6i-spi
18: 304 sun4i_irq 29 Edge 1c0c000.lcd-controller
19: 470 sun4i_irq 7 Edge mv64xxx_i2c
23: 341287 sun4i_irq 23 Edge sunxi-mmc
24: 12 sun4i_irq 22 Edge sun4i-a10-lradc-keys
25: 1057 sun4i_irq 1 Edge ttyS0
26: 36 sun4i_irq 26 Edge musb-hdrc.1.auto
62: 1 sunxi_pio_edge 34 Edge usb0-id-det
Err: 0
会看到lradc中断
24: 12 sun4i_irq 22 Edge sun4i-a10-lradc-keys
离线
楼主 #28 2022-01-27 16:38:33 分享评论
- LinuxGo
- 会员
- 注册时间: 2021-01-07
- 已发帖子: 88
- 积分: 120
Re: 开源 全志f1c100s(200s)所有IO都引出
在内核源码sun4i-lradc-keys.c 中加入printk函数 察看一些数据
static irqreturn_t sun4i_lradc_irq(int irq, void *dev_id)
{
	struct sun4i_lradc_data *lradc = dev_id;
	u32 i, ints, val, voltage, diff, keycode = 0, closest = 0xffffffff;

	ints  = readl(lradc->base + LRADC_INTS);

	/*
	 * lradc supports only one keypress at a time, release does not give
	 * any info as to which key was released, so we cache the keycode.
	 */

	if (ints & CHAN0_KEYUP_IRQ) {
		input_report_key(lradc->input, lradc->chan0_keycode, 0);
		lradc->chan0_keycode = 0;
	}

	if ((ints & CHAN0_KEYDOWN_IRQ) && lradc->chan0_keycode == 0) {
		val = readl(lradc->base + LRADC_DATA0) & 0x3f;
		voltage = val * lradc->vref / 63;
for (i = 0; i < lradc->chan0_map_count; i++) {
			diff = abs(lradc->chan0_map[i].voltage - voltage);
			if (diff < closest) {
				closest = diff;
				keycode = lradc->chan0_map[i].keycode;
			}
		}

		{
			int reg = 0;
			printk("val = %d,lradc voltage = %d,lradc->vref = %d\n",val,voltage,lradc->vref);
			reg = readl(lradc->base + LRADC_CTRL);
			printk("LRADC_CTRL=%x\n",reg);
			printk("keycode=%x\n",keycode);
		}
		lradc->chan0_keycode = keycode;
		input_report_key(lradc->input, lradc->chan0_keycode, 1);
	}

	input_sync(lradc->input);

	writel(ints, lradc->base + LRADC_INTS);

	return IRQ_HANDLED;
}
观察按下按键后的数据
[ 2762.695488] val = 13,lradc voltage = 412698,lradc->vref = 2000000
[ 2762.701589] LRADC_CTRL=2000141
[ 2762.704639] keycode=72
根据lradc voltage = 412698 修改设备树中
    button-200 {
        label = "Volume Up";
        linux,code = <KEY_VOLUMEUP>;
        channel = <0>;
        voltage = <200000>;
    };
各按键的电压值,可以改成一样或在附近的值.比如lradc voltage = 412698 可以把节点改成
    button-200 {
        label = "Volume Up";
        linux,code = <KEY_VOLUMEUP>;
        channel = <0>;
        voltage = <412698>;
    };
依次检测4个按键并修改设备树.
另外在调试总发现lrad 是非线性的.而且电压超过1.4v不能进中断,每个按键间隔最好在0.3V以上.通过上面修改,驱动部分基本正常了,每次按下都可以printk打印出原始电压,键值等.
接下来编写app测试,参看正点原子的教程,复制源码即可.
#include <sys/types.h>
#include <sys/stat.h>
#include <fcntl.h>
#include <stdio.h>
#include <poll.h>
#include <signal.h>
#include <sys/types.h>
#include <unistd.h>
#include <fcntl.h>

#include <linux/input.h>

/* 定义一个 input_event 变量,存放输入事件信息 */
static struct input_event inputevent;

int main(int argc, char *argv[])
{
    int fd;
    int err = 0;
    char *filename;

    filename = argv[1];

    if(argc != 2) {
    printf("Error Usage!\r\n");
    return -1;
    }

    fd = open(filename, O_RDWR);
    if (fd < 0) {
        printf("Can't open file %s\r\n", filename);
    return -1;
    }

    while (1) {
        err = read(fd, &inputevent, sizeof(inputevent));
        if (err > 0) { /* 读取数据成功 */
            switch (inputevent.type) {
                case EV_KEY:
                    if (inputevent.code < BTN_MISC)
                    { /* 键盘键值 */
                        printf("key %x %s\r\n", inputevent.code,inputevent.value ? "press" : "release");
                    }
                    else
                    {
                        printf("button %x %s\r\n", inputevent.code,inputevent.value ? "press" : "release");
                    }
                 break;

                /* 其他类型的事件,自行处理 */
                case EV_REL:
                break;
                case EV_ABS:
                break;
                case EV_MSC:
                break;
                case EV_SW:
                break;
            }
        }
        else {
             printf("读取数据失败\r\n");
        }
    }
    return 0;
}
运行app 每次按下松开会有如下打印:
[ 2763.057281] val = 0,lradc voltage = 0,lradc->vref = 2000000
[ 2763.062866] LRADC_CTRL=2000141
[ 2763.065917] keycode=73
key 73 press
key 73 release
最近编辑记录 LinuxGo (2022-01-27 16:41:20)
离线
楼主 #29 2022-02-06 08:08:00 分享评论
- LinuxGo
- 会员
- 注册时间: 2021-01-07
- 已发帖子: 88
- 积分: 120
Re: 开源 全志f1c100s(200s)所有IO都引出
2022/1/29
关于 NS2009 触摸
1->设备树 添加
 &i2c0 {
    pinctrl-0 = <&i2c0_pins>;
    pinctrl-names = "default";
    status = "okay";
    tsc2007: tsc2007@49 {
        compatible = "ti,tsc2007";
        reg = <0x49>;
		interrupt-parent = <&pio>;
		interrupts = <4 3 IRQ_TYPE_EDGE_BOTH>;
        gpios = <&pio 4 3 GPIO_ACTIVE_LOW>;
        ti,x-plate-ohms = <500>;
        status = "okay";
    };
 };
make 后 更新设备树
2->内核开启 触摸驱动 ,应该在input 下
  │ Symbol: TOUCHSCREEN_TSC2007 [=y]                                                                                                                               │
  │ Type  : tristate                                                                                                                                               │
  │ Prompt: TSC2007 based touchscreens                                                                                                                             │
  │   Location:                                                                                                                                                    │
  │     -> Device Drivers                                                                                                                                          │
  │       -> Input device support                                                                                                                                  │
  │         -> Generic input layer (needed for keyboard, mouse, ...) (INPUT [=y])                                                                                  │
  │           -> Touchscreens (INPUT_TOUCHSCREEN [=y])
开启tsc2007 驱动
make 重新编译 后更新内核
重启 发现按下屏幕没反应.
先调适中断,看是否能进入pio中断.
将PE3 用排线引出,插到gnd 和 3v3,cat /prco/interrupts 观察中断计数是否变化,发现中断不会变。说明加载中断后并不能进入中断。。。。
为了调试方便,重新 make menuconfig 将驱动选择去掉 ,tsc2007_core.c 和h文件复制出来。编译成模块。
研究probe函数
	err = devm_request_threaded_irq(&client->dev, ts->irq,
					tsc2007_hard_irq, tsc2007_soft_irq,
					IRQF_ONESHOT,
					client->dev.driver->name, ts);
	if (err) {
		dev_err(&client->dev, "Failed to request irq %d: %d\n",
			ts->irq, err);
		return err;
	}

	//tsc2007_stop(ts);
发现这里 devm_request_threaded_irq 申请中断后 在tsc2007_stop(ts); 会关闭中断。注释掉这句,重新编译加载。发现PE4 可以进入中断了
# cat /proc/interrupts
           CPU0
 16:       1893  sun4i_irq  13 Edge      timer@1c20c00
 17:     255997  sun4i_irq  10 Edge      sun6i-spi
 18:        305  sun4i_irq  29 Edge      1c0c000.lcd-controller
 19:       7077  sun4i_irq   7 Edge      mv64xxx_i2c
 23:        911  sun4i_irq  23 Edge      sunxi-mmc
 24:          0  sun4i_irq  22 Edge      sun4i-a10-lradc-keys
 25:        445  sun4i_irq   1 Edge      ttyS0
 63:        348  sunxi_pio_edge  35 Edge      tsc2007
Err:          0
不知那句去掉会怎样。。。。接下来调试iic数据读取。
tsc2007_stop(ts);不能删除.删除后在lvgl运行会出错.
在内核加入prink函数方便调试.
整体驱动思路是: 按下屏幕.irq上产生低电平,cpu中断,触发硬件中断,交给软中断下半部执行.在中断下半部中对iic设备读取。计算坐标。
原驱动是读取了原始数据直接上传到input的。为了屏幕调试方便这里修改了驱动,将原始数据转变成了屏幕像素坐标。
static irqreturn_t tsc2007_soft_irq(int irq, void *handle)
{
	struct tsc2007 *ts = handle;
	struct input_dev *input = ts->input;
	struct ts_event tc;
	u32 rt;
	printk("tsc2007_soft_irq\r\n");
	while (!ts->stopped && tsc2007_is_pen_down(ts)) {

		/* pen is down, continue with the measurement */

		mutex_lock(&ts->mlock);
		tsc2007_read_values(ts, &tc);
		mutex_unlock(&ts->mlock);
		rt = tsc2007_calculate_resistance(ts, &tc);
		{//Scale and offset the touchscreen coordinates
			s32 hmin = 216,hmax = 3940,vmin = 250,vmax = 3830;
			s32 x = 0,y=0;
			x = (tc.x - hmin)*1000/4655;
			if(x < 0)
			{
				x = 0;
			}
			else if(x > 800)
			{
				x = 800;
			}

			y = (tc.y - vmin)*1000/7458;
			if(y < 0)
			{
				y = 0;
			}
			else if(y > 480)
			{
				y = 480;
			}
			printk("h=%d v=%d\r\n",x,y);

			if (!rt && !ts->get_pendown_state) {
				/*
				* If pressure reported is 0 and we don't have
				* callback to check pendown state, we have to
				* assume that pen was lifted up.
				*/
				break;
			}

			if (rt <= ts->max_rt) {
				dev_dbg(&ts->client->dev,
					"DOWN point(%4d,%4d), resistance (%4u)\n",
					tc.x, tc.y, rt);

				rt = ts->max_rt - rt;

				input_report_key(input, BTN_TOUCH, 1);
				input_report_abs(input, ABS_X, x);
				input_report_abs(input, ABS_Y, y);
				input_report_abs(input, ABS_PRESSURE, rt);

				input_sync(input);

			} else {
				/*
				* Sample found inconsistent by debouncing or pressure is
				* beyond the maximum. Don't report it to user space,
				* repeat at least once more the measurement.
				*/
				dev_dbg(&ts->client->dev, "ignored pressure %d\n", rt);
			}
		}
		wait_event_timeout(ts->wait, ts->stopped, ts->poll_period);
	}

	dev_dbg(&ts->client->dev, "UP\n");

	input_report_key(input, BTN_TOUCH, 0);
	input_report_abs(input, ABS_PRESSURE, 0);
	input_sync(input);

	if (ts->clear_penirq)
		ts->clear_penirq();

	return IRQ_HANDLED;
}
这样加载驱动后,再运行lvgl demo就可以正常触摸了。
LittlevGL 使用 lvgl
LittlevGL 是一个开源免费的GUI,支持触摸屏操作,LittlevGL 自带了丰富的控件:窗口、按键、标签、list、图表等,还可以自定义控件;支持很多特效:透明、阴影、自动显示隐藏滚动条、界面切换动画、图标打开关闭动画、平滑的拖拽控件、分层显示、反锯齿、仅耗少量内存的字体等等。
中文翻译后的参考网站
http://lvgl.100ask.org/8.1/intro/index.html
git clone --recursive
把demo 连同 工程一起下来
git clone --recursive https://github.com/lvgl/lv_port_linux_frame_buffer
使用cmake构建makefile 安装cmake
apt-get install cmake
这步可以不要,下载的工程里有了makefil文件了 到工程目录里执行 make
#define LV_HOR_RES_MAX          (480)  //屏幕水平宽度 根据实际使用修改
#define LV_VER_RES_MAX          (320)  //屏幕垂直高度 根据实际使用修改
#define LV_COLOR_DEPTH     16           //LCD 屏幕的像素深度。一般的可能是rgb565 也有是rgb8888的就写 32 根据实际使用修改
#define LV_USE_GPU              1           //这个记得给他置0了一般的板子应该没有gpu
下面这几个可以不动
#define LV_USE_PERF_MONITOR     0  //右下角cpu信息输出。测试可以打开看下
#  define LV_MEM_SIZE    (32U * 1024U) //这里默认的是32K 用作lvgl的动态内存分配。可以根据实际情况修改,但是要大于等于2KB
#define LV_DISP_DEF_REFR_PERIOD      30   //刷新周期 30ms 就是刷新速率问题,看性能设置吧。
#define LV_INDEV_DEF_READ_PERIOD          30//输入设备的扫描时间,就是轮询按键的时间。默认30ms。
#define LV_USE_FILESYSTEM       1    //文件系统不用也可以给置0了
#define LV_USE_DEBUG        1         //debug信息输出可关闭
驱动修改
将lvgl driver模板拷贝出来修改 cp lv_drivers/lv_drv_conf_template.h ./lv_drv_conf.h
修改头 if 0改为 if 1
#  define USE_FBDEV           0    //把这个置位为1
#  define FBDEV_PATH          "/dev/fb0"  //确认是否为你设备的fb
闪动的光标 移除方法:
echo 0 > /sys/class/graphics/fbcon/cursor_blink
echo 0 > /sys/class/vtconsole/vtcon1/bind
lvgl加入input支持,1在头文件里使能。2加入input支持函数
    /*tuch function */
    evdev_init();
    lv_indev_drv_t indev_drv;
    lv_indev_drv_init(&indev_drv);
    indev_drv.type =LV_INDEV_TYPE_POINTER;
    indev_drv.read_cb =evdev_read;
    lv_indev_drv_register(&indev_drv);
注意:这部分函数要加在 屏幕显示设备初始化之后, 因为在lvgl中disp_drv 是所有对象的父节点。
离线

#31 2022-02-07 11:06:27 分享评论
- hongyancl
- 会员
- 注册时间: 2018-11-16
- 已发帖子: 19
- 积分: 3.5
Re: 开源 全志f1c100s(200s)所有IO都引出
mapleft wrote:
F1C 中间那个大洞是用老散热的么?, 我看很多人画的PCB中间的洞都是这么大的
这个洞是为了方便焊接,方便灌锡
离线
楼主 #32 2022-02-07 13:46:45 分享评论
- LinuxGo
- 会员
- 注册时间: 2021-01-07
- 已发帖子: 88
- 积分: 120
Re: 开源 全志f1c100s(200s)所有IO都引出
触摸添加tslib
在buildroot中
│ Symbol: BR2_PACKAGE_TSLIB [=y] │
│ Type : boolean │
│ Prompt: tslib │
│ Location: │
│ -> Target packages │
│ -> Libraries │
│ -> Hardware handling
打开后 编译root 重新打包后烧录
buildroot 配置中tslib使能后,在 /etc/profile中加入以下内容。
#!/bin/sh
export T_ROOT=/usr/tslib4arm #目录
export TSLIB_TSDEVICE=/dev/input/event1 #触摸屏设备文件
export TSLIB_CALIBFILE=/etc/pointercal #指定触摸屏校准文件pintercal的存放位置
export TSLIB_CONFFILE=/etc/ts.conf #tslib模块配置文件
export TSLIB_PLUGINDIR=/usr/lib/ts/ #tslib插件库目录
export TSLIB_CONSOLEDEVICE=/dev/tty
export TSLIB_FBDEVICE=/dev/fb0 #framebuffer设备文件
echo "tslib init success!"
环境变量
#生效
source /etc/profile
cd /usr/bin/
ls ts*
ts_calibrate ts_print ts_test ts_verify
ts_finddev ts_print_mt ts_test_mt ts_verify_ts.conf
ts_harvest ts_print_raw ts_uinput
这些都是tslib自带的测试程序,运行ts_calibrate
完成5点测试便可以得到校正常数
vi /etc/pointercal 可以看到校正常数
修改lvgl Linux demo使用tslib获取触摸坐标
修改代码为tslib库获取触摸坐标
https://whycan.com/t_2303.html
参考这里
离线

#34 2023-01-30 17:56:05 分享评论
- Jkkk
- 会员
- 注册时间: 2023-01-30
- 已发帖子: 8
- 积分: 8
Re: 开源 全志f1c100s(200s)所有IO都引出
学习了,一直没搞通
离线
#36 2023-05-19 14:39:27 分享评论
- sjshe3326
- 会员
- 注册时间: 2020-10-19
- 已发帖子: 125
- 积分: 69.5
Re: 开源 全志f1c100s(200s)所有IO都引出
mapleft wrote:
F1C 中间那个大洞是用老散热的么?, 我看很多人画的PCB中间的洞都是这么大的
因为没有风枪,后面有个洞可以用烙铁焊地下的地
离线
#37 2024-01-24 16:01:57 分享评论
- wl989898
- 会员
- 注册时间: 2024-01-15
- 已发帖子: 42
- 积分: 5
Re: 开源 全志f1c100s(200s)所有IO都引出
所有IO都引出,是个好办法,以后做板子都要引出IO
离线
东莞哇酷科技有限公司开发