- 首页
- » 搜索
- » coolesp32 发表的帖子
页次: 1
#2 ESP32/ESP8266 » 我的ESP32板子通过电源线插在电脑usb口上时,可以看到led灯闪烁(程序在运行),但是插在手机充电器上时led无任何反应,像是程序没有跑 » 2017-10-09 14:05:06
#4 Re: ESP32/ESP8266 » 我想DIY一个ESP32门磁, 连接家里面的WIFI路由器, 当门被打开之后,发一条微信信息给我。也就是说ESP32里面跑一个轻量级微信 » 2017-10-07 13:57:04
#5 Re: ESP32/ESP8266 » 请教大家我用esp32操作MFRC522读卡,发现读写一个字节有问题,请问有没有做过SPI的朋友? » 2017-10-06 16:05:44
Linux初学者 wrote:
我翻半天也没有翻到,
不过还是有一个版本寄存器
VersionReg,
将就着用吧。
https://www.nxp.com/docs/en/data-sheet/MFRC522.pdf
果然有,谢谢大神,
MFRC522 version 1.0 software version is: 91h.
MFRC522 version 2.0 software version is: 92h.
#8 Re: ESP32/ESP8266 » 台湾的螃蟹卡来抢esp32的饭碗了 » 2017-10-06 15:56:05
#11 Re: ESP32/ESP8266 » ESP32的双核怎么使用? » 2017-09-30 11:31:01
用 xTaskCreatePinnedToCore 创建任务, 最后一个参数就是内核Id, 0第一个, 1第二个.
BaseType_t xTaskCreatePinnedToCore(
TaskFunction_t pxTaskCode,
const char * pcName,
const uint16_t usStackDepth,
void *pvParameters,
UBaseType_t uxPriority,
TaskHandle_t *pxCreatedTask,
const BasType_t xCoreID)
顾名思义, Pin的意思是绑定, Core是核心,
那就是创建一个任务,绑定到指定的核心。
#14 Re: ESP32/ESP8266 » esp32温度传感器读出来 1148的温度值,怎么与摄氏温度对应? » 2017-09-30 10:26:58
自己搞定了, 参考 https://esp32.com/viewtopic.php?t=72
// simply code
uint8 temper;
float celsius;temper= temperature_sensor_read();
celsius = ( temper - 32 ) / 1.8;
printf("Sensor onBoard is F: %i C: %.2f\n", temper, clesius);
#18 ESP32/ESP8266 » 我想DIY一个ESP32门磁, 连接家里面的WIFI路由器, 当门被打开之后,发一条微信信息给我。也就是说ESP32里面跑一个轻量级微信 » 2017-09-29 15:40:04
#20 Re: ESP32/ESP8266 » 奇怪,我用esp32作为wifi热点, 出现expression: esp_wifi_set_config错误, 而且系统不断复位 » 2017-09-29 15:00:05
// Main application
void app_main()
{

	// disable the default wifi logging
	esp_log_level_set("wifi", ESP_LOG_NONE);

	// create the event group to handle wifi events
	event_group = xEventGroupCreate();

	// initialize the tcp stack
	tcpip_adapter_init();

	// stop DHCP server
	ESP_ERROR_CHECK(tcpip_adapter_dhcps_stop(TCPIP_ADAPTER_IF_AP));

	// assign a static IP to the network interface
	tcpip_adapter_ip_info_t info;
    memset(&info, 0, sizeof(info));
	IP4_ADDR(&info.ip, 192, 168, 10, 1);
    IP4_ADDR(&info.gw, 192, 168, 10, 1);
    IP4_ADDR(&info.netmask, 255, 255, 255, 0);
	ESP_ERROR_CHECK(tcpip_adapter_set_ip_info(TCPIP_ADAPTER_IF_AP, &info));

	// start the DHCP server
    ESP_ERROR_CHECK(tcpip_adapter_dhcps_start(TCPIP_ADAPTER_IF_AP));

	// initialize the wifi event handler
	ESP_ERROR_CHECK(esp_event_loop_init(event_handler, NULL));

	// initialize the wifi stack in AccessPoint mode with config in RAM
	wifi_init_config_t wifi_init_config = WIFI_INIT_CONFIG_DEFAULT();
	ESP_ERROR_CHECK(esp_wifi_init(&wifi_init_config));
	ESP_ERROR_CHECK(esp_wifi_set_storage(WIFI_STORAGE_RAM));
	ESP_ERROR_CHECK(esp_wifi_set_mode(WIFI_MODE_AP));

	// configure the wifi connection and start the interface
	wifi_config_t ap_config = {
        .ap = {
            .ssid = CONFIG_AP_SSID,
            .password = CONFIG_AP_PASSWORD,
			.ssid_len = 0,
			.channel = CONFIG_AP_CHANNEL,
			.authmode = CONFIG_AP_AUTHMODE,
			.ssid_hidden = CONFIG_AP_SSID_HIDDEN,
			.max_connection = CONFIG_AP_MAX_CONNECTIONS,
			.beacon_interval = CONFIG_AP_BEACON_INTERVAL,
        },
    };
	ESP_ERROR_CHECK(esp_wifi_set_config(WIFI_IF_AP, &ap_config));

	// start the wifi interface
	ESP_ERROR_CHECK(esp_wifi_start());
	printf("Starting access point, SSID=%s\n", CONFIG_AP_SSID);

	// start the main task
    xTaskCreate(&monitor_task, "monitor_task", 2048, NULL, 5, NULL);
	xTaskCreate(&station_list_task, "station_list_task", 2048, NULL, 5, NULL);
}#21 ESP32/ESP8266 » 奇怪,我用esp32作为wifi热点, 出现expression: esp_wifi_set_config错误, 而且系统不断复位 » 2017-09-29 14:57:54
- coolesp32
- 回复: 3
[0;32mI (1128) cpu_start: App cpu up.[0m
[0;32mI (1141) heap_alloc_caps: Initializing. RAM available for dynamic allocation:[0m
[0;32mI (1163) heap_alloc_caps: At 3FFAE2A0 len 00001D60 (7 KiB): DRAM[0m
[0;32mI (1184) heap_alloc_caps: At 3FFB7A88 len 00028578 (161 KiB): DRAM[0m
[0;32mI (1205) heap_alloc_caps: At 3FFE0440 len 00003BC0 (14 KiB): D/IRAM[0m
[0;32mI (1226) heap_alloc_caps: At 3FFE4350 len 0001BCB0 (111 KiB): D/IRAM[0m
[0;32mI (1248) heap_alloc_caps: At 40093160 len 0000CEA0 (51 KiB): IRAM[0m
[0;32mI (1269) cpu_start: Pro cpu start user code[0m
[0;32mI (1326) cpu_start: Starting scheduler on PRO CPU.[0m
[0;32mI (1331) cpu_start: Starting scheduler on APP CPU.[0m
[0;32mI (1361) system_api: Base MAC address is not set, read default base MAC address from BLK0 of EFUSE[0m
[0;32mI (1361) system_api: Base MAC address is not set, read default base MAC address from BLK0 of EFUSE[0m
ESP_ERROR_CHECK failed: esp_err_t 0xb at 0x400df5e8
file: "C:/esp32-tutorial/12_accesspoint/main/main.c" line 168
func: app_main
expression: esp_wifi_set_config(WIFI_IF_AP, &ap_config)
Backtrace: 0x4008687c:0x3ffb88f0 0x40086bf9:0x3ffb8910 0x400df5e8:0x3ffb8930 0x400d08aa:0x3ffb8a00
Rebooting...
ets Jun 8 2016 00:22:57
就酱紫一直重启
#23 Re: ESP32/ESP8266 » 蓝牙协议简介【转载】 » 2017-09-29 14:27:18
#25 ESP32/ESP8266 » 在买了一块开发板(ESP32 DEVKIT),环境配好后,调用打开wifi,在调用esp_wifi_start()时,报错如下: phy_i » 2017-09-28 15:23:45
#26 ESP32/ESP8266 » 一个很巧妙的STM32一键下载原理图 » 2017-09-22 09:38:50
- coolesp32
- 回复: 0
http://blog.sina.com.cn/s/blog_13552328d0102vzcr.html
要想了解一键下载电路的工作过程,首先要了解STM32的几种启动模式。
STM32的几种启动模式如下表所示:

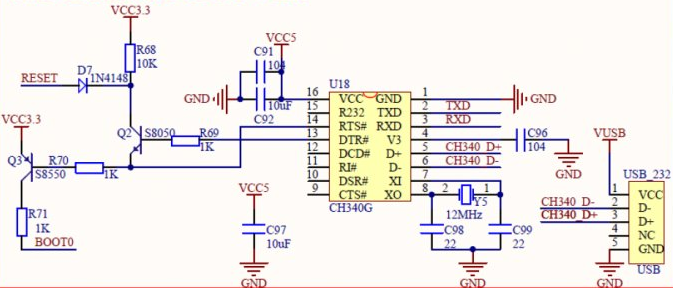
从表中可知,我们想用串口下载代码,就要配置BOOT0为1,BOOT1为0,但是如果想让STM32一复位就运行代码,就要配置BOOT0为0,BOOT1配置为什么都可以,为了解决这个问题,我们可以设计一个电路,通过串口转USB芯片CH340G的DTR#和RTS#引脚的信号来控制一键下载电路,从而间接控制STM32的RESET和BOOT0引脚的信号,来达到通过串口一键下载和运行的效果,省去了购买仿真器的费用,下载程序也变得简单方便,一键下载电路如下图所示:
串口下载软件选用的是MCUISP,通过串口的DTR和RTS信号来自动配置BOOT0和RESET信号,不需要用户手动切换它们的状态,直接串口软件自动控制,可以方便的下载代码。
打开 MCUISP,点击搜索串口,将自动找到电路板板载串口,在bps中选择波特率为460800,左下角选择:DTR的低电平复位,RTS 高电平进 BootLoader。再加载烧写文件。
#27 ESP32/ESP8266 » UART中的硬件流控RTS与CTS » 2017-09-22 09:25:15
- coolesp32
- 回复: 0
http://blog.csdn.net/haozi0_0/article/details/47275045
硬流控的RTS、CTS:
(现在做串口使用RTS/CTS必看内容,因为MTK/)
RTS (Require ToSend,发送请求)为输出信号,用于指示本设备准备好可接收数据,低电平有效,低电平说明本设备可以接收数据。
CTS (Clear ToSend,发送允许)为输入信号,用于判断是否可以向对方发送数据,低电平有效,低电平说明本设备可以向对方发送数据。
此处有人将CTS翻译为发送允许,我感觉的确比翻译为清除发送好。因为CTS是对方的RTS控制己方的CTS是否允许发送的功能。
#28 Re: ESP32/ESP8266 » ESP32 乐鑫官方资料收集贴 » 2017-09-22 08:57:29
页次: 1
- 首页
- » 搜索
- » coolesp32 发表的帖子
东莞哇酷科技有限公司开发