- 首页
- » 搜索
- » 605364021 发表的帖子
#2 Re: 全志 SOC » v3s RTC使用备用电池时,时间只保存,不走怎么回事? » 2019-07-10 22:01:41
https://whycan.cn/files/members/370/QQ20180202112836.jpg
https://whycan.cn/files/members/370/QQ20180202112307.png
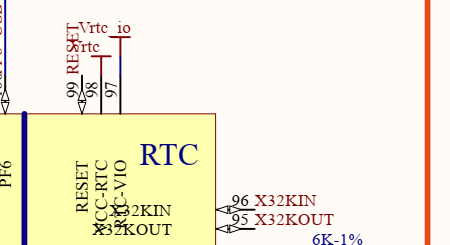
终于解决V3s自带的RTC不准问题,
电阻电容调大又调小,始终解决不了时间不准问题,
淘宝买一片PCF8563, 外挂上去解决这个问题。dts修改:
&i2c0 {
status = "okay";ns2009: ns2009@48 {
compatible = "nsiway,ns2009";
reg = <0x48>;
};
rtc@51 {
compatible = "nxp,pcf8563";
reg = <0x51>;
};
};PCF8563驱动加入内核:
CONFIG_RTC_DRV_PCF8563=y
我通用选择外接pcf8563芯片用作外部rtc,但是我从打印信息中看到,系统使用的依旧是内部RTC?设备节点有2个RTC,分别是sun6i-rtc和rtc-pcf8563,我想问一下需要在设备树在禁止sun6i-rtc?我认为我的v3s现在并没有使用外接的pcf8563-rtc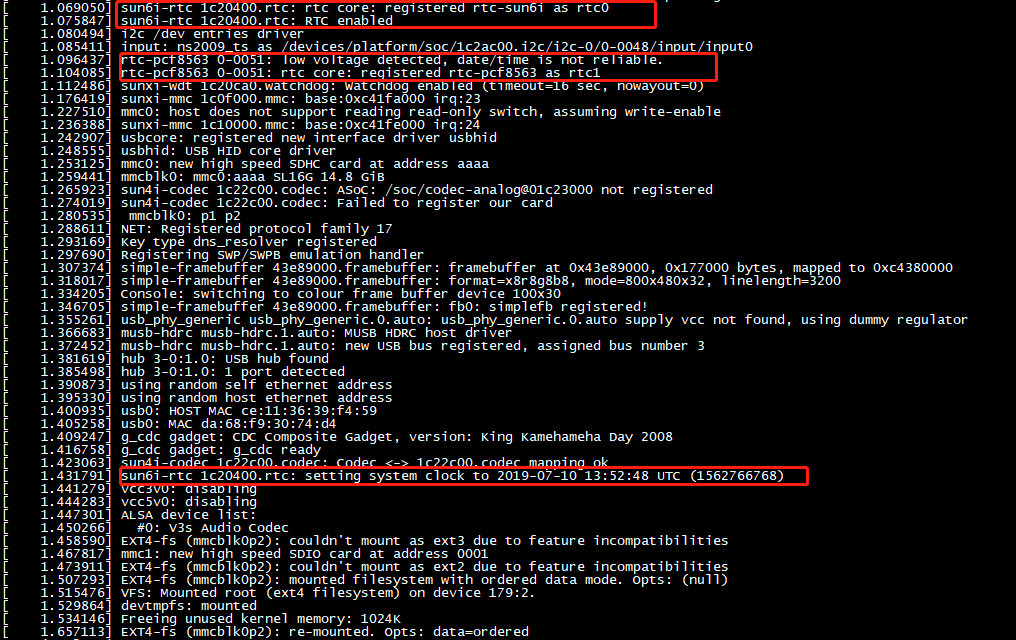
还有一个问题就是,我在查看pcf8563-rtc时间时hwclock -f /dev/rtc1 提示
rtc-pcf8563 0-0051: low voltage detected, date/time is not reliable.
hwclock: RTC_RD_TIME: Invalid argument
有人外接时候碰到过吗?这是pcf8563-rtc没有用上?
#3 Re: 全志 SOC » 关于 Gparted进行SD卡分区问题 » 2019-06-21 11:09:01
#4 Re: 全志 SOC » 关于 Gparted进行SD卡分区问题 » 2019-06-20 22:57:15
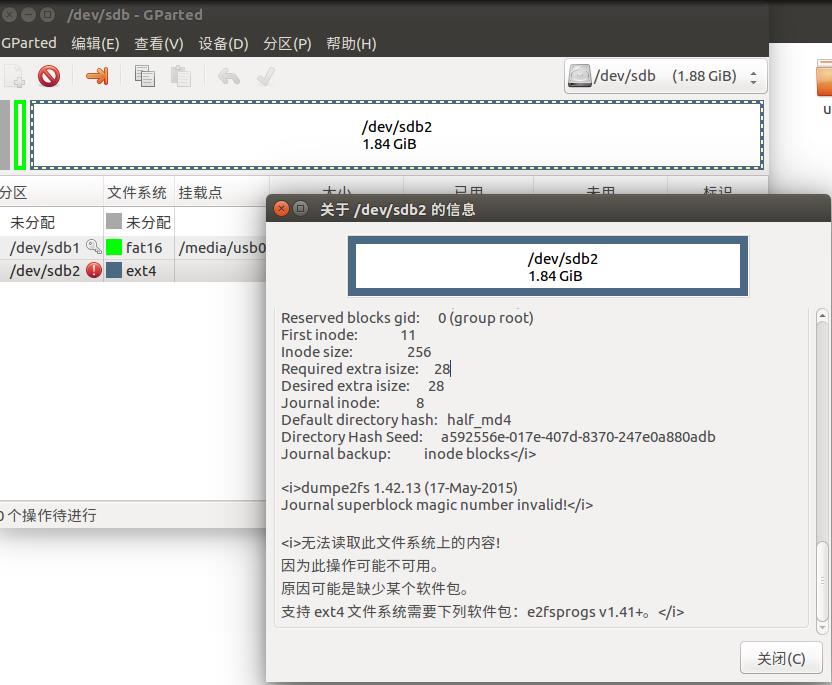
我在解决的时候发现是ext4文件系统功能引起的无法挂载,has_journal日志功能存在的时候,ext4分区无法挂载,我尝试吧这个文件系统功能去掉后,是可以成功挂载的,但是我使用晕哥提供的文件系统以及我以往成功运行的文件系统都是无法正确启动。
[    1.440383] EXT4-fs (mmcblk0p2): couldn't mount as ext3 due to feature incompatibilities
[    1.449630] EXT4-fs (mmcblk0p2): couldn't mount as ext2 due to feature incompatibilities
[    1.473268] EXT4-fs (mmcblk0p2): warning: mounting unchecked fs, running e2fsck is recommended
[    1.484155] EXT4-fs (mmcblk0p2): mounted filesystem without journal. Opts: (null)
[    1.491827] VFS: Mounted root (ext4 filesystem) on device 179:2.
[    1.501335] devtmpfs: mounted
[    1.505605] Freeing unused kernel memory: 1024K
[    1.514607] Starting init: /sbin/init exists but couldn't execute it (error -8)
[    1.523472] Starting init: /bin/sh exists but couldn't execute it (error -8)
[    1.530648] Kernel panic - not syncing: No working init found.  Try passing init= option to kernel. See Linux Documentation/admin-guide/init.rst for guidance.
[    1.544807] CPU: 0 PID: 1 Comm: swapper/0 Not tainted 4.13.16-licheepi-zero+ #13
[    1.552190] Hardware name: Allwinner sun8i Family
[    1.556931] [<c010e4c4>] (unwind_backtrace) from [<c010b218>] (show_stack+0x10/0x14)
[    1.564677] [<c010b218>] (show_stack) from [<c06664dc>] (dump_stack+0x84/0x98)
[    1.571901] [<c06664dc>] (dump_stack) from [<c011b544>] (panic+0xdc/0x248)
[    1.578778] [<c011b544>] (panic) from [<c0678ef0>] (kernel_init+0x100/0x110)
[    1.585825] [<c0678ef0>] (kernel_init) from [<c0107578>] (ret_from_fork+0x14/0x3c)
[ 1.593398] Rebooting in 5 seconds..还有一种情况就是当我解压文件系统并在ext4分区重新添加has_journal功能时,开发板启动信息显示无法找到ext4分区,难道是tf卡的问题?我已经用2张tf卡试过
[    1.434514]   #0: V3s Audio Codec
[    1.440421] EXT4-fs (mmcblk0p2): couldn't mount as ext3 due to feature incompatibilities
[    1.449675] EXT4-fs (mmcblk0p2): couldn't mount as ext2 due to feature incompatibilities
[    1.461824] JBD2: no valid journal superblock found
[    1.466800] EXT4-fs (mmcblk0p2): error loading journal
[    1.473809] EXT4-fs (mmcblk0p2): couldn't mount as ext3 due to feature incompatibilities
[    1.483139] EXT4-fs (mmcblk0p2): couldn't mount as ext2 due to feature incompatibilities
[    1.495212] JBD2: no valid journal superblock found
[    1.500203] EXT4-fs (mmcblk0p2): error loading journal
[    1.506561] List of all partitions:
[    1.510081] b300         1967104 mmcblk0
[    1.510087]  driver: mmcblk
[    1.516961]   b301           30720 mmcblk0p1 5decf8e4-01
[    1.516965]
[    1.523758]   b302         1934336 mmcblk0p2 5decf8e4-02
[    1.523760]
[    1.530570] No filesystem could mount root, tried:
[    1.530573]  ext3
[    1.535441]  ext2
[    1.537377]  ext4
[    1.539299]  vfat
[    1.541219]
[    1.544632] Kernel panic - not syncing: VFS: Unable to mount root fs on unknown-block(179,2)
[    1.553062] CPU: 0 PID: 1 Comm: swapper/0 Not tainted 4.13.16-licheepi-zero+ #13
[    1.560444] Hardware name: Allwinner sun8i Family
[    1.565183] [<c010e4c4>] (unwind_backtrace) from [<c010b218>] (show_stack+0x10/0x14)
[    1.572930] [<c010b218>] (show_stack) from [<c06664dc>] (dump_stack+0x84/0x98)
[    1.580153] [<c06664dc>] (dump_stack) from [<c011b544>] (panic+0xdc/0x248)
[    1.587029] [<c011b544>] (panic) from [<c0901278>] (mount_block_root+0x224/0x26c)
[    1.594508] [<c0901278>] (mount_block_root) from [<c09013e4>] (mount_root+0x124/0x12c)
[    1.602417] [<c09013e4>] (mount_root) from [<c090153c>] (prepare_namespace+0x150/0x198)
[    1.610414] [<c090153c>] (prepare_namespace) from [<c0900e24>] (kernel_init_freeable+0x1bc/0x1cc)
[    1.619278] [<c0900e24>] (kernel_init_freeable) from [<c0678df8>] (kernel_init+0x8/0x110)
[    1.627451] [<c0678df8>] (kernel_init) from [<c0107578>] (ret_from_fork+0x14/0x3c)
[ 1.635023] Rebooting in 5 seconds..#6 Re: 全志 SOC » 关于V3开发板运行QT程序中Qtime类获取当前时间的问题 » 2019-06-15 20:23:22
https://whycan.cn/files/members/370/QQ20180202112836.jpg
https://whycan.cn/files/members/370/QQ20180202112307.png
终于解决V3s自带的RTC不准问题,
电阻电容调大又调小,始终解决不了时间不准问题,
淘宝买一片PCF8563, 外挂上去解决这个问题。dts修改:
&i2c0 {
status = "okay";ns2009: ns2009@48 {
compatible = "nsiway,ns2009";
reg = <0x48>;
};
rtc@51 {
compatible = "nxp,pcf8563";
reg = <0x51>;
};
};PCF8563驱动加入内核:
CONFIG_RTC_DRV_PCF8563=y
如果我使用外接PCF8563的方法,大概怎么去接。。。
#8 Re: 全志 SOC » 关于SD卡启动遇到的问题 » 2019-05-30 17:31:27
#9 Re: 全志 SOC » 关于SD卡启动遇到的问题 » 2019-05-28 19:54:13
mmc1_pins: pinmux_mmc1_pins {
		pinctrl-single,pins = <
			AM33XX_IOPAD(0x960, PIN_INPUT | MUX_MODE7)		/* spi0_cs1.gpio0_6 */
			AM33XX_IOPAD(0x8fc, PIN_INPUT_PULLUP | MUX_MODE0)	/* mmc0_dat0.mmc0_dat0 */
			AM33XX_IOPAD(0x8f8, PIN_INPUT_PULLUP | MUX_MODE0)	/* mmc0_dat1.mmc0_dat1 */
			AM33XX_IOPAD(0x8f4, PIN_INPUT_PULLUP | MUX_MODE0)	/* mmc0_dat2.mmc0_dat2 */
			AM33XX_IOPAD(0x8f0, PIN_INPUT_PULLUP | MUX_MODE0)	/* mmc0_dat3.mmc0_dat3 */
			AM33XX_IOPAD(0x904, PIN_INPUT_PULLUP | MUX_MODE0)	/* mmc0_cmd.mmc0_cmd */
			AM33XX_IOPAD(0x900, PIN_INPUT_PULLUP | MUX_MODE0)	/* mmc0_clk.mmc0_clk */
			AM33XX_IOPAD(0x9a0, PIN_INPUT | MUX_MODE4)		/* mcasp0_aclkr.mmc0_sdwp */
		>;
	};

&mmc1{
     status = "okay";
     vmmc-supply = <&vmmc_reg>;
     bus-width = <4>;
     pinctrl-names = "default";
     pinctrl-0 = <&mmc1_pins>;
	 broken-cd;
     //cd-gpios = <&gpio0 6 GPIO_ACTIVE_LOW>;
 };

vmmc_reg: regulator@12 {
             regulator-min-microvolt = <1800000>;
             regulator-max-microvolt = <3300000>;
             regulator-always-on;
         };
这是我从运行设备树中提取出来的一部分,我在网上查找资料有说到DTS中的MMC1代表的是MMC0
#10 Re: 全志 SOC » 关于SD卡启动遇到的问题 » 2019-05-28 17:17:38
晕哥,这个问题是我在其他板子上面运行的时候遇到的,可能跟V3有点区别,在uboot中进行mmc测试有以下的结果
U-Boot# mmc part

Partition Map for MMC device 0  --   Partition Type: DOS

Part    Start Sector    Num Sectors     UUID            Type
  1     2048            143360          923c2b58-01     0c Boot
  2     145408          30939136        923c2b58-02     83

U-Boot# mmc dev 0
switch to partitions #0, OK
mmc0 is current device
U-Boot# mmcinfo
Device: OMAP SD/MMC
Manufacturer ID: 3
OEM: 5344
Name: SL16G
Tran Speed: 50000000
Rd Block Len: 512
SD version 3.0
High Capacity: Yes
Capacity: 14.8 GiB
Bus Width: 4-bit
我认为Uboot已经找到了MMC0并且分区为2个分区,但是启动的时候就是会卡在Waiting for root device /dev/mmcblk0p2上,我在控制台也可以输出。。。。
#11 Re: 全志 SOC » 关于SD卡启动遇到的问题 » 2019-05-28 10:36:36
看前面的 log,有没有生成 mtdX分区?
U-Boot 2014.10 (May 25 2019 - 20:29:07)
       Watchdog enabled
I2C:   ready
DRAM:  512 MiB
NAND:  1024 MiB
MMC:   OMAP SD/MMC: 0, OMAP SD/MMC: 1
Net:   <ethaddr> not set. Validating first E-fuse MAC
cpsw, usb_ether
Hit any key to stop autoboot:  0
switch to partitions #0, OK
mmc0 is current device
SD/MMC found on device 0
** Unable to read file boot.scr **
222 bytes read in 2 ms (108.4 KiB/s)
Loaded environment from uEnv.txt
Importing environment from mmc ...
Running uenvcmd ...
4107352 bytes read in 238 ms (16.5 MiB/s)
41278 bytes read in 6 ms (6.6 MiB/s)
Kernel image @ 0x82000000 [ 0x000000 - 0x3eac58 ]
## Flattened Device Tree blob at 88000000
   Booting using the fdt blob at 0x88000000
   Loading Device Tree to 8fff2000, end 8ffff13d ... OK

Starting kernel ...

[    0.000000] Booting Linux on physical CPU 0x0
[    0.000000] Linux version 4.14.79-gbde58ab01e (zhang@zhang-virtual-machine) (gcc version 5.4.0 20160609 (Ubuntu/Linaro 5.4.0-6ubuntu1~16.04.9)) #2 SMP Mon May 27 16:18:18 CST 2019
[    0.000000] CPU: ARMv7 Processor [413fc082] revision 2 (ARMv7), cr=10c5387d
[    0.000000] CPU: PIPT / VIPT nonaliasing data cache, VIPT aliasing instruction cache
[    0.000000] OF: fdt: Machine model: TI AM335x EVM
[    0.000000] Memory policy: Data cache writeback
[    0.000000] cma: Reserved 16 MiB at 0x9e800000
[    0.000000] CPU: All CPU(s) started in SVC mode.
[    0.000000] AM335X ES2.1 (sgx neon)
[    0.000000] percpu: Embedded 17 pages/cpu @df939000 s40872 r8192 d20568 u69632
[    0.000000] Built 1 zonelists, mobility grouping on.  Total pages: 129412
[    0.000000] Kernel command line: console=ttyO0,115200n8 root=/dev/mmcblk0p2 rw rootfstype=ext3 rootwait rootdelay=2
[    0.000000] PID hash table entries: 2048 (order: 1, 8192 bytes)
[    0.000000] Dentry cache hash table entries: 65536 (order: 6, 262144 bytes)
[    0.000000] Inode-cache hash table entries: 32768 (order: 5, 131072 bytes)
[    0.000000] Memory: 479932K/522240K available (8192K kernel code, 818K rwdata, 2432K rodata, 1024K init, 7475K bss, 25924K reserved, 16384K cma-reserved, 0K highmem)
[    0.000000] Virtual kernel memory layout:
[    0.000000]     vector  : 0xffff0000 - 0xffff1000   (   4 kB)
[    0.000000]     fixmap  : 0xffc00000 - 0xfff00000   (3072 kB)
[    0.000000]     vmalloc : 0xe0000000 - 0xff800000   ( 504 MB)
[    0.000000]     lowmem  : 0xc0000000 - 0xdfe00000   ( 510 MB)
[    0.000000]     pkmap   : 0xbfe00000 - 0xc0000000   (   2 MB)
[    0.000000]     modules : 0xbf000000 - 0xbfe00000   (  14 MB)
[    0.000000]       .text : 0xc0008000 - 0xc0900000   (9184 kB)
[    0.000000]       .init : 0xc0c00000 - 0xc0d00000   (1024 kB)
[    0.000000]       .data : 0xc0d00000 - 0xc0dccad8   ( 819 kB)
[    0.000000]        .bss : 0xc0dce000 - 0xc151afc0   (7476 kB)
[    0.000000] Running RCU self tests
[    0.000000] Hierarchical RCU implementation.
[    0.000000]  RCU event tracing is enabled.
[    0.000000]  RCU lockdep checking is enabled.
[    0.000000]  RCU restricting CPUs from NR_CPUS=2 to nr_cpu_ids=1.
[    0.000000] RCU: Adjusting geometry for rcu_fanout_leaf=16, nr_cpu_ids=1
[    0.000000] NR_IRQS: 16, nr_irqs: 16, preallocated irqs: 16
[    0.000000] IRQ: Found an INTC at 0xfa200000 (revision 5.0) with 128 interrupts
[    0.000000] OMAP clockevent source: timer2 at 19200000 Hz
[    0.000023] sched_clock: 32 bits at 19MHz, resolution 52ns, wraps every 111848106981ns
[    0.000060] clocksource: timer1: mask: 0xffffffff max_cycles: 0xffffffff, max_idle_ns: 99544814920 ns
[    0.000141] OMAP clocksource: timer1 at 19200000 Hz
[    0.000870] timer_probe: no matching timers found
[    0.002087] Console: colour dummy device 80x30
[    0.002155] Lock dependency validator: Copyright (c) 2006 Red Hat, Inc., Ingo Molnar
[    0.002172] ... MAX_LOCKDEP_SUBCLASSES:  8
[    0.002188] ... MAX_LOCK_DEPTH:          48
[    0.002204] ... MAX_LOCKDEP_KEYS:        8191
[    0.002221] ... CLASSHASH_SIZE:          4096
[    0.002237] ... MAX_LOCKDEP_ENTRIES:     32768
[    0.002253] ... MAX_LOCKDEP_CHAINS:      65536
[    0.002268] ... CHAINHASH_SIZE:          32768
[    0.002284]  memory used by lock dependency info: 4655 kB
[    0.002300]  per task-struct memory footprint: 1536 bytes
[    0.002347] Calibrating delay loop... 795.44 BogoMIPS (lpj=3977216)
[    0.078191] pid_max: default: 32768 minimum: 301
[    0.078723] Security Framework initialized
[    0.078900] Mount-cache hash table entries: 1024 (order: 0, 4096 bytes)
[    0.078931] Mountpoint-cache hash table entries: 1024 (order: 0, 4096 bytes)
[    0.083137] CPU: Testing write buffer coherency: ok
[    0.083392] CPU0: Spectre v2: using BPIALL workaround
[    0.085297] CPU0: thread -1, cpu 0, socket -1, mpidr 0
[    0.087395] Setting up static identity map for 0x80100000 - 0x80100078
[    0.088378] Hierarchical SRCU implementation.
[    0.090675] smp: Bringing up secondary CPUs ...
[    0.090711] smp: Brought up 1 node, 1 CPU
[    0.090733] SMP: Total of 1 processors activated (795.44 BogoMIPS).
[    0.090753] CPU: All CPU(s) started in SVC mode.
[    0.095889] devtmpfs: initialized
[    0.131856] random: get_random_u32 called from bucket_table_alloc+0xdc/0x260 with crng_init=0
[    0.133293] VFP support v0.3: implementor 41 architecture 3 part 30 variant c rev 3
[    0.134367] clocksource: jiffies: mask: 0xffffffff max_cycles: 0xffffffff, max_idle_ns: 19112604462750000 ns
[    0.134458] futex hash table entries: 256 (order: 2, 16384 bytes)
[    0.136785] pinctrl core: initialized pinctrl subsystem
[    0.143041] NET: Registered protocol family 16
[    0.151752] DMA: preallocated 256 KiB pool for atomic coherent allocations
[    0.212095] omap_hwmod: debugss: _wait_target_disable failed
[    0.271652] cpuidle: using governor menu
[    0.287628] OMAP GPIO hardware version 0.1
[    0.317206] omap-gpmc 50000000.gpmc: could not find pctldev for node /ocp/l4_wkup@44c00000/scm@210000/pinmux@800/nandflash_pins_s0, deferring probe
[    0.325978] No ATAGs?
[    0.326015] hw-breakpoint: debug architecture 0x4 unsupported.
[    0.326464] omap4_sram_init:Unable to allocate sram needed to handle errata I688
[    0.326493] omap4_sram_init:Unable to get sram pool needed to handle errata I688
[    0.373976] edma 49000000.edma: TI EDMA DMA engine driver
[    0.383809] SCSI subsystem initialized
[    0.386129] omap_i2c 44e0b000.i2c: could not find pctldev for node /ocp/l4_wkup@44c00000/scm@210000/pinmux@800/pinmux_i2c0_pins, deferring probe
[    0.386287] omap_i2c 4802a000.i2c: could not find pctldev for node /ocp/l4_wkup@44c00000/scm@210000/pinmux@800/pinmux_i2c1_pins, deferring probe
[    0.386699] pps_core: LinuxPPS API ver. 1 registered
[    0.386722] pps_core: Software ver. 5.3.6 - Copyright 2005-2007 Rodolfo Giometti <giometti@linux.it>
[    0.386786] PTP clock support registered
[    0.392644] clocksource: Switched to clocksource timer1
[    0.541421] VFS: Disk quotas dquot_6.6.0
[    0.541702] VFS: Dquot-cache hash table entries: 1024 (order 0, 4096 bytes)
[    0.573985] NET: Registered protocol family 2
[    0.576473] TCP established hash table entries: 4096 (order: 2, 16384 bytes)
[    0.576603] TCP bind hash table entries: 4096 (order: 5, 147456 bytes)
[    0.577327] TCP: Hash tables configured (established 4096 bind 4096)
[    0.577879] UDP hash table entries: 256 (order: 2, 20480 bytes)
[    0.578018] UDP-Lite hash table entries: 256 (order: 2, 20480 bytes)
[    0.578479] NET: Registered protocol family 1
[    0.581190] RPC: Registered named UNIX socket transport module.
[    0.581255] RPC: Registered udp transport module.
[    0.581275] RPC: Registered tcp transport module.
[    0.581294] RPC: Registered tcp NFSv4.1 backchannel transport module.
[    0.585447] hw perfevents: no interrupt-affinity property for /pmu, guessing.
[    0.586586] hw perfevents: enabled with armv7_cortex_a8 PMU driver, 5 counters available
[    0.589994] audit: initializing netlink subsys (disabled)
[    0.593969] audit: type=2000 audit(0.579:1): state=initialized audit_enabled=0 res=1
[    0.594453] workingset: timestamp_bits=14 max_order=17 bucket_order=3
[    0.598533] NFS: Registering the id_resolver key type
[    0.599044] Key type id_resolver registered
[    0.599095] Key type id_legacy registered
[    0.599294] jffs2: version 2.2. (NAND) (SUMMARY)  © 2001-2006 Red Hat, Inc.
[    0.608645] io scheduler noop registered
[    0.608696] io scheduler deadline registered
[    0.608877] io scheduler cfq registered (default)
[    0.608902] io scheduler mq-deadline registered
[    0.608923] io scheduler kyber registered
[    0.611853] pinctrl-single 44e10800.pinmux: 142 pins at pa f9e10800 size 568
[    0.621790] Serial: 8250/16550 driver, 6 ports, IRQ sharing enabled
[    0.630011] omap_uart 44e09000.serial: no wakeirq for uart0
[    0.630621] 44e09000.serial: ttyO0 at MMIO 0x44e09000 (irq = 30, base_baud = 3000000) is a OMAP UART0
[    1.572509] console [ttyO0] enabled
[    1.579262] omap_uart 48022000.serial: no wakeirq for uart1
[    1.587307] 48022000.serial: ttyO1 at MMIO 0x48022000 (irq = 31, base_baud = 3000000) is a OMAP UART1
[    1.638653] brd: module loaded
[    1.674577] loop: module loaded
[    1.682246] mtdoops: mtd device (mtddev=name/number) must be supplied
[    1.695960] libphy: Fixed MDIO Bus: probed
[    1.772711] davinci_mdio 4a101000.mdio: davinci mdio revision 1.6, bus freq 1000000
[    1.782853] davinci_mdio 4a101000.mdio: detected phy mask fffffffe
[    1.796786] libphy: 4a101000.mdio: probed
[    1.802069] davinci_mdio 4a101000.mdio: phy[0]: device 4a101000.mdio:00, driver Atheros 8035 ethernet
[    1.816303] cpsw 4a100000.ethernet: Detected MACID = 64:cf:d9:5c:87:ed
[    1.825731] cpsw 4a100000.ethernet: initialized cpsw ale version 1.4
[    1.834220] cpsw 4a100000.ethernet: ALE Table size 1024
[    1.841207] cpsw 4a100000.ethernet: cpts: overflow check period 500 (jiffies)
[    1.854989] i2c /dev entries driver
[    1.863829] sdhci: Secure Digital Host Controller Interface driver
[    1.871917] sdhci: Copyright(c) Pierre Ossman
[    2.035184] ledtrig-cpu: registered to indicate activity on CPUs
[    2.047150] oprofile: using arm/armv7
[    2.053235] Initializing XFRM netlink socket
[    2.059448] NET: Registered protocol family 10
[    2.074395] Segment Routing with IPv6
[    2.079363] sit: IPv6, IPv4 and MPLS over IPv4 tunneling driver
[    2.090201] NET: Registered protocol family 17
[    2.096319] NET: Registered protocol family 15
[    2.102716] Key type dns_resolver registered
[    2.108529] omap_voltage_late_init: Voltage driver support not added
[    2.116956] sr_dev_init: No voltage domain specified for smartreflex0. Cannot initialize
[    2.127590] sr_dev_init: No voltage domain specified for smartreflex1. Cannot initialize
[    2.138830] ThumbEE CPU extension supported.
[    2.144588] Registering SWP/SWPB emulation handler
[    2.150847] SmartReflex Class3 initialized
[    2.186748] omap-gpmc 50000000.gpmc: GPMC revision 6.0
[    2.194303] gpmc_mem_init: disabling cs 0 mapped at 0x0-0x1000000
[    2.207784] nand: second ID read did not match 30,87 against be,e9
[    2.216224] nand: No NAND device found
[    2.221133] omap2-nand 8000000.nand: scan failed, may be bus-width mismatch
[    2.264245] tps65910 0-002d: No interrupt support, no core IRQ
[    2.275604] tps65910 0-002d: Error in configuring external control EN1
[    2.284338] tps65910 0-002d: Failed to initialise ext control config
[    2.292893] vrtc: supplied by vbat
[    2.298376] vrtc: failed to enable
[    2.303117] tps65910 0-002d: failed to register tps65910-pmic regulator
[    2.311900] tps65910-pmic: probe of tps65910-pmic failed with error -121
[    2.322219] omap_i2c 44e0b000.i2c: bus 0 rev0.11 at 400 kHz
[    2.335217] omap_i2c 4802a000.i2c: bus 1 rev0.11 at 100 kHz
[    2.349510] hctosys: unable to open rtc device (rtc0)
[    2.356379] sr_init: No PMIC hook to init smartreflex
[    2.363423] sr_init: platform driver register failed for SR
[    2.371776] lis3_reg: disabling
[    2.376189] wlan-en-regulator: disabling
[    2.384774] Waiting 2 sec before mounting root device...
[    4.404088] Waiting for root device /dev/mmcblk0p2...
[    4.822786] random: fast init done
上面分别是Kernel启动时的打印信息已经uboot 中的mtdparts,但是这个mtd是nand的,我不知道跟SD卡启动有没有关系,谢谢晕哥
#12 全志 SOC » 关于SD卡启动遇到的问题 » 2019-05-27 22:19:15
#13 Re: 全志 SOC » 关于V3开发板运行QT程序中Qtime类获取当前时间的问题 » 2019-05-21 22:05:50
#14 Re: 全志 SOC » 关于V3开发板运行QT程序中Qtime类获取当前时间的问题 » 2019-05-21 17:39:53
#15 Re: 全志 SOC » 关于V3开发板运行QT程序中Qtime类获取当前时间的问题 » 2019-05-20 18:47:16
#18 Re: 全志 SOC » 关于V3s的串口使用 » 2019-05-11 15:29:13
#19 Re: 全志 SOC » 关于V3s的串口使用 » 2019-05-11 14:54:06
#20 Re: 全志 SOC » 关于V3s的串口使用 » 2019-05-11 13:38:56
#21 全志 SOC » 关于V3s的串口使用 » 2019-05-11 12:49:31
- 605364021
- 回复: 15
现在我要使用到v3s的uart0和uart1,其中我uart0接控制控制台做调试,uart1接串口做数据的收发并将程序运行结果显示在控制台上,由于uart0的波特率为115200,uart1的波特率为9600,请问有必要将串口1的波特率调成115200吗?需要修改的话在哪修改,根据帖子我已经修改了,开启了uart1和uart2
sun8i-v3s.dtsi:
uart0_pins_a: uart0@0 { pins = “PB8”, “PB9”;function = “uart0”;bias-pull-up; };
uart1_pins_a: uart1@0 { pins = “PE21”, “PE22”;function = “uart1”;bias-pull-up; };
uart2_pins_a: uart2@0 { pins = “PB0”, “PB1”;function = “uart2”;bias-pull-up; };
sun8i-v3s-licheepi-zero.dts:
&uart0 { pinctrl-0 = <&uart0_pins_a>;pinctrl-names = “default”;status = “okay”; };
&uart1 { pinctrl-0 = <&uart1_pins_a>;pinctrl-names = “default”;status = “okay”; };
&uart2 { pinctrl-0 = <&uart2_pins_a>;pinctrl-names = “default”;status = “okay”; };
#22 Re: 全志 SOC » 有关QT5.50移植,Qsound播放声音的问题 » 2019-03-19 11:34:48
直接把源码加进去,
见错改错,应该只会有很少错.设置好声卡参数, 然后调用 play_sample() 播放内存数据即可。
https://github.com/tinyalsa/tinyalsa/blob/master/utils/tinyplay.c
我现在tinyplay可以加进去进行完成编译,但是有一个问题是,我每次使用tinyplay前都需要用tinymix将通道口打开才有声音,但是tinymix和tinyplay是2个程序,怎么去掉tinymix这一步?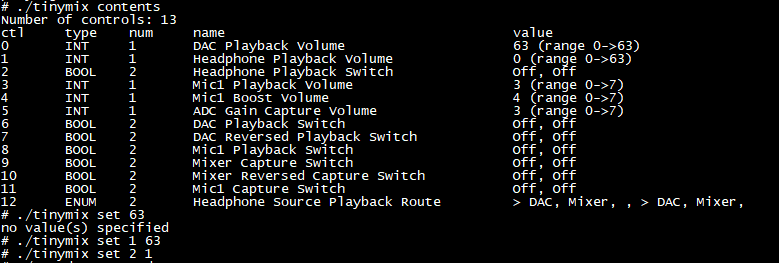
#23 Re: 全志 SOC » 有关QT5.50移植,Qsound播放声音的问题 » 2019-03-18 22:18:10
605364021 说:晕哥 说:tinyalsa可以加入 你的项目一起编译,我就是这么干的
https://github.com/tinyalsa/tinyalsa
这个是tinyalsa源码?把头文件和C文件加入到QT程序中一起编译吗?对的,就是这个!
晕哥能简单说下怎么把源码加进QT项目一起编译吗?谢谢
#24 Re: 全志 SOC » 有关QT5.50移植,Qsound播放声音的问题 » 2019-03-18 18:30:40
tinyalsa可以加入 你的项目一起编译,我就是这么干的
https://github.com/tinyalsa/tinyalsa
这个是tinyalsa源码?把头文件和C文件加入到QT程序中一起编译吗?
#25 Re: 全志 SOC » 有关QT5.50移植,Qsound播放声音的问题 » 2019-03-18 17:19:57
#26 Re: 全志 SOC » 有关QT5.50移植,Qsound播放声音的问题 » 2019-03-18 17:16:46
#27 Re: 全志 SOC » 有关QT5.50移植,Qsound播放声音的问题 » 2019-03-18 16:34:48
#29 Re: 全志 SOC » 有关tslib校正,进行屏幕校正是失败 » 2019-02-21 18:51:04
605364021 说:校正成功后 我运行了qt程序,好像把系统搞崩了 ,下面是错误信息不断弹出来,能看下什么原因?
mmc1: card 0001 removed
[  274.240601] mmc1: error -110 whilst initialising SDIO card
[  275.360577] mmc1: error -110 whilst initialising SDIO card
[  276.473379] sunxi-mmc 1c10000.mmc: card claims to support voltages below defined range
这是 camdroid ? mmc1 你在设备树设置的什么?
我没修改过设备树文件,SDIO应该是TF WIFI卡,我的qt程序测试wifi传输的,运行完就保存了 我把tf wifi卡拔了就不弹了
#30 Re: 全志 SOC » 有关tslib校正,进行屏幕校正是失败 » 2019-02-21 18:48:20
605364021 说:校正成功后 我运行了qt程序,好像把系统搞崩了 ,下面是错误信息不断弹出来,能看下什么原因?
mmc1: card 0001 removed
[  274.240601] mmc1: error -110 whilst initialising SDIO card
[  275.360577] mmc1: error -110 whilst initialising SDIO card
[  276.473379] sunxi-mmc 1c10000.mmc: card claims to support voltages below defined range
这是 camdroid ? mmc1 你在设备树设置的什么?
我没修改过设备树文件,SDIO应该是TF WIFI卡,我的程序时qt测试wifi传输的,运行完就保存了 我把tf wifi卡拔了就不弹了
#31 Re: 全志 SOC » 有关tslib校正,进行屏幕校正是失败 » 2019-02-21 17:53:40
校正成功后 我运行了qt程序,好像把系统搞崩了 ,下面是错误信息不断弹出来,能看下什么原因?
mmc1: card 0001 removed
[  274.240601] mmc1: error -110 whilst initialising SDIO card
[  275.360577] mmc1: error -110 whilst initialising SDIO card
[ 276.473379] sunxi-mmc 1c10000.mmc: card claims to support voltages below defined range#32 Re: 全志 SOC » 有关tslib校正,进行屏幕校正是失败 » 2019-02-21 17:26:38
#33 Re: 全志 SOC » 有关tslib校正,进行屏幕校正是失败 » 2019-02-21 16:43:23
#34 Re: 全志 SOC » 有关tslib校正,进行屏幕校正是失败 » 2019-02-21 16:02:57
#35 Re: 全志 SOC » 有关tslib校正,进行屏幕校正是失败 » 2019-02-21 15:50:11
#36 Re: 全志 SOC » 有关tslib校正,进行屏幕校正是失败 » 2019-02-21 12:01:40
#37 全志 SOC » 有关tslib校正,进行屏幕校正是失败 » 2019-02-21 11:25:06
- 605364021
- 回复: 15
运行提示校正失败,以前还可以校正的。下面是校正失败提示和我的tslib和qt初始化文件
# ./ts_calibrate
ts_setup: No such file or directory
export TSLIB_CONSOLEDEVICE=none
export TSLIB_FBDEVICE=/dev/fb0
export TSLIB_TSDEVICE=/dev/input/event1
export TSLIB_CONFFILE=/root/download/tslib/etc/ts.conf
export TSLIB_PLUGINDIR=/root/download/tslib/lib/ts
export TSLIB_CALIBFILE=/etc/pointercal
export LD_LIBRARY_PATH=/lib:/usr/lib:/root/download/tslib/lib:/root/arm_qt5.50/lib
export PATH=/bin:/sbin:/usr/bin/:/usr/sbin:/root/download/tslib/bin
export QT_QPA_PLATFORM_PLUGIN_PATH=/root/arm_qt5.50/plugins
export QT_QPA_PLATFORM=linuxfb:tty=/dev/fb0
export QT_QPA_FONTDIR=/root/arm_qt5.50/lib/fonts
export QT_QPA_GENERIC_PLUGINS=tslib:$TSLIB_TSDEVICE#38 Re: 全志 SOC » 关于荔枝派V3S开发板AD采集 » 2019-02-18 17:03:05
#39 全志 SOC » 关于荔枝派V3S开发板AD采集 » 2019-02-18 15:18:15
#40 Re: 全志 SOC » 想在v3s上实现不同通信协议的转换 » 2018-12-25 21:59:17
#41 Re: 全志 SOC » 想在v3s上实现不同通信协议的转换 » 2018-12-25 21:26:30
#43 Re: 全志 SOC » 关于arm开发板远程访问mysql数据库 » 2018-12-15 09:55:06
已经解决V3S上使用QT访问windows上的mysql数据库,我没有使用buildroot的mysql_client,直接从mysql源码编译,编写对应QT程序可以从读取或修改windows下mysql数据库的内容
教程如下http://bbs.elecfans.com/jishu_910286_1_1.html
#44 Re: 全志 SOC » 关于arm开发板远程访问mysql数据库 » 2018-12-13 10:34:07
#45 Re: 全志 SOC » 关于arm开发板远程访问mysql数据库 » 2018-12-12 23:07:17
https://git.busybox.net/buildroot/commit/?id=06c8212866389948d7ad80573ea0c3faa7411a9c
MySQL client package has been renamed to MySQL.
可能是改名,而不是删除,具体明天我用buildroot试一试。
在bulidroot里面的名字是MySQL client package has been renamed to MySQL. 它在的分支是Legacy options removed in 2014.02,我试一下看能不能用
#46 Re: 全志 SOC » 关于arm开发板远程访问mysql数据库 » 2018-12-12 22:53:50
605364021 说:晕哥 说:只要在zero上面跑 mysqlclient 就可以了
编译出arm架构的mysql 然后把里面的mysql-client放在licheepi上使用?网上没找到移植mysqlclient的教程..
灰常简单,用 buildroot: https://whycan.cn/t_561.html
buildroot中mysql-client在的部分是Legacy options removed in 2014.02
这个还能用吗?
#47 Re: 全志 SOC » 关于arm开发板远程访问mysql数据库 » 2018-12-12 22:37:23
#49 Re: 全志 SOC » 关于v3s使用rtl8723bs网卡实现AP模式自启动的脚本 » 2018-12-10 18:30:04
#50 Re: 全志 SOC » RTL8723bs同时开启STA和AP模式 » 2018-12-09 21:37:51
#51 Re: 全志 SOC » RTL8723bs同时开启STA和AP模式 » 2018-12-09 20:55:37
你确认编译成功了?
我搜了一下, 主线 linux 根本没有这几个函数的定义,linux3.4 倒是有这几个函数:
https://github.com/qq516333132/camdroid/blob/master/lichee/linux-3.4/drivers/misc/rf_pm/wifi_pm.c
 CC [M]  /home/share/r8723bs/rtl8723bs/hal/phydm/rtl8723b/phydm_rtl8723b.o
  CC [M]  /home/share/r8723bs/rtl8723bs/platform/platform_ops.o
  CC [M]  /home/share/r8723bs/rtl8723bs/platform/platform_ARM_SUNnI_sdio.o
  CC [M]  /home/share/r8723bs/rtl8723bs/core/rtw_mp.o
  CC [M]  /home/share/r8723bs/rtl8723bs/core/rtw_bt_mp.o
  LD [M]  /home/share/r8723bs/rtl8723bs/8723bs.o
  Building modules, stage 2.
  MODPOST 1 modules
WARNING: "script_get_item" [/home/share/r8723bs/rtl8723bs/8723bs.ko] undefined!
WARNING: "sunxi_mci_rescan_card" [/home/share/r8723bs/rtl8723bs/8723bs.ko] undefined!
WARNING: "wifi_pm_get_mod_type" [/home/share/r8723bs/rtl8723bs/8723bs.ko] undefined!
WARNING: "wifi_pm_power" [/home/share/r8723bs/rtl8723bs/8723bs.ko] undefined!
  CC      /home/share/r8723bs/rtl8723bs/8723bs.mod.o
  LD [M]  /home/share/r8723bs/rtl8723bs/8723bs.ko
make[1]: Leaving directory '/home/zhang/linux'这是最后的编译信息,我的源码是从https://github.com/TinkerBoard/debian_kernel/tree/develop/drivers/net/wireless/rockchip_wlan/rtl8723bs进行修改编译的
#52 Re: 全志 SOC » RTL8723bs同时开启STA和AP模式 » 2018-12-09 17:54:55
CONFIG_PLATFORM_ARM_SUNxI = n
CONFIG_PLATFORM_ARM_SUN6I = n
CONFIG_PLATFORM_ARM_SUN7I = n
CONFIG_PLATFORM_ARM_SUN8I_W3P1 = y
CONFIG_PLATFORM_ARM_SUN8I_W5P1 = n
rtl8723bs驱动的Makefile选项,我编译出了8723bs.ko模块,但是加载在v3s中加载时出现了以下错误,有人遇到过吗?
insmod 8723bs.ko
[    9.528318] 8723bs: loading out-of-tree module taints kernel.
[    9.542893] 8723bs: Unknown symbol wifi_pm_power (err 0)
[    9.548583] 8723bs: Unknown symbol wifi_pm_get_mod_type (err 0)
[    9.554821] 8723bs: Unknown symbol sunxi_mci_rescan_card (err 0)
[    9.561021] 8723bs: Unknown symbol script_get_item (err 0)
[    9.593651] 8723bs: Unknown symbol wifi_pm_power (err 0)
[    9.599345] 8723bs: Unknown symbol wifi_pm_get_mod_type (err 0)
[    9.605585] 8723bs: Unknown symbol sunxi_mci_rescan_card (err 0)
[    9.611807] 8723bs: Unknown symbol script_get_item (err 0)
insmod: can't insert '8723bs.ko': unknown symbol in module, or unknown parameter#53 Re: 全志 SOC » 关于v3s使用rtl8723bs网卡实现AP模式自启动的脚本 » 2018-12-08 17:28:20
#54 Re: 全志 SOC » 关于v3s使用rtl8723bs网卡实现AP模式自启动的脚本 » 2018-12-08 16:59:52
成功实现rtl8723bs AP模式自启动脚本
//在/sbin目录下新建auto_wifi_ap.sh文件
#!/bin/sh
#/sbin/auto_wifi_ap.sh
insmod /root/wifi/r8723bs.ko //r8723bs.ko的绝对路径
hostapd -B /etc/hostapd.conf
 ifconfig wlan0 192.168.0.10 netmask 255.255.255.0
touch /var/lib/misc/udhcpd.leases
udhcpd /etc/udhcpd.conf
*******************************************
在/etc/init.d/目录下新建S80_auto_ap文件
#r8723bs wifi ap auto start
/sbin/auto_wifi_ap.sh
exit 0
可以自启动rtl8723bs网卡的AP模式,就是启动打印信息有点乱,有改进的方法吗?
[    1.432794] EXT4-fs (mmcblk0p2): mounted filesystem with ordered data mode. Opts: (null)
[    1.441087] VFS: Mounted root (ext4 filesystem) on device 179:2.
[    1.449440] devtmpfs: mounted
[    1.453709] Freeing unused kernel memory: 1024K
[    1.604690] EXT4-fs (mmcblk0p2): re-mounted. Opts: data=ordered
Starting logging: OK
Initializing random number generator... done.
Starting network: OK
[    1.864949] r8723bs: module is from the staging directory, the quality is unknown, you have been warned.
[    1.881710] RTL8723BS: module init start
[    1.885653] RTL8723BS: rtl8723bs v4.3.5.5_12290.20140916_BTCOEX20140507-4E40
[    1.892796] RTL8723BS: rtl8723bs BT-Coex version = BTCOEX20140507-4E40
[    1.900508] pnetdev = c3ba2800
[    1.935629] RTL8723BS: rtw_ndev_init(wlan0)
[    1.941477] RTL8723BS: module init ret =0
Configuration file: /etc/hostapd.conf
[    2.094646] rtl8723bs: acquire FW from file:rtlwifi/rtl8723bs_nic.bin
[    2.767935] random: crng init done
rfkill: Cannot open RFKILL control device
Using interface wlan0 with hwaddr 8c:18:d9:34:1e:5a and ssid "licheepi "
random: Cannot read from /dev/random: Resource temporarily unavailable
random: Only 0/20 bytes of strong random data available from /dev/random
random: Not enough entropy pool available for secure operations
WPA: Not enough entropy in random pool for secure operations - update keys later when the first station connects
[    3.729227] RTL8723BS: rtw_cmd_thread(wlan0) pcmd->sctx
[    3.734535] RTL8723BS: assoc success
wlan0: interface state UNINITIALIZED->ENABLED[    3.743488] RTL8723BS: set group key camid:1, addr:00:00:00:00:00:00, kid:1, type:TKIP

wlan0: AP-ENABLED
udhcp server (v0.9.8) started

Welcome to Buildroot
buildroot login: #55 Re: 全志 SOC » 关于v3s使用rtl8723bs网卡实现AP模式自启动的脚本 » 2018-12-08 15:32:38
#56 Re: 全志 SOC » 关于v3s使用rtl8723bs网卡实现AP模式自启动的脚本 » 2018-12-08 15:26:18
#!/bin/sh
if [ $ACTION = "add" ];
then
   echo --------usb wifi connect--------- > /dev/console
   hostapd -B /etc/hostapd.conf
   ifconfig wlan0 192.168.2.1
   dhcpd -cf /etc/dhcpcd.conf wlan0

else
   echo --------usb wifi disconnect--------- > /dev/console
   killall hostapd
   killall dhcpd
fi
---------------------
#define CONFIG_BOOTARGS "console=ttyS0,115200 panic=5 rootwait root=/dev/mmcblk0p2 earlyprintk rw vt.global_cursor_default=0"第一段代码是网上自启动脚本,第二段是v3s的启动bootagrs,请问一下shell脚本的中/dev/console 需要修改为/dev/mmcblk0p2吗?
#57 Re: 全志 SOC » 关于v3s使用rtl8723bs网卡实现AP模式自启动的脚本 » 2018-12-08 14:51:50
#58 Re: 全志 SOC » 关于v3s使用rtl8723bs网卡实现AP模式自启动的脚本 » 2018-12-08 13:35:37
#59 全志 SOC » 关于v3s使用rtl8723bs网卡实现AP模式自启动的脚本 » 2018-12-08 13:16:23
- 605364021
- 回复: 14
参考教程https://blog.csdn.net/thisway_diy/article/details/81327077
https://whycan.cn/t_711.html
mdev是busybox自带的一个简化版的udev
作用是在系统启动和热插拔 或动态加载驱动程序时,自动产生驱动程序所需的节点文件,在文件系统中的/dev目录下的设备节点都是由mdev创建的。
mdev扫描/sys/class和/sys/block中所有的类设备目录,如果在目录中含有名为"dev"的文件,且文件中包含的是设备号,则mdev就利用这些信息为这个设备在/dev下创建设备节点u盘自动挂载功能实现步骤如下:
1、配置内核
a)配置内核支持热插拔:
#cd linux.2.6.21
#vi .config
CONFIG_KALLSYMS=y
CONFIG_HOTPLUG=y //确保此项为y
CONFIG_PRINTK=y
CONFIG_NET=y //确保此项为y
确保以上两项均设置为y,否则/proc/sys/kernel/目录下不会出现huotplug文件。
b)配置内核支持
#make menuconfig
选择Device Drivers -->
USB support -->
<*> Support for Host-side USB
<*> OHIC HCD support
<*> UHCI HCD (most Intel and VIA) support
<*> SL811HS HCD support
<*> USB Mass Storage support2、配置busybox
#make menuconfig
选择Linux System Utilities --->
[ * ]mdev
[ * ] Support /etc/mdev.conf
[ * ] Support subdirs/symlinks
[ * ] Support regular expressions substitutions when renaming device
[ * ] Support command execution at device addition/removal
[ * ] Support loading of firmwares
但是我在buildroot里面的busybox里面没找到mdev选项.....
#60 Re: 全志 SOC » 很急求解答 » 2018-12-08 12:56:49
#61 Re: 全志 SOC » 很急求解答 » 2018-12-08 12:46:20
#62 Re: 全志 SOC » 很急求解答 » 2018-12-08 11:30:36
#63 Re: 全志 SOC » 很急求解答 » 2018-12-08 11:29:08
#64 Re: 全志 SOC » 很急求解答 » 2018-12-08 10:52:49
#65 全志 SOC » RTL8723bs同时开启STA和AP模式 » 2018-12-07 23:02:00
- 605364021
- 回复: 8
https://www.cnblogs.com/rain-blog/p/rtl8723bs-driver-test.html
CONFIG_PLATFORM_ARM_SUNxI = n
CONFIG_PLATFORM_ARM_SUN6I = n
CONFIG_PLATFORM_ARM_SUN7I = n
CONFIG_PLATFORM_ARM_SUN8I = n
我想问下,licheepi zero选哪个平台架构?
#66 全志 SOC » 很急求解答 » 2018-12-07 20:13:44
#67 Re: 全志 SOC » Wlan0加载成功,驱动没有问题,固件也有,但最后报nolinked power save enter。还无法中断,这是什么情况? » 2018-12-07 17:44:26
晕哥 说:/etc/wpa_supplicant.conf 文件内容:
ctrl_interface=/var/run/wpa_supplicant
ctrl_interface_group=0
ap_scan=1
network={
ssid="whycan.cn"
scan_ssid=1
key_mgmt=WPA-EAP WPA-PSK IEEE8021X NONE
pairwise=TKIP CCMP
group=CCMP TKIP WEP104 WEP40
psk="13800138000"
priority=5
}输出wpa_supplicant -B -d -i wlan0 -c /etc/wpa_supplicant.conf指令后,同样遇到1楼的问题,请问有解决了的吗?
已经修改成功,原因是/etc/wpa_supplicant.conf中的ssid和psk要根据实际wifi的名称和密码进行修改
#70 Re: 全志 SOC » Wlan0加载成功,驱动没有问题,固件也有,但最后报nolinked power save enter。还无法中断,这是什么情况? » 2018-12-06 11:24:28
/etc/wpa_supplicant.conf 文件内容:
ctrl_interface=/var/run/wpa_supplicant
ctrl_interface_group=0
ap_scan=1
network={
ssid="whycan.cn"
scan_ssid=1
key_mgmt=WPA-EAP WPA-PSK IEEE8021X NONE
pairwise=TKIP CCMP
group=CCMP TKIP WEP104 WEP40
psk="13800138000"
priority=5
}
输出wpa_supplicant -B -d -i wlan0 -c /etc/wpa_supplicant.conf指令后,同样遇到1楼的问题,请问有解决了的吗?
#71 Re: 全志 SOC » licheepi zero 使用wifi » 2018-12-05 16:08:53
建立 /etc/wpa_supplicant.conf 文件:
ctrl_interface=/var/run/wpa_supplicant
ctrl_interface_group=0
ap_scan=1
network={
ssid="debugdump"
scan_ssid=1
key_mgmt=WPA-EAP WPA-PSK IEEE8021X NONE
pairwise=TKIP CCMP
group=CCMP TKIP WEP104 WEP40
psk="13800138000"
priority=5
}依次执行下面的shell命令:
#安装驱动
#激活WIFI网卡
#加密连接无线WIFI热点
#DHCP获取IP
insmod /usr/lib/r8723bs.ko
ifconfig wlan0 up
wpa_supplicant -B -d -i wlan0 -c /etc/wpa_supplicant.conf
udhcpc -i wlan0
固件rtl8723bs_nic.bin加载完成,/etc/wpa_supplicant.conf配置好,但是在连接wifi热点的时候提示没找到wpa_supplicant,我看了下/var/run/目录下没有wpa_supplicant
# wpa_supplicant -B -d -i wlan0 -c /etc/wpa_supplicant.conf
-sh: wpa_supplicant: not found#72 Re: 全志 SOC » licheepi zero 使用wifi » 2018-12-05 11:26:19
# lsmod
Module                  Size  Used by    Tainted: G
r8723bs               524288  0
# ifconfig wlan0 up
[ 1238.718666] rtl8723bs: acquire FW from file:rtlwifi/rtl8723bs_nic.bin
[ 1238.725204] rtl8723bs mmc1:0001:1: Direct firmware load for rtlwifi/rtl8723bs_nic.bin failed with error -2
[ 1238.734968] Request firmware failed with error 0xfffffffe
ifconfig: SIOCSIFFLAGS: Operation not permitted拷贝 rtl8723bs_nic.bin 到根文件系统的 /lib/firmware/rtlwifi/ 目录下.
但我是进入开发板的根目录的lib目录下并没有/firmware/rtlwifi目录.......
#73 Re: 全志 SOC » licheepi zero 使用wifi » 2018-12-05 10:37:53
605364021 说:参考教程http://zero.lichee.pro/%E8%B4%A1%E7%8C%AE/article%2012.html,驱动百度网盘挂了,谁有r8723bs.ko驱动,可以分享下吗?谢谢
自己make编译一下就有了,在 linux驱动目录下。
4.13y分支自带了?然后将r8723bs.ko移植到zero板子上,insmod加载模块就能用wifi了?
#74 全志 SOC » licheepi zero 使用wifi » 2018-12-05 10:30:05
- 605364021
- 回复: 6
参考教程http://zero.lichee.pro/%E8%B4%A1%E7%8C%AE/article%2012.html,驱动百度网盘挂了,谁有r8723bs.ko驱动,可以分享下吗?谢谢
#75 Re: 全志 SOC » 请问有人可以教一下怎么写lradc驱动吗? » 2018-12-03 11:39:14
lradc.ko模块可以加载,但是在打开设备时提示申请中断失败
# cat /proc/interrupts
           CPU0
 19:       7017     GIC-0  27 Level     arch_timer
 21:          0     GIC-0  50 Level     /soc/timer@01c20c00
 22:          0     GIC-0  82 Level     1c02000.dma-controller
 23:      18046     GIC-0  92 Level     sunxi-mmc
 24:      12219     GIC-0  93 Level     sunxi-mmc
 25:          1     GIC-0 103 Level     musb-hdrc.1.auto
 26:          0     GIC-0 104 Level     ehci_hcd:usb1
 27:          0     GIC-0 105 Level     ohci_hcd:usb2
 28:          0     GIC-0  72 Level     1c20400.rtc
 35:        800     GIC-0  32 Level     ttyS0
 36:          0     GIC-0  38 Level     mv64xxx_i2c
IPI0:          0  CPU wakeup interrupts
IPI1:          0  Timer broadcast interrupts
IPI2:          0  Rescheduling interrupts
IPI3:          0  Function call interrupts
IPI4:          0  CPU stop interrupts
IPI5:          0  IRQ work interrupts
IPI6:          0  completion interrupts
Err:          0
# exec 6</dev/lradc
[  293.796488] genirq: Failed to request resources for my_adc (irq 62) on irqchip sunxi_pio_edge
-sh: can't open /dev/lradc: Invalid argument
我在驱动程序open函数中使用request_irq进行申请中断,其中62我是在v3s芯片手册中查到的lradc中断号,知道会是什么原因导致注册中断失败?
static int adc_open(struct inode * inode,struct file * file) //打开设备函数
{
	//注册中断
	int ret;
	ret=request_irq(62,adc_interrupt,IRQF_SHARED,ADC_NAME,1);//注册中断 IRQ_ADC在 mach/irqs.h中定义
	if(ret<0)
	{
		printk("IRQ %d can not request/n",IRQ_ADC);
		return ret;
	}
	return 0;
}#76 Re: 全志 SOC » 请问有人可以教一下怎么写lradc驱动吗? » 2018-12-02 23:13:29
[ 86.050259] PC is at clk_enable+0x8/0x10
[ 86.054187] LR is at adc_init+0x28/0x1000 [lradc]从这里看出,挂在 adc_init 这个函数里面, 具体是 clk_enable 这行, 检查一下为什么使能时钟出错?
全局变量 struct clk *adc_clk;
static int __init adc_init(void)
{
        adc_clk = clk_get(NULL,"adc");//获取时钟
	clk_enable(adc_clk);//使能时钟
}
我看网上也是这样写的.....
#77 Re: 全志 SOC » 请问有人可以教一下怎么写lradc驱动吗? » 2018-12-02 22:02:48
#include <linux/kernel.h>
#include <linux/module.h>
#include <linux/fs.h>
#include <linux/device.h> /*创建设备节点*/
#include <linux/clk.h>
#include <linux/wait.h> /*定义DECLARE_WAIT_QUEUE_HEAD*/
#include <linux/irqreturn.h> /*定义了irqreturn_t等*/
#include <linux/interrupt.h> /*request_irq disable_irq enable_irq*/
#include <asm/io.h>
#include <asm/uaccess.h>
#include <asm/irq.h>  /*其中包含了#include "mach/irqs.h" */

#define ADC_MAJOR 102
#define ADC_NAME "my_adc"
#define SUCCESS 0
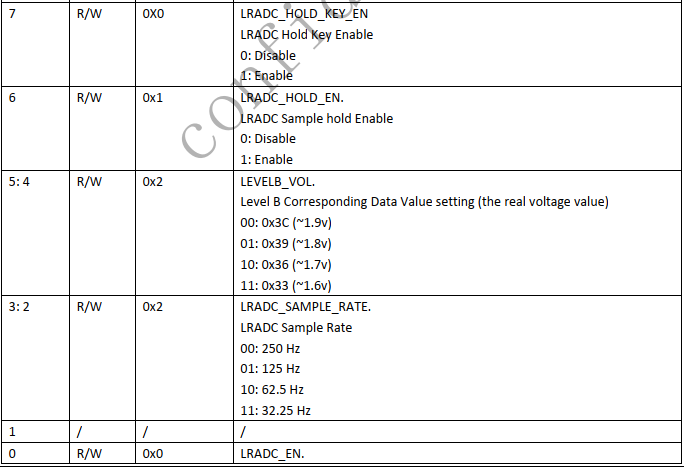
/* LRADC_CTRL bits */
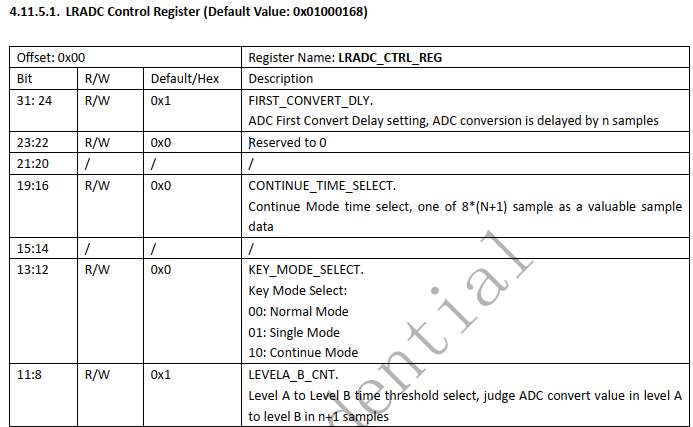
#define FIRST_CONVERT_DLY(x)	((x) << 24) /* 8 bits 31:24*/
#define CHAN_SELECT(x)		((x) << 22) /* 2 bits 23:22 */
#define CONTINUE_TIME_SEL(x)	((x) << 16) /* 4 bits 19:16*/
#define KEY_MODE_SEL(x)		((x) << 12) /* 2 bits 14:12*/
#define LEVELA_B_CNT(x)		((x) << 8)  /* 4 bits 11:8*/
#define HOLD_EN(x)		((x) << 6)
#define LEVELB_VOL(x)		((x) << 4)  /* 2 bits 5:4*/
#define SAMPLE_RATE(x)		((x) << 2)  /* 2 bits 3:2*/
#define ENABLE(x)		((x) << 0)
#define IRQ_ADC 62
static int adc_open(struct inode *,struct file *);
static int adc_release(struct inode *,struct file *);
static int __init adc_init(void);
static int __exit adc_exit(void);
static ssize_t adc_read(struct file *,char *,size_t,loff_t *);
volatile unsigned long adc_con;
unsigned long adc_dat0;
int flag;//等待任务完成标志
unsigned long buf;//存放转换完成的数据
//声明等待队列
DECLARE_WAIT_QUEUE_HEAD(adc_wait);
struct clk *adc_clk;
static irqreturn_t adc_interrupt(int irq,void * dev_id)//中断处理程序
{
	if(flag==0)
	{
		buf=(readl(adc_dat0) & 0x3f );//读取转换完成的数据,readw(unsigned int addr)读取16位数据(2字节)
		flag=1;
		wake_up_interruptible(&adc_wait);//唤醒等待其上的进程
		printk("Read value is %ld/n",buf);
	}
	return IRQ_HANDLED;
}

struct file_operations  adc_ops =
{
	.owner	=	THIS_MODULE,
	.read	    =   adc_read,
	.open	=   adc_open,
	.release	=	adc_release,
};

static int __init adc_init(void)
{
	int ret;
	adc_clk = clk_get(NULL,"adc");//获取时钟
	clk_enable(adc_clk);//使能时钟

	ret=register_chrdev(ADC_MAJOR,ADC_NAME,&adc_ops); //注册设备
	if(ret<0)
	{
		printk("register device fail/n");
		return ret;
	}
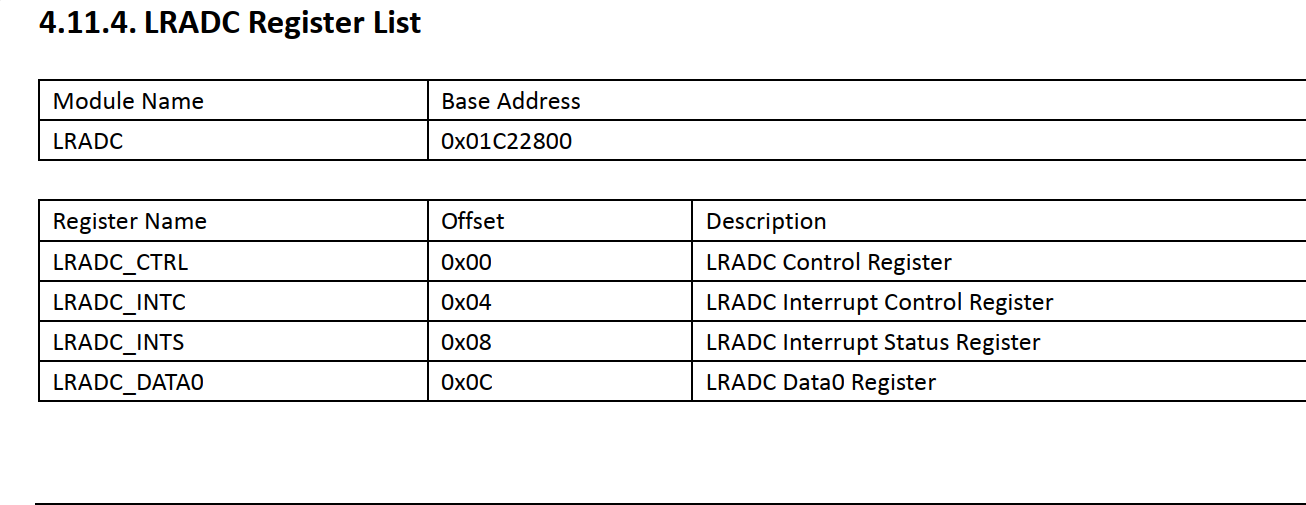
	adc_con=(unsigned long)ioremap(0x01C22800,4);
	adc_dat0=(volatile unsigned long)ioremap(0x01C2280C,4);
	if( !(adc_con & adc_dat0) )
	{
		printk("Failed to ioremap/n");
		goto handle;
	}
	printk("Initialized.../n");
	return SUCCESS;
handle:
	unregister_chrdev(ADC_MAJOR,ADC_NAME);
	return -1;
}
static int adc_open(struct inode * inode,struct file * file) //打开设备函数
{
	//注册中断
	int ret;
	//disable_irq(IRQ_ADC);
	//enable_irq(IRQ_ADC);
	ret=request_irq(IRQ_ADC,adc_interrupt,IRQF_SHARED,ADC_NAME,1);//注册中断 IRQ_ADC在 mach/irqs.h中定义
	if(ret<0)
	{
		printk("IRQ %d can not request/n",IRQ_ADC);
		return ret;
	}
	return SUCCESS;
}
static int adc_release(struct inode * inode,struct file * file) //关闭设备函数
{
	free_irq(IRQ_ADC,1);//释放中断
	return SUCCESS;
}
static ssize_t adc_read(struct file *file,
                            char * buffer,
                            size_t length,
                            loff_t * offset)//设备读取函数
{

	writel(FIRST_CONVERT_DLY(2) | LEVELA_B_CNT(1) | HOLD_EN(1) |
		SAMPLE_RATE(0) | ENABLE(1), adc_con);       //设置ADCCON writew (unsigned char data , unsigned short addr )写16位数据 2字节
	/*writew((readw(adc_con) | 0x1),adc_con);  //启动AD转换*/
	wait_event_interruptible(adc_wait,flag);
	flag=0;
}
static int __exit adc_exit(void) //驱动卸载函数
{
	iounmap(adc_con);
	iounmap(adc_dat0);
	unregister_chrdev(ADC_MAJOR,ADC_NAME);
	clk_disable(adc_clk);
    clk_put(adc_clk);
	printk("The adc is unintialized/n");
}
module_init(adc_init);
module_exit(adc_exit);
MODULE_LICENSE("GPL");
这是我写的lradc驱动,可以生产.ko模块,但是在zero上加载时会提示
[   86.001381] lradc: loading out-of-tree module taints kernel.
[   86.007740] Unable to handle kernel paging request at virtual address fffffffe
[   86.014967] pgd = c3bd4000
[   86.017784] [fffffffe] *pgd=43e88861, *pte=00000000, *ppte=00000000
[   86.024062] Internal error: Oops: 37 [#1] SMP ARM
[   86.028758] Modules linked in: lradc(O+)
[   86.032688] CPU: 0 PID: 98 Comm: insmod Tainted: G           O    4.13.16-licheepi-zero+ #9
[   86.041025] Hardware name: Allwinner sun8i Family
[   86.045722] task: c3966e00 task.stack: c3bf2000
[   86.050259] PC is at clk_enable+0x8/0x10
[   86.054187] LR is at adc_init+0x28/0x1000 [lradc]
[   86.058884] pc : [<c038b988>]    lr : [<bf005028>]    psr: a00e0013
[   86.065140] sp : c3bf3de8  ip : 00000000  fp : bf0020c0
[   86.070357] r10: 00000024  r9 : 3c414d9c  r8 : 00000001
[   86.075574] r7 : c3beb280  r6 : 00000000  r5 : bf005000  r4 : bf0022c0
[   86.082090] r3 : fffffffe  r2 : 00000000  r1 : 00000000  r0 : fffffffe
[   86.088609] Flags: NzCv  IRQs on  FIQs on  Mode SVC_32  ISA ARM  Segment none
[   86.095733] Control: 10c5387d  Table: 43bd406a  DAC: 00000051
[   86.101469] Process insmod (pid: 98, stack limit = 0xc3bf2210)
[   86.107294] Stack: (0xc3bf3de8 to 0xc3bf4000)
[   86.111649] 3de0:                   c389f740 c0701a38 c311e000 ffffe000 bf005000 c010179c
[   86.119817] 3e00: c07d8d20 bf002108 00000000 c0a35a10 c0a35a24 c431afff ffe00000 fffff000
[   86.127984] 3e20: c31032d0 c3beba40 c3e7a920 00000000 00000000 00003bc9 00040000 3c414d9c
[   86.136152] 3e40: bf0020c0 00000001 bf0020c0 00000001 c3bebac0 00000001 3c414d9c c018d748
[   86.144320] 3e60: 00000001 c3beb2a4 c3bf3f50 00000001 c3beb2a4 c018ca5c bf0020cc 00007fff
[   86.152488] 3e80: bf0020c0 c0189e08 c34a5d38 bf0020c0 bf002108 c070301c bf0021f0 c0703000
[   86.160655] 3ea0: c082d7d0 c07dd8f0 c07dd954 c07dd8fc bf00227c 00000000 00001728 c01fac00
[   86.168822] 3ec0: 00001728 00000000 c01facfc 00000000 00000000 00000000 00000000 00000000
[   86.176989] 3ee0: 00000000 00000000 00000000 00000000 00000000 00000000 00000000 00000000
[   86.185156] 3f00: 00000000 00000000 7fffffff 00000000 00000003 000c5008 0000017b c0107684
[   86.193324] 3f20: c3bf2000 00000000 00000000 c018d170 7fffffff 00000000 00000003 c3bad018
[   86.201491] 3f40: c311e000 c4318000 00001728 00000000 c4318356 c4318000 00001728 c4319278
[   86.209659] 3f60: c431913c c4318c88 00003000 00003090 00000000 00000000 00000000 0000174c
[   86.217826] 3f80: 0000001c 0000001d 00000015 00000000 00000011 00000000 000c5008 be94fd1f
[   86.225994] 3fa0: be94fbe4 c01074c0 000c5008 be94fd1f 00000003 000c5008 00000000 be94fd1f
[   86.234162] 3fc0: 000c5008 be94fd1f be94fbe4 0000017b be94fd1f 00000000 b6f6c000 00000000
[   86.242329] 3fe0: be94fa40 be94fa30 00025f10 b6ee8a42 800e0030 00000003 00000000 00000000
[   86.250519] [<c038b988>] (clk_enable) from [<bf005028>] (adc_init+0x28/0x1000 [lradc])
[   86.258444] [<bf005028>] (adc_init [lradc]) from [<c010179c>] (do_one_initcall+0x44/0x16c)
[   86.266709] [<c010179c>] (do_one_initcall) from [<c018d748>] (do_init_module+0x60/0x1f0)
[   86.274797] [<c018d748>] (do_init_module) from [<c018ca5c>] (load_module+0x1d80/0x2280)
[   86.282794] [<c018ca5c>] (load_module) from [<c018d170>] (SyS_finit_module+0xa8/0xb8)
[   86.290620] [<c018d170>] (SyS_finit_module) from [<c01074c0>] (ret_fast_syscall+0x0/0x3c)
[   86.298791] Code: e1a00004 e8bd8070 e2503000 012fff1e (e5930000)
[   86.304969] ---[ end trace 0df6ff5a82d15799 ]---
Segmentation fault#78 Re: 全志 SOC » 请问有人可以教一下怎么写lradc驱动吗? » 2018-12-02 21:56:03
#79 Re: 全志 SOC » 请问有人可以教一下怎么写lradc驱动吗? » 2018-11-30 22:20:09
#80 Re: 全志 SOC » 请问有人可以教一下怎么写lradc驱动吗? » 2018-11-30 22:10:14
#81 Re: 全志 SOC » 请问有人可以教一下怎么写lradc驱动吗? » 2018-11-30 21:09:47
#82 Re: 全志 SOC » 请问有人可以教一下怎么写lradc驱动吗? » 2018-11-30 20:53:24
#83 Re: 全志 SOC » 请问有人可以教一下怎么写lradc驱动吗? » 2018-11-30 17:42:31
#84 Re: 全志 SOC » 请问有人可以教一下怎么写lradc驱动吗? » 2018-11-30 17:32:32
#85 Re: 全志 SOC » 请问有人可以教一下怎么写lradc驱动吗? » 2018-11-30 17:22:26
605364021 说:晕哥 说:V3s 的 lradc 驱动已经写好,用户层只要访问 /dev/input/eventX 就可以了, 自己编译一个 evtest.c 就可以测试按键输入了。
我知道有自带的sun4i-lradc-keys驱动,但是我刚刚开始学写驱动,希望自己写个简单的lradc驱动来实现相关功能,但我没搞懂怎么如何去检测是哪个按键按下...网上大部分都是1个gpio对应1个按键,但是V3S用的是ADC按键
https://github.com/Lichee-Pi/linux/blob/zero-4.13.y/drivers/input/keyboard/sun4i-lradc-keys.c
注册成为输入设备,按后利用adc中断输出自定义的key值给用户层。
你也可以写一个最简单的驱动程序,利用这个adc,从轮询开始,先别用中断。
sun4i-lradc-keys是用平台驱动设备模型为架构来编写的,但是这个驱动我想用杂项设备来做可以?做成一个.ko内核模块来完成检测功能,
#86 Re: 全志 SOC » 请问有人可以教一下怎么写lradc驱动吗? » 2018-11-30 16:49:10
#88 Re: 全志 SOC » v3s开发板,想用按钮驱动产生中断实现开关led灯 » 2018-11-21 10:15:20
#89 Re: 全志 SOC » v3s开发板,想用按钮驱动产生中断实现开关led灯 » 2018-11-21 09:36:08
#90 Re: 全志 SOC » v3s开发板,想用按钮驱动产生中断实现开关led灯 » 2018-11-20 22:07:00
#91 Re: 全志 SOC » v3s开发板,想用按钮驱动产生中断实现开关led灯 » 2018-11-20 20:56:04
#92 Re: 全志 SOC » v3s开发板,想用按钮驱动产生中断实现开关led灯 » 2018-11-19 18:49:48
#93 Re: 全志 SOC » v3s开发板,想用按钮驱动产生中断实现开关led灯 » 2018-11-19 11:37:01
#94 Re: 全志 SOC » v3s开发板,想用按钮驱动产生中断实现开关led灯 » 2018-11-18 22:24:21
#95 Re: 全志 SOC » 写一个非常简单的 V3s@linux4.13-y 中断驱动 » 2018-11-18 16:37:21
#include <linux/init.h>
#include <linux/module.h>
#include <linux/kernel.h>
#include <linux/miscdevice.h>
#include <linux/types.h>
#include <linux/ioctl.h>
#include <linux/cdev.h>
#include <linux/delay.h>
#include <linux/gpio.h>
#include <linux/errno.h>
#include <linux/fs.h>
#include <linux/init.h>

#define PG0 192 //PG0 192=32*6+0
#define DEVICE "myled"
#define MAGIC_NUM 'k'			//定义幻数
#define LED_ON _IO(MAGIC_NUM, 0) //_IO    不带参数的ioctl
#define LED_OFF _IO(MAGIC_NUM, 1)

/*--------------------------------------------------------------------------
  函数名:      led_open
  参数:        struct inode *inode,struct file *filp
  返回值:      int
  描述:        open对应的驱动函数
 -------------------------------------------------------------------------*/

int led_open(struct inode *inode, struct file *filp)
{
   int ret;
   ret = gpio_request_one(PG0,GPIOF_OUT_INIT_HIGH,"myled");//配置为输出,并初始化为高电平,gpio.txt
   if(ret)
	{
		printk("error: cannot request gpio PG0 \n");
		printk("error ret = %d", ret);
	}
	gpio_set_value(PG0,1); // GPIO 输出   void gpio_set_value(unsigned gpio, int value);
	return 0;
}

/*--------------------------------------------------------------------------
	函数名:		led_release
	参数:		struct inode *inode,struct file *filp
	返回值:	int
	描述:		release对应的驱动函数
--------------------------------------------------------------------------*/

int led_release(struct inode *inode, struct file *filp)
{
	gpio_free(PG0);// 释放之前声明的 GPIO  void gpio_free(unsigned gpio);
	printk("LED dev release");
	return 0;
}

/*--------------------------------------------------------------------------
	函数名:	led_ioctl
	参数:		struct inode *inode,struct file *filp,unsigned int cmd, unsigned long arg
	返回值:	int
	描述:		led_ioctl函数
--------------------------------------------------------------------------*/

long led_ioctl(struct file *filp, unsigned int cmd, unsigned long arg)
{
	switch(cmd)
	{
		case LED_ON:
			printk("GPIO LED set low.\n");
			gpio_set_value(PG0, 0);
			break;
		case LED_OFF:
			printk("GPIO LED set high.\n");
			gpio_set_value(PG0, 1);
			break;
		default:
			printk("error cmd .\n");
			break;
	}
	return 0;
}

/*--------------------------------------------------------------------------
	函数名:		file_opreations led_fops
	参数:		owner, open, release, ioctl
	返回值:		null
	描述:		file_opreations结构体
--------------------------------------------------------------------------*/

struct file_operations led_fops ={
		.owner		= THIS_MODULE,
		.open		= led_open,
		.release	= led_release,
		.unlocked_ioctl		= led_ioctl,
};

/*--------------------------------------------------------------------------
	函数名:		miscdevie led_dev
	参数:		minor, name, fops
	返回值:		null
	描述:		杂项设备
--------------------------------------------------------------------------*/

struct miscdevice led_dev ={
		.minor		= MISC_DYNAMIC_MINOR,//minor是这个混杂设备的次设备号,由系统自动配置,
		.name		= DEVICE,			//.name 设备名
		.fops		= &led_fops
};

/*--------------------------------------------------------------------------
	函数名:		led_init
	参数:		void
	返回值:		int
	描述:		模块初始化参数,安装模块时执行
--------------------------------------------------------------------------*/

static int __init led_init(void)
{
		int ret;
		ret = misc_register(&led_dev);//注册驱动程序时采用misc_register函数注册,此函数中会自动创建设备节点,即设备文件
		if(ret)
		{
			printk("error: cannot register misc.\n");
			return ret;
		}
		printk("misc-register %s\n", DEVICE);
		return 0;
}

/*--------------------------------------------------------------------------
		函数:		led_exit
		参数:		void
		返回值:		void
		描述:		模块卸载函数,卸载模块时执行
--------------------------------------------------------------------------*/

static void __exit led_exit(void)
{
		misc_deregister(&led_dev);//杂项设备的注销过程,其实就是注册过程的逆向过程
		printk("mise-deregister %s\n", DEVICE);
}

module_init(led_init);
module_exit(led_exit);
MODULE_LICENSE("GPL");
#include<stdio.h>
#include<stdlib.h>
#include<unistd.h>
#include<fcntl.h>
#include<errno.h>
#include<string.h>
#include<asm-generic/ioctl.h>
#define DEVICE "/dev/myled"
#define MAGIC_NUM 'k'
#define LED_ON _IO(MAGIC_NUM, 0)
#define LED_OFF _IO(MAGIC_NUM, 1)
int main(int argc, char *argv[])
{
int fd;
printf("Start led test.\n");
fd = open(DEVICE, O_RDWR);//O_RDWR:可读可写
if (fd < 2) {
printf("Cannot open device %s\n", DEVICE);
return -EFAULT;
}
while (1) {
ioctl(fd, LED_ON, 0);//ioctl(int fd,unsigned long cmd,...),fd:文件描述符,cmd 控制命令
sleep(1);
ioctl(fd, LED_OFF, 0);
sleep(1);
}
return 0;
}上面是驱动程序和测试程序,能实现led灯的自动闪烁,我现在在弄按键产生中断来控制led灯的控制,但是原理图不会找按钮对应的引脚.....
#97 Re: 全志 SOC » 写一个非常简单的 V3s@linux4.13-y 中断驱动 » 2018-11-15 21:51:10
#98 Re: 全志 SOC » 写一个非常简单的 V3s@linux4.13-y 中断驱动 » 2018-11-15 20:48:08
#99 Re: 全志 SOC » 写一个非常简单的 V3s@linux4.13-y 中断驱动 » 2018-11-15 20:31:59
晕哥 我将你的代码复制来进行测试,但是在insmod .ko文件时出现了
# insmod led.ko
[ 3287.239687] led: Unknown symbol gpiod_get_raw_value (err 0)
[ 3287.245282] led: Unknown symbol gpiod_to_irq (err 0)
[ 3287.250413] led: Unknown symbol gpio_free (err 0)
[ 3287.255131] led: Unknown symbol gpio_to_desc (err 0)
[ 3287.260126] led: Unknown symbol gpio_request (err 0)
[ 3287.266851] led: Unknown symbol gpiod_get_raw_value (err 0)
[ 3287.272447] led: Unknown symbol gpiod_to_irq (err 0)
[ 3287.277566] led: Unknown symbol gpio_free (err 0)
[ 3287.282282] led: Unknown symbol gpio_to_desc (err 0)
[ 3287.287271] led: Unknown symbol gpio_request (err 0)
insmod: can't insert 'led.ko': unknown symbol in module, or unknown parameter
这个问题解决了,.c文件缺失MODULE_LICENSE("GPL");,在.c文件加上,再编译就可以在v3上进行模块加载了
#100 Re: 全志 SOC » 写一个非常简单的 V3s@linux4.13-y 中断驱动 » 2018-11-15 20:21:01
https://discuss.96boards.org/t/simple-irq-driver-issue/724/2
CONFIG_ARCH_WANT_OPTIONAL_GPIOLIB=y
CONFIG_ARCH_REQUIRE_GPIOLIB=y
CONFIG_GPIOLIB=y
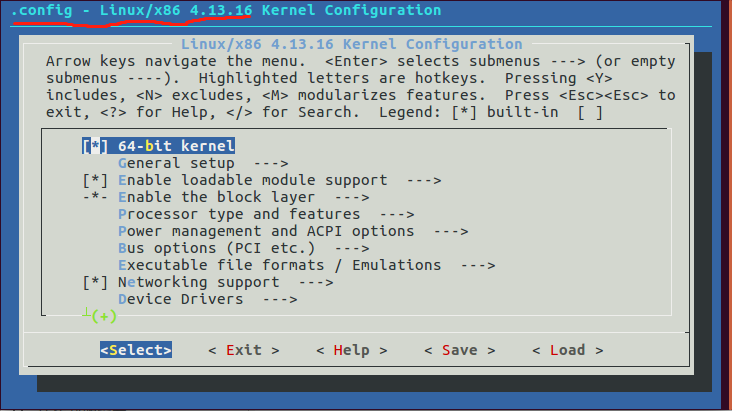
前两个在内核.config文件下不存在,只有第三个有。是要将新建的内核加载到zimge上去运行?只移植.ko模块到板子上运行可以?
#101 Re: 全志 SOC » 写一个非常简单的 V3s@linux4.13-y 中断驱动 » 2018-11-15 20:02:33
#102 Re: 全志 SOC » 写一个非常简单的 V3s@linux4.13-y 中断驱动 » 2018-11-15 19:34:20
晕哥 我将你的代码复制来进行测试,但是在insmod .ko文件时出现了
# insmod led.ko
[ 3287.239687] led: Unknown symbol gpiod_get_raw_value (err 0)
[ 3287.245282] led: Unknown symbol gpiod_to_irq (err 0)
[ 3287.250413] led: Unknown symbol gpio_free (err 0)
[ 3287.255131] led: Unknown symbol gpio_to_desc (err 0)
[ 3287.260126] led: Unknown symbol gpio_request (err 0)
[ 3287.266851] led: Unknown symbol gpiod_get_raw_value (err 0)
[ 3287.272447] led: Unknown symbol gpiod_to_irq (err 0)
[ 3287.277566] led: Unknown symbol gpio_free (err 0)
[ 3287.282282] led: Unknown symbol gpio_to_desc (err 0)
[ 3287.287271] led: Unknown symbol gpio_request (err 0)
insmod: can't insert 'led.ko': unknown symbol in module, or unknown parameter#103 Re: 全志 SOC » v3s实现流水灯显示 » 2018-11-14 22:40:13
我想交叉编译一个可以在v3s开发板上运行hello.ko内核模块,下面分别是我的.C文件和Makefile文件
#include <linux/init.h>
#include <linux/module.h>
#include <linux/kernel.h>
static int hello_init(void)
{
    printk(KERN_INFO "Hello world enter\n");
    return 0;
}

static void hello_exit(void)
{

     printk(KERN_INFO "Hello world exit\n");
}

module_init(hello_init);
module_exit(hello_exit);

MODULE_LICENSE("Dual BSD/GPL");
MODULE_DESCRIPTION("A simple hello worild Module");
MODULE_ALIAS("a simplest module");
KERNELDIR:=/home/zhang/linux
obj-m += hello.o
default:
$(MAKE) -C $(KERNELDIR) M=$(shell pwd) modules
clean:
$(MAKE) -C $(KERNELDIR) M=$(shell pwd) modules clean 我用的编译命令是make ARCH=arm CROSS_COMPILE=arm-linux-gnueabihf-
我进行编译是出现的大量的warning和error,能帮忙看下代码,是不是Makefile写得有问题?
#104 Re: 全志 SOC » v3s实现流水灯显示 » 2018-11-14 17:11:40
我想交叉编译一个helloworld.ko模块至v3s板子,我的Makefile是这样写
CROSS_COMPLE:=arm-linux-gnueabihf-
ARCH:=arm
CC:=$(CROSS_COMPILE)gcc
LD:=$(CROSS_COMPILE)ld


obj-m := helloworld.o


KDIR := /home/zhang/linux //内核所在目录
PWD := $(shell pwd)
defaule:
	make -C $(KDIR) M=$(PWD) modules


clean:
	$(MAKE) -C $(KDIR) M=$(PWD) modules clean
编译命令是make ARCH=arm CROSS_COMPILE=arm-linux-gnueabihf-
但是一编译出来,各种提示头文件错误。我按照别人Makefile改了各种版本也不行,会是什么问题?
#105 Re: 全志 SOC » v3s实现流水灯显示 » 2018-11-12 22:18:40
#106 Re: 全志 SOC » v3s实现流水灯显示 » 2018-11-11 23:05:14
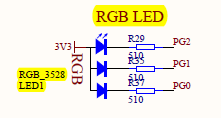
leds {
		compatible = "gpio-leds";

		blue_led {
			label = "licheepi:blue:usr";
			gpios = <&pio 6 1 GPIO_ACTIVE_LOW>; /* PG1 */
		};

		green_led {
			label = "licheepi:green:usr";
			gpios = <&pio 6 0 GPIO_ACTIVE_LOW>; /* PG0 */
			default-state = "on";                          //default状态表示设备处于active时的状态
		};

		red_led {
			label = "licheepi:red:usr";
			gpios = <&pio 6 2 GPIO_ACTIVE_LOW>; /* PG2 */
		};
	};
谢谢解答,我还有个不懂的地方,我把default-state = “on” 放到blue_led节点上,重新生成dtb文件,但是板子上电还是亮的绿灯,我去掉defalut-state,板子依旧会亮绿灯,这是为什么?
#107 Re: 全志 SOC » v3s实现流水灯显示 » 2018-11-11 22:26:05
#108 Re: 全志 SOC » v3s实现流水灯显示 » 2018-11-11 21:50:08
#109 Re: 全志 SOC » v3s实现流水灯显示 » 2018-11-11 21:15:32
#110 Re: 全志 SOC » v3s实现流水灯显示 » 2018-11-11 16:34:58
#111 Re: 全志 SOC » v3s实现流水灯显示 » 2018-11-11 15:53:03
#112 Re: 全志 SOC » v3s实现流水灯显示 » 2018-11-11 11:20:58
https://blog.csdn.net/lu_embedded/article/details/53061901
Linux下用文件IO的方式操作GPIO(/sys/class/gpio)
谢谢晕哥
#113 全志 SOC » v3s实现流水灯显示 » 2018-11-11 10:56:08
#118 Re: 全志 SOC » QT creator构建套件kit » 2018-11-08 21:14:44
#120 全志 SOC » QT creator构建套件kit » 2018-11-08 17:47:30
- 605364021
- 回复: 4
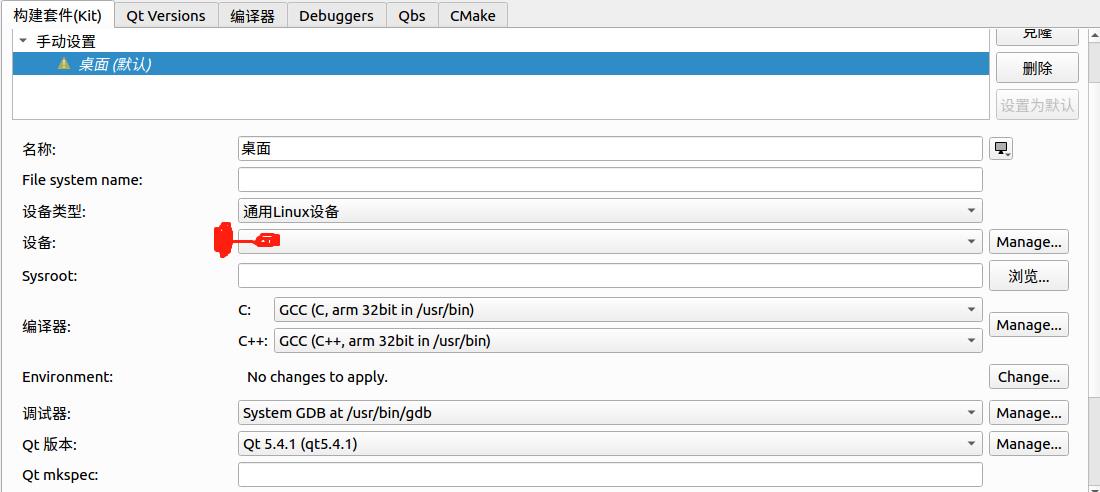
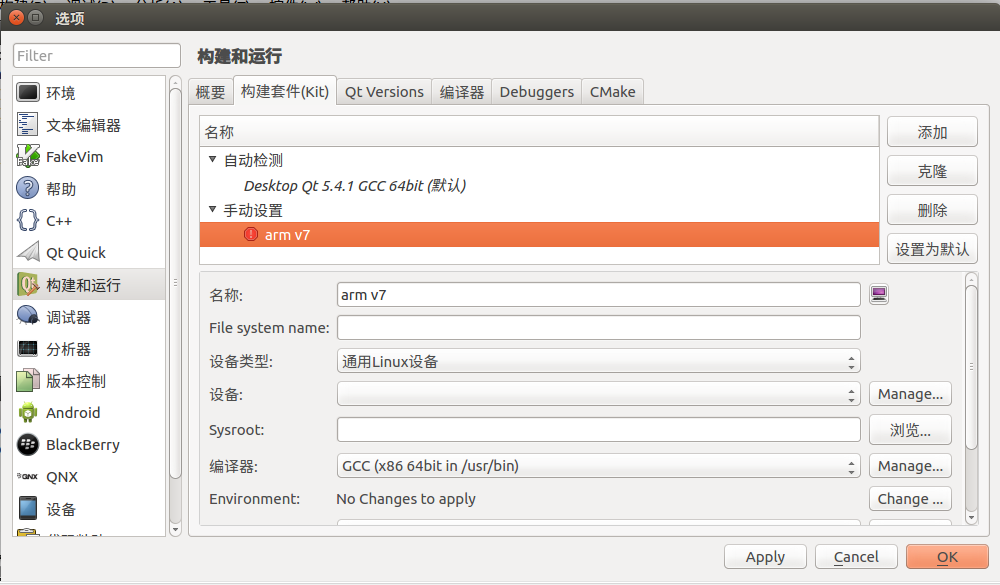
http://zero.lichee.pro/%E5%BA%94%E7%94%A8/QT_doc4.html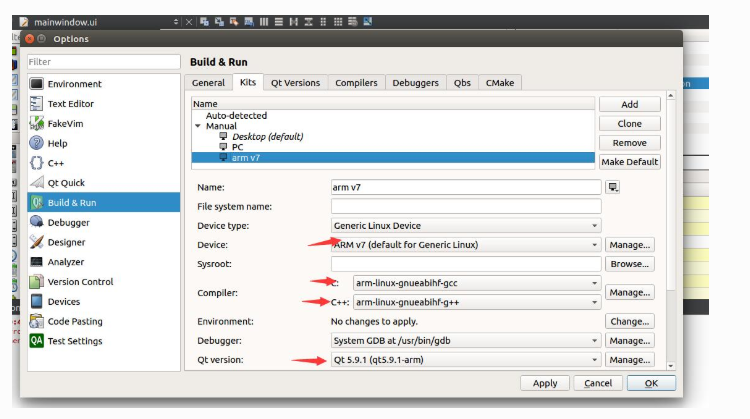
我直接用的.run装的qt,为什么构建kit里面找不到ARM v7?是qt-creator-opensource才行?
#121 Re: 全志 SOC » 准备把Qt5.9.2运行在AllWinner全志V3s荔枝派zero板子上 » 2018-11-07 15:22:06
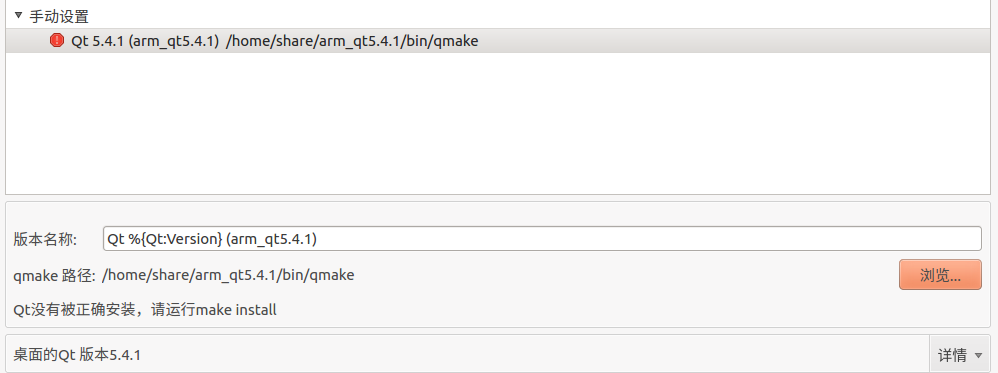
/home/zhang/qt-everywhere-opensource-src-5.4.1/qtwebkit/Source/JavaScriptCore//libJavaScriptCore.a(/home/zhang/qt-everywhere-opensource-src-5.4.1/qtwebkit/Source/JavaScriptCore//.obj/runtime/JSArray.o):JSArray.cpp:function JSC::JSArray::push(JSC::ExecState*, JSC::JSValue): error: undefined reference to 'void JSC::JSObject::putByIndexBeyondVectorLengthWithoutAttributes<(unsigned char)20>(JSC::ExecState*, unsigned int, JSC::JSValue)'
collect2: error: ld returned 1 exit status
Makefile.jsc:98: recipe for target '../../bin/jsc' failed
make[3]: *** [../../bin/jsc] Error 1
make[3]: Leaving directory '/home/zhang/qt-everywhere-opensource-src-5.4.1/qtwebkit/Source/JavaScriptCore'
Makefile.JavaScriptCore:126: recipe for target 'sub-jsc-pro-make_first-ordered' failed
make[2]: *** [sub-jsc-pro-make_first-ordered] Error 2
make[2]: Leaving directory '/home/zhang/qt-everywhere-opensource-src-5.4.1/qtwebkit/Source/JavaScriptCore'
Makefile:93: recipe for target 'sub-Source-JavaScriptCore-JavaScriptCore-pro-make_first-ordered' failed
make[1]: *** [sub-Source-JavaScriptCore-JavaScriptCore-pro-make_first-ordered] Error 2
make[1]: Leaving directory '/home/zhang/qt-everywhere-opensource-src-5.4.1/qtwebkit'
Makefile:485: recipe for target 'module-qtwebkit-make_first' failed
make: *** [module-qtwebkit-make_first] Error 2
在ubuntu上编译QT5.4.1,有人出现过这种错误吗?
#122 Re: 全志 SOC » 移植QT至V3板子 » 2018-11-06 13:38:47
也可以试一试省时省心的buildroot: https://whycan.cn/t_561.html
新手入门,我觉得自己移植会学得更多点
#126 Re: 全志 SOC » v3编译kernel » 2018-11-05 22:41:43
#127 Re: Nuvoton N32905/N32926/NUC972/N9H20/N9H26/N9H30 » nuc970评估版nfs启动失败的问题 » 2018-11-05 22:34:39
这是我编译好的带以太网的u-boot: u-boot-sunxi-with-splethernet.7z
能不能用都可以到本帖反馈。
我的u-boot用的晕哥提供的u-boot
u-boot中的ip设置ipaddr=10.23.14.100,netmask=255.255.252.0 gatewayip=10.23.13.1 nfsserver=10.23.13.250 serverip=10.23.13.250
ethact=ethernet@1c30000 ethaddr=02:00:91:f6:8d:99
setenv bootargs root=/dev/nfs nfsroot=10.23.13.250:/home/nfs ip=10.23.13.100:10.23.13.250:10.23.13.1:255.255.252.0::ens33:off init=/linuxrc console=ttyS0,115200#129 Re: Nuvoton N32905/N32926/NUC972/N9H20/N9H26/N9H30 » nuc970评估版nfs启动失败的问题 » 2018-11-05 18:39:11
605364021 说:https://whycan.cn/files/members/1205/_20181105173731.jpg
在tf卡启动情况下,挂载nfs服务器是成功的,可以在/mmt目录下看到服务器的文件,可以ping通nfs服务器,但是u-boot命令行ping不通nfs服务器你的 bootargs 是什么?
setenv bootargs root=/dev/nfs nfsroot=10.23.13.250:/home/nfs ip=10.23.13.100:10.23.13.250:10.23.13.1:255.255.252.0::ens33:off init=/linuxrc console=ttyS0,115200 其中10.23.13.250是ubuntu ip地址(nfs服务器地址),10.23.13.100是我在u-boot命令行中的ip地址,10.23.13.1是gatewayip地址,255.255.252.0是netmask,ens33是网卡名字,
可以看下有没有设置错误,
#132 Re: 全志 SOC » v3编译kernel » 2018-11-05 17:32:11
#133 全志 SOC » v3编译kernel » 2018-11-05 17:06:54
#134 Re: 全志 SOC » 全志Allwinner V3s我想用以太网使用tftp下载zImage和设备树,使用nfs根文件系统,可是u-boot如何启用以太网呢? » 2018-11-05 09:44:44
晕哥 说:这是我编译好的带以太网的u-boot: u-boot-sunxi-with-splethernet.7z
能不能用都可以到本帖反馈。
跟着教程走了一遍,也用了你提供的u-boot试了下
都不能使用以太网都是这样的
https://whycan.cn/files/members/449/QQ20180206112609.png


我安装流程走,在编译u-boot的时候dts文件出现警告,不知道有没有影响,也是u-boot ping不通,kernel可以ping通
#136 Re: Nuvoton N32905/N32926/NUC972/N9H20/N9H26/N9H30 » nuc970评估版nfs启动失败的问题 » 2018-11-04 21:20:28
首先,能ping通那台nfs服务器吗?
[   13.852036]   #0: V3s Audio Codec
[  109.926782] VFS: Unable to mount root fs via NFS, trying floppy.
[  109.933356] VFS: Cannot open root device "nfs" or unknown-block(2,0): error -6
[  109.940677] Please append a correct "root=" boot option; here are the available partitions:
[  109.949050] b300         1932288 mmcblk0
[  109.949056]  driver: mmcblk
[  109.955851]   b301           20480 mmcblk0p1 adb9da71-01
[  109.955854]
[  109.962669]   b302         1909760 mmcblk0p2 adb9da71-02
[  109.962672]
[  109.969478] Kernel panic - not syncing: VFS: Unable to mount root fs on unknown-block(2,0)
[  109.977734] CPU: 0 PID: 1 Comm: swapper/0 Not tainted 4.13.16-licheepi-zero+ #6
[  109.985030] Hardware name: Allwinner sun8i Family
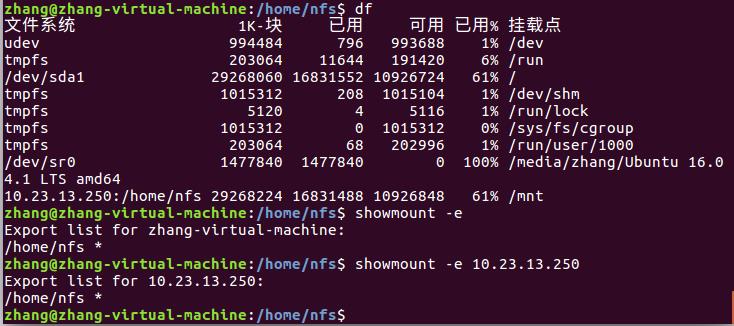
上面的启动信息显示挂载nfs没成功,ping通nfs服务器是在u-boot命令行下进行ping?下面是nfs服务器的挂载情况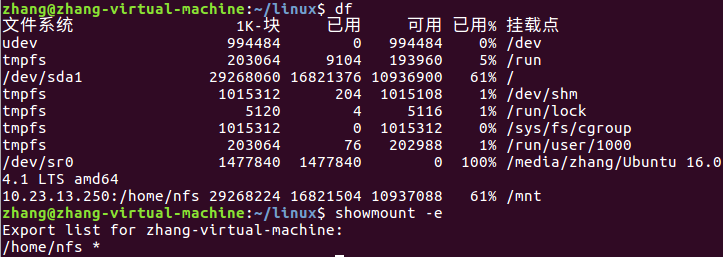
#137 Re: 全志 SOC » V3S板子上显示PNG图片 » 2018-11-04 20:19:14
605364021 说:v3板子+RGB屏,怎么在屏幕上显示png图片.....
fbv
buildroot 自带
https://github.com/godspeed1989/fbv
https://github.com/godspeed1989/fbv/blob/master/png.c
其实我不是很懂这个显示图片机制...
#138 Re: 全志 SOC » V3S板子上显示PNG图片 » 2018-11-04 20:09:41
#139 Re: 全志 SOC » V3S板子上显示PNG图片 » 2018-11-04 20:01:57
605364021 说:v3板子+RGB屏,怎么在屏幕上显示png图片.....
fbv
buildroot 自带
https://github.com/godspeed1989/fbv
https://github.com/godspeed1989/fbv/blob/master/png.c
我下的地址上的源码,但是这个./configure 不支持--host=arm-linux-gnueabihf-gcc 那有什么方法交叉编译?
#140 Re: 全志 SOC » V3S板子上显示PNG图片 » 2018-11-04 19:46:30
#141 全志 SOC » V3S板子上显示PNG图片 » 2018-11-04 17:34:02
#142 Re: 计算机图形/GUI/RTOS/FileSystem/OpenGL/DirectX/SDL2 » 2d绘图引擎 Cairo 在 SDL@Ubuntu 运行成功 » 2018-11-04 17:10:12
#143 Re: 全志 SOC » nfs挂载rootfs文件系统 » 2018-11-03 14:16:09
[   13.846063] vcc5v0: disabling
[   13.849045] ALSA device list:
[   13.852010]   #0: V3s Audio Codec
[  109.926754] VFS: Unable to mount root fs via NFS, trying floppy.
[  109.933334] VFS: Cannot open root device "nfs" or unknown-block(2,0): error -6
[  109.940659] Please append a correct "root=" boot option; here are the available partitions:
[  109.949032] b300         1932288 mmcblk0
[  109.949036]  driver: mmcblk
[  109.955831]   b301           20480 mmcblk0p1 adb9da71-01
[  109.955834]
[  109.962647]   b302         1909760 mmcblk0p2 adb9da71-02
[  109.962650]
[  109.969455] Kernel panic - not syncing: VFS: Unable to mount root fs on unknown-block(2,0)
[  109.977713] CPU: 0 PID: 1 Comm: swapper/0 Not tainted 4.13.16-licheepi-zero+ #6
[  109.985009] Hardware name: Allwinner sun8i Family
[  109.989746] [<c010e4c4>] (unwind_backtrace) from [<c010b218>] (show_stack+0x10/0x14)
[  109.997489] [<c010b218>] (show_stack) from [<c066187c>] (dump_stack+0x84/0x98)
[  110.004712] [<c066187c>] (dump_stack) from [<c011b544>] (panic+0xdc/0x248)
[  110.011592] [<c011b544>] (panic) from [<c09011ec>] (mount_block_root+0x198/0x26c)
[  110.019070] [<c09011ec>] (mount_block_root) from [<c09013e4>] (mount_root+0x124/0x12c)
[  110.026982] [<c09013e4>] (mount_root) from [<c090153c>] (prepare_namespace+0x150/0x198)
[  110.034981] [<c090153c>] (prepare_namespace) from [<c0900e24>] (kernel_init_freeable+0x1bc/0x1cc)
[  110.043845] [<c0900e24>] (kernel_init_freeable) from [<c0674198>] (kernel_init+0x8/0x110)
[  110.052016] [<c0674198>] (kernel_init) from [<c0107578>] (ret_from_fork+0x14/0x3c)
[  110.059589] ---[ end Kernel panic - not syncing: VFS: Unable to mount root fs on unknown-block(2,0)
-Boot SPL 2017.01-rc2-00057-g32ab180-dirty (Oct 31 2018 - 22:10:51)
DRAM: 64 MiB
Trying to boot from MMC1#144 Re: 全志 SOC » nfs挂载rootfs文件系统 » 2018-11-03 14:11:53
#145 全志 SOC » nfs挂载rootfs文件系统 » 2018-11-03 13:54:09
- 605364021
- 回复: 3
V3S板子想通过nfs挂载方式启动rootfs文件,修改后发现启动不了kernel
修改u-boot参数后启动信息
U-Boot 2017.01-rc2-00057-g32ab180-dirty (Oct 31 2018 - 22:10:51 +0800) Allwinner Technology

CPU:   Allwinner V3s (SUN8I 1681)
Model: Lichee Pi Zero
DRAM:  64 MiB
MMC:   SUNXI SD/MMC: 0
Setting up a 800x480 lcd console (overscan 0x0)
dotclock: 33000kHz = 33000kHz: (1 * 3MHz * 66) / 6
In:    serial@01c28000
Out:   serial@01c28000
Err:   serial@01c28000
Net:   No ethernet found.
starting USB...
No controllers found
Hit any key to stop autoboot:  0
reading zImage
3931528 bytes read in 207 ms (18.1 MiB/s)
reading sun8i-v3s-licheepi-zero-dock.dtb
12105 bytes read in 27 ms (437.5 KiB/s)
## Flattened Device Tree blob at 41800000
   Booting using the fdt blob at 0x41800000
   Loading Device Tree to 42dfa000, end 42dfff48 ... OK

Starting kernel ...
在u-boot命令行主要进行了以下修改参数
setenv bootargs root=/dev/nfs nfsroot=10.23.13.250:/home/nfs/rootfs ip=10.23.13.10010.23.13.250:10.23.13.1:255.255.252.0::ens33:off init=linuxrc console=ttySAC2,115200
setenv ipaddr 10.23.13.100
setenv netmask 255.255.252.0
setenv gatwayip 10.23.13.1
setenv serverip 10.23.13.250
saveenv
用的4.1.3y内核,ubuntu下已经开启nfs服务,其中/home/nfs/rootfs 为nfs服务器目录,会是什么原因导致读取不了kernel呢,原来我是将rootfs解压到tf卡的第二个分区中的
#146 Re: 计算机图形/GUI/RTOS/FileSystem/OpenGL/DirectX/SDL2 » 2d绘图引擎 Cairo 在 V3s@Linux运行成功 » 2018-11-03 10:11:00
#147 Re: 计算机图形/GUI/RTOS/FileSystem/OpenGL/DirectX/SDL2 » 2d绘图引擎 Cairo 在 SDL@Ubuntu 运行成功 » 2018-11-02 19:39:45
#148 Re: 计算机图形/GUI/RTOS/FileSystem/OpenGL/DirectX/SDL2 » 2d绘图引擎 Cairo 在 SDL@Ubuntu 运行成功 » 2018-11-02 19:28:45
#149 Re: 计算机图形/GUI/RTOS/FileSystem/OpenGL/DirectX/SDL2 » 2d绘图引擎 Cairo 在 SDL@Ubuntu 运行成功 » 2018-11-02 17:44:11
#150 Re: 计算机图形/GUI/RTOS/FileSystem/OpenGL/DirectX/SDL2 » 2d绘图引擎 Cairo 在 SDL@Ubuntu 运行成功 » 2018-11-02 17:32:27
#151 Re: 计算机图形/GUI/RTOS/FileSystem/OpenGL/DirectX/SDL2 » 2d绘图引擎 Cairo 在 SDL@Ubuntu 运行成功 » 2018-11-02 16:33:03
#152 Re: 计算机图形/GUI/RTOS/FileSystem/OpenGL/DirectX/SDL2 » 2d绘图引擎 Cairo 在 SDL@Ubuntu 运行成功 » 2018-11-02 11:25:42
#153 Re: 计算机图形/GUI/RTOS/FileSystem/OpenGL/DirectX/SDL2 » 2d绘图引擎 Cairo 在 SDL@Ubuntu 运行成功 » 2018-11-01 22:24:28
#154 Re: 计算机图形/GUI/RTOS/FileSystem/OpenGL/DirectX/SDL2 » 2d绘图引擎 Cairo 在 SDL@Ubuntu 运行成功 » 2018-11-01 21:35:12
#155 Re: 全志 SOC » 2d绘图引擎 Cairo 在 V3s上运行 » 2018-11-01 21:30:41
#156 Re: 全志 SOC » 2d绘图引擎 Cairo 在 V3s上运行 » 2018-11-01 21:05:17
#157 Re: 计算机图形/GUI/RTOS/FileSystem/OpenGL/DirectX/SDL2 » 2d绘图引擎 Cairo 在 SDL@Ubuntu 运行成功 » 2018-11-01 20:44:39
我想将动画在v3s板子上运行,在进行编译时
zhang@zhang-virtual-machine:~/cairosdl$ arm-linux-gnueabihf-gcc -o v3s fuzzy-balls.c cairosdl.c -I/usr/include/cairo -I/usr/include/SDL -lcairo -lSDL -lm
/usr/lib/gcc-cross/arm-linux-gnueabihf/5/../../../../arm-linux-gnueabihf/bin/ld: 找不到 -lcairo
/usr/lib/gcc-cross/arm-linux-gnueabihf/5/../../../../arm-linux-gnueabihf/bin/ld: 找不到 -lSDL
collect2: error: ld returned 1 exit status
这怎么解决?
#158 全志 SOC » 下载编译tslib » 2018-11-01 20:35:32
- 605364021
- 回复: 0
根据教程http://zero.lichee.pro/%E5%BA%94%E7%94%A8/QT_doc1.html进行操作
但是在进行./configure --host=arm-linux-gnueabihf --cache-file=tmp.cache --prefix=/opt/tslib CC=/opt/gcc-linaro-6.3.1-2017.05-x86_64_arm-linux-gnueabihf/bin/arm-linux-gnueabihf-gcc
make时出现以下错误
zhang@zhang-virtual-machine:~/tslib$ ./configure --host=arm-linux-gnueabihf --cache-file=tmp.cache   --prefix=/opt/tslib CC=/opt/gcc-linaro-6.3.1-2017.05-x86_64_arm-linux-gnueabihf/bin/arm-linux-gnueabihf-gcc
configure: loading cache tmp.cache
checking for a BSD-compatible install... /usr/bin/install -c
checking whether build environment is sane... yes
checking for arm-linux-gnueabihf-strip... arm-linux-gnueabihf-strip
checking for a thread-safe mkdir -p... /bin/mkdir -p
checking for gawk... no
checking for mawk... mawk
checking whether make sets $(MAKE)... yes
checking whether make supports nested variables... yes
checking whether make supports nested variables... (cached) yes
checking build system type... x86_64-pc-linux-gnu
checking host system type... arm-unknown-linux-gnueabihf
checking for arm-linux-gnueabihf-gcc... /opt/gcc-linaro-6.3.1-2017.05-x86_64_arm-linux-gnueabihf/bin/arm-linux-gnueabihf-gcc
checking whether the C compiler works... no
configure: error: in `/home/zhang/tslib':
configure: error: C compiler cannot create executables
See `config.log' for more details
zhang@zhang-virtual-machine:~/tslib$ make
make: *** 没有指明目标并且找不到 makefile。 停止。
是需要修改./configure --host=arm-linux-gnueabihf --cache-file=tmp.cache --prefix=/opt/tslib CC=/opt/gcc-linaro-6.3.1-2017.05-x86_64_arm-linux-gnueabihf/bin/arm-linux-gnueabihf-gcc编译命令?
#159 Re: 全志 SOC » 2d绘图引擎 Cairo 在 V3s上运行 » 2018-11-01 20:08:06
#160 Re: 全志 SOC » 2d绘图引擎 Cairo 在 V3s上运行 » 2018-11-01 19:56:27
编译应用程序:
/disk4/buildroot-2017.08.1/output/host/bin/arm-linux-gcc -o test rectangles.c -lcairo -lts
这个编译指令是在ubuntu上运行的吧,我编译提示缺失tslib.h
zhang@zhang-virtual-machine:/home/share$ arm-linux-gnueabihf-gcc -o test rectangles.c -I/usr/include/cairo -lcairo -lts
rectangles.c:24:19: fatal error: tslib.h: 没有那个文件或目录
compilation terminated.是需要先移植tslib?http://zero.lichee.pro/%E5%BA%94%E7%94%A8/QT_doc1.html
#161 Re: 全志 SOC » 2d绘图引擎 Cairo 在 V3s上运行 » 2018-11-01 19:10:29
我在buildroot根目录下又make了一次还是./usr/lib文件下没有engines文件夹和缺失前缀为libatomic.,下面是我的编译信息
zhang@zhang-virtual-machine:~/buildroot-2017.08.1$ make
>>>   Finalizing target directory
/bin/sed -i -e '/# GENERIC_SERIAL$/s~^.*#~console::respawn:/sbin/getty -L  console 0 vt100 #~' /home/zhang/buildroot-2017.08.1/output/target/etc/inittab
/bin/sed -i -e '/^#.*-o remount,rw \/$/s~^#\+~~' /home/zhang/buildroot-2017.08.1/output/target/etc/inittab
mkdir -p /home/zhang/buildroot-2017.08.1/output/target/etc
echo "buildroot" > /home/zhang/buildroot-2017.08.1/output/target/etc/hostname
/bin/sed -i -e '$a \127.0.1.1\tbuildroot' -e '/^127.0.1.1/d' /home/zhang/buildroot-2017.08.1/output/target/etc/hosts
mkdir -p /home/zhang/buildroot-2017.08.1/output/target/etc
echo "Welcome to Buildroot" > /home/zhang/buildroot-2017.08.1/output/target/etc/issue
/bin/sed -i -e s,^root:[^:]*:,root::, /home/zhang/buildroot-2017.08.1/output/target/etc/shadow
rm -f /home/zhang/buildroot-2017.08.1/output/build/locales.nopurge
for i in C en_US locale-archive; do echo $i >> /home/zhang/buildroot-2017.08.1/output/build/locales.nopurge; done
for dir in ; do for langdir in $dir/*; do if [ -e "${langdir}" ]; then grep -qx "${langdir##*/}" /home/zhang/buildroot-2017.08.1/output/build/locales.nopurge || rm -rf $langdir; fi done; done
if [ -d /home/zhang/buildroot-2017.08.1/output/target/usr/share/X11/locale ]; then for lang in C en_US; do if [ -f /home/zhang/buildroot-2017.08.1/output/target/usr/share/X11/locale/$lang/XLC_LOCALE ]; then echo "$lang/XLC_LOCALE: $lang"; fi done > /home/zhang/buildroot-2017.08.1/output/target/usr/share/X11/locale/locale.dir; fi
rm -rf /home/zhang/buildroot-2017.08.1/output/target/usr/include /home/zhang/buildroot-2017.08.1/output/target/usr/share/aclocal \
	/home/zhang/buildroot-2017.08.1/output/target/usr/lib/pkgconfig /home/zhang/buildroot-2017.08.1/output/target/usr/share/pkgconfig \
	/home/zhang/buildroot-2017.08.1/output/target/usr/lib/cmake /home/zhang/buildroot-2017.08.1/output/target/usr/share/cmake
find /home/zhang/buildroot-2017.08.1/output/target/usr/{lib,share}/ -name '*.cmake' -print0 | xargs -0 rm -f
find /home/zhang/buildroot-2017.08.1/output/target/lib/ /home/zhang/buildroot-2017.08.1/output/target/usr/lib/ /home/zhang/buildroot-2017.08.1/output/target/usr/libexec/ \
	\( -name '*.a' -o -name '*.la' \) -print0 | xargs -0 rm -f
find: `/home/zhang/buildroot-2017.08.1/output/target/usr/libexec/': 没有那个文件或目录
rm -rf /home/zhang/buildroot-2017.08.1/output/target/usr/share/gdb
rm -rf /home/zhang/buildroot-2017.08.1/output/target/usr/share/bash-completion
rm -rf /home/zhang/buildroot-2017.08.1/output/target/usr/share/zsh
rm -rf /home/zhang/buildroot-2017.08.1/output/target/usr/man /home/zhang/buildroot-2017.08.1/output/target/usr/share/man
rm -rf /home/zhang/buildroot-2017.08.1/output/target/usr/info /home/zhang/buildroot-2017.08.1/output/target/usr/share/info
rm -rf /home/zhang/buildroot-2017.08.1/output/target/usr/doc /home/zhang/buildroot-2017.08.1/output/target/usr/share/doc
rm -rf /home/zhang/buildroot-2017.08.1/output/target/usr/share/gtk-doc
rmdir /home/zhang/buildroot-2017.08.1/output/target/usr/share 2>/dev/null || true
find /home/zhang/buildroot-2017.08.1/output/target -type f \( -perm /111 -o -name '*.so*' \) -not \( -name 'libpthread*.so*' -o -name 'ld-*.so*' -o -name '*.ko' \) -print0 | xargs -0 /home/zhang/buildroot-2017.08.1/output/host/bin/arm-linux-gnueabihf-strip --remove-section=.comment --remove-section=.note 2>/dev/null || true
find /home/zhang/buildroot-2017.08.1/output/target/lib/ -type f -name 'libpthread*.so*' | \
	xargs -r /home/zhang/buildroot-2017.08.1/output/host/bin/arm-linux-gnueabihf-strip --remove-section=.comment --remove-section=.note --strip-debug
find /home/zhang/buildroot-2017.08.1/output/target/lib/ -type f -name 'ld-*.so*' | \
	xargs -r /home/zhang/buildroot-2017.08.1/output/host/bin/arm-linux-gnueabihf-strip --remove-section=.comment --remove-section=.note --strip-debug
test -f /home/zhang/buildroot-2017.08.1/output/target/etc/ld.so.conf && \
	{ echo "ERROR: we shouldn't have a /etc/ld.so.conf file"; exit 1; } || true
test -d /home/zhang/buildroot-2017.08.1/output/target/etc/ld.so.conf.d && \
	{ echo "ERROR: we shouldn't have a /etc/ld.so.conf.d directory"; exit 1; } || true
mkdir -p /home/zhang/buildroot-2017.08.1/output/target/etc
( \
	echo "NAME=Buildroot"; \
	echo "VERSION=2017.08.1"; \
	echo "ID=buildroot"; \
	echo "VERSION_ID=2017.08.1"; \
	echo "PRETTY_NAME=\"Buildroot 2017.08.1\"" \
) >  /home/zhang/buildroot-2017.08.1/output/target/etc/os-release
>>>   Sanitizing RPATH in target tree
/home/zhang/buildroot-2017.08.1/support/scripts/fix-rpath target
>>>   Generating root filesystem image rootfs.tar
rm -f /home/zhang/buildroot-2017.08.1/output/build/_fakeroot.fs
rm -f /home/zhang/buildroot-2017.08.1/output/target/THIS_IS_NOT_YOUR_ROOT_FILESYSTEM
rm -f /home/zhang/buildroot-2017.08.1/output/build/_users_table.txt
echo '#!/bin/sh' > /home/zhang/buildroot-2017.08.1/output/build/_fakeroot.fs
echo "set -e" >> /home/zhang/buildroot-2017.08.1/output/build/_fakeroot.fs
echo "chown -h -R 0:0 /home/zhang/buildroot-2017.08.1/output/target" >> /home/zhang/buildroot-2017.08.1/output/build/_fakeroot.fs
printf '   \n' >> /home/zhang/buildroot-2017.08.1/output/build/_users_table.txt
PATH="/home/zhang/buildroot-2017.08.1/output/host/bin:/home/zhang/buildroot-2017.08.1/output/host/sbin:/home/zhang/bin:/home/zhang/.local/bin:/usr/local/sbin:/usr/local/bin:/usr/sbin:/usr/bin:/sbin:/bin:/usr/games:/usr/local/games:/snap/bin:/opt/gcc-linaro-6.3.1-2017.05-x86_64_arm-linux-gnueabihf/bin" /home/zhang/buildroot-2017.08.1/support/scripts/mkusers /home/zhang/buildroot-2017.08.1/output/build/_users_table.txt /home/zhang/buildroot-2017.08.1/output/target >> /home/zhang/buildroot-2017.08.1/output/build/_fakeroot.fs
cat system/device_table.txt > /home/zhang/buildroot-2017.08.1/output/build/_device_table.txt
printf '   	/bin/busybox                     f 4755 0  0 - - - - -\n /dev/console c 622 0 0 5 1 - - -\n\n' >> /home/zhang/buildroot-2017.08.1/output/build/_device_table.txt
echo "/home/zhang/buildroot-2017.08.1/output/host/bin/makedevs -d /home/zhang/buildroot-2017.08.1/output/build/_device_table.txt /home/zhang/buildroot-2017.08.1/output/target" >> /home/zhang/buildroot-2017.08.1/output/build/_fakeroot.fs
printf '   	(cd /home/zhang/buildroot-2017.08.1/output/target; find -print0 | LC_ALL=C sort -z | tar  -cf /home/zhang/buildroot-2017.08.1/output/images/rootfs.tar --null --no-recursion -T - --numeric-owner)\n' >> /home/zhang/buildroot-2017.08.1/output/build/_fakeroot.fs
chmod a+x /home/zhang/buildroot-2017.08.1/output/build/_fakeroot.fs
PATH="/home/zhang/buildroot-2017.08.1/output/host/bin:/home/zhang/buildroot-2017.08.1/output/host/sbin:/home/zhang/bin:/home/zhang/.local/bin:/usr/local/sbin:/usr/local/bin:/usr/sbin:/usr/bin:/sbin:/bin:/usr/games:/usr/local/games:/snap/bin:/opt/gcc-linaro-6.3.1-2017.05-x86_64_arm-linux-gnueabihf/bin" /home/zhang/buildroot-2017.08.1/output/host/bin/fakeroot -- /home/zhang/buildroot-2017.08.1/output/build/_fakeroot.fs
rootdir=/home/zhang/buildroot-2017.08.1/output/target
table='/home/zhang/buildroot-2017.08.1/output/build/_device_table.txt'
/usr/bin/install -m 0644 support/misc/target-dir-warning.txt /home/zhang/buildroot-2017.08.1/output/target/THIS_IS_NOT_YOUR_ROOT_FILESYSTEM
编译根文件系统好像是没错误....
#162 Re: 全志 SOC » 2d绘图引擎 Cairo 在 V3s上运行 » 2018-11-01 19:01:55
#163 Re: 全志 SOC » 2d绘图引擎 Cairo 在 V3s上运行 » 2018-11-01 18:53:00
#164 Re: 全志 SOC » 2d绘图引擎 Cairo 在 V3s上运行 » 2018-11-01 18:49:01
#165 Re: 全志 SOC » 2d绘图引擎 Cairo 在 V3s上运行 » 2018-11-01 18:33:03
打包部分 lib 文件:
cd /disk4/buildroot-2017.08.1/output/host/arm-buildroot-linux-gnueabi/sysroot
tar cvf /mnt/hgfs/E/libcairo.tar ./usr/lib/libcairo* ./usr/lib/engines/lib* ./usr/lib/libpixman-1.* ./usr/lib/libfontconfig.* ./usr/lib/libexpat.* ./usr/lib/libfreetype.* ./usr/lib/libatomic.*
我在进行打包是出现文件缺失,会有影响?
zhang@zhang-virtual-machine:~/buildroot-2017.08.1/output/host/arm-buildroot-linux-gnueabihf/sysroot$ sudo tar cvf /mnt/usb/libcairo.tar ./usr/lib/libcairo* ./usr/lib/engines/lib* ./usr/lib/libpixman-1.* ./usr/lib/libfontconfig.* ./usr/lib/libexpat.* ./usr/lib/libfreetype.* ./usr/lib/libatomic.*
[sudo] zhang 的密码:
./usr/lib/libcairo.la
./usr/lib/libcairo.so
./usr/lib/libcairo.so.2
./usr/lib/libcairo.so.2.11400.8
tar: ./usr/lib/engines/lib*:无法 stat: 没有那个文件或目录
./usr/lib/libpixman-1.la
./usr/lib/libpixman-1.so
./usr/lib/libpixman-1.so.0
./usr/lib/libpixman-1.so.0.34.0
./usr/lib/libfontconfig.la
./usr/lib/libfontconfig.so
./usr/lib/libfontconfig.so.1
./usr/lib/libfontconfig.so.1.9.2
./usr/lib/libexpat.la
./usr/lib/libexpat.so
./usr/lib/libexpat.so.1
./usr/lib/libexpat.so.1.6.4
./usr/lib/libfreetype.la
./usr/lib/libfreetype.so
./usr/lib/libfreetype.so.6
./usr/lib/libfreetype.so.6.14.0
tar: ./usr/lib/libatomic.*:无法 stat: 没有那个文件或目录
tar: 由于前次错误,将以上次的错误状态退出#166 Re: 计算机图形/GUI/RTOS/FileSystem/OpenGL/DirectX/SDL2 » 2d绘图引擎 Cairo 在 V3s@Linux运行成功 » 2018-11-01 17:16:20
打开buidroot根目录下 .config 文件,开启:
BR2_PACKAGE_CAIRO=y
BR2_PACKAGE_PIXMAN=y接下来直接make即可.
我在.config中加入后编译出现这样的错误
zhang@zhang-virtual-machine:~/buildroot-2017.08.1$ make
Makefile:539: *** fontconfig is in the dependency chain of cairo that has added it to its _DEPENDENCIES variable without selecting it or depending on it from Config.in。 停止。
Makefile:79: recipe for target '_all' failed
make: *** [_all] Error 2
是buildroot没配置好?
#167 全志 SOC » 2d绘图引擎 Cairo 在 V3s上运行 » 2018-11-01 16:59:55
- 605364021
- 回复: 18
参考https://whycan.cn/t_1352.html
进入到buildroot根目录下 通过vim .config修改.config文件,文件开头添加
BR2_PACKAGE_CAIRO=y
BR2_PACKAGE_PIXMAN=y
但是在编译根文件系统是出现编译错误
zhang@zhang-virtual-machine:~/buildroot-2017.08.1$ make
Makefile:539: *** fontconfig is in the dependency chain of cairo that has added it to its _DEPENDENCIES variable without selecting it or depending on it from Config.in。 停止。
Makefile:79: recipe for target '_all' failed
make: *** [_all] Error 2
不懂是什么原因.......
#168 Re: 全志 SOC » v3s适配RGB屏 » 2018-11-01 11:20:07
zhang@zhang-virtual-machine:~/cairosdl$ gcc -o test fuzzy-balls.c cairosdl.c -I/usr/include/cairo -I/usr/include/SDL/ -lcairo -lSDL -lm
In file included from fuzzy-balls.c:5:0:
cairosdl.h:27:19: fatal error: cairo.h: 没有那个文件或目录
compilation terminated.
In file included from cairosdl.c:27:0:
cairosdl.h:27:19: fatal error: cairo.h: 没有那个文件或目录
compilation terminated.
我没有修改Makefile,直接编译出现的问题
#169 Re: 全志 SOC » v3s适配RGB屏 » 2018-11-01 11:01:39
#170 Re: 全志 SOC » v3s适配RGB屏 » 2018-11-01 10:44:18
需要安装 libSDL, libcairo.
Makefile 需要稍修改一下:
CFLAGS += -W -Wall -g -O3
CFLAGS += -I/usr/include/cairo -I/usr/include/SDL/ -lcairo -lSDL -lmTARGETS=test-cairosdl fuzzy-balls sdl-clock gears
all: $(TARGETS)
fuzzy-balls: fuzzy-balls.o cairosdl.o
$(CC) -o $@ $+ `pkg-config --libs sdl cairo` -lmsdl-clock: sdl-clock.o cairosdl.o
$(CC) -o $@ $+ `pkg-config --libs sdl cairo` -lmgears: gears.o cairosdl.o
$(CC) -o $@ $+ `pkg-config --libs sdl cairo` -lmtest-cairosdl: test-cairosdl.o cairosdl.o
$(CC) -o $@ $+ `pkg-config --libs sdl cairo` -lmclean:
$(RM) $(TARGETS)
$(RM) *.o
$(RM) *~
或者直接用命令行编译:gcc -o test fuzzy-balls.c cairosdl.c -I/usr/include/cairo -I/usr/include/SDL/ -lcairo -lSDL -lm
不太懂标红修改的是什么意思.....
#171 Re: 全志 SOC » v3s适配RGB屏 » 2018-11-01 10:25:37
我重新更新了下u-boot现在可以显示了,cat /dev/urandom > /dev/fb0 向RGB屏写入随机数屏幕有反应了。参考https://whycan.cn/t_503.html,我现在也是想在RGB屏上显示图片,是需要配置好 2d绘图引擎 Cairo才可以在RGB屏上显示图片?
#172 全志 SOC » v3s适配RGB屏 » 2018-10-31 21:49:44
- 605364021
- 回复: 7
我linux用的4.13分支,我用的是tf卡烧写模式,屏幕用的是淘宝买板子自带的RGB屏,我看了https://www.bilibili.com/video/av13808067
但是我发现在板子上的/dev下没有fb0驱动,是需要在设备树上添加驱动?
#173 Re: 全志 SOC » V3S声卡驱动 » 2018-10-28 19:02:49
应该还有一个 c 文件没有参与编译,你搜索一下,就在这个目录
zhang@zhang-virtual-machine:~/tinyalsa/utils$ arm-linux-gnueabihf-gcc -o tinymix tinymix.c mixer.c -L../src -I../include -static
zhang@zhang-virtual-machine:~/tinyalsa/utils$ arm-linux-gnueabihf-gcc -o tinypcminfo tinypcminfo.c pcm.c -L../src -I../include -static
zhang@zhang-virtual-machine:~/tinyalsa/utils$ arm-linux-gnueabihf-gcc -o tinyplay tinyplay.c pcm.c -L../src -I../include -static
将/tinyalsa/src目录下的pcm.c mixer.c文件拉到utils目录,可以完成编译,已经可以播放声音了,谢谢大家帮助
#174 Re: 全志 SOC » V3S声卡驱动 » 2018-10-28 17:39:14
删除 -ltinyalsa
zhang@zhang-virtual-machine:~/tinyalsa/utils$ arm-linux-gnueabihf-gcc -o tinypcminfo tinypcminfo.c -L../src -I../include -static
/tmp/cczGy732.o:在函数‘main’中:
tinypcminfo.c:(.text+0x154):对‘pcm_params_get’未定义的引用
tinypcminfo.c:(.text+0x172):对‘pcm_params_get_mask’未定义的引用
tinypcminfo.c:(.text+0x194):对‘pcm_params_get_mask’未定义的引用
tinypcminfo.c:(.text+0x264):对‘pcm_params_get_mask’未定义的引用
tinypcminfo.c:(.text+0x286):对‘pcm_params_get_min’未定义的引用
tinypcminfo.c:(.text+0x290):对‘pcm_params_get_max’未定义的引用
tinypcminfo.c:(.text+0x2aa):对‘pcm_params_get_min’未定义的引用
tinypcminfo.c:(.text+0x2b4):对‘pcm_params_get_max’未定义的引用
tinypcminfo.c:(.text+0x2ce):对‘pcm_params_get_min’未定义的引用
tinypcminfo.c:(.text+0x2d8):对‘pcm_params_get_max’未定义的引用
tinypcminfo.c:(.text+0x2f2):对‘pcm_params_get_min’未定义的引用
tinypcminfo.c:(.text+0x2fc):对‘pcm_params_get_max’未定义的引用
tinypcminfo.c:(.text+0x316):对‘pcm_params_get_min’未定义的引用
tinypcminfo.c:(.text+0x320):对‘pcm_params_get_max’未定义的引用
tinypcminfo.c:(.text+0x338):对‘pcm_params_free’未定义的引用
collect2: error: ld returned 1 exit status
编译tinymix的情况也是 删除-ltinyalsa后....
#175 Re: 全志 SOC » V3S声卡驱动 » 2018-10-28 16:45:35
我写了个hello world,传到板子上是可以运行的但是在ubuntu编译时提示我
zhang@zhang-virtual-machine:~/tinyalsa/utils$ arm-linux-gnueabihf-gcc -o tinypcminfo tinypcminfo.c -ltinyalsa -L../src -I../include -static
/usr/lib/gcc-cross/arm-linux-gnueabihf/5/../../../../arm-linux-gnueabihf/bin/ld: 找不到 -ltinyalsa
collect2: error: ld returned 1 exit status
zhang@zhang-virtual-machine:~/tinyalsa/utils$ arm-linux-gnueabihf-gcc -o tinymix tinymix.c -ltinyalsa -L../src -I../include -static
/usr/lib/gcc-cross/arm-linux-gnueabihf/5/../../../../arm-linux-gnueabihf/bin/ld: 找不到 -ltinyalsa
collect2: error: ld returned 1 exit status#176 Re: 全志 SOC » V3S声卡驱动 » 2018-10-28 12:53:43
是不是用 arm-linux-gcc 交叉编译器编译的?
zhang@zhang-virtual-machine:~/tinyalsa/utils$ arm-linux-gnueabihf-gcc -o tinypcminfo tinypcminfo.c -ltinyalsa -L../src -I../include -static
/usr/lib/gcc-cross/arm-linux-gnueabihf/5/../../../../arm-linux-gnueabihf/bin/ld: 找不到 -ltinyalsa
collect2: error: ld returned 1 exit status
我的是arm-linux-gnueabihf-gcc交叉编译器 但是arm-linux-gnueabihf-gcc -o tinypcminfo tinypcminfo.c -ltinyalsa -L../src -I../include -static编译错误,所以我选择用静态编译方式
1. git clone https://github.com/tinyalsa/tinyalsa.git
2. 把所有Makefile的 CC行都改成这样: CC = $(CROSS_COMPILE)gcc
3. 执行 CROSS_COMPILE=arm-linux-gnueabihf-make
#177 Re: 全志 SOC » V3S声卡驱动 » 2018-10-28 12:20:07
参考这个帖子: https://whycan.cn/t_490.html
或者论坛搜 tinyplay, tinymix 找别的帖子.
我看这个帖子,我理解的是在ubuntu上编译出./tinymix和./tinyplay,然后通过tftp将./tinymix和./tinyplay下载到zero板子修改寄存器配置就行,难道我理解错了?我算是小白,就看着帖子慢慢试的...
#178 Re: 全志 SOC » V3S声卡驱动 » 2018-10-28 11:28:14
605364021 说:晕哥 说:https://whycan.cn/files/members/3/QQ20171128142743.png
再次验证, 一点问题都没有。这上面晕哥的操作不是从192.168.1.99中移植tinymix和tinyplay?.......然后运行?
是同一个tinymix文件吗?
# ls -l
total 216
-rwxr-xr-x    1 root     root         28296 Jan  1  1970 tinymix
-rw-r--r--    1 root     root         33920 Jan  1 00:14 tinyplay
-rw-r--r--    1 root     root        152044 Jan  1  1970 usersound.wav
# ./tinymix contents
./tinymix: line 1: syntax error: unexpected "("
这是在板子上的文件,看文件大小应该是同一个文件,文件大小是和笔记本上一样的,
#179 Re: 全志 SOC » V3S声卡驱动 » 2018-10-27 22:59:27
https://whycan.cn/files/members/3/QQ20171128142743.png
再次验证, 一点问题都没有。
这上面晕哥的操作不是从192.168.1.99中移植tinymix和tinyplay?.......然后运行?
#180 Re: 全志 SOC » V3S声卡驱动 » 2018-10-27 22:44:47
#181 Re: 全志 SOC » V3S声卡驱动 » 2018-10-27 20:37:19
chmod +x tinymix
记得找本 linux 入门书看一看哦
我是先将tinymix tinyplay通过winscp移到windows上,然后再通过tftp32.exe 把文件移植到板子上,这样的方法tinyplay可以在板子上运行吗?
# ./tinymix contents
-sh: ./tinymix: Permission denied
# chmod 777 tinymix
# ls
tinymix        tinyplay       usersound.wav
# ./tinymix contents
./tinymix: line 1: syntax error: unexpected "("
# ./tinymix contents
./tinymix: line 1: syntax error: unexpected "("
......我感觉我移植方法有点问题
#182 Re: 全志 SOC » V3S声卡驱动 » 2018-10-27 19:59:51
#183 Re: 全志 SOC » Windows如何与我的荔枝派zero实现文件共享,有几种方式呀? » 2018-10-26 23:11:20
#184 Re: 全志 SOC » Windows如何与我的荔枝派zero实现文件共享,有几种方式呀? » 2018-10-26 22:53:08
#185 Re: 全志 SOC » Windows如何与我的荔枝派zero实现文件共享,有几种方式呀? » 2018-10-26 22:48:24
https://whycan.cn/files/members/3/QQ20181026222136.png
把网络设置为桥接模式, 然后再把Ubuntu IP 设置为 169.254.63.xxx
ifconfig
ens33     Link encap:以太网  硬件地址 00:0c:29:ac:39:d3
          inet 地址:169.254.63.180  广播:169.254.255.255  掩码:255.255.0.0
          inet6 地址: fe80::576f:3c2:f239:2785/64 Scope:Link
          UP BROADCAST RUNNING MULTICAST  MTU:1500  跃点数:1
          接收数据包:4453 错误:0 丢弃:0 过载:0 帧数:0
          发送数据包:210 错误:0 丢弃:0 过载:0 载波:0
          碰撞:0 发送队列长度:1000
          接收字节:396682 (396.6 KB)  发送字节:32760 (32.7 KB)

lo        Link encap:本地环回
          inet 地址:127.0.0.1  掩码:255.0.0.0
          inet6 地址: ::1/128 Scope:Host
          UP LOOPBACK RUNNING  MTU:65536  跃点数:1
          接收数据包:260 错误:0 丢弃:0 过载:0 帧数:0
          发送数据包:260 错误:0 丢弃:0 过载:0 载波:0
          碰撞:0 发送队列长度:1
          接收字节:21472 (21.4 KB)  发送字节:21472 (21.4 KB)
开发板还是只能跟笔记本ping通,而且ubuntu和笔记本的ping不通 笔记本ip地址为169.254.63.187 开发板IP地址169.254.63.160
#186 Re: 全志 SOC » Windows如何与我的荔枝派zero实现文件共享,有几种方式呀? » 2018-10-26 22:06:31
#187 Re: 全志 SOC » V3S声卡驱动 » 2018-10-26 21:16:38
zhang@zhang-virtual-machine:~/tinyalsa/utils$ ./tinyplay /home/zhang/Downloads/record.wav
failed to open for pcm 0,0
zhang@zhang-virtual-machine:~/tinyalsa/utils$ ./tinymix contents
Number of controls: 26
ctl	type	num	name                                    value
0	BOOL	1	Master Playback Switch                  On
1	INT	2	Master Playback Volume                  63, 63 (range 0->63)
2	BOOL	1	Phone Playback Switch                   Off
3	INT	2	Phone Playback Volume                   0, 0 (range 0->63)
4	BOOL	1	Mic Playback Switch                     Off
5	INT	2	Mic Playback Volume                     0, 0 (range 0->63)
6	BOOL	1	Mic Boost (+20dB)                       Off
7	BOOL	1	Line Playback Switch                    Off
8	INT	2	Line Playback Volume                    0, 0 (range 0->63)
9	BOOL	1	CD Playback Switch                      Off
10	INT	2	CD Playback Volume                      0, 0 (range 0->63)
11	BOOL	1	Video Playback Switch                   Off
12	INT	2	Video Playback Volume                   0, 0 (range 0->63)
13	BOOL	1	Aux Playback Switch                     Off
14	INT	2	Aux Playback Volume                     0, 0 (range 0->63)
15	BOOL	1	PCM Playback Switch                     On
16	INT	2	PCM Playback Volume                     57, 57 (range 0->63)
17	ENUM	2	Capture Source                          > Mic, CD, Video, Aux, Line, Mix, Mix Mono, Phone, , > Mic, CD, Video, Aux, Line, Mix, Mix Mono, Phone,
18	BOOL	1	Capture Switch                          On
19	INT	2	Capture Volume                          0, 0 (range 0->15)
20	IEC958	1	IEC958 Playback Con Mask                unknown
21	IEC958	1	IEC958 Playback Pro Mask                unknown
22	IEC958	1	IEC958 Playback Default                 unknown
23	BOOL	1	IEC958 Playback Switch                  Off
24	INT	2	Playback Channel Map                    0, 0 (range 0->36)
25 INT 2 Playback Channel Map 0, 0 (range 0->36)#188 Re: 全志 SOC » V3S声卡驱动 » 2018-10-26 20:59:51
605364021 说:晕哥 说:参考这个帖子: https://whycan.cn/t_490.html
或者论坛搜 tinyplay, tinymix 找别的帖子.
./tiny contents 里面不存在headphone选项怎么办..?我看好多帖子都是说要将headphone寄存器打开
那就是版本不对,确认是否 4.13分支
https://whycan.cn/files/members/1205/_20181026185947.jpg
我git clone 的是4.13分支......
#189 Re: 全志 SOC » Windows如何与我的荔枝派zero实现文件共享,有几种方式呀? » 2018-10-26 20:39:11
#190 Re: 全志 SOC » V3S声卡驱动 » 2018-10-26 20:26:27
参考这个帖子: https://whycan.cn/t_490.html
或者论坛搜 tinyplay, tinymix 找别的帖子.
./tiny contents 里面不存在headphone选项怎么办..?我看好多帖子都是说要将headphone寄存器打开
#191 Re: 全志 SOC » V3S声卡驱动 » 2018-10-26 19:29:58
#192 Re: 全志 SOC » Zero通过otg与PC共享网络 » 2018-10-26 19:04:53
#193 Re: 全志 SOC » Zero通过otg与PC共享网络 » 2018-10-26 19:03:18
#194 全志 SOC » Zero通过otg与PC共享网络 » 2018-10-26 17:53:52
#195 Re: 全志 SOC » V3S声卡驱动 » 2018-10-26 17:30:11
https://whycan.cn/files/members/3/QQ20171128142743.png
再次验证, 一点问题都没有。
这里面是将tinyplay和tinymix 通过tftp方式移植到板子的意思?然后在板子上播放.wav文件?
#196 Re: 全志 SOC » V3S声卡驱动 » 2018-10-26 11:20:59
zhang@zhang-virtual-machine:~/tinyalsa/utils$ ./tinyplay /home/zhang/Downloads/record.wav
failed to open for pcm 0,0
zhang@zhang-virtual-machine:~/tinyalsa/utils$ ./tinymix contents
Number of controls: 26
ctl	type	num	name                                    value
0	BOOL	1	Master Playback Switch                  On
1	INT	2	Master Playback Volume                  63, 63 (range 0->63)
2	BOOL	1	Phone Playback Switch                   Off
3	INT	2	Phone Playback Volume                   0, 0 (range 0->63)
4	BOOL	1	Mic Playback Switch                     Off
5	INT	2	Mic Playback Volume                     0, 0 (range 0->63)
6	BOOL	1	Mic Boost (+20dB)                       Off
7	BOOL	1	Line Playback Switch                    Off
8	INT	2	Line Playback Volume                    0, 0 (range 0->63)
9	BOOL	1	CD Playback Switch                      Off
10	INT	2	CD Playback Volume                      0, 0 (range 0->63)
11	BOOL	1	Video Playback Switch                   Off
12	INT	2	Video Playback Volume                   0, 0 (range 0->63)
13	BOOL	1	Aux Playback Switch                     Off
14	INT	2	Aux Playback Volume                     0, 0 (range 0->63)
15	BOOL	1	PCM Playback Switch                     On
16	INT	2	PCM Playback Volume                     57, 57 (range 0->63)
17	ENUM	2	Capture Source                          > Mic, CD, Video, Aux, Line, Mix, Mix Mono, Phone, , > Mic, CD, Video, Aux, Line, Mix, Mix Mono, Phone,
18	BOOL	1	Capture Switch                          On
19	INT	2	Capture Volume                          0, 0 (range 0->15)
20	IEC958	1	IEC958 Playback Con Mask                unknown
21	IEC958	1	IEC958 Playback Pro Mask                unknown
22	IEC958	1	IEC958 Playback Default                 unknown
23	BOOL	1	IEC958 Playback Switch                  Off
24	INT	2	Playback Channel Map                    0, 0 (range 0->36)
25	INT	2	Playback Channel Map                    0, 0 (range 0->36)
这个应该怎么修改?并没有headphone相关寄存器....
#197 Re: 全志 SOC » V3S声卡驱动 » 2018-10-26 11:09:12
1. git clone https://github.com/tinyalsa/tinyalsa.git
2. 把所有Makefile的 CC行都改成这样: CC = $(CROSS_COMPILE)gcc
3. 执行 CROSS_COMPILE=arm-linux- make
动态编译成功
#198 Re: 全志 SOC » v3s 网卡ping的问题 » 2018-10-26 10:58:47
#199 Re: 全志 SOC » V3S声卡驱动 » 2018-10-26 10:55:41
zhang@zhang-virtual-machine:~/tinyalsa/utils$ arm-linux-gnueabihf-gcc -o tinypcminfo tinypcminfo.c -ltinyalsa -L../src -I../include -static
/usr/lib/gcc-cross/arm-linux-gnueabihf/5/../../../../arm-linux-gnueabihf/bin/ld: 找不到 -ltinyalsa
collect2: error: ld returned 1 exit status
编译的时候提示我出现错误...
#200 Re: 全志 SOC » v3s 网卡ping的问题 » 2018-10-25 23:14:54
- 首页
- » 搜索
- » 605364021 发表的帖子
太原小智科技有限责任公司 - 东莞哇酷科技有限公司联合开发
