- 首页
- » 搜索
- » hzqlz 发表的帖子
页次: 1
#4 ST/STM8/STM8S/STM8L » 重磅开源:带屏幕LCD脱机下载器离线下载器资料 » 2025-07-29 18:36:17
- hzqlz
- 回复: 7
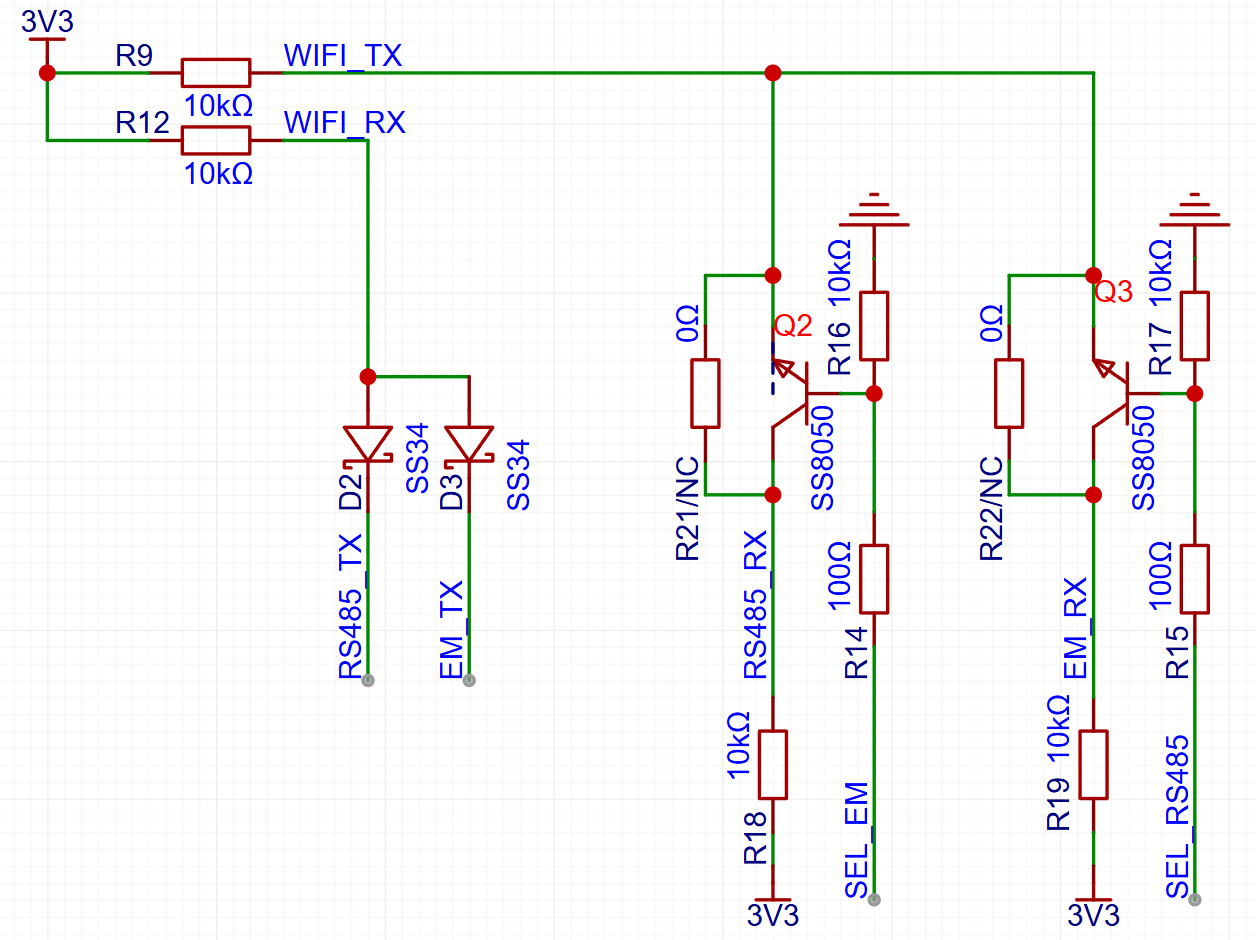
这是以前下载的资料,包含脱机烧录器的源代码和PCB文件,有需要的可以参考下。
对应的产品图片如下:
不是打广告,资料仅供参考。
资料下载链接:
重磅开源:带屏幕LCD脱机下载器离线下载器资料.rar
#5 Re: 工业芯 匠芯创 » 请教如何定位D133程序崩溃的位置 » 2024-12-22 15:38:00
#6 Re: 工业芯 匠芯创 » 请教如何定位D133程序崩溃的位置 » 2024-12-22 15:37:07
#7 Re: 工业芯 匠芯创 » luban-lite的lwip组件编译失败 » 2024-10-17 14:39:53
#8 Re: 工业芯 匠芯创 » luban-lite的lwip组件编译失败 » 2024-10-17 10:11:25
#10 Re: 工业芯 匠芯创 » 请教如何定位D133程序崩溃的位置 » 2024-10-16 16:52:07
#11 Re: 工业芯 匠芯创 » 请教如何定位D133程序崩溃的位置 » 2024-10-16 16:44:10
#12 Re: 工业芯 匠芯创 » 请教如何定位D133程序崩溃的位置 » 2024-10-14 17:47:16
#13 Re: 工业芯 匠芯创 » 请教如何定位D133程序崩溃的位置 » 2024-10-14 17:43:33
#14 Re: 工业芯 匠芯创 » 请教如何定位D133程序崩溃的位置 » 2024-10-14 17:42:30
#15 Re: 工业芯 匠芯创 » 请教如何定位D133程序崩溃的位置 » 2024-10-14 17:40:31
您好,有更加详细的信息吗,是在什么环境情况下发生的
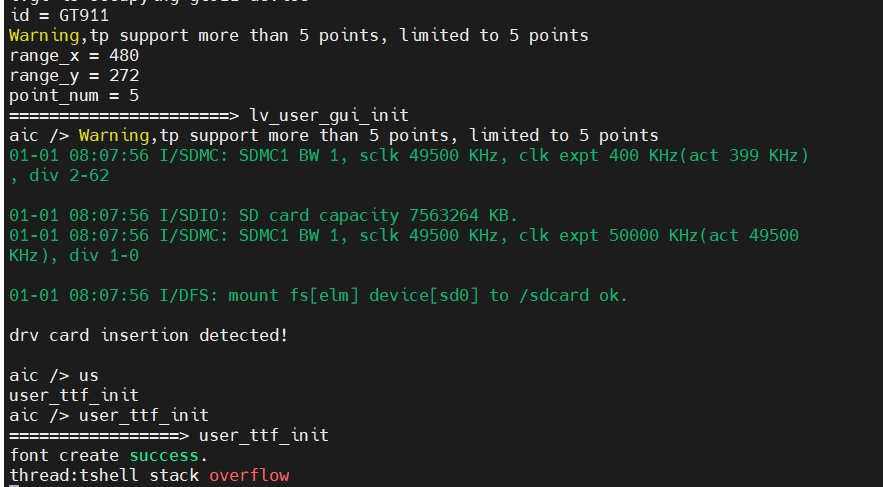
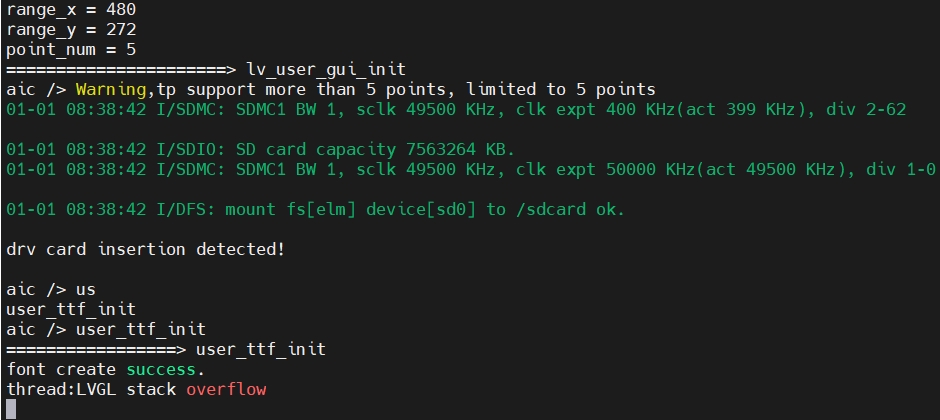
我使用SD卡存放ttf字库,写了一个非常简单的测试demo,代码如下:
void user_ttf_init(void)
{
    static lv_ft_info_t info;
    rt_kprintf("=================> user_ttf_init\n");
    //rt_thread_mdelay(5000);
    /*FreeType uses C standard file system, so no driver letter is required.*/
    //info.name = "/rodata/font.ttf";
    info.name = "/sdcard/font/font.ttf";
    info.weight = 64;
    info.style = FT_FONT_STYLE_NORMAL;
    info.mem = NULL;

    if (!lv_ft_font_init(&info))
    {
        rt_kprintf("font create failed.\n");
        return;
    }
    else
    {
        rt_kprintf("font create success.\n");
    }

    /*Create style with the new font*/
    static lv_style_t style;
    lv_style_init(&style);
    lv_style_set_text_font(&style, info.font);
    lv_style_set_text_align(&style, LV_TEXT_ALIGN_CENTER);

    /*Create a label with the new style*/
    lv_obj_t *label = lv_label_create(lv_scr_act());
    lv_obj_add_style(label, &style, 0);
    lv_label_set_text(label, "你好啊");
    lv_obj_center(label);
}

// INIT_APP_EXPORT(user_ttf_init);
MSH_CMD_EXPORT(user_ttf_init, test free type);
使用串口命令运行user_ttf_init,结果打印如下日志:
=================> user_ttf_init
font create success.
[Error] (16.537, +16039)         get_glyph_dsc_cb_cache: ImageCache_Lookup error        (in lv_freetype.c line #307)
[Error] (16.588, +51)    _lv_inv_area: detected modifying dirty areas in render         (in lv_refr.c line #217)
[Error] (16.598, +10)    _lv_inv_area: detected modifying dirty areas in render         (in lv_refr.c line #217)
[Error] (16.607, +9)     _lv_inv_area: detected modifying dirty areas in render         (in lv_refr.c line #217)
[Error] (16.634, +27)    get_glyph_dsc_cb_cache: ImageCache_Lookup error        (in lv_freetype.c line [Error]  (16.658, in lv_freetype.c line #307)
CPU Exception: NO.4
x1: 400c553a    x2: 3004e6c0    x3: 300423bc    x4: deadbeef
x5: 400024b8    x6: 0000003b    x7: 300900a0    x8: 3004e760
x9: 00004f60    x10: 00000032   x11: 3004e708   x12: 3004e6f4
x13: 0000597d   x14: 00000003   x15: 00000001   x16: 00000080
x17: 0000003b   x18: 3004f8a4   x19: 3004f8b8   x20: 0000597d
x21: 3004f8b8   x22: 00000000   x23: 00000000   x24: 00000001
x25: 00000023   x26: 00004f60   x27: 00000020   x28: 00000039
x29: 000032a8   x30: 00000000   x31: 30079f10
mcause : 38000004
mtval  : 000000be
mepc   : 400564fe
mstatus: 80007880
重要的是要掌握解决此类问题的方法,如果能有一个类似《ESP8266重启原因以及常见Fatal Exceptionܻ原因》的文档,那就非常棒了,麻烦大佬帮忙指点一下,谢谢!
#16 工业芯 匠芯创 » 请教如何定位D133程序崩溃的位置 » 2024-10-10 16:05:35
- hzqlz
- 回复: 16
日志如下:
CPU Exception: NO.7
x1: 40026450    x2: 30081610    x3: 30048620    x4: deadbeef
x5: deadbeef    x6: 00000000    x7: deadbeef    x8: 30075bb4
x9: 80006088    x10: 80006080   x11: 3004bb14   x12: 00000003
x13: 00000002   x14: 80100400   x15: 80100400   x16: 30081724
x17: 00000000   x18: 300811ec   x19: 30049e38   x20: 30049d38
x21: 30049d28   x22: 30075bd0   x23: 00000000   x24: deadbeef
x25: deadbeef   x26: deadbeef   x27: deadbeef   x28: deadbeef
x29: deadbeef   x30: deadbeef   x31: deadbeef
mcause : 30000007
mtval  : 00000000
mepc   : 400002e6
mstatus: 80007800#17 Re: 工业芯 匠芯创 » luban-lite的SDK分层有点乱啊 » 2024-09-25 16:55:17
#18 工业芯 匠芯创 » luban-lite的SDK分层有点乱啊 » 2024-09-25 15:30:36
- hzqlz
- 回复: 2
我在玩lvgl,发现原厂居然把lvgl放到了luban-lite\packages\artinchip下面,而不是luban-lite\packages\third-party。
我把lvgl剥离放到luban-lite\packages\third-party下面后,编译OK,但是加上自己的UI后,编译报错如下:
python3 D:\workspace\luban-lite\tools/scripts/elf_parse.py output\d13x_kunlunpi88_rt-thread_smarthome\images\d13x.elf D:\workspace\luban-lite\output/d13x_kunlunpi88_rt-thread_smarthome/images/ riscv64-unknown-elf-
D:\workspace\luban-lite\tools/scripts/mk_image.exe -v -c D:\workspace\luban-lite\output/d13x_kunlunpi88_rt-thread_smarthome/images/image_cfg.json -d D:\workspace\luban-lite\output/d13x_kunlunpi88_rt-thread_smarthome/images/
        Creating D:\workspace\luban-lite\output/d13x_kunlunpi88_rt-thread_smarthome/images/d13x_os.itb ...
        Creating D:\workspace\luban-lite\output/d13x_kunlunpi88_rt-thread_smarthome/images/env.bin ...
        Creating D:\workspace\luban-lite\output/d13x_kunlunpi88_rt-thread_smarthome/images/usbupg-psram-init.aic ...
        Creating D:\workspace\luban-lite\output/d13x_kunlunpi88_rt-thread_smarthome/images/pbp_ext.aic ...
        Creating D:\workspace\luban-lite\output/d13x_kunlunpi88_rt-thread_smarthome/images/loader.aic ...
        Creating D:\workspace\luban-lite\output/d13x_kunlunpi88_rt-thread_smarthome/images/bootloader.aic ...
        Image header is generated.
        Meta data for image components:
                Meta for image.updater.psram       offset 0x1600     size 0x7010 (28688)
                Meta for image.updater.spl         offset 0x8e00     size 0x33610 (210448)
                Meta for image.info                offset 0x0        size 0x800 (2048)
                Meta for image.target.spl          offset 0x3c600    size 0x33610 (210448)
                Meta for image.target.env          offset 0x6fe00    size 0x1000 (4096)
d13x_os.itb file_size: 0x2fa800 is over much than part_size: 0x200000
scons: *** [output\d13x_kunlunpi88_rt-thread_smarthome\images\d13x.elf] Error 1
scons: building terminated because of errors.
请问是需要注意什么呢
#19 Re: ESP32/ESP8266 » 蓝牙Sig Mesh视频教程分享 » 2024-09-22 23:21:04
#20 ESP32/ESP8266 » 蓝牙Sig Mesh视频教程分享 » 2024-09-22 22:36:38
- hzqlz
- 回复: 3
通过网盘分享的文件:sig mesh
链接: https://pan.baidu.com/s/1TDVNuYHpcfumOtzlekt3kA?pwd=i4ty 提取码: i4ty
先分享这一个,后面还有一个视频等我下载完了再分享
#21 Re: 工业芯 匠芯创 » 匠心创的芯片只有windows环境的下载工具吗? » 2024-07-26 11:33:50
#22 Re: 工业芯 匠芯创 » 匠心创的芯片只有windows环境的下载工具吗? » 2024-07-26 11:31:10
目前SDK里有命令行下载工具:upgcmd,此工具也可以通过构建系统来调用(scons --aicupg)。但我在D21x上测试发现很不稳定,只下载成功过一次。
好的,感谢感谢,稍后我试下大佬的方式
#24 Re: 工业芯 匠芯创 » luban-lite不支持D133BAS吗? » 2024-06-28 23:04:25
#25 Re: 工业芯 匠芯创 » luban-lite不支持D133BAS吗? » 2024-06-11 11:48:30
#28 Re: ST/STM8/STM8S/STM8L » 合宙Air001定时器对DMA传输有影响,请教一下大佬们有没有遇到过【已解决】 » 2024-03-29 23:05:28
来来来,结帖,问题找到了,附上新的代码
timer1.c
#include "timer1.h"
#include "air001xx_ll_tim.h"
#include "air001xx_ll_bus.h"
#include "air001xx_ll_gpio.h"
#include "air001xx_ll_rcc.h"
#include "led.h"

void pwm_gpio_config(void)
{
    LL_IOP_GRP1_EnableClock(LL_IOP_GRP1_PERIPH_GPIOA);

    LL_GPIO_InitTypeDef GPIO_InitStruct = {0};
    GPIO_InitStruct.Pin = LL_GPIO_PIN_0;
    GPIO_InitStruct.Mode = LL_GPIO_MODE_ALTERNATE;
    GPIO_InitStruct.Alternate = LL_GPIO_AF13_TIM1;
    GPIO_InitStruct.Speed = LL_GPIO_SPEED_FREQ_HIGH;
    GPIO_InitStruct.OutputType = LL_GPIO_OUTPUT_PUSHPULL;
    GPIO_InitStruct.Pull = LL_GPIO_PULL_NO;
    LL_GPIO_Init(GPIOA, &GPIO_InitStruct);
}

void timer1_ch3_config(void)
{
    LL_APB1_GRP2_EnableClock(LL_APB1_GRP2_PERIPH_TIM1);
    LL_TIM_InitTypeDef TIM_InitStruct = {0};
    LL_TIM_StructInit(&TIM_InitStruct);
    TIM_InitStruct.Prescaler = 48-1;
    TIM_InitStruct.CounterMode = LL_TIM_COUNTERMODE_UP;
    TIM_InitStruct.Autoreload = 1000-1;
    TIM_InitStruct.ClockDivision = LL_TIM_CLOCKDIVISION_DIV1;

    LL_TIM_Init(TIM1, &TIM_InitStruct);
		NVIC_EnableIRQ(TIM1_BRK_UP_TRG_COM_IRQn);
		NVIC_SetPriority(TIM1_BRK_UP_TRG_COM_IRQn,1);
		LL_TIM_ClearFlag_UPDATE(TIM1);
		LL_TIM_EnableIT_UPDATE(TIM1);
    LL_TIM_EnableCounter(TIM1);
}

static uint32_t counter= 0;
void TIM1_BRK_UP_TRG_COM_IRQHandler(void)
{
	if(LL_TIM_IsActiveFlag_UPDATE(TIM1))
	{
		LL_TIM_ClearFlag_UPDATE(TIM1);
		counter++;
		if(counter >= 500)
		{
			counter = 0;
			led_toggle();
		}
	}
}#32 Re: ST/STM8/STM8S/STM8L » 合宙Air001定时器对DMA传输有影响,请教一下大佬们有没有遇到过【已解决】 » 2024-03-29 21:29:21
timer3.c内容
#include "main.h"
#include "timer3.h"
#include "air001xx_ll_tim.h"
#include "air001xx_ll_bus.h"
#include "air001xx_ll_gpio.h"
#include "air001xx_ll_rcc.h"
#include "air001xx_ll_dma.h"
#include "led.h"

#define TIM_ARR_VALUE (60-1)

void timer3_ch2_gpio_init(void)
{
    LL_IOP_GRP1_EnableClock(LL_IOP_GRP1_PERIPH_GPIOA);

    LL_GPIO_InitTypeDef GPIO_InitStruct = {0};
    GPIO_InitStruct.Pin = LL_GPIO_PIN_7;
    GPIO_InitStruct.Mode = LL_GPIO_MODE_ALTERNATE;
    GPIO_InitStruct.Alternate = LL_GPIO_AF1_TIM3;
    GPIO_InitStruct.Speed = LL_GPIO_SPEED_FREQ_HIGH;
    GPIO_InitStruct.OutputType = LL_GPIO_OUTPUT_PUSHPULL;
    GPIO_InitStruct.Pull = LL_GPIO_PULL_NO;
    LL_GPIO_Init(GPIOA, &GPIO_InitStruct);
}

void timer3_ch2_init(void)
{
    LL_APB1_GRP1_EnableClock(LL_APB1_GRP1_PERIPH_TIM3);
    LL_TIM_InitTypeDef TIM_InitStruct = {0};
    LL_TIM_StructInit(&TIM_InitStruct);
    TIM_InitStruct.Prescaler = 0;
    TIM_InitStruct.CounterMode = LL_TIM_COUNTERMODE_UP;
    TIM_InitStruct.Autoreload = TIM_ARR_VALUE;//周期
    TIM_InitStruct.ClockDivision = LL_TIM_CLOCKDIVISION_DIV1;//

    LL_TIM_Init(TIM3, &TIM_InitStruct);

    LL_TIM_OC_InitTypeDef TIM_OC_InitStruct = {0};
    LL_TIM_OC_StructInit(&TIM_OC_InitStruct);
    TIM_OC_InitStruct.OCMode = LL_TIM_OCMODE_PWM1;
    TIM_OC_InitStruct.OCState = LL_TIM_OCSTATE_ENABLE;
    TIM_OC_InitStruct.CompareValue = 0;
    TIM_OC_InitStruct.OCPolarity = LL_TIM_OCPOLARITY_HIGH;
    LL_TIM_OC_Init(TIM3, LL_TIM_CHANNEL_CH2, &TIM_OC_InitStruct);

	LL_TIM_EnableARRPreload(TIM3);
    LL_TIM_EnableDMAReq_UPDATE(TIM3);
    LL_TIM_CC_SetDMAReqTrigger(TIM3,LL_TIM_CCDMAREQUEST_UPDATE);
}

//16位定时器
static uint16_t dma_buffer[128]= {0};


void timer3_dma_config(void)
{
    LL_DMA_InitTypeDef dma_initstruct;

    /* 使能DMA时钟 */
    LL_AHB1_GRP1_EnableClock(LL_AHB1_GRP1_PERIPH_DMA1);
    LL_APB1_GRP2_EnableClock(LL_APB1_GRP2_PERIPH_SYSCFG);

    LL_SYSCFG_SetDMARemap_CH1(LL_SYSCFG_DMA_MAP_TIM3_UP);

    /* 配置DMA功能参数 */
    dma_initstruct.PeriphOrM2MSrcAddress  = (uint32_t)&(TIM3->CCR2);           /* ????? */
    dma_initstruct.MemoryOrM2MDstAddress  = (uint32_t)dma_buffer;                 /* ?????? */
    dma_initstruct.Direction              = LL_DMA_DIRECTION_MEMORY_TO_PERIPH;      /* M2M ?? */
    dma_initstruct.Mode                   = LL_DMA_MODE_NORMAL;                     /* DMA?????? */
    dma_initstruct.PeriphOrM2MSrcIncMode  = LL_DMA_PERIPH_NOINCREMENT;                /* ?????????? */
    dma_initstruct.MemoryOrM2MDstIncMode  = LL_DMA_MEMORY_INCREMENT;                /* ??????????? */
    dma_initstruct.PeriphOrM2MSrcDataSize = LL_DMA_PDATAALIGN_HALFWORD;                 /* ???????32? */
    dma_initstruct.MemoryOrM2MDstDataSize = LL_DMA_MDATAALIGN_HALFWORD;                 /* ????????32? */
    dma_initstruct.NbData                 = 0x00000000U;
    dma_initstruct.Priority               = LL_DMA_PRIORITY_VERYHIGH;                   /* ??????? */
    /* ???DMA */
    if (LL_DMA_Init(DMA1, LL_DMA_CHANNEL_1, &dma_initstruct) != SUCCESS)
    {
        Error_Handler();
    }
}


void timer3_dma_send_data(uint16_t *pbuf,uint16_t len)
{
    LL_DMA_SetMemoryAddress(DMA1,LL_DMA_CHANNEL_1,(uint32_t)pbuf);
    LL_DMA_SetDataLength(DMA1, LL_DMA_CHANNEL_1, len);
    LL_DMA_EnableChannel(DMA1, LL_DMA_CHANNEL_1);
    LL_TIM_SetCounter(TIM3,TIM_ARR_VALUE);
    LL_TIM_EnableCounter(TIM3);
    while(!LL_DMA_IsActiveFlag_TC1(DMA1));
    LL_TIM_DisableCounter(TIM3);
    LL_DMA_DisableChannel(DMA1, LL_DMA_CHANNEL_1);
    LL_DMA_ClearFlag_TC1(DMA1);
}


static uint32_t counter= 0;
void TIM3_IRQHandler(void)
{
    counter++;
    if(counter >= 500000)
    {
        counter = 0;
        led_toggle();
    }
}

void DMA1_Channel1_IRQHandler(void)
{
    if(LL_DMA_IsActiveFlag_TC1(DMA1) == 1)
    {
        LL_DMA_ClearFlag_GI1(DMA1);
    }
    else if(LL_DMA_IsActiveFlag_TE1(DMA1) == 1)
    {
    }
}
timer1.c内容
#include "timer1.h"
#include "air001xx_ll_tim.h"
#include "air001xx_ll_bus.h"
#include "air001xx_ll_gpio.h"
#include "air001xx_ll_rcc.h"
#include "led.h"

void pwm_gpio_config(void)
{
    LL_IOP_GRP1_EnableClock(LL_IOP_GRP1_PERIPH_GPIOA);

    LL_GPIO_InitTypeDef GPIO_InitStruct = {0};
    GPIO_InitStruct.Pin = LL_GPIO_PIN_0;
    GPIO_InitStruct.Mode = LL_GPIO_MODE_ALTERNATE;
    GPIO_InitStruct.Alternate = LL_GPIO_AF13_TIM1;
    GPIO_InitStruct.Speed = LL_GPIO_SPEED_FREQ_HIGH;
    GPIO_InitStruct.OutputType = LL_GPIO_OUTPUT_PUSHPULL;
    GPIO_InitStruct.Pull = LL_GPIO_PULL_NO;
    LL_GPIO_Init(GPIOA, &GPIO_InitStruct);
}

void timer1_ch3_config(void)
{
    LL_APB1_GRP2_EnableClock(LL_APB1_GRP2_PERIPH_TIM1);
    LL_TIM_InitTypeDef TIM_InitStruct = {0};
    LL_TIM_StructInit(&TIM_InitStruct);
    TIM_InitStruct.Prescaler = 48-1;
    TIM_InitStruct.CounterMode = LL_TIM_COUNTERMODE_UP;
    TIM_InitStruct.Autoreload = 1000-1;
    TIM_InitStruct.ClockDivision = LL_TIM_CLOCKDIVISION_DIV1;

    LL_TIM_Init(TIM1, &TIM_InitStruct);
		NVIC_EnableIRQ(TIM1_BRK_UP_TRG_COM_IRQn);
		LL_TIM_EnableIT_UPDATE(TIM1);
    LL_TIM_EnableCounter(TIM1);
}

static uint32_t counter= 0;
void TIM1_BRK_UP_TRG_COM_IRQHandler(void)
{
	counter++;
	if(counter >= 500000)
	{
		counter = 0;
		led_toggle();
	}
}#41 Re: 全志 SOC » 模仿stm32标准库风格写的库文件(f1c100s/f1c200s),且已移植了rt-thread、lvgl、fatfs、cherryusb » 2023-12-29 12:47:26
#42 Re: DIY/综合/Arduino/写字机/3D打印机/智能小车/平衡车/四轴飞行/MQTT/物联网 » WhyCan赞助项目-SuperHUB工程师专用USB-HUB » 2023-11-02 23:09:12
#43 Re: 计算机图形/GUI/RTOS/FileSystem/OpenGL/DirectX/SDL2 » 制作一个类似淘晶驰差不多的串口屏上位机需要什么技能 » 2023-03-19 01:38:39
#46 Re: 全志 SOC » V3s这么强显示能力, 不搞个示波器可惜了,接什么ADC好呢? » 2022-08-23 00:09:21
#47 Re: 全志 SOC » 芯灵思SIN-V3s光盘资料 分享 (带SPI NAND启动以及QT) » 2022-05-09 15:28:50
hzqlz 说:我来补个链接
链接: https://pan.baidu.com/s/1ZMdeVF56wABmGKvq4BSDxA
提取码:ueab您好 可以重新分享下吗?已经失效了。
来来来,换一个链接
「芯灵思SIN-V3s光盘资料」
https://www.aliyundrive.com/s/2Jxcu1xfuDS
提取码: 86bq
点击链接保存,或者复制本段内容,打开「阿里云盘」APP ,无需下载极速在线查看,视频原画倍速播放。
#48 Re: 全志 SOC » 全志V3s采用UDP视频传输H264效果很好 » 2021-11-24 13:16:13
#49 Re: 全志 SOC » 一个迟到的高性价比开发板!芯灵思SIN-V3S! » 2021-11-24 12:47:43
#50 Re: 全志 SOC » 芯灵思SIN-V3s光盘资料,谁能再分享一下?谢谢 » 2021-11-24 12:47:23
#51 Re: 全志 SOC » 芯灵思SIN-V3s光盘资料 分享 (带SPI NAND启动以及QT) » 2021-11-24 12:47:00
我来补个链接
链接: https://pan.baidu.com/s/1ZMdeVF56wABmGKvq4BSDxA
提取码:ueab
#52 Re: 全志 SOC » 哪个大哥有芯灵思v3s的光盘资料 » 2021-11-24 12:46:44
#53 Re: 计算机图形/GUI/RTOS/FileSystem/OpenGL/DirectX/SDL2 » lvgl显示单色控件,很多控件无法显示,有什么需要特别注意的地方吗? » 2021-09-25 15:26:35
@0x7c00 感谢大佬建议,感谢晕哥提供平台支持,问题已解决!是样式的问题
一、ARC控件测试代码(彩色主题)
//创建一个屏幕对象
lv_obj_t* scr = lv_obj_create(lv_scr_act());
lv_obj_set_size(scr, 390, 390);
lv_obj_set_style_bg_color(scr, lv_color_white(), LV_PART_MAIN);
lv_obj_set_style_border_color(scr, lv_color_black(), LV_PART_MAIN);

//创建一个arc对象
lv_obj_t* arc_progress = lv_arc_create(scr);
//背景设置
static lv_style_t style_bg;
lv_style_init(&style_bg);
//lv_style_reset(&style_bg);
lv_style_set_bg_color(&style_bg,lv_color_make(0x00, 0x00, 0xff));//设置背景颜色
lv_style_set_bg_opa(&style_bg, LV_OPA_COVER);//设置背景透明度
lv_style_set_bg_grad_color(&style_bg,lv_color_make(0x24, 0xf9, 0xcf));//设置渐变颜色
lv_style_set_bg_grad_dir(&style_bg, LV_GRAD_DIR_VER);//设置渐变方向

lv_style_set_border_opa(&style_bg, LV_OPA_COVER);//设置边框透明度;
lv_style_set_border_width(&style_bg, 3);//设置边框宽度
lv_style_set_border_color(&style_bg, lv_color_make(0, 255, 0));//设置边框颜色
lv_obj_set_style_arc_rounded(arc_progress, true, LV_PART_INDICATOR);

//enum lv_arc_draw_part_type_t
lv_obj_add_style(arc_progress, &style_bg, LV_PART_MAIN);//设置背景样式
lv_obj_set_style_arc_width(arc_progress, 40, LV_PART_MAIN);//设置背景ARC宽度
lv_style_set_arc_color(&style_bg, lv_color_make(255, 0, 0));//设置ARC背景颜色

//去掉圆点
lv_obj_remove_style(arc_progress, NULL, LV_PART_KNOB);

static lv_style_t arc_style_ind;
//lv_style_reset(&style_blue);
lv_style_init(&arc_style_ind);
lv_style_set_arc_color(&arc_style_ind, lv_color_make(255, 255, 0));
lv_obj_set_style_arc_width(arc_progress, 60, LV_PART_INDICATOR);//设置前景ARC宽度
lv_obj_add_style(arc_progress, &arc_style_ind, LV_PART_INDICATOR);//设置Indicator样式

lv_arc_set_bg_angles(arc_progress, 0, 360);
lv_obj_align(arc_progress, LV_ALIGN_CENTER, 0, 0);
lv_arc_set_angles(arc_progress, 0, 270);
lv_obj_set_size(arc_progress, 300, 300);
测试效果如下:

二、ARC测试代码(单色主题)
打开lv_conf.h,将宏定义LV_COLOR_DEPTH设为1
   lv_theme_t* th;
   lv_disp_t *lv_disp;
   lv_disp = lv_disp_get_default();
   lv_disp_set_bg_color(lv_disp, lv_color_white());
   th = lv_theme_mono_init(lv_disp, false, LV_FONT_DEFAULT);
   lv_disp_set_theme(lv_disp, th);

   //创建一个屏幕对象
   lv_obj_t* scr = lv_obj_create(lv_scr_act());
   lv_obj_set_size(scr, 390, 390);
   lv_obj_set_style_bg_color(scr, lv_color_white(), LV_PART_MAIN);
   lv_obj_set_style_border_color(scr, lv_color_black(), LV_PART_MAIN);

   //创建一个arc对象
   lv_obj_t* arc_progress = lv_arc_create(scr);

   //背景设置
   static lv_style_t style_bg;
   lv_style_init(&style_bg);
   //lv_style_reset(&style_bg);
   lv_style_set_bg_color(&style_bg,lv_color_make(0xff, 0xff, 0xff));//设置背景全白
   lv_style_set_bg_opa(&style_bg, LV_OPA_COVER);//设置背景透明度
   lv_style_set_bg_grad_color(&style_bg,lv_color_make(0xff, 0xff, 0xff));//设置渐变颜色
   lv_style_set_bg_grad_dir(&style_bg, LV_GRAD_DIR_VER);//设置渐变方向

   lv_style_set_border_opa(&style_bg, LV_OPA_COVER);//设置边框透明度;
   lv_style_set_border_width(&style_bg, 3);//设置边框宽度
   lv_style_set_border_color(&style_bg, lv_color_make(0, 0, 0));//设置边框颜色
   lv_obj_set_style_arc_rounded(arc_progress, true, LV_PART_INDICATOR);

   //enum lv_arc_draw_part_type_t
   lv_obj_add_style(arc_progress, &style_bg, LV_PART_MAIN);//设置背景样式
   lv_obj_set_style_arc_width(arc_progress, 40, LV_PART_MAIN);//设置背景ARC宽度
   lv_style_set_arc_color(&style_bg, lv_color_make(255, 0xff, 0xff));//设置ARC背景颜色

   //去掉圆点
   lv_obj_remove_style(arc_progress, NULL, LV_PART_KNOB);

   static lv_style_t arc_style_ind;
   //lv_style_reset(&style_blue);
   lv_style_init(&arc_style_ind);
   lv_style_set_arc_color(&arc_style_ind, lv_color_make(0, 0, 0));
   lv_obj_set_style_arc_width(arc_progress, 60, LV_PART_INDICATOR);//设置前景ARC宽度
   lv_obj_add_style(arc_progress, &arc_style_ind, LV_PART_INDICATOR);//设置Indicator样式

   lv_arc_set_bg_angles(arc_progress, 0, 360);
   lv_obj_align(arc_progress, LV_ALIGN_CENTER, 0, 0);
   lv_arc_set_angles(arc_progress, 0, 270);
   lv_obj_set_size(arc_progress, 300, 300);
效果如下: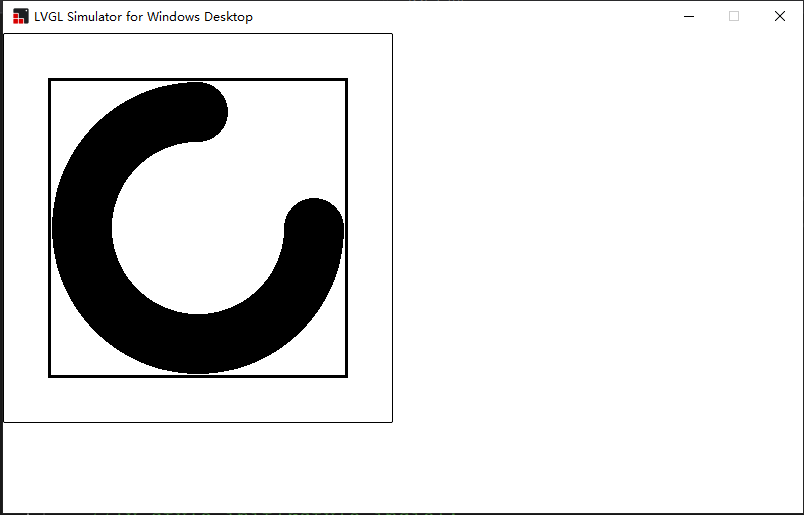
#54 计算机图形/GUI/RTOS/FileSystem/OpenGL/DirectX/SDL2 » lvgl显示单色控件,很多控件无法显示,有什么需要特别注意的地方吗? » 2021-09-23 14:32:12
#56 ESP32/ESP8266 » 平头哥TG7100C的ADC测试不太正常,有大佬玩过吗? » 2021-04-09 16:30:06
- hzqlz
- 回复: 0
根据提供的adc相关接口,我做了一些测试,但是发现采集到的数据是乱的,ADC使用的是IO5,代码如下:
#define ADC1_PORT_NUM	(4)

adc_dev_t mic_adc =
{
	ADC1_PORT_NUM,
	{0,1000},
	NULL,
};

uint8_t adc_buffer[10];

void mic_adc_cb(adc_event_t event, void *data, uint32_t size)
{
    int i;

    printf("evnet:%d\r\n", event);
    if (NULL != data) {
        for (i = 0; i < size; i++) {
            printf("adc_data:%u\r\n", ((uint16_t *)data)[i]);
        }
    }
}


void mic_adc_task(void* p)
{
    uint32_t adc_value;
    while(1)
    {
	hal_adc_value_get(&mic_adc,&adc_value,HAL_WAIT_FOREVER);
	printf("adc:%d\n",adc_value);
        aos_msleep(30);
    }
}

void mic_adc_init(void)
{
	int ret = -1;
	ret = hal_adc_init(NULL);
	ret = hal_adc_init(&mic_adc);
	if(ret != 0)
	{
		printf("adc init err\n");
	}
	ret = hal_adc_start(&mic_adc, adc_buffer, 1);
	aos_task_new("adc_task",mic_adc_task,NULL,1024);
}
ADC输入端的变化很小,结果打印日志如下
adc:746
adc:275
adc:313
adc:2514
adc:302
adc:374
adc:1578
adc:886
adc:898
adc:250
adc:414
adc:2811
adc:1347
adc:2147
adc:1595
adc:1616
adc:261
adc:263
adc:255
adc:1799
adc:1749
adc:329
adc:1318
adc:267
adc:1123
adc:977
adc:268
adc:454
adc:412
adc:1910
adc:994
adc:1565
adc:268
adc:914
adc:1962
adc:247
adc:2760
adc:459
adc:268
adc:1123
adc:3998
adc:1095
adc:2928
adc:1406
adc:257
adc:1766
adc:2557
adc:366
adc:2929
adc:356
adc:376
采用查询的方式,麻烦帮忙看看,非常感谢!
#57 计算机图形/GUI/RTOS/FileSystem/OpenGL/DirectX/SDL2 » ucgui3.98源码【转】 » 2021-03-14 13:45:21
- hzqlz
- 回复: 1
从别的地方嫖的
UCGUI3.98源码.rar
#58 Re: Cortex M0/M3/M4/M7 » RK2108 » 2021-03-13 16:07:39
#59 Qt/MSVC/MINGW/C++/MFC/GTK+/Delphi/BCB » 串口通讯C++源码【转】 » 2021-03-13 09:27:46
- hzqlz
- 回复: 0
串口通讯C++源码.rar
按需下载
#60 Qt/MSVC/MINGW/C++/MFC/GTK+/Delphi/BCB » 山寨Everything桌面搜索_原理_源码【转】 » 2021-03-13 09:24:56
- hzqlz
- 回复: 3
#61 Qt/MSVC/MINGW/C++/MFC/GTK+/Delphi/BCB » Modbus TCPIP协议Client-Server端C++源代码【转】 » 2021-03-13 09:23:48
- hzqlz
- 回复: 4
Modbus TCPIP协议Client-Server端C++源代码.zip
有需要的大佬可以看看
#62 Qt/MSVC/MINGW/C++/MFC/GTK+/Delphi/BCB » 低通滤波器算法[转] » 2021-03-13 09:21:09
- hzqlz
- 回复: 0
从别处转过来的,有需要的可以参考一下
低通滤波器算法.7z
#63 8051/STC8/AT89C51/N76E003 » 51单片机bootloader[转] » 2021-03-13 09:16:21
- hzqlz
- 回复: 1
这是某论坛收费之前用朋友的收费账号扒下来的,如有用到可以参考一下
51bootloader.rar.rar
#64 Re: 全志 SOC » 发一分全志 视频解码库 API 手册。 » 2021-03-12 14:02:14
#65 Re: 全志 SOC » 发一分全志 视频解码库 API 手册。 » 2021-03-11 17:53:56
#66 Re: 全志 SOC » 发一分全志 视频解码库 API 手册。 » 2021-03-11 15:05:46
我来补上,花了我好几个积分,心疼
Video Decoder API.pdf
#67 Re: DOPI开源摄像头(HI3516/HI3518) » hi3518学习资料分享 » 2021-03-02 09:54:04
#68 Re: DOPI开源摄像头(HI3516/HI3518) » 开源RTSP协议库 » 2021-03-02 09:48:32
#69 Re: 全志 SOC » 【芒果派F1C200s/R3】串口2无法使用 » 2021-03-02 09:47:29
#70 Re: 计算机图形/GUI/RTOS/FileSystem/OpenGL/DirectX/SDL2 » NXP出了个LVGL界面设计器 ---- Gui-Guider-Setup-1.0.0-GA.exe » 2021-02-09 16:47:43
#74 Re: 全志 SOC » 跟贴从零构建f1c200s硬件开发板 » 2021-01-26 10:33:04
#75 Re: 全志 SOC » 人生路,…………似美梦…… » 2021-01-26 10:28:58
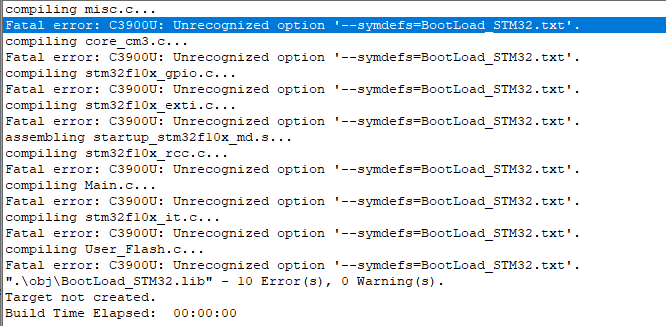
#76 Re: ST/STM8/STM8S/STM8L » keil在Misc Control中写--symdefs=BootLoad_STM32.txt导出函数Symbol失败 » 2021-01-25 22:59:12
#77 ST/STM8/STM8S/STM8L » keil在Misc Control中写--symdefs=BootLoad_STM32.txt导出函数Symbol失败 » 2021-01-25 17:33:30
#78 Re: 全志 SOC » F1C100s涨价又缺货,有什么推荐的替代? » 2021-01-25 16:55:11
感谢 深圳市启明云端科技 友情赠送的7寸电容 4G & WIFI SSD202 开发板
http://whycan.com/t_5891.html
(出处:哇酷开发者社区)这个据说不涨价,据说而已,涨价了别打我, (逃
这价格得多少呢
#80 Re: 全志 SOC » arm9完全学习手册 » 2021-01-21 22:07:45
#81 Re: 全志 SOC » 新作F1C200S,打算百分之百开源,给大家的新年礼物。 » 2021-01-08 23:38:04
#82 Re: 技术人生/软件使用技巧/破解经验/技术吐槽/灌水 » Beyond Compare 4 提示错误“这个授权密钥已被吊销”的解决办法 » 2021-01-07 14:23:31
Beyond_Compare_Pro_v4_x_Windows_CracKed.7z
上传一个我一直用的,按照文档操作就可以安心使用
#83 Re: 全志 SOC » 新作F1C200S,打算百分之百开源,给大家的新年礼物。 » 2021-01-07 09:48:43
#84 Re: 全志 SOC » 新作F1C200S,打算百分之百开源,给大家的新年礼物。 » 2020-12-30 14:50:42
#87 Re: 计算机图形/GUI/RTOS/FileSystem/OpenGL/DirectX/SDL2 » LvglFontTool字体工具更新V0.4版本 » 2020-08-20 14:48:21
#88 DIY/综合/Arduino/写字机/3D打印机/智能小车/平衡车/四轴飞行/MQTT/物联网 » 语音播放【基于C8051F330】 » 2020-05-21 13:33:52
- hzqlz
- 回复: 0
在M论坛搞下来的,已经买了芯片,暂未验证功能,有兴趣的可以玩玩,怕资料搞丢了,先传到坑网跟大家学习一下
DAC Audio 4Bit ADPCM.rar
#89 Re: DIY/综合/Arduino/写字机/3D打印机/智能小车/平衡车/四轴飞行/MQTT/物联网 » [准备发车]@bunny带我们玩入门级方波无感BLDC,提供 schematic & gerber,QQ群:807712443 [已售罄] » 2020-05-21 12:23:48
#91 Re: 全志 SOC » 你们口中的主线是指? » 2020-05-16 21:21:53
#92 Re: ESP32/ESP8266 » 分享一个自己做的wifi时钟代码 » 2020-05-15 15:26:03
#93 Re: Qt/MSVC/MINGW/C++/MFC/GTK+/Delphi/BCB » 【分享】山寨Everything桌面搜索,原理,源码 » 2020-05-12 09:45:29
我不记得以前改过什么东西,编译是没啥问题的
#94 Qt/MSVC/MINGW/C++/MFC/GTK+/Delphi/BCB » 【分享】Modbus TCPIP协议Client-Server端源代码 » 2020-05-12 09:13:35
- hzqlz
- 回复: 0
#95 Qt/MSVC/MINGW/C++/MFC/GTK+/Delphi/BCB » 【分享】山寨Everything桌面搜索,原理,源码 » 2020-05-12 08:57:53
- hzqlz
- 回复: 2
别的论坛搞过来的,先分享一下
Everything桌面搜索_原理_源码.zip
#96 Re: DIY/综合/Arduino/写字机/3D打印机/智能小车/平衡车/四轴飞行/MQTT/物联网 » 大家玩过热敏打印机吗?买了两个FTP-638MCL101 » 2020-05-11 14:14:07
#97 Re: DIY/综合/Arduino/写字机/3D打印机/智能小车/平衡车/四轴飞行/MQTT/物联网 » 大家玩过热敏打印机吗?买了两个FTP-638MCL101 » 2020-05-11 14:13:32
#98 Re: Qt/MSVC/MINGW/C++/MFC/GTK+/Delphi/BCB » 晓奇取模软件,花了我5个黑B,气死了 » 2020-05-11 14:11:31
我找个一个带源码的字库,超级牛,大家可以看看,不会上传,分享下百度链接吧,
链接:
提取码:kekc
复制这段内容后打开百度网盘手机App,操作更方便哦
感谢,我来帮忙上传一下
FontMaster.rar
#99 Qt/MSVC/MINGW/C++/MFC/GTK+/Delphi/BCB » 晓奇取模软件,花了我5个黑B,气死了 » 2020-05-11 11:29:41
- hzqlz
- 回复: 8
没看到源码啊
51黑论坛_晓琪取模.zip
#100 Re: Cortex M0/M3/M4/M7 » stm32f407用引导升级挖坑跳坑 » 2020-05-11 09:38:01
#101 Re: 技术人生/软件使用技巧/破解经验/技术吐槽/灌水 » 在网上看到的开源低成本USB 2.0协议分析仪OpenVizsla,支持高速USB(480 Mb/s) » 2020-05-11 09:13:34
#104 Re: 全志 SOC » 分享一份自己的F1c100s的Buildroot编译配置 » 2020-04-30 17:27:46
#106 Re: 站务公告/网站建设 » 感觉最近帖子变水了? » 2020-04-21 17:25:27
#107 Re: 计算机图形/GUI/RTOS/FileSystem/OpenGL/DirectX/SDL2 » 漂亮、灵动、实用的全平台 GUI效果(亦支持:单片机、IoT设备) » 2020-04-10 10:26:09
#109 Re: ESP32/ESP8266 » 发现一个不错的小米手环 Android项目 » 2020-04-10 10:01:05
#111 Re: 全志 SOC » f1c系列芯片支持JPEG裸跑解码成功 » 2020-04-01 17:14:32
#114 Re: 8051/STC8/AT89C51/N76E003 » 【求助】各位能否推荐一个占用资源比较少,支持FAT32的文件系统? » 2020-04-01 15:46:44
感谢热心网友
fatfs 精简版 http://elm-chan.org/fsw/ff/00index_p.html
Features
Very small RAM consumption (44 bytes work area + certain stack).
Very small code size (2K-4K bytes).
FAT12, FAT16 and FAT32.
Single volume and Single file.
Streaming file read.
File write function with some restrictions.
#115 Re: 8051/STC8/AT89C51/N76E003 » 【求助】各位能否推荐一个占用资源比较少,支持FAT32的文件系统? » 2020-04-01 15:45:32
多谢大侠分享
你看合不合适,代码在此:ch12-SDCard-Fat32.zip
#116 Re: DIY/综合/Arduino/写字机/3D打印机/智能小车/平衡车/四轴飞行/MQTT/物联网 » AIR724模块, 合宙拼团: 一个4G模块+一个4G开发板 = 19.9元 » 2020-04-01 15:42:50
#118 Re: 计算机图形/GUI/RTOS/FileSystem/OpenGL/DirectX/SDL2 » xynth----早些年很感兴趣的一个gui » 2020-04-01 15:27:38
#119 Re: ESP32/ESP8266 » qemu_esp32 » 2020-04-01 15:23:46
#120 Re: 技术人生/软件使用技巧/破解经验/技术吐槽/灌水 » 新人水一帖 » 2020-03-28 14:53:04
#121 Re: 技术人生/软件使用技巧/破解经验/技术吐槽/灌水 » 【搞笑图片】欧姆定律形象恶搞图 » 2020-03-28 14:52:30
#122 Re: DIY/综合/Arduino/写字机/3D打印机/智能小车/平衡车/四轴飞行/MQTT/物联网 » AIR724模块, 合宙拼团: 一个4G模块+一个4G开发板 = 19.9元 » 2020-03-27 15:37:59
#123 Re: 8051/STC8/AT89C51/N76E003 » 【求助】各位能否推荐一个占用资源比较少,支持FAT32的文件系统? » 2020-03-27 14:26:26
之前用STM32单片机,移植了这个文件系统,貌似占用资源还是比较大啊
#124 Re: DIY/综合/Arduino/写字机/3D打印机/智能小车/平衡车/四轴飞行/MQTT/物联网 » AIR724模块, 合宙拼团: 一个4G模块+一个4G开发板 = 19.9元 » 2020-03-27 14:25:22
#125 Re: DIY/综合/Arduino/写字机/3D打印机/智能小车/平衡车/四轴飞行/MQTT/物联网 » 下单买了一个 汇顶 GT911/GT9xx 电容触摸屏产测工具 » 2020-03-27 14:24:40
#126 Re: 全志 SOC » 全志 V3S 用户手册 寄存器[PDF] + 原理图[DSN+PDF] » 2020-03-27 14:21:36
#127 Re: DIY/综合/Arduino/写字机/3D打印机/智能小车/平衡车/四轴飞行/MQTT/物联网 » 据说JLC5元包邮恢复了,各位开始薅羊毛了吗? » 2020-03-27 13:56:35
#130 Re: 计算机图形/GUI/RTOS/FileSystem/OpenGL/DirectX/SDL2 » 正在大刀阔斧地改革uC/GUI,大家给提点意见。 » 2020-03-04 11:31:01
#135 Re: 华芯微特 » 【华芯微特】本站积分30以上,可跟帖,并联系 微信 17722814269 / QQ 348596630, 免费获得synwit开发板与样片 » 2020-01-14 16:03:42
#136 Re: 华芯微特 » SWM320成功移植micropython » 2020-01-11 13:26:28
#138 Re: 技术人生/软件使用技巧/破解经验/技术吐槽/灌水 » 从淘宝网购买时要小心 » 2020-01-04 16:15:41
#139 Re: Qt/MSVC/MINGW/C++/MFC/GTK+/Delphi/BCB » 《Ivor Horton's Beginning Visual C++ 2013》 源码下载 《Visual C++ 2013 入门经典》 » 2019-12-11 22:26:09
#141 Re: DIY/综合/Arduino/写字机/3D打印机/智能小车/平衡车/四轴飞行/MQTT/物联网 » 感谢@weiyongwill 赠送的某银行淘汰终端机,AM3354 CPU,运行Android【开车了, 凑满50台就发车, 60元+运费】 » 2019-12-08 22:07:48
https://whycan.cn/files/members/3/QQ图片20191117111144.jpg
左边是热敏打印机, 右边是驱动板.
我记得之前传过一次这个热敏打印机的手册和网上找的资料,晕哥看能不能把这个驱起来
#142 Re: RISC-V » 【合泰触摸库分享】这是代理给的触摸库,有兴趣的一起交流一下 » 2019-12-07 15:00:13
#143 DIY/综合/Arduino/写字机/3D打印机/智能小车/平衡车/四轴飞行/MQTT/物联网 » 【合泰开发板资料共享】在网上找的淘宝店开发板光盘资料,分四卷上传,下载后注意删掉扩展名.zip,一起解压 » 2019-12-07 14:57:53
- hzqlz
- 回复: 6
有部分参考价值,不知道合泰为什么这么封闭,技术支持不到位
EAS-BSHT-V1_2_7z_001.zip
#145 RISC-V » 【合泰触摸库分享】这是代理给的触摸库,有兴趣的一起交流一下 » 2019-12-07 14:35:37
- hzqlz
- 回复: 3
用的是合泰的BS83B12C,代理只给了这个库和芯片手册,其他资料没有,头大
#147 Re: DIY/综合/Arduino/写字机/3D打印机/智能小车/平衡车/四轴飞行/MQTT/物联网 » 感谢@weiyongwill 赠送的某银行淘汰终端机,AM3354 CPU,运行Android【开车了, 凑满50台就发车, 60元+运费】 » 2019-11-29 15:25:27
#149 Re: DIY/综合/Arduino/写字机/3D打印机/智能小车/平衡车/四轴飞行/MQTT/物联网 » 带控制器 0.9 寸(段码???)液晶, 0.3元 » 2019-10-31 09:29:45
#150 Re: DIY/综合/Arduino/写字机/3D打印机/智能小车/平衡车/四轴飞行/MQTT/物联网 » 大家玩过热敏打印机吗?买了两个FTP-638MCL101 » 2019-10-29 20:23:29
#151 Re: DIY/综合/Arduino/写字机/3D打印机/智能小车/平衡车/四轴飞行/MQTT/物联网 » 大家玩过热敏打印机吗?买了两个FTP-638MCL101 » 2019-10-29 20:22:56
#152 Re: 计算机图形/GUI/RTOS/FileSystem/OpenGL/DirectX/SDL2 » 自己用Qt写一个 emwin 5.26 电脑模拟器 » 2019-10-28 17:32:18
#153 Re: DIY/综合/Arduino/写字机/3D打印机/智能小车/平衡车/四轴飞行/MQTT/物联网 » 跟风买了 100pcs 3.2 寸 I80 8bit/16bit 的IPS 46pin 液晶屏, 2元/pcs » 2019-10-28 17:25:29
#154 DIY/综合/Arduino/写字机/3D打印机/智能小车/平衡车/四轴飞行/MQTT/物联网 » 大家玩过热敏打印机吗?买了两个FTP-638MCL101 » 2019-10-28 16:59:30
- hzqlz
- 回复: 13
head printer.rar
FTP-638MCL101_Specifications.pdfftp628_printer.rar
FTP-628 MCL101103, Easy Loading Method.pdf
Com32.rar
不知道怎么玩,网上找了一些资料,先分享一下,有想玩的一起交流下,咸鱼上老板只给了一个pdf文档,貌似没什么用
#157 Re: 计算机图形/GUI/RTOS/FileSystem/OpenGL/DirectX/SDL2 » 折腾一个晚上,终于把 littlevgl移植到新唐N32903U1DN芯片上面裸奔了.soc只支持16bit颜色 » 2019-07-09 18:46:25
#160 Re: ESP32/ESP8266 » RTL8710大家玩过没有?我来共享一下资料 » 2019-05-24 15:28:20
#161 Re: ESP32/ESP8266 » 做了一个非常简单的Android 蓝牙 demo » 2019-05-24 15:25:08
#163 Re: Nuvoton N32905/N32926/NUC972/N9H20/N9H26/N9H30 » N32903U1DN 板子使用, 在这里记录备忘, 以免过几天又忘记了. » 2019-05-19 08:25:22
#164 Re: 全志 SOC » lvgl移植到裸跑的f1c100s上 » 2019-05-17 13:59:45
#165 Re: 全志 SOC » F1C100S跑起MicroPython! » 2019-05-17 13:52:57
#166 Re: 全志 SOC » 分享朋友给的NUC972, N32903U1DN 开发资料 » 2019-05-17 13:44:54
#167 Re: 计算机图形/GUI/RTOS/FileSystem/OpenGL/DirectX/SDL2 » littlevgl 官方已经支持 vc2017 了, 终于可以丢掉编译速度辣鸡到家的 mingw 了 » 2019-01-17 08:26:54
#168 Nuvoton N32905/N32926/NUC972/N9H20/N9H26/N9H30 » 三、新唐N32905U1DN开发教程:使用寄存器配置IO口 » 2018-07-18 21:11:15
- hzqlz
- 回复: 5
个人原创系列之使用寄存器控制IO口,比官方的SDK方便
https://blog.csdn.net/hzqhmlz/article/details/81078889
#169 Nuvoton N32905/N32926/NUC972/N9H20/N9H26/N9H30 » 二、新唐N32905U1DN开发教程:控制IO口点亮LED » 2018-07-18 21:09:58
- hzqlz
- 回复: 0
同理给出博客链接,都搬移过来浪费时间
https://blog.csdn.net/hzqhmlz/article/details/81078822
#170 Nuvoton N32905/N32926/NUC972/N9H20/N9H26/N9H30 » 一、新唐N32905U1DN开发教程:MDK环境下工程搭建(官方提供的固件库) » 2018-07-18 21:08:41
- hzqlz
- 回复: 0
直接给我博客的链接,裸机开发 https://blog.csdn.net/hzqhmlz/article/details/80702548
页次: 1
- 首页
- » 搜索
- » hzqlz 发表的帖子
太原小智科技有限责任公司 - 东莞哇酷科技有限公司联合开发
