- 首页
- » 搜索
- » lilo 发表的帖子
#2 Re: DIY/综合/Arduino/写字机/3D打印机/智能小车/平衡车/四轴飞行/MQTT/物联网 » 分享一点 SIM800 / SIM800C 系列经验 » 2019-01-22 11:19:39
#3 Re: DIY/综合/Arduino/写字机/3D打印机/智能小车/平衡车/四轴飞行/MQTT/物联网 » 分享一点 SIM800 / SIM800C 系列经验 » 2019-01-22 11:10:33
#4 Re: Nuvoton N32905/N32926/NUC972/N9H20/N9H26/N9H30 » nuc972核心板 nuc976dk62y项目在用片子出售 » 2019-01-19 18:45:38
#5 Re: Nuvoton N32905/N32926/NUC972/N9H20/N9H26/N9H30 » nuc972核心板 nuc976dk62y项目在用片子出售 » 2019-01-19 18:24:12
#6 Re: Nuvoton N32905/N32926/NUC972/N9H20/N9H26/N9H30 » nuc972核心板 nuc976dk62y项目在用片子出售 » 2019-01-19 18:17:13
#9 Re: 全志 SOC » V3s CSI如何Enable . » 2018-12-25 08:13:18
#10 Re: 计算机图形/GUI/RTOS/FileSystem/OpenGL/DirectX/SDL2 » @assert 分享的在littlevgl 调用freetye显示文字, 而不用通过字模软件生成 » 2018-12-25 08:10:31
达克罗德 wrote:
ttf放在文件系统里,这个文件系统怎么和freetype对接的?freetype怎么去找的。 Linux没问题但是逻辑呢,得自己实现文件系统吧
对接是指如何调用吗?
调用方法可以参考晕哥这个帖子: https://whycan.cn/t_741.html
文件系统改改代码估计未必需要, 把需要的字扣出来, 存到另外一个 ttf 文件里面, 然后把文件存数组。
剪裁ttf字库可以参考 中科世为 这个套路: https://developer.flythings.cn/docs/zh/font_cut_tool
#11 Re: 全志 SOC » 买了两块中科世为的 HMI 屏 玩玩 » 2018-12-24 10:56:07
#12 Re: 全志 SOC » V3s linux 4.13 音频播放延迟了,开始以为是线程同步问题,纠结了很久 (问题由 @Andy1234 解决,欢迎大家验证) » 2018-12-21 16:59:52
https://github.com/Lichee-Pi/linux/blob/zero-4.13.y/arch/arm/boot/dts/sun8i-v3s.dtsi
codec: codec@01c22c00 {
#sound-dai-cells = <0>;
compatible = "allwinner,sun8i-v3s-codec";
reg = <0x01c22c00 0x400>;
interrupts = <GIC_SPI 29 IRQ_TYPE_LEVEL_HIGH>;
clocks = <&ccu CLK_BUS_CODEC>, <&ccu CLK_AC_DIG>;
clock-names = "apb", "codec";
resets = <&ccu RST_BUS_CODEC>;
dmas = <&dma 15>, <&dma 15>;
dma-names = "rx", "tx";
allwinner,codec-analog-controls = <&codec_analog>;
status = "disabled";
};codec_analog: codec-analog@01c23000 {
compatible = "allwinner,sun8i-v3s-codec-analog";
reg = <0x01c23000 0x4>;
};
不明白为什么 模拟音频寄存器有 0x18 个寄存器(1字节), 但是dts 里面只有四个字节?


#16 Re: 全志 SOC » lvgl移植到裸跑的f1c100s上 » 2018-12-20 17:35:50
我也看了一下代码
int boot_main(int argc, char **argv) {
lv_init();
/ Do initial mem pool /
do_init_mem_pool();
do_init_dma_pool();fb_f1c100s_init(&fb_f1c100s);
render = fb_f1c100s_create(&fb_f1c100s);for (int i = 0; i < render->pixlen/4;i++)
{
((uint32_t*)render->pixels)[i ] = 0xffffffff;
}
fb_f1c100s_present(&fb_f1c100s, render);
fb_f1c100s_setbl(&fb_f1c100s, 100);lv_disp_drv_t disp_drv;
lv_disp_drv_init(&disp_drv);
disp_drv.disp_flush = fbdev_flush;
lv_disp_drv_register(&disp_drv);demo_create();
while(1)
{
lv_tick_inc(5);
lv_task_handler();
delay(1000);
}
return 0;
}
粗体 delay(1000); 这个是多余的, 没必要延时.
#19 Re: 全志 SOC » 荔枝派nano f1c100s 开发板入坑记录 » 2018-12-20 10:21:16
#20 Re: DIY/综合/Arduino/写字机/3D打印机/智能小车/平衡车/四轴飞行/MQTT/物联网 » 发现一款性价比很高的以太网PHY---SR8201F,只要1.5元! » 2018-12-19 18:02:42
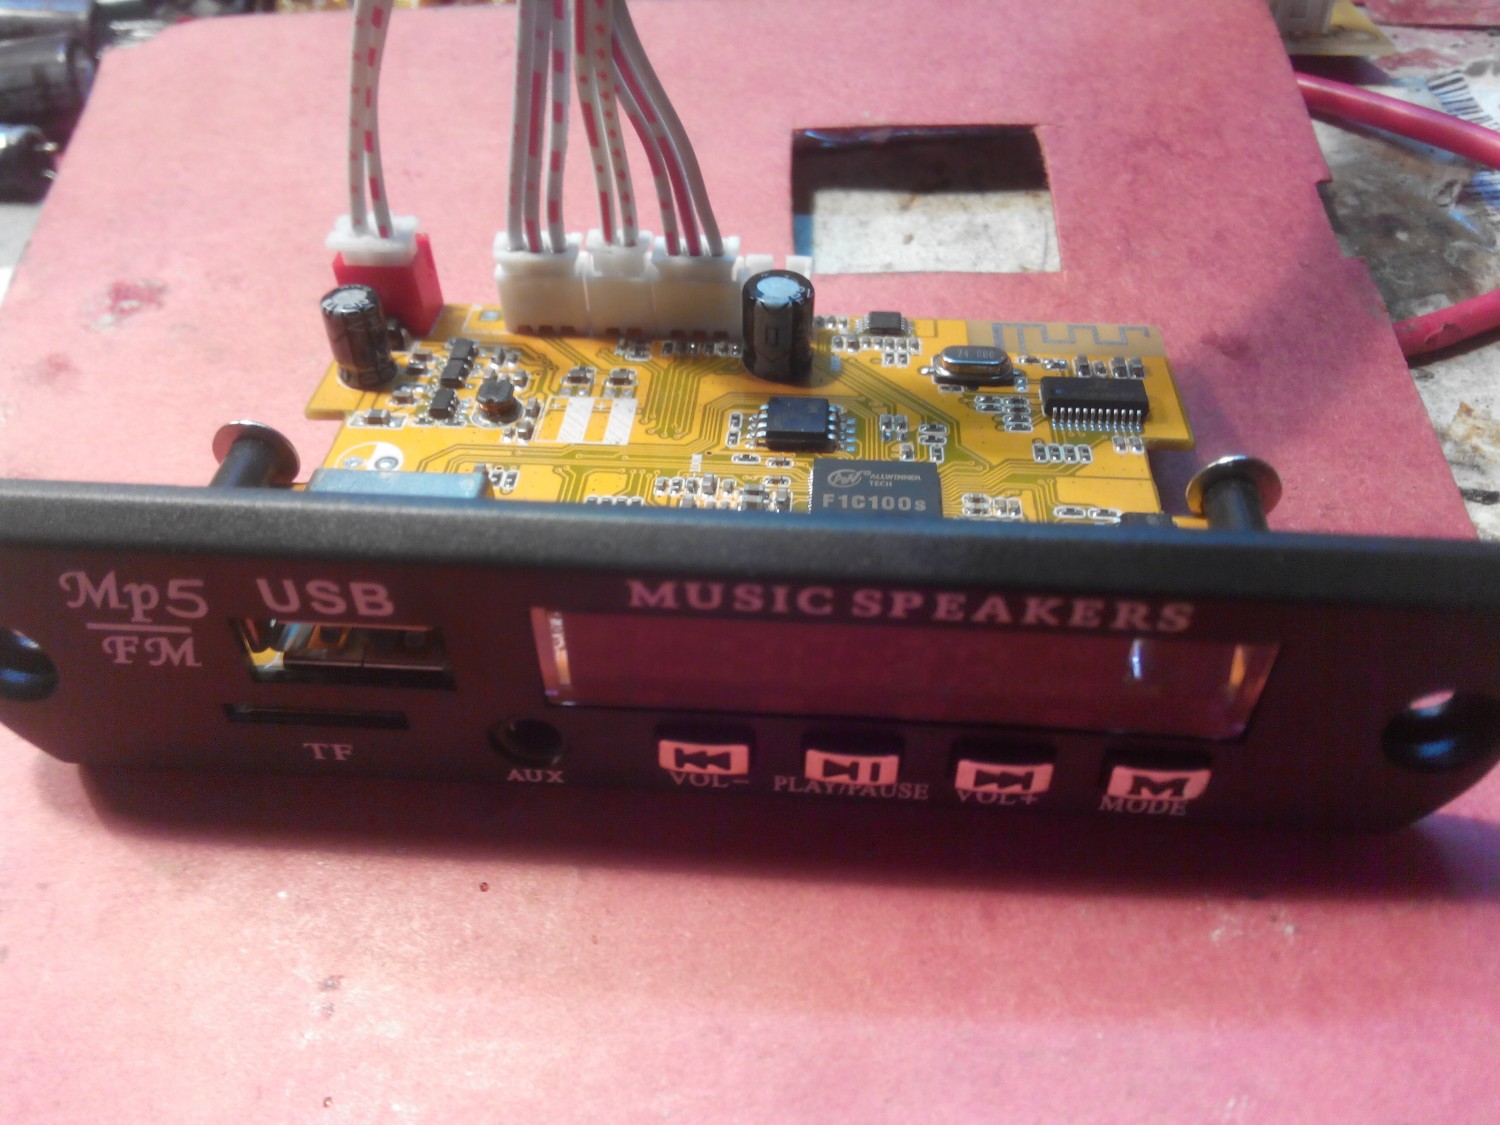
#23 Re: 全志 SOC » 这种 f1c100s 车载音乐播放器, 请问哪里有卖? » 2018-12-17 11:05:10
#24 Re: 全志 SOC » 这种 f1c100s 车载音乐播放器, 请问哪里有卖? » 2018-12-13 16:48:11
jiangming1399 wrote:
晕哥 wrote:
lcfmax wrote:
有一个支持4.3寸屏的板子,功能比这个全面点
求链接
就在同一家店里面
#26 Re: 全志 SOC » 想在Windows下载程序 » 2018-12-13 15:24:01
#27 Re: 全志 SOC » 想在Windows下载程序 » 2018-12-13 15:21:56
#28 Re: 全志 SOC » flash 1,4 pin » 2018-12-13 15:20:53
#29 Re: 全志 SOC » 各路大神,荔枝派v3s(有底板的那种)开发板怎挂载wifi【RTL8723BS】,求写入门教程! » 2018-12-13 14:57:42
#insmod r8723bs.ko
[ 2.343619] r8723bs: module is from the staging directory, the quality is unknown, you have been warned.
[ 2.355911] RTL8723BS: module init start
[ 2.355948] RTL8723BS: rtl8723bs v4.3.5.5_12290.20140916_BTCOEX20140507-4E40
[ 2.355958] RTL8723BS: rtl8723bs BT-Coex version = BTCOEX20140507-4E40
[ 2.356111] RTL8723BS: module init ret =0
wpa_supplicant -Dnl80211 -iwlan0 -c/etc/wpa_supplicant.conf -B
wlan0: Unsupported driver 'nl80211'
wpa_supplicant -Dwext -iwlan0 -c/etc/wpa_supplicant.conf -B
Could not read interface wlan0 flags: No such device
WEXT: Could not set interface 'wlan0' UP
wlan0: Failed to initialize driver interface
啊,我的怎么会出现这种问题,没有生成 wlan0
#30 Re: 全志 SOC » 想在Windows下载程序 » 2018-12-13 10:02:04
#31 Re: 全志 SOC » 想在Windows下载程序 » 2018-12-13 09:39:58
#33 Re: 全志 SOC » V3S内置RTC掉电保存但是不计时 » 2018-12-12 14:24:15
#34 Re: 全志 SOC » V3S内置RTC掉电保存但是不计时 » 2018-12-12 14:15:17
#35 Re: 全志 SOC » V3S内置RTC掉电保存但是不计时 » 2018-12-12 13:43:44
#36 Re: 全志 SOC » 想在荔枝派上使用spi、iic等外设,请大佬指条明路 » 2018-12-12 13:42:29
@cody http://www.chip-community.org/index.php/SPI_support
用逻辑分析仪呢?能不能抓到
#37 Re: 全志 SOC » f1c100s有人调过内存频率没 » 2018-12-11 17:14:54
#38 Re: 全志 SOC » 嵌入式 利用wpa_supplicant编写WIFI、有线网络管理器 转自CSDN, 估计搞带GUI网络编程的朋友都能用上 » 2018-12-11 14:35:50
wpa_gui这里有界面: https://w1.fi/wpa_supplicant/wpa_gui.html
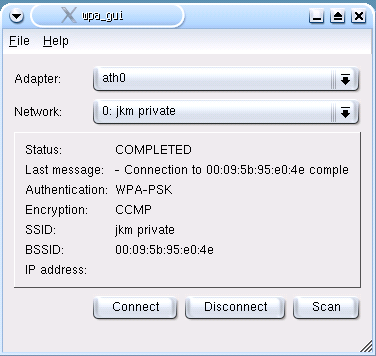
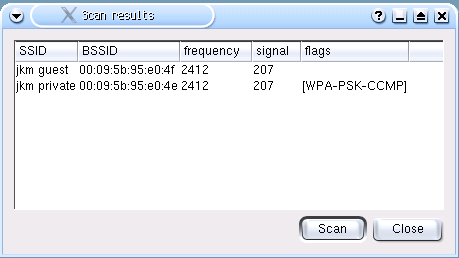
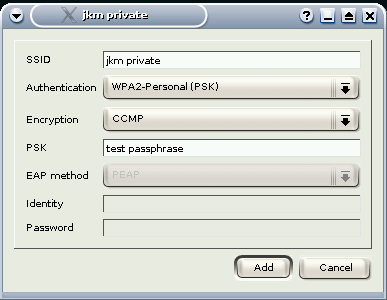
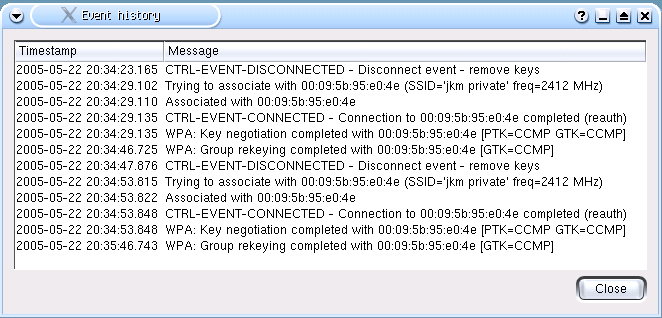
#39 Re: 全志 SOC » 嵌入式 利用wpa_supplicant编写WIFI、有线网络管理器 转自CSDN, 估计搞带GUI网络编程的朋友都能用上 » 2018-12-11 14:31:55
https://github.com/stevenhoneyman/wpa_gui/tree/master/wpa_supplicant-2.4/wpa_supplicant/wpa_gui-qt4
有人直接把 wpa_supplicant 怼到 Qt上去了.
#41 Re: 全志 SOC » USB挂着SD卡失败 用的自动挂载的脚本 » 2018-12-11 09:44:53
#42 Re: 全志 SOC » USB挂着SD卡失败 用的自动挂载的脚本 » 2018-12-11 09:29:19
#43 Re: 全志 SOC » USB挂着SD卡失败 用的自动挂载的脚本 » 2018-12-11 08:58:37
无情一刀 wrote:
晕哥 wrote:
SD卡和 SD NAND 用同一组 SDIO口吗?
哈哈 我这个USB接了串口和SD卡 所以不行 只能使用其中之一 ,
晕哥 碰到很奇怪的问题 为什么我sun8i-v3s-licheepi-zero.dtb这个文件删除了
然后再去 make ARCH=arm CROSS_COMPILE=arm-linux-gnueabihf- dtbs 去编译获取dtb文件 就是死活都不会生成dtb了
好奇 USB 怎么接了串口和SD卡的?
先执行touch .config, 再执行 make ARCH=arm CROSS_COMPILE=arm-linux-gnueabihf- dtbs 呢?
#45 Re: DIY/综合/Arduino/写字机/3D打印机/智能小车/平衡车/四轴飞行/MQTT/物联网 » windows下官方的 [CP210xPortReadWrite.exe] 可以读写CP2104 GPIO, 但是Linux始终不行 » 2018-12-08 10:13:36
On Linux
The CP210x driver has been distributed as part of the Linux kernel since v2.6.12, and GPIO operations also be supported by Linux 4.10.0 kernel or later.
而我的 Linux 版本:
lilo@ubuntu:/opt$ uname -a
Linux ubuntu 4.2.0-42-generic #49~14.04.1-Ubuntu SMP Wed Jun 29 20:22:11 UTC 2016 x86_64 x86_64 x86_64 GNU/Linux
#46 DIY/综合/Arduino/写字机/3D打印机/智能小车/平衡车/四轴飞行/MQTT/物联网 » windows下官方的 [CP210xPortReadWrite.exe] 可以读写CP2104 GPIO, 但是Linux始终不行 » 2018-12-08 10:12:31
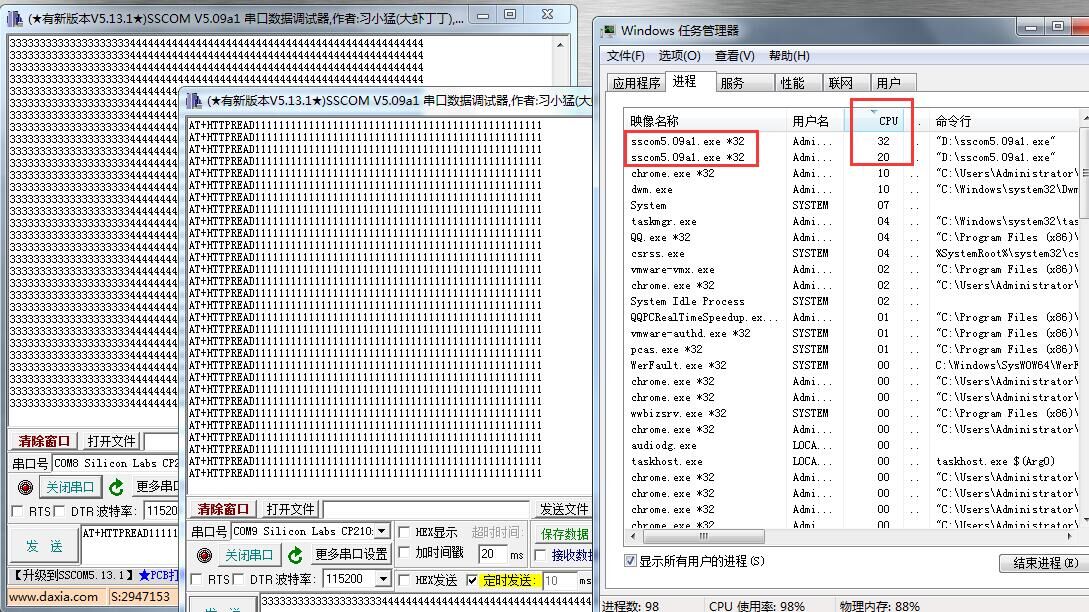
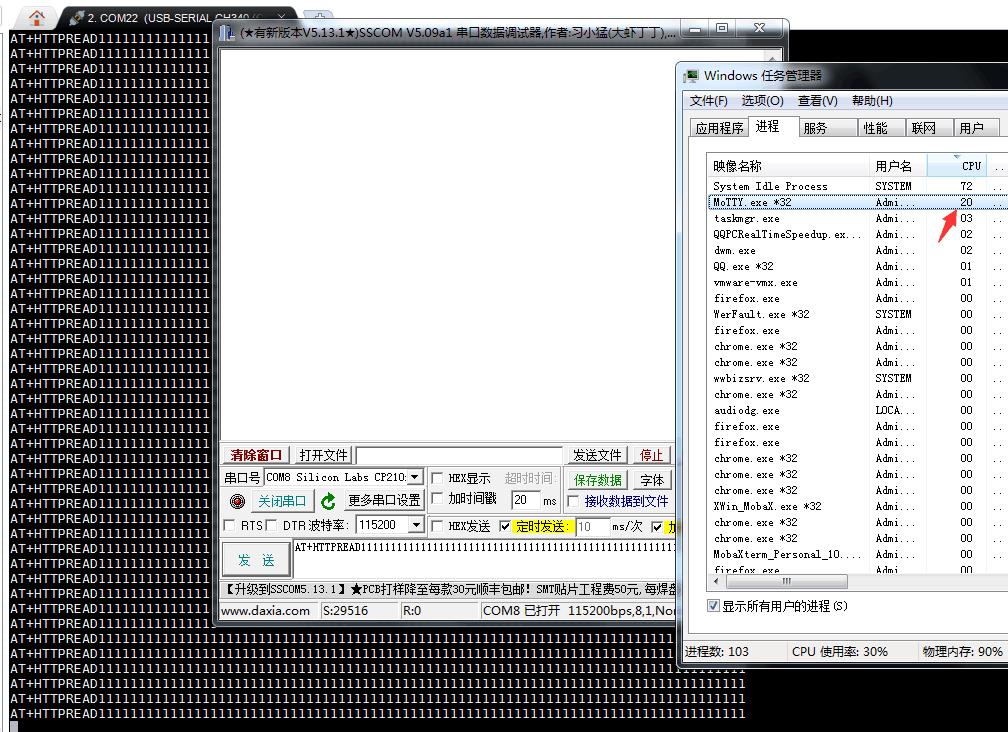
#47 DIY/综合/Arduino/写字机/3D打印机/智能小车/平衡车/四轴飞行/MQTT/物联网 » 间隔10ms发一次, 这些串口软件的 CPU 占用率为什么这么高呢? » 2018-12-08 09:25:40
#48 Re: Qt/MSVC/MINGW/C++/MFC/GTK+/Delphi/BCB » 关于C++编译代码出错,不知道是怎么回事,请大神们帮帮忙....... » 2018-12-06 11:52:28
#49 Re: 全志 SOC » 请教一下,屏幕花屏,有哪些情况 » 2018-12-06 11:45:05
#50 Re: DIY/综合/Arduino/写字机/3D打印机/智能小车/平衡车/四轴飞行/MQTT/物联网 » altiumdesigner画PCB时左边惊现两根找不到的线,请问有大佬遇到过吗? » 2018-12-05 08:19:55
#52 Re: 全志 SOC » 【2】step by step 编译全志 f1c100s 官方linux bsp (重建文件系统已经搞定,详见5楼) » 2018-12-04 13:40:35
hai wrote:
修改成这个得话#define CONFIG_BOOTCOMMAND "sf probe 0:50000000; "
就启动不了
spi_flash@0:50000000: failed to activate chip-select 50000000
SF: error -2 reading JEDEC ID改成这个 #define CONFIG_BOOTCOMMAND "sf probe 0; " 能启动,但就会卡着很久
https://whycan.cn/t_1014.html#p7622
https://whycan.cn/t_1623.html#p8850
#53 Re: 全志 SOC » 请问有人可以教一下怎么写lradc驱动吗? » 2018-12-03 13:58:02
https://github.com/Lichee-Pi/f1c100s_linux/blob/zero-4.13.y/kernel/irq/manage.c
/ First installed action requests resources. /
if (!desc->action) {
ret = irq_request_resources(desc);
if (ret) {
pr_err("Failed to request resources for %s (irq %d) on irqchip %s\n",
new->name, irq, desc->irq_data.chip->name);
goto out_bus_unlock;
}
}
错误是这里报出来的, 很奇怪,都没有用到pio, 但是会出这个错误.
#56 Re: 全志 SOC » 在海豚派上运行彩虹派的SDK » 2018-11-30 08:02:03
#57 Re: 全志 SOC » 最小的 Licheepi nano 镜像 » 2018-11-29 14:31:50
无意中去搜了一下中科世维的组态屏, 看起来还挺不错 https://item.taobao.com/item.htm?id=571394563358
#60 Re: 全志 SOC » 请教一下,为什么我没有用到dock,却会报dock错误。 » 2018-11-28 11:15:39
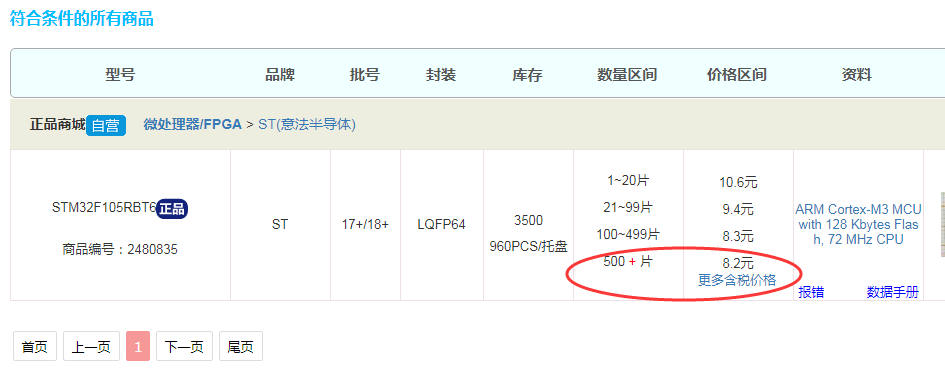
#61 Cortex M0/M3/M4/M7 » 寻找带 USB HOST功能的最便宜的单片机方案, 我现在能找到的就是 STM32F105RBT6, 网上报价 8.2 元含税 » 2018-11-26 14:06:02
#62 Re: 全志 SOC » 闲鱼58元收了一台 A33 平板电脑 » 2018-11-26 13:58:08
#63 Re: DIY/综合/Arduino/写字机/3D打印机/智能小车/平衡车/四轴飞行/MQTT/物联网 » 看自己的视频教程又帮同事修好了 JLINK V8 » 2018-11-26 13:57:07
#64 Re: 全志 SOC » v3s RTC使用备用电池时,时间只保存,不走怎么回事? » 2018-11-26 13:55:36
#65 Re: 全志 SOC » 荔枝派zero V3S高分屏配置 1024*600 » 2018-11-23 16:36:17
#66 Re: ESP32/ESP8266 » esp32+8388边录边播问题 » 2018-11-23 15:30:51
#67 Re: ESP32/ESP8266 » esp32+8388边录边播问题 » 2018-11-23 15:13:36
#68 Re: ESP32/ESP8266 » esp32+8388边录边播问题 » 2018-11-23 14:41:32
播放的I2S初始化:
i2s_stream_cfg_t i2s_cfg = I2S_STREAM_CFG_DEFAULT();
i2s_cfg.i2s_port = I2S_NUM_0;
i2s_cfg.type = AUDIO_STREAM_WRITER;
i2s_stream_writer = i2s_stream_init(&i2s_cfg);
录音的I2S初始化:
i2s_stream_cfg_t i2s_cfg = I2S_STREAM_CFG_DEFAULT();
i2s_cfg.i2s_port = I2S_NUM_1;
i2s_cfg.task_core = 1;
i2s_cfg.i2s_config.sample_rate = 8000;
i2s_cfg.i2s_config.channel_format = I2S_CHANNEL_FMT_ONLY_LEFT;
i2s_cfg.type = AUDIO_STREAM_READER;
i2s_stream_reader = i2s_stream_init(&i2s_cfg);
这是播放用I2S0 口, 录音用I2S1 口?
#69 Re: ESP32/ESP8266 » esp32+8388边录边播问题 » 2018-11-23 14:30:30
#70 Re: ESP32/ESP8266 » esp32+8388边录边播问题 » 2018-11-23 14:11:00
#71 Re: 全志 SOC » 请教F1C100S 启动顺序 » 2018-11-23 09:14:20
#72 Re: 全志 SOC » F1C100S裸奔framebuffer+PWM+GPIO驱动 » 2018-11-21 08:33:48
#73 Re: 全志 SOC » v3s开发板,想用按钮驱动产生中断实现开关led灯 » 2018-11-21 08:31:39
#75 Re: 全志 SOC » 新手请教,V3s的RGB接口是不是有点拧? » 2018-11-20 09:32:29
#76 Re: 全志 SOC » 新手请教,V3s的RGB接口是不是有点拧? » 2018-11-20 09:16:02
#77 DIY/综合/Arduino/写字机/3D打印机/智能小车/平衡车/四轴飞行/MQTT/物联网 » 分享一点 SIM800 / SIM800C 系列经验 » 2018-11-20 08:50:39
- lilo
- 回复: 5
最近做SIM868(GSM/GPRS/Bluetooth/GPS/北斗)开发, 发现一个手册找不全所有资料,
后来才知道他们是分开写的, 比如 蓝牙,地理定位, TCP/IP 写到一个专门的手册上,对初次接触的同学来说真是脑疼.
SIM868硬件开发手册: SIM868_Series_Hardware_Design_V1.06
SIM800系列AT手册: SIM800-Series_AT_Command_Manual_V1_10
SIM800系列蓝牙应用手册: SIM800 Series _Bluetooth_Application Note_V1.07
SIM800系列地理定位应用手册: SIM800 Series_GNSS_Application Note_V1.00
SIM800系列IP网络应用手册: SIM800_Series_IP_Application_Note_V1_03
SIM800系列 SSL/HTTPS 网络应用手册:SIM800_Series_SSL_Application_Note_V1_02.pdf
SIM800系列 TCP/IP 网络应用手册: SIM800_Series_TCPIP_Application_Note_V1_01.pdf
#84 Re: 全志 SOC » 在线配置F1C100S工具求测试 » 2018-11-12 11:12:21
#85 Re: Nuvoton N32905/N32926/NUC972/N9H20/N9H26/N9H30 » 网友 @19697805 作品 基于NUC972 的 FreeRTOS + emwin » 2018-11-12 09:56:03
#86 Re: 君正Ingenic/X1000/X2000/T10/T20/T30 » 君正这是又要准备玩一票更大的 ----- 收购ISSI,进军高端存储领域 » 2018-11-12 09:43:27
#87 Re: Nuvoton N32905/N32926/NUC972/N9H20/N9H26/N9H30 » 网友 @19697805 作品 基于NUC972 的 FreeRTOS + emwin » 2018-11-12 09:40:48
#88 Re: 全志 SOC » v3s实现流水灯显示 » 2018-11-12 09:39:40
605364021 wrote:
leds {
		compatible = "gpio-leds";

		blue_led {
			label = "licheepi:blue:usr";
			gpios = <&pio 6 1 GPIO_ACTIVE_LOW>; /* PG1 */
		};

		green_led {
			label = "licheepi:green:usr";
			gpios = <&pio 6 0 GPIO_ACTIVE_LOW>; /* PG0 */
			default-state = "on";                          //default状态表示设备处于active时的状态
		};

		red_led {
			label = "licheepi:red:usr";
			gpios = <&pio 6 2 GPIO_ACTIVE_LOW>; /* PG2 */
		};
	};
谢谢解答,我还有个不懂的地方,我把default-state = “on” 放到blue_led节点上,重新生成dtb文件,但是板子上电还是亮的绿灯,我去掉defalut-state,板子依旧会亮绿灯,这是为什么?
改成 off 呢?
#89 君正Ingenic/X1000/X2000/T10/T20/T30 » 君正这是又要准备玩一票更大的 ----- 收购ISSI,进军高端存储领域 » 2018-11-10 08:21:36
- lilo
- 回复: 3
http://www.chinaflashmarket.com/News/2018-11/163937
11月9日晚间公告,北京君正集成电路股份有限公司(以下简称“北京君正”)或其全资子公司合肥君正科技有限公司拟通过发行股份或支付现金方式购买北京屹唐半导体产业投资中心(有限合伙)99.9993%的财产份额、购买北京华创芯原科技有限公司100%的股权、购买烟台民和志威投资中心(有限合伙)99.90%的财产份额、购买WorldwideMemoryCo.,Limited100%的股权、购买Asia-PacificMemoryCo.,Limited100%的股权和购买厦门芯华企业管理合伙企业(有限合伙)100%的财产份额,合计交易价格暂定为264,195.76万元。
#90 Re: 全志 SOC » 请问 荔枝派zero V3s主线u-boot 如何修改默认的串口为uart2(PB0/PB1) ? » 2018-11-09 17:44:47
无情一刀 wrote:
/files/members/1116/123111.png
我现在好像是改错 因为这些文件在uboot和内核里面都有
这也行...
u-boot和kernel完全是独立的,没有几毛钱关系, 引导kernel启动之后,u-boot就不存在了,
可以说二者水火不容.
#91 Re: ESP32/ESP8266 » 编辑ESP32模块代码的工具 » 2018-11-09 16:48:34
https://code.visualstudio.com/docs/setup/linux
visual code 不错
#93 Re: 全志 SOC » 我想读取鼠标数据,/dev/mice 这个设备居然把触摸屏的数据也读进来. » 2018-11-09 09:54:21
#include <stdio.h>
#include <unistd.h>
#include <fcntl.h>int main(int argc, char** argv)
{
int fd, bytes;
unsigned char data[3];const char *pDevice = "/dev/input/mice";
// Open Mouse
fd = open(pDevice, O_RDWR);
if(fd == -1)
{
printf("ERROR Opening %s\n", pDevice);
return -1;
}int left, middle, right;
signed char x, y;
while(1)
{
// Read Mouse
bytes = read(fd, data, sizeof(data));if(bytes > 0)
{
left = data[0] & 0x1;
right = data[0] & 0x2;
middle = data[0] & 0x4;x = data[1];
y = data[2];
printf("x=%d, y=%d, left=%d, middle=%d, right=%d\n", x, y, left, middle, right);
}
}
return 0;
}
#94 全志 SOC » 我想读取鼠标数据,/dev/mice 这个设备居然把触摸屏的数据也读进来. » 2018-11-09 09:50:55
- lilo
- 回复: 2
参考的是这个帖子: https://blog.csdn.net/A694543965/article/details/79834008
能不能单纯的只读 /dev/mice 的数据, 因为触摸屏是绝对坐标, 鼠标是相对坐标, 这样全读到会出事的.
#95 Re: 硬件设计 KiCAD/Protel/DXP/PADS/ORCAD/EAGLE » 如何设计一个电路使用串口的一个小信号达到开关的效果?求助大家 » 2018-11-06 19:20:14
#96 Re: 技术人生/软件使用技巧/破解经验/技术吐槽/灌水 » 吐槽一下公司的开发管理,有没有大神能解决。 » 2018-11-06 17:28:28
C37R wrote:
楼主可以借鉴一下,目前大部分手机芯片提供商的做法,用宏来解决兼容问题,无法兼容的,可以增建分支。
实施方案:
1.比较不同机型之间的差异,对于公共代码部分进行提炼,每个机型开发不同的config File,具体差异的的地方用makefile和Kconfig注入的宏来控制编译过程2.同一机型不同市场的(比如绝大部分相似,但是界面需要开发不同的代码时),建议使用分支控制更为合理。
我对多仓库的观点:
除非是新的项目,或者另外的团队来做,否则不建议开辟独立的仓库进行管理。
以上工作都是要花时间的,也不是说了,立马就能完成的。关键看公司领导和个人的时间计划以及心思安排。如果完成了,也算是小成就一件。
不错不错, 感谢分享!
#97 Re: 全志 SOC » LCD我换为1024*600 在uboot里面也设置1024*600 写到fb的时候就是不显示出来 » 2018-11-06 10:21:15
无情一刀 wrote:
后面弄好了 主要根据厂家提供的参数 我用的是1024*600 厂家提供的参数配置如下截图
/files/members/1116/1111.png
与前面的有什么不同吗?
#98 Re: 硬件设计 KiCAD/Protel/DXP/PADS/ORCAD/EAGLE » 如何设计一个电路使用串口的一个小信号达到开关的效果?求助大家 » 2018-11-05 19:46:39
#99 Re: 全志 SOC » v3编译kernel » 2018-11-05 17:23:14
#100 Re: ESP32/ESP8266 » 推荐一个好玩的板子,8元,二手, 飞思卡尔 K21 + AP6210B + 12864液晶屏蓝牙POS机, 可以用作Cortex-M4开发板 » 2018-11-05 12:01:01
#101 Re: 全志 SOC » 如何将那个开机q启动的时候输入的root给去掉哦哦 » 2018-11-02 18:05:22
#102 Re: 全志 SOC » F1C100S裸奔framebuffer+PWM+GPIO驱动 » 2018-11-02 14:02:25
#103 Re: ST/STM8/STM8S/STM8L » STM8S+SI4432 收发失败求助 » 2018-10-31 09:46:41
#104 Re: 全志 SOC » f1c100s官方bsp关于spi nand启动的问题 » 2018-10-30 13:55:58
phonixsuit 烧 spi nand 的 img 要特别处理过才行吧?至少 u-boot 要包含 spi nand 的操作代码.
asdf wrote:
直接烧感觉不可控,新片子的话勾上格式化应该是没问题的,但我不确定更改类似分区或者多次烧录会不会再出什么意外咯~反正我是遇到了
晕哥 wrote:
asdf wrote:
这个问题目前找到一个解决方案,首先下载assert大神改的uboot到dram,然后对nand flash 进行全盘擦除;然后再用最新的全志phonixsuuit,注意要勾上格式化烧录就可以了,不擦只加格式化是不行的,除非新片子,应该是烧录时分区处理的完善性问题了
直接用 phonixsuit 烧录 spi nand 不可以吗?
#105 Re: 全志 SOC » ./app: error while loading shared libraries: libstdc++.so.6: cannot op » 2018-10-30 11:41:54
#106 Re: Nuvoton N32905/N32926/NUC972/N9H20/N9H26/N9H30 » N32926 Framebuffer驱动增大到1024x768后出错 » 2018-10-29 16:55:07
#107 Re: Cortex M0/M3/M4/M7 » 死磕NXP RT10xx 的 ST STM32H750 怎么还没见到开发板? » 2018-10-29 08:46:19
最邪门的是 STM32官方旗舰店 这个产品也下架了.
STM32H750的这个内置128k的flash,
如果用户可以使用的话那比RT10xx好太多,
毕竟单纯的用来跑一些简单的程序,128K的flash绰绰有余,
RT10xx的话不管你的代码多小,都需要一个外置flash来存放代码.
#109 Re: 技术人生/软件使用技巧/破解经验/技术吐槽/灌水 » 有个排班问题看看如何进行建模 » 2018-10-28 15:56:14
#110 Re: 全志 SOC » 怎么让linux驱动程序里面的调试函数 dev_dbg 输出调试信息 » 2018-10-27 16:13:43
#112 Re: 全志 SOC » v3s 网卡ping的问题 » 2018-10-25 23:31:25
#113 Re: 全志 SOC » v3s 网卡ping的问题 » 2018-10-25 22:20:42
#114 Re: 全志 SOC » f1c100s能超频到多少呢? » 2018-10-25 22:18:38
#115 Re: Nuvoton N32905/N32926/NUC972/N9H20/N9H26/N9H30 » NUC972我们做了块板,没用LCD,主要做数据传输和设备管理,基于Web界面的模式 » 2018-10-25 21:17:54
#116 Re: 全志 SOC » 怎样查询f1c100scpu的工作频率 » 2018-10-25 17:12:57
#117 Re: 全志 SOC » v3s 网卡ping的问题 » 2018-10-25 17:11:47
#118 Re: DIY/综合/Arduino/写字机/3D打印机/智能小车/平衡车/四轴飞行/MQTT/物联网 » 请问大家 cp2102 与 cp2104 有什么区别? » 2018-10-25 11:18:14
题
CP2102和CP2104有什么区别?
回答
主要区别:
1。CP2104更便宜。
CP2104体积更小,占地面积不同。CP2104是QFN24(4x4mm); CP2102是QFN28(5x5mm)。
CP2104具有I / O电源引脚,可通过外部电阻承受VDD至5V的电压。
CP2104支持RS-485; CP2102没有。
CP2104具有GPIO引脚; CP2102没有。
CP2104具有一次性可编程存储器(OTP); 您只能自定义一次CP2104。CP2102具有可重新编程的闪存; 您可以多次自定义CP2102。
找到官方答案了, 谢谢楼上的朋友.
#119 DIY/综合/Arduino/写字机/3D打印机/智能小车/平衡车/四轴飞行/MQTT/物联网 » 请问大家 cp2102 与 cp2104 有什么区别? » 2018-10-25 11:09:42
#120 Re: 全志 SOC » 最近用了V3S的芯片画的一个主控板 就是总提示Allwinner USB FEL device not Fount » 2018-10-25 11:08:19
无情一刀 wrote:
晕哥 wrote:
hexing@ubuntu:/opt/speech-php$ lsusb
Bus 001 Device 001: ID 1d6b:0002 Linux Foundation 2.0 root hub
Bus 002 Device 023: ID 1f3a:efe8 Onda (unverified) V972 tablet in flashing mode
Bus 002 Device 003: ID 0e0f:0002 VMware, Inc. Virtual USB Hub
Bus 002 Device 002: ID 0e0f:0003 VMware, Inc. Virtual Mouse
Bus 002 Device 001: ID 1d6b:0001 Linux Foundation 1.1 root hub有这个没, 没有就赶快叫硬哥赶快查查电路。
现在就是刚出来的板子 什么程序都没有
很明显你接错USB口了,接到了CP210x的USB了, 本来应该接V3s的USB口.
#121 Re: 全志 SOC » 除了V3S,还有没有其它有视频编解码功能的低功耗低成本的方案? » 2018-10-25 10:03:05
ftp://ftp.ingenic.com/SOC/X1000/X1000_DS.pdf
1.2.2 Image Core
Hardware JPEG encoder
– Baseline ISO/IEC 10918-1 JPEG compliant
– 8-bit pixel depth support
– Support for YUY2 ([Y0,U0,Y1,V0]) color
– Up to four programmable Quantization tables
– Fully programmable Huffman tables
– Image size up to 2M pixels
好奇去翻了一下手册,只有 jpeg 编码.
#122 Re: 全志 SOC » 除了V3S,还有没有其它有视频编解码功能的低功耗低成本的方案? » 2018-10-24 14:05:34
#124 Re: 全志 SOC » 荔枝派zero USB » 2018-10-23 20:53:28
CONFIG_USB=y
CONFIG_USB_DEFAULT_PERSIST=y
CONFIG_USB_EHCI_HCD=y
CONFIG_USB_EHCI_TT_NEWSCHED=y
CONFIG_USB_EHCI_HCD_PLATFORM=y
CONFIG_USB_OHCI_HCD=y
CONFIG_USB_OHCI_HCD_PLATFORM=y
CONFIG_USB_ACM=y
CONFIG_USB_STORAGE=y
CONFIG_USB_MUSB_HDRC=y
CONFIG_USB_MUSB_DUAL_ROLE=y
CONFIG_USB_MUSB_SUNXI=y
CONFIG_USB_SERIAL=y
CONFIG_USB_SERIAL_CONSOLE=y
CONFIG_USB_SERIAL_GENERIC=y
CONFIG_USB_SERIAL_SIMPLE=y
CONFIG_USB_SERIAL_CH341=y
CONFIG_USB_SERIAL_CP210X=y
CONFIG_USB_SERIAL_FTDI_SIO=y
CONFIG_USB_SERIAL_PL2303=y
CONFIG_USB_PHY=y
CONFIG_NOP_USB_XCEIV=y
CONFIG_USB_GADGET=y
CONFIG_USB_GADGET_VBUS_DRAW=2
CONFIG_USB_GADGET_STORAGE_NUM_BUFFERS=2
这是我的USB驱动配置, 你看下是不是缺了什么项目.
#125 Re: 全志 SOC » 荔枝派zero USB » 2018-10-23 20:50:21
#126 Re: 全志 SOC » 荔枝派zero USB » 2018-10-23 20:19:27
#128 Re: VMWare/Linux/Ubuntu/Fedora/CentOS/U-BOOT » 求一 shell 命令, 可以把stdout,stderr同时输出到文件和当前tty, 以前经常用,但是很久不用,怎么都想不起来了. » 2018-10-23 14:57:30
#129 VMWare/Linux/Ubuntu/Fedora/CentOS/U-BOOT » 求一 shell 命令, 可以把stdout,stderr同时输出到文件和当前tty, 以前经常用,但是很久不用,怎么都想不起来了. » 2018-10-23 14:34:56
#130 Re: 全志 SOC » v3s 适配ethernet编译问题 » 2018-10-23 14:33:03
#133 Re: VMWare/Linux/Ubuntu/Fedora/CentOS/U-BOOT » ubuntu 18.04 已经完全放弃了32bit 了 » 2018-10-23 11:02:23
#137 Re: 全志 SOC » 使用jlink调试F1C100s,是否需要初始化SDRAM » 2018-10-22 14:38:49
#138 Re: 全志 SOC » 请教关于荔枝派zero/nano 开发板串口线不拔出就无法重启问题 » 2018-10-22 14:30:28
#140 Re: RISC-V » 随手画了个K210模组,要打样测试了 » 2018-10-21 22:08:12
#141 Re: 全志 SOC » 请教关于荔枝派zero/nano 开发板串口线不拔出就无法重启问题 » 2018-10-20 18:04:01
#143 Re: 全志 SOC » 【2】step by step 编译全志 f1c100s 官方linux bsp (重建文件系统已经搞定,详见5楼) » 2018-10-19 14:25:29
https://blog.csdn.net/chenyu105/article/details/9749549
本文记录一次内核模块内存越界,导致故障的排查分析过程,和各位共享交流。
#146 Re: 全志 SOC » 能在linux下使用h264编解码功能的V3S方案,只有海豚派吗? » 2018-10-18 09:27:58
#147 Re: 计算机图形/GUI/RTOS/FileSystem/OpenGL/DirectX/SDL2 » 使用qt编译littlevgl出现错误,求教 » 2018-10-18 09:26:39
#148 Re: DIY/综合/Arduino/写字机/3D打印机/智能小车/平衡车/四轴飞行/MQTT/物联网 » 请问大家U盘存大文件用NTFS还是exFAT,哪个比较好,linux下的vfat文件系统识别exFAT吗? » 2018-10-18 09:19:05
#149 Re: DIY/综合/Arduino/写字机/3D打印机/智能小车/平衡车/四轴飞行/MQTT/物联网 » 请问大家U盘存大文件用NTFS还是exFAT,哪个比较好,linux下的vfat文件系统识别exFAT吗? » 2018-10-17 18:02:39
#150 Re: 计算机图形/GUI/RTOS/FileSystem/OpenGL/DirectX/SDL2 » LittleFS (lfs) -------- 一个高度完整的嵌入式文件系统 » 2018-10-17 10:30:18
#152 Re: 全志 SOC » F1C100s启动时搜索SPI Flash的顺序? » 2018-10-15 14:38:30
#153 Re: 全志 SOC » 小容量的TF卡,有没有质量好的供货渠道? » 2018-10-15 14:37:23
#156 DIY/综合/Arduino/写字机/3D打印机/智能小车/平衡车/四轴飞行/MQTT/物联网 » 这个50包邮的LVDS屏如何? » 2018-10-13 09:13:33
- lilo
- 回复: 3
https://item.taobao.com/item.htm?id=531669387167
联想 thinkpad tablet 2 液晶屏幕 总成 LP101WH4-SLA3 带框包邮
#157 Re: DIY/综合/Arduino/写字机/3D打印机/智能小车/平衡车/四轴飞行/MQTT/物联网 » 小软件,大用处, pdf去水印软件,BC 文本/二进制比较软件, UltraCompare, FastStoneCapture屏幕录像 » 2018-10-13 08:16:52
#158 Re: DIY/综合/Arduino/写字机/3D打印机/智能小车/平衡车/四轴飞行/MQTT/物联网 » 请问这种螺丝柱是通过什么工艺弄进去的? » 2018-10-12 13:37:33

#160 Re: Qt/MSVC/MINGW/C++/MFC/GTK+/Delphi/BCB » 怀旧精简版 Delphi7 » 2018-10-11 16:20:24
下载地址:
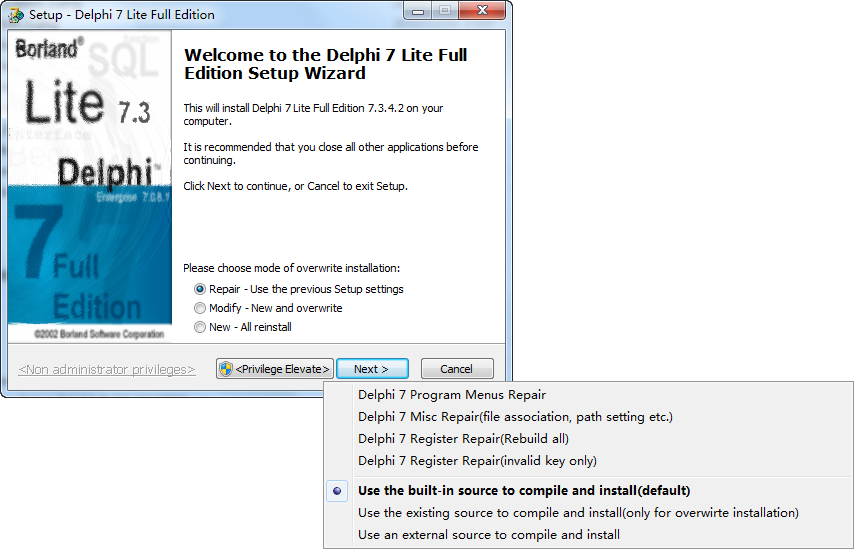
1.Delphi7 Lite Full Edition 7.3.4.3 [All Updates Integrated] [Optional D2007 RTL/VCL] [Portable-Edition Integrated] [Supports Windows7 Fully] <<=>> Delphi7 优化精简全功能版 7.3.4.3[集成目前所有补丁及修正] [可选D2007 RTL/VCL] [安装版/绿色便携版二合一][全面支持Windows7]
FileName: Delphi7_Lite_Full_Edition_Setup_7.3.4.3_Build_20110801.exe
MD5: 251DD0193CCA8906E2335087BE2FE1D0
#162 Qt/MSVC/MINGW/C++/MFC/GTK+/Delphi/BCB » 怀旧精简版 Delphi7 » 2018-10-11 16:17:09
- lilo
- 回复: 15
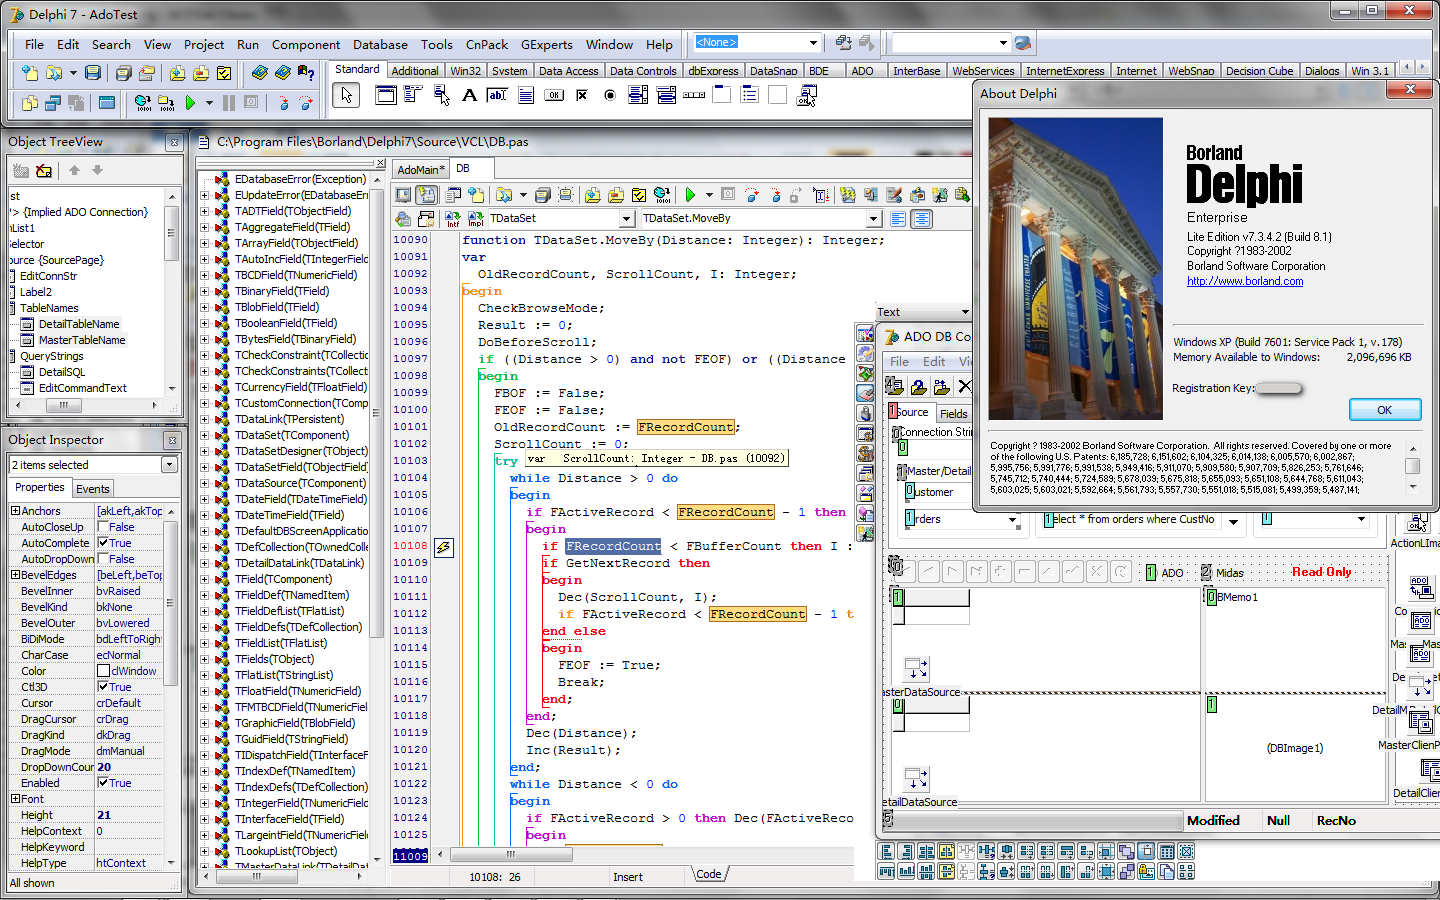
官方主页: https://delphi7lite.wordpress.com/ 要番蔷
Delphi7 Lite Edition 7.3.4.3 [2011-08-01] [All Updates Integrated][Optional D2007 RTL/VCL][Portable-Edition Integrated][Supports Windows7 Fully]
序
【Borland是一家令人敬仰的公司,當值Borland已成往事之際,謹以此產品獻給曾經的Borland,紀念已經仙逝的Borland,藉以緬懷Borland傳奇中的經(精)典Delphi7.本產品僅供學習交流之用,未與任何盈利為目的,請勿用於任何非法的商業用途,否則後果自負.】
Delphi7 Lite,簡約而不簡單,一次安裝,到處運行.內含4彈:Tiny/Mini/Meduim/Full,功能和體積由小至大,力求達到功能和體積的完美平衡.已作性能優化及優量精簡,含安裝/綠色便攜版二合一,集成了部分常用高效的IDE專家及外掛程式,致力於把Delphi7打造成一個現代化(相對而言)的整合式開發環境,使用本產品將使你在開發效率/使用體驗/系統相容性等方面上相對原版有大幅提高.
关键特性:
一次安裝,到處運行.第一次需安裝,以後每次只需註冊即可.
已安裝集成現在所有可用的升級補丁(至Delphi7 Update 1.1,IDE版本號為Build 8.1),集成目前絕大多數的Bug Fix Pack.
支援現在所有正在使用的Windows版本:Windows7, 2008 R2, Vista, XP, 2008, 2003, 2000, Me, 98, 和 NT 4.0,支援非管理員許可權使用者安裝,支援UAC.
特別地對Windows7提供全面支援.
去除了所有多餘的安裝選項但保留了原始程式碼選項,移除了非必需的檔(ModelMaker,InterBase,MergeModules,Extra Docs,Images,MDAC等).
採用安裝後動態編譯生成RTL,VCL的DCU檔,極大的減小了安裝檔體積.
可選將Delphi7 RTL/VCL替換為Delphi2007 的RTL/VCL,讓Delphi7支援Delphi2007新增的Vista屬性.
可選將Delphi7 RTL/VCL 恢復為使用官方原始的源碼檔,僅供用於部分協力廠商元件兼容性的可能需要(不推薦).
安裝程式是設計為可重複安裝的.您在安裝新版本時,如果安裝程式沒有特別指明,則不需要先刪除舊的版本,直接升級即可,所有設置都會保留,原Delphi安裝的控制項及設置等會自動導入新安裝IDE環境中.
安裝程式內置了可直接選擇的”綠色便攜版安裝模式”,使用此模式安裝後目的檔案夾即成為一個可移動的綠色版,實現徹底的名符其實的”安裝/綠色便攜版二合一”.
安裝程式自帶獨立的綠化註冊程式(D7LiteReg.exe),方便您快速地恢復Delphi7開發環境(控制項/專家/設置).直接複製整個Delphi目錄,再執行D7LiteReg.exe即可完成Delphi的註冊工作.同樣方法可適用于對其它Delphi7版本進行綠化註冊,如Delphi7 SECOND EDITION v7.2.
安裝程式支援”使用現有的原始程式碼重編譯安裝(僅覆蓋安裝時有效)”或”使用外部的Delphi7-source原始程式碼來編譯安裝”,更多詳情請查看說明.
安裝程式帶附加的命令列功能.支援對已安裝程式的功能表/註冊表/雜項進行修復,使用命令列參數/?或/help查看更多詳情.
安裝程式支援附加的命令列參數以實現額外功能.支援對已安裝Delphi7程式的功能表/註冊表/雜項進行修復,常用的命令列參數已直接集成到了安裝程式中,在視窗中點擊右鍵或使用命令列參數/?或/help查看更多詳情.
安裝程式會根據安裝目的機器性能自動選擇不同的安裝元件.
安裝程式支援多語言介面(含中文簡體/繁體/英文).
同時可選僅替換為Delphi2007中windows相關pas,以支援XP/Vista API及視窗屬性,不同于完全替換Delphi2007 RTL/VCL,能最大程度保持Delphi7的相容性的同時支援vista的新API及視窗屬性.
代碼編輯器顏色方案設為Delphi2006樣式.
包含程式設計專用字體Consolas (推薦字體大小為10並且啟用ClearType).
IDE及VCL預設字體由原先的MS Sans Serif改為Tahoma,介面看上去更為美觀.
可選擇修改Delphi IDE本身支援XP風格,在設計時即可見到程式運行的XP效果,所見即所得.
集成DelphiZLib 1.2.5(ZLibEx.pas),可選擇升級內置的ZLib 1.04至ZLib 1.2.5.
集成VCL Fix Pack 1.4,需要在工程中手動引用單元VCLFixPack.pas.
集成Midas Speed Fix 1.2,需要在工程中手動引用單元MidasSpeedFix.pas.
集成以下來自www.delphi-jedi.org的擴展的Win32Api單元:SHELL LITE :: Microsoft Shell Lightweight Utility API, v.1.2/SNMP :: Microsoft headers for Simple Network Management Protocol definitions/WINSOCK 2 :: Winsock 2 API (Windows Sockets).
集成MySQL Driver for DBExpress,支援MySQL 3.22/4.0/4.1/5.0 驅動程式.
集成Newly Delphi Features Extented Components,移植自Delphi7以后版本新增的控制項,如Vista Dialogs等,讓Delphi7也可以開發Vista風格對話方塊的程式.
包含下列專家或工具(依據版本不同有所差異):
Delphi IDE 外掛程式 DelphiSpeedUp 3.1.(IDE加速).
Delphi IDE 外掛程式 DDevExtensions 2.4.(增強IDE中工程的設置及編譯,可為工程增加不同版本編譯配置如release/debug版).
Delphi 專家 GExperts 1.35 Experimental.(超級IDE專家).
Delphi 專家 DelforExp 2.5.(代碼格式化工具).
Delphi 專家 UnitExpert(提高IDE單元操作效率工具).
Delphi 專家 CnWizards 0.9.9.614.(由中國人開發的超級IDE專家,支援原始程式碼結構高亮連線顯示,能自動備份恢復已安裝控制項資訊,製作自己綠化版delphi的好工具).
Delphi 工具 DelphiDistiller 1.85.(選擇IDE啟動時載入的控制項及設置工具).
Spy工具Microsoft Spy++ v7.1和Spy4Win (Spy for Window) v0.20b.
EXE/DLL依賴關係分析工具Dependency Walker 2.2.
DLL匯出函數檢視器DLL Export Viewer v1.42.
BDE (Borland Database Engine 5.2), 及相關工具BDE Administrator, SQL Explorer, Database Desktop, SQL Monitor, Data Pump等.
BDE 示例資料庫(別名DBDEMOS).
#167 Re: ESP32/ESP8266 » esp8266+5110 lcd 字符动画 » 2018-10-11 08:08:26
#169 Qt/MSVC/MINGW/C++/MFC/GTK+/Delphi/BCB » 基于STL的内存池类 和 测试程序 在linux下已做过稳定性测试 » 2018-10-10 16:31:33
- lilo
- 回复: 0
基于STL的内存池类 和 测试程序 在linux下已做过稳定性测试
一共三个文件:
MemPool.h
#ifndef MEMPOOL.H
#define MEMPOOL.H

#include <pthread.h>
#include <stdio.h>
#include <list>
#include <iostream>
using namespace std;

//  when you have used the mem, call InsertFreeItem

#define DEFAULT_MEM_COUNT  32

template <class TYPE>
class CMemPool
{
public:
	CMemPool(void);
	 ~CMemPool(void);
	int Init(int memCount=DEFAULT_MEM_COUNT);
	void Fini();
	int GetFreeMemCount(){return  m_nFreeMemItemCount;};
	TYPE* GetFreeMem();
	void  InsertFreeMem(TYPE* pItem);
	int GetUseMemCount(){return m_nUseMemItemCount;};
	TYPE* GetUsedMem();
	void  InsertUsedMem(TYPE* pItem);

private:
	int m_bInit;
	int m_nMemSize;
	int m_nMemItemCount;
	int m_nFreeMemItemCount;
	int m_nUseMemItemCount;
	pthread_mutex_t  m_freeListCs;
	list<TYPE*>   m_freeMemList;
	pthread_mutex_t  m_useListCs;
	list<TYPE*>   m_useMemList;
};

// implention

template <class TYPE>
CMemPool<TYPE>::CMemPool(void)
{
    m_bInit=0;
	m_nMemItemCount=DEFAULT_MEM_COUNT;
	m_nFreeMemItemCount=m_nMemItemCount;
	m_nUseMemItemCount=0;
	pthread_mutex_init(&m_freeListCs,0);
	pthread_mutex_init(&m_useListCs,0);
}
template <class TYPE>
CMemPool<TYPE>::~CMemPool(void)
{
	pthread_mutex_destroy(&m_freeListCs);
	pthread_mutex_destroy(&m_useListCs);
}

template <class TYPE>
int CMemPool<TYPE>::Init(int memCount)
{
	if (m_bInit)
	{
	    return 0;
	}

	if (memCount<=0)
	{
	    return -1;
	}

	for (int i = 0; i<memCount; i++)
	{
	    TYPE* pMemItem=new TYPE;
		if (0!=pMemItem)
		{
		    pthread_mutex_lock(&m_freeListCs);
			m_freeMemList.push_back(pMemItem);
			pthread_mutex_unlock(&m_freeListCs);
		}
		else
		{
		    return -1;
		}
	}

	m_nMemItemCount=memCount;
	m_nFreeMemItemCount=memCount;
	m_nUseMemItemCount=0;

	m_bInit=1;

    return 0;
}
template <class TYPE>
void CMemPool<TYPE>::Fini()
{
    if (!m_bInit)
    {
        return;
    }
	pthread_mutex_lock(&m_freeListCs);
	for (class list<TYPE *>::iterator itor = m_freeMemList.begin(); itor!=m_freeMemList.end(); itor++)
	{
	    TYPE* pItem=*itor;
		delete pItem;
		itor = m_freeMemList.erase(itor);
	}
	pthread_mutex_unlock(&m_freeListCs);

	pthread_mutex_lock(&m_useListCs);
	for (typename list<TYPE*>::iterator itor = m_useMemList.begin(); itor!=m_useMemList.end(); itor++)
	{
	    TYPE* pItem=*itor;
		delete  pItem;
		itor = m_useMemList.erase(itor);
	}
	pthread_mutex_unlock(&m_useListCs);

	m_nMemItemCount=DEFAULT_MEM_COUNT;
	m_nFreeMemItemCount=m_nMemItemCount;
	m_nUseMemItemCount=0;

	m_bInit=0;
}
template <class TYPE>
TYPE* CMemPool<TYPE>::GetFreeMem()
{
	pthread_mutex_lock(&m_freeListCs);

	int nListSize=m_freeMemList.size();
	if (nListSize>0)
	{
	    TYPE* pItem=m_freeMemList.front();
		m_freeMemList.pop_front();
		m_nFreeMemItemCount--;
		pthread_mutex_unlock(&m_freeListCs);
		return pItem;
	}
	pthread_mutex_unlock(&m_freeListCs);

    return NULL;
}
template <class TYPE>
void  CMemPool<TYPE>::InsertFreeMem(TYPE* pItem)
{
	if (NULL==pItem)
	{
	    return;
	}
    pthread_mutex_lock(&m_freeListCs);
	m_freeMemList.push_back(pItem);
	m_nFreeMemItemCount++;
	pthread_mutex_unlock(&m_freeListCs);
}

template <class TYPE>
TYPE* CMemPool<TYPE>::GetUsedMem()
{
	pthread_mutex_lock(&m_useListCs);

	int nListSize=m_useMemList.size();
	if (nListSize>0)
	{
	    TYPE* pItem=m_useMemList.front();
		m_useMemList.pop_front();
		m_nUseMemItemCount--;
		pthread_mutex_unlock(&m_useListCs);
		return pItem;
	}
	pthread_mutex_unlock(&m_useListCs);

    return NULL;
}
template <class TYPE>
void  CMemPool<TYPE>::InsertUsedMem(TYPE* pItem)
{
	if (NULL==pItem)
	{
	    return;
	}
    pthread_mutex_lock(&m_useListCs);
	m_useMemList.push_back(pItem);
	m_nUseMemItemCount++;
	pthread_mutex_unlock(&m_useListCs);
}

#endif /* MEMPOOL.H */
MemPoolTest.cpp
#include "MemPool.h"

typedef struct FRAME_ITEM
{
    int nBufLen;
	char* pBuf;
	FRAME_ITEM()
	{
	 	 pBuf=new char[32*1024];
		 nBufLen=32*1024;
	}
	~FRAME_ITEM()
	{
	    if (0!=pBuf)
	    {
	        delete pBuf;
	    }
	}
}FRAME_ITEM;

int main()
{
	CMemPool<FRAME_ITEM> pool;
	int nRet=pool.Init();

	if (nRet!=0)
	{
	    printf("init failed \n");
		return 0;
	}

	int n=100;
	while (n)
	{
		FRAME_ITEM* pItem=pool.GetFreeMem();

		printf("free item num %d \n",pool.GetFreeMemCount());

		pool.InsertUsedMem(pItem);

		printf("used item num %d \n",pool.GetUseMemCount());

		pItem=pool.GetUsedMem();

		pool.InsertFreeMem(pItem);

		usleep(10*1000);
		n--;
	}

	pool.Fini();

	printf("free item num %d \n",pool.GetFreeMemCount());

	getchar();

    return 0;
}
Makefile
#INCLUDE := ./*.h

CFLAGS =
SRC = *.cpp

LIB = -lpthread

BIN = test

all:

	g++ -o ${BIN} ${CFLAGS} ${SRC} ${LIB} -g

clean:
	rm ${BIN}

install:
	cp ${BIN} /bin/

uninstall:
	rm -rf /bin/${BIN}

.PHONY:
all clean install uninstall#170 Re: 全志 SOC » F1C100s的ADC和模拟参考电压关系 » 2018-10-10 13:40:26
#172 Re: ESP32/ESP8266 » ESP32-LyraT开发板 能够获取参考信号吗?或者哪个用例可以获取参考信号? » 2018-10-10 09:22:39
https://github.com/espressif/esp-idf/blob/master/examples/peripherals/i2s/main/i2s_example_main.c
可以不用 esp-adf 架构,直接 i2s_write 写音频数据,这样就可以很容易捕获了。
#173 Re: 全志 SOC » 请问大家V3s linux 4.13我的U盘或者USB转串口线,每次上电重启都不能检测到USB设备(没拔),如果在系统运行中重新拔插才能识别 » 2018-10-09 16:58:24
lilo wrote:
晕哥 wrote:
这种情况很可能要调用 mdev -s
折腾一天了,我试一试去,看看疗效...
果然是这个问题。。。
我去。。。
非常感谢 晕哥!!
#174 Re: 全志 SOC » 请问大家V3s linux 4.13我的U盘或者USB转串口线,每次上电重启都不能检测到USB设备(没拔),如果在系统运行中重新拔插才能识别 » 2018-10-09 16:56:13
晕哥 wrote:
这种情况很可能要调用 mdev -s
折腾一天了,我试一试去,看看疗效...
#175 Re: 全志 SOC » 请问大家V3s linux 4.13我的U盘或者USB转串口线,每次上电重启都不能检测到USB设备(没拔),如果在系统运行中重新拔插才能识别 » 2018-10-09 16:48:11

#178 Re: 全志 SOC » 请问大家V3s linux 4.13我的U盘或者USB转串口线,每次上电重启都不能检测到USB设备(没拔),如果在系统运行中重新拔插才能识别 » 2018-10-09 11:50:29
https://www.kernel.org/doc/Documentation/usb/power-management.txt
悲剧,对着里面各个文件写参数,U盘都纹丝不动.
#179 Re: 全志 SOC » 请问大家V3s linux 4.13我的U盘或者USB转串口线,每次上电重启都不能检测到USB设备(没拔),如果在系统运行中重新拔插才能识别 » 2018-10-09 10:52:48
#180 Re: 计算机图形/GUI/RTOS/FileSystem/OpenGL/DirectX/SDL2 » 自己用Qt写一个 emwin 5.26 电脑模拟器 » 2018-10-09 10:38:12
#181 Re: 全志 SOC » 请问大家V3s linux 4.13我的U盘或者USB转串口线,每次上电重启都不能检测到USB设备(没拔),如果在系统运行中重新拔插才能识别 » 2018-10-09 10:33:16
#182 全志 SOC » 请问大家V3s linux 4.13我的U盘或者USB转串口线,每次上电重启都不能检测到USB设备(没拔),如果在系统运行中重新拔插才能识别 » 2018-10-09 09:39:21
#183 Re: 全志 SOC » 有没有朋友用过 【SD 接口的 NAND】,可以用在全志soc上 » 2018-10-08 12:01:09
#184 Re: Openwrt/LEDE/AR9331/MT7688/RT5350 » 抓住一枚飞线狂人 » 2018-10-06 11:41:41
#185 Re: 全志 SOC » reboot不起作用 » 2018-10-06 08:31:47
#186 Re: 全志 SOC » linux内核启动过程中没有看到分区标信息 » 2018-10-06 08:15:20
#187 Re: ESP32/ESP8266 » 求助 ESP32 ADF编译dueros 成功 但是现在到板子上只要一按rec录音,就系统崩溃,进度gbd模式? » 2018-10-05 20:19:15
#188 Re: ESP32/ESP8266 » 求助 ESP32 ADF编译dueros 成功 但是现在到板子上只要一按rec录音,就系统崩溃,进度gbd模式? » 2018-10-05 14:59:45
I (17169) AUDIO_PIPELINE: Pipeline started
**input and output channel must be 1 or 2 channelE (17179) RSP_FILTER: Allocate me
mory failed,line:57**
W (17030,tid:3ffbd2e0) lightduer_events.c( 80): [lightduer_ca] <== event end =
0x40130484, timespent = 337
0x40130484: duer_engine_data_available at ??:?E (17189) AUDIO_ELEMENT: [resample] AEL_STATUS_ERROR_OPEN
I (17205) RSP_FILTER: rsp_filter_close
Guru Meditation Error: Core 0 panic'ed (LoadProhibited)
. Exception was unhandled.
看下粗体部分发生了什么?
分配内存出错?
#189 Re: RISC-V » risc-v gcc 工具链编译 与 qemu 虚拟机 (ubuntu等发行版linux平台搭建RISCV模拟环境) » 2018-10-05 14:44:39
smartcar wrote:
我新建的一个 test5.s 文件:
.global _start
_start:
addi a0, x0, 0x7FF ###这里立即数 用 0x000 - 0x7FF 都不会编译出错
j _start编译指令:
riscv64-unknown-elf-gcc -o test5 test5.s -nostdlib -g --entry _start
如果立即数改成 0x800 或者以上就会出错:
#riscv64-unknown-elf-gcc -o test5 test5.s -nostdlib -g --entry _start
test5.s: Assembler messages:
test5.s:4: Error: illegal operands `addi a0,x0,0x800'这是为什么呢?
在 RISCV手册里面,规定了 addi 指令的立即数是 12位有符号的, 所以表示范围是 -2048 - +2047(0x7FF)
所以明显你的 0x800 超过了立即数的范围.
0x800 及其之后已经是负数了.
看下手册, 我记得在 RISC-V指令集里面, 负数是补码形式存在了.
#190 Re: RISC-V » risc-v gcc 工具链编译 与 qemu 虚拟机 (ubuntu等发行版linux平台搭建RISCV模拟环境) » 2018-10-05 11:42:13
qemu-riscv64
qemu-system-riscv64
请教下这两个命令有什么区别?
为什么楼主的程序用 qemu-riscv64, 而 xboot 的程序用 qemu-system-riscv64 ?
lilo@ubuntu:/opt/# cat xboot/tools/qemu-system/linux/riscv64-virt-dbg.sh
#!/bin/sh
#The qemu's root directory.
export QEMU_DIR=$(cd
dirname $0; pwd)Run qemu
exec qemu-system-riscv64 -M virt -m 512M -smp 2 -name "RiscV64 Virtual Machine" -S -gdb tcp::10000,ipv4 -show-cursor -rtc base=localtime -serial stdio -kernel ${QEMU_DIR}/../../../output/xboot
#192 技术人生/软件使用技巧/破解经验/技术吐槽/灌水 » 给推荐两个Android机用的浏览器 ---- Firefox & Yandex » 2018-10-05 08:48:25
- lilo
- 回复: 6
如果不想再被国产安卓手机再虐千百遍,那么直接去下载 Yandex 或者 Firefox 吧,
Firefox 一般手机内置的应用市场有下载,
Yandex 要去 apkpure 下载 APK 才行:
https://apkpure.com/yandex-browser-with-protect/com.yandex.browser
#193 Re: RISC-V » 学习使用一个最简单的RISCV项目 ---- riscv-probe » 2018-10-04 17:49:39
riscv64-unknown-elf-gcc -o hello \
hello.o \
printf.o \
putchar.o \
getchar.o \
vsnprintf.o \
exit.o \
malloc.o \
puts.o \
vprintf.o \
snprintf.o \
device.o \
csr.o \
trap.o \
memory.o \
auxval.o \
start.o \
ns16550a.o \
sifive_test.o \
setup.o \
crt.o \
-T env/virt/default.lds \
-mcmodel=medany -ffunction-sections -fdata-sections -nostartfiles -nostdlib -nostdinc -static -lgcc -Wl,--nmagic -Wl,--gc-sections
这个差不多是 ns16550串口(qemu virt 模拟器)模拟 printf输出 RISCV程序 的最精简版本了.
如果不使用 printf 可以更精简一些.
#194 Re: RISC-V » 学习使用一个最简单的RISCV项目 ---- riscv-probe » 2018-10-04 17:38:07
实在没办法了,把三个 .s 文件手动合并成 crt.s 文件:
# See LICENSE for license details.

# See LICENSE for license details.

.equ REGBYTES, 8

.macro lx a, b
ld \a, \b
.endm

.macro sx a, b
sd \a, \b
.endm

.macro lxsp a, b
ld \a, ((\b)*REGBYTES)(sp)
.endm

.macro sxsp a, b
sd \a, ((\b)*REGBYTES)(sp)
.endm

.macro .ptr a
.8byte \a
.endm

# See LICENSE for license details.

.equ MAX_HARTS,    4
.equ SAVE_REGS,    16
.equ STACK_SIZE,   1024
.equ STACK_SHIFT,  10
.equ CONTEXT_SIZE, (SAVE_REGS * REGBYTES)

.globl _text_start
.globl _text_end
.globl _rodata_start
.globl _rodata_end
.globl _data_start
.globl _data_end
.globl _bss_start
.globl _bss_end
.global _memory_start;
.global _memory_end;

#
# start of trap handler
#

.section .text.init,"ax",@progbits
.globl _start

_start:
    # setup default trap vector
    la      t0, trap_vector
    csrw    mtvec, t0

    # set up stack pointer based on hartid
    csrr    t0, mhartid
    slli    t0, t0, STACK_SHIFT
    la      sp, stacks + STACK_SIZE
    add     sp, sp, t0

    # park all harts excpet hart 0
    csrr    a0, mhartid
    bnez    a0, park

    # jump to libfemto_start_main
    j       libfemto_start_main

    # sleeping harts mtvec calls trap_fn upon receiving IPI
park:
    wfi
    j       park

    .align 2
trap_vector:
    # Save registers.
    addi    sp, sp, -CONTEXT_SIZE
    sxsp    ra, 0
    sxsp    a0, 1
    sxsp    a1, 2
    sxsp    a2, 3
    sxsp    a3, 4
    sxsp    a4, 5
    sxsp    a5, 6
    sxsp    a6, 7
    sxsp    a7, 8
    sxsp    t0, 9
    sxsp    t1, 10
    sxsp    t2, 11
    sxsp    t3, 12
    sxsp    t4, 13
    sxsp    t5, 14
    sxsp    t6, 15

    # Invoke the handler.
    mv      a0, sp
    csrr    a1, mcause
    csrr    a2, mepc
    jal     trap_handler

    # Restore registers.
    lxsp    ra, 0
    lxsp    a0, 1
    lxsp    a1, 2
    lxsp    a2, 3
    lxsp    a3, 4
    lxsp    a4, 5
    lxsp    a5, 6
    lxsp    a6, 7
    lxsp    a7, 8
    lxsp    t0, 9
    lxsp    t1, 10
    lxsp    t2, 11
    lxsp    t3, 12
    lxsp    t4, 13
    lxsp    t5, 14
    lxsp    t6, 15
    addi sp, sp, CONTEXT_SIZE

    # Return
    mret

    .bss
    .align 4
    .global stacks
stacks:
    .skip STACK_SIZE * MAX_HARTS
然后执行编译, 生成 crt.o:
riscv64-unknown-elf-gcc -c -march=rv64imac -mabi=lp64 -mcmodel=medany -ffunction-sections -fdata-sections crt.s
再编译其他的 .c 文件
riscv64-unknown-elf-gcc -Ienv/common \
-I./libfemto/include/ \
-I./env/common/rv64 \
-I./libfemto/include/ \
-I./env/common/ \
-c \
./examples/hello/hello.c \
./libfemto/std/strncmp.c \
./libfemto/std/abort.c \
./libfemto/std/memcpy.c \
./libfemto/std/ctz.c \
./libfemto/std/printf.c \
./libfemto/std/strcmp.c \
./libfemto/std/putchar.c \
./libfemto/std/memset.c \
./libfemto/std/getchar.c \
./libfemto/std/clz.c \
./libfemto/std/strlen.c \
./libfemto/std/memchr.c \
./libfemto/std/vsnprintf.c \
./libfemto/std/exit.c \
./libfemto/std/strchr.c \
./libfemto/std/malloc.c \
./libfemto/std/puts.c \
./libfemto/std/vprintf.c \
./libfemto/std/strncpy.c \
./libfemto/std/memcmp.c \
./libfemto/std/snprintf.c \
./libfemto/arch/riscv/device.c \
./libfemto/arch/riscv/csr.c \
./libfemto/arch/riscv/trap.c \
./libfemto/arch/riscv/pmp.c \
./libfemto/arch/riscv/memory.c \
./libfemto/arch/riscv/auxval.c \
./libfemto/arch/riscv/start.c \
./libfemto/drivers/ns16550a.c \
./libfemto/drivers/sifive_test.c \
./env/virt/setup.c \
-march=rv64imac -mabi=lp64 \
-mcmodel=medany -ffunction-sections -fdata-sections
链接成 hello:
riscv64-unknown-elf-gcc -o hello \
hello.o \
strncmp.o \
abort.o \
memcpy.o \
ctz.o \
printf.o \
strcmp.o \
putchar.o \
memset.o \
getchar.o \
clz.o \
strlen.o \
memchr.o \
vsnprintf.o \
exit.o \
strchr.o \
malloc.o \
puts.o \
vprintf.o \
strncpy.o \
memcmp.o \
snprintf.o \
device.o \
csr.o \
trap.o \
pmp.o \
memory.o \
auxval.o \
start.o \
ns16550a.o \
sifive_test.o \
setup.o \
crt.o \
-T env/virt/default.lds \
-mcmodel=medany -ffunction-sections -fdata-sections -nostartfiles -nostdlib -nostdinc -static -lgcc -Wl,--nmagic -Wl,--gc-sections
运行:
qemu-system-riscv64 -nographic -machine virt -kernel hello
运行一切正常:
lilo@ubuntu:/opt/riscv-probe# qemu-system-riscv64 -nographic -machine virt -kernel hello
hello
lilo@ubuntu:/opt/riscv-probe#
#195 Re: RISC-V » 学习使用一个最简单的RISCV项目 ---- riscv-probe » 2018-10-04 17:34:24
但是我想自己用 gcc 编译链接却卡在那个汇编文件了
lilo@ubuntu:/opt/riscv-probe# riscv64-unknown-elf-as -Ienv/common-I./libfemto/include/-I./env/common/rv64/ -I./libfemto/include/ -I./env/common/ -c ./env/virt/crt.s
./env/common//crtm.s: Assembler messages:
./env/common//crtm.s:3: Error: can't open macros.s for reading: No such file or directory
./env/common//crtm.s:39: Error: illegal operands `addi sp,sp,-CONTEXT_SIZE'
./env/common//crtm.s:40: Error: unrecognized opcode `sxsp ra,0'
./env/common//crtm.s:41: Error: unrecognized opcode `sxsp a0,1'
./env/common//crtm.s:42: Error: unrecognized opcode `sxsp a1,2'
./env/common//crtm.s:43: Error: unrecognized opcode `sxsp a2,3'
./env/common//crtm.s:44: Error: unrecognized opcode `sxsp a3,4'
./env/common//crtm.s:45: Error: unrecognized opcode `sxsp a4,5'
./env/common//crtm.s:46: Error: unrecognized opcode `sxsp a5,6'
./env/common//crtm.s:47: Error: unrecognized opcode `sxsp a6,7'
./env/common//crtm.s:48: Error: unrecognized opcode `sxsp a7,8'
./env/common//crtm.s:49: Error: unrecognized opcode `sxsp t0,9'
./env/common//crtm.s:50: Error: unrecognized opcode `sxsp t1,10'
./env/common//crtm.s:51: Error: unrecognized opcode `sxsp t2,11'
./env/common//crtm.s:52: Error: unrecognized opcode `sxsp t3,12'
./env/common//crtm.s:53: Error: unrecognized opcode `sxsp t4,13'
./env/common//crtm.s:54: Error: unrecognized opcode `sxsp t5,14'
./env/common//crtm.s:55: Error: unrecognized opcode `sxsp t6,15'
./env/common//crtm.s:64: Error: unrecognized opcode `lxsp ra,0'
./env/common//crtm.s:65: Error: unrecognized opcode `lxsp a0,1'
./env/common//crtm.s:66: Error: unrecognized opcode `lxsp a1,2'
./env/common//crtm.s:67: Error: unrecognized opcode `lxsp a2,3'
./env/common//crtm.s:68: Error: unrecognized opcode `lxsp a3,4'
./env/common//crtm.s:69: Error: unrecognized opcode `lxsp a4,5'
./env/common//crtm.s:70: Error: unrecognized opcode `lxsp a5,6'
./env/common//crtm.s:71: Error: unrecognized opcode `lxsp a6,7'
./env/common//crtm.s:72: Error: unrecognized opcode `lxsp a7,8'
./env/common//crtm.s:73: Error: unrecognized opcode `lxsp t0,9'
./env/common//crtm.s:74: Error: unrecognized opcode `lxsp t1,10'
./env/common//crtm.s:75: Error: unrecognized opcode `lxsp t2,11'
./env/common//crtm.s:76: Error: unrecognized opcode `lxsp t3,12'
./env/common//crtm.s:77: Error: unrecognized opcode `lxsp t4,13'
./env/common//crtm.s:78: Error: unrecognized opcode `lxsp t5,14'
./env/common//crtm.s:79: Error: unrecognized opcode `lxsp t6,15'
./env/common//crtm.s:80: Error: illegal operands `addi sp,sp,CONTEXT_SIZE'
./env/virt/crt.s: Error: invalid operands (ABS and UND sections) for*' when settingCONTEXT_SIZE'
https://github.com/michaeljclark/riscv-probe/blob/master/env/virt/crt.s
https://github.com/michaeljclark/riscv-probe/blob/master/env/common/constants.s
https://github.com/michaeljclark/riscv-probe/blob/master/env/common/crtm.s
https://github.com/michaeljclark/riscv-probe/blob/master/env/common/rv64/macros.s
看起来包含目录也是没有问题的.
#196 Re: RISC-V » 学习使用一个最简单的RISCV项目 ---- riscv-probe » 2018-10-04 17:29:27
#197 RISC-V » 学习使用一个最简单的RISCV项目 ---- riscv-probe » 2018-10-04 17:28:12
- lilo
- 回复: 4
学习使用一个最简单的RISCV项目 ---- riscv-probe
项目地址: https://github.com/michaeljclark/riscv-probe
项目简介:
riscv探头
简单的机器模式程序,用于探测RISC-V控制和状态寄存器。riscv-probe目前主要用于 Spike, QEMU和 SiFive E21内核。riscv-probe是一种测试工具,用于比较多个RISC-V仿真器和RISC-V硬件实现之间的CSR(控制和状态寄存器)。
riscv-probe包含libfemto,它是一个轻量级的裸金属C库,符合POSIX.1-2017 / IEEE 1003.1-2017标准的简化集。libfemto可以用作需要中断处理,基本字符串例程和printf的裸机RISC-V程序的起点。
项目构建:
构建系统使用CROSS_COMPILE工具链前缀并期望工具链存在于PATH环境变量中。然而,默认值CROSS_COMPILE是riscv64-unknown-elf-可以覆盖的,例如make CROSS_COMPILE=riscv64-unknown-linux-gnu-。构建系统需要一个multilib工具链,因为它使用相同的工具链来构建riscv32和riscv64。确保--enable-multilib在配置riscv-gnu-toolchain时使用。这些示例都是-nostartfiles -nostdlib -nostdinc使用RISC-V GCC Newlib工具链或RISC-V GCC Glibc Linux工具链构建的。
要在environent设置后构建示例,请键入:
make
使用方法:
要在spike和RISC-V QEMU中调用探测器示例:
$ spike --isa=RV32IMAFDC build/bin/rv32imac/spike/probe
$ spike --isa=RV64IMAFDC build/bin/rv64imac/spike/probe
$ qemu-system-riscv32 -nographic -machine spike_v1.10 -kernel build/bin/rv32imac/spike/probe
$ qemu-system-riscv64 -nographic -machine spike_v1.10 -kernel build/bin/rv64imac/spike/probe
$ qemu-system-riscv32 -nographic -machine virt -kernel build/bin/rv32imac/virt/probe
$ qemu-system-riscv64 -nographic -machine virt -kernel build/bin/rv64imac/virt/probe
$ qemu-system-riscv32 -nographic -machine sifive_e -kernel build/bin/rv32imac/qemu-sifive_e/probe
$ qemu-system-riscv64 -nographic -machine sifive_e -kernel build/bin/rv64imac/qemu-sifive_e/probe
$ qemu-system-riscv32 -nographic -machine sifive_u -kernel build/bin/rv32imac/qemu-sifive_u/probe
$ qemu-system-riscv64 -nographic -machine sifive_u -kernel build/bin/rv64imac/qemu-sifive_u/probe
#200 Qt/MSVC/MINGW/C++/MFC/GTK+/Delphi/BCB » 有比较好的qt开源项目推荐吗?涉及到数据库,多线程及网络编程的qt项目 » 2017-10-23 16:08:10
- 首页
- » 搜索
- » lilo 发表的帖子
东莞哇酷科技有限公司开发