- 首页
- » 搜索
- » jimmy 发表的帖子
#7 Re: 计算机图形/GUI/RTOS/FileSystem/OpenGL/DirectX/SDL2 » 一个不错的LVGL Builder设计器 » 2020-01-16 17:18:46
应该支持C++11:
root@jimmy:/opt/LVGLBuilder# g++ -v
Using built-in specs.
COLLECT_GCC=g++
COLLECT_LTO_WRAPPER=/usr/lib/gcc/x86_64-linux-gnu/7/lto-wrapper
OFFLOAD_TARGET_NAMES=nvptx-none
OFFLOAD_TARGET_DEFAULT=1
Target: x86_64-linux-gnu
Configured with: ../src/configure -v --with-pkgversion='Ubuntu 7.4.0-1ubuntu1~18.04.1' --with-bugurl=file:///usr/share/doc/gcc-7/README.Bugs --enable-languages=c,ada,c++,go,brig,d,fortran,objc,obj-c++ --prefix=/usr --with-gcc-major-version-only --program-suffix=-7 --program-prefix=x86_64-linux-gnu- --enable-shared --enable-linker-build-id --libexecdir=/usr/lib --without-included-gettext --enable-threads=posix --libdir=/usr/lib --enable-nls --with-sysroot=/ --enable-clocale=gnu --enable-libstdcxx-debug --enable-libstdcxx-time=yes --with-default-libstdcxx-abi=new --enable-gnu-unique-object --disable-vtable-verify --enable-libmpx --enable-plugin --enable-default-pie --with-system-zlib --with-target-system-zlib --enable-objc-gc=auto --enable-multiarch --disable-werror --with-arch-32=i686 --with-abi=m64 --with-multilib-list=m32,m64,mx32 --enable-multilib --with-tune=generic --enable-offload-targets=nvptx-none --without-cuda-driver --enable-checking=release --build=x86_64-linux-gnu --host=x86_64-linux-gnu --target=x86_64-linux-gnu
Thread model: posix
gcc version 7.4.0 (Ubuntu 7.4.0-1ubuntu1~18.04.1)#8 Re: 计算机图形/GUI/RTOS/FileSystem/OpenGL/DirectX/SDL2 » 一个不错的LVGL Builder设计器 » 2020-01-16 17:13:29
楼主在什么平台用什么Qt 版本编译的, 我用Ubuntu18.04 Qt5.9.5 一堆错误
这样修正了一些:
diff --git a/LVGLObject.cpp b/LVGLObject.cpp
index 57bca92..2e28b13 100644
--- a/LVGLObject.cpp
+++ b/LVGLObject.cpp
@@ -3,6 +3,7 @@
#include "LVGLCore.h"
#include <QJsonArray>
+#include <assert.h>
LVGLObject::LVGLObject(const LVGLWidget *widgetClass, QString name, LVGLObject *parent)
: m_obj(widgetClass->newObject(parent->obj())), m_widgetClass(widgetClass)
diff --git a/LVGLProject.cpp b/LVGLProject.cpp
index b2ba85c..e9ce218 100644
--- a/LVGLProject.cpp
+++ b/LVGLProject.cpp
@@ -6,6 +6,7 @@
#include <QJsonDocument>
#include <QJsonObject>
#include <QJsonArray>
+#include <assert.h>
#include "LVGLCore.h"
#include "LVGLObject.h"
diff --git a/freetype/builds/unix/ftsystem.c b/freetype/builds/unix/ftsystem.c
index 826713f..8ba5600 100644
--- a/freetype/builds/unix/ftsystem.c
+++ b/freetype/builds/unix/ftsystem.c
@@ -19,6 +19,9 @@
#include <ft2build.h>
/* we use our special ftconfig.h file, not the standard one */
#include <ftconfig.h>
+#include <sys/types.h>
+#include <sys/stat.h>
+#include <fcntl.h>
#include FT_INTERNAL_DEBUG_H
#include FT_SYSTEM_H
#include FT_ERRORS_H
diff --git a/freetype/freetype.pri b/freetype/freetype.pri
index 52a036a..a3f8a46 100644
--- a/freetype/freetype.pri
+++ b/freetype/freetype.pri
@@ -57,3 +57,5 @@ win32 {
}
DEFINES += FT2_BUILD_LIBRARY
+
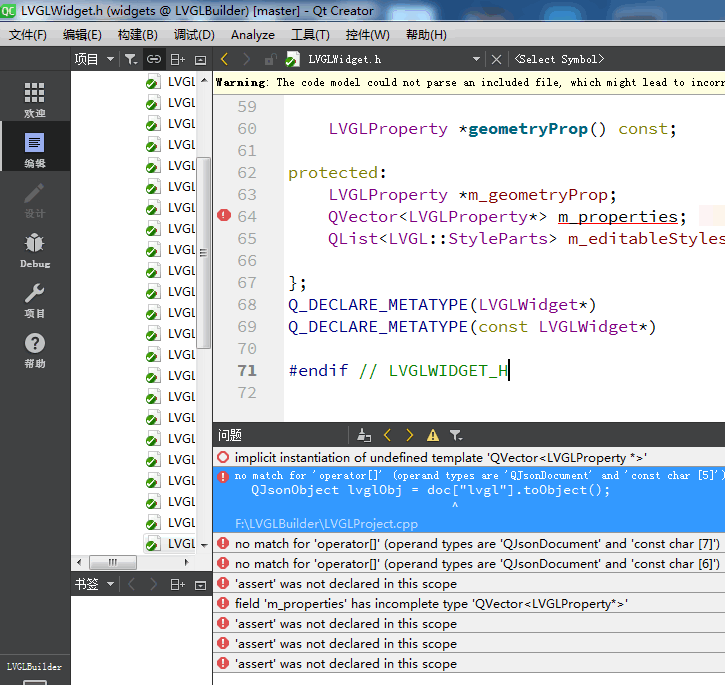
+INCLUDEPATH += $$PWD/include/freetype/config/但是还是有一个错误, 不知道如何解决:
root@jimmy:/opt/LVGLBuilder# make
g++ -c -pipe -O2 -std=gnu++11 -Wall -W -D_REENTRANT -fPIC -DQT_DEPRECATED_WARNINGS -DFT_CONFIG_OPTION_ERROR_STRINGS -DFT2_BUILD_LIBRARY -DQT_NO_DEBUG -DQT_WIDGETS_LIB -DQT_GUI_LIB -DQT_CORE_LIB -I. -Ilvgl -Ifreetype/include -Ifreetype/builds/unix -Ifreetype/include/freetype/config -isystem /usr/include/x86_64-linux-gnu/qt5 -isystem /usr/include/x86_64-linux-gnu/qt5/QtWidgets -isystem /usr/include/x86_64-linux-gnu/qt5/QtGui -isystem /usr/include/x86_64-linux-gnu/qt5/QtCore -Ibuild/moc -isystem /usr/include/libdrm -Ibuild/ui -I/usr/lib/x86_64-linux-gnu/qt5/mkspecs/linux-g++ -o build/obj/LVGLProject.o LVGLProject.cpp
LVGLProject.cpp: In static member function ‘static LVGLProject* LVGLProject::load(const QString&)’:
LVGLProject.cpp:42:27: error: no match for ‘operator[]’ (operand types are ‘QJsonDocument’ and ‘const char [5]’)
  QJsonObject lvglObj = doc["lvgl"].toObject();
                           ^
LVGLProject.cpp:46:27: error: no match for ‘operator[]’ (operand types are ‘QJsonDocument’ and ‘const char [7]’)
  QJsonArray imageArr = doc["images"].toArray();
                           ^
LVGLProject.cpp:52:26: error: no match for ‘operator[]’ (operand types are ‘QJsonDocument’ and ‘const char [6]’)
  QJsonArray fontArr = doc["fonts"].toArray();
                          ^
Makefile:6064: recipe for target 'build/obj/LVGLProject.o' failed
make: *** [build/obj/LVGLProject.o] Error 1
root@jimmy:/opt/LVGLBuilder##10 Re: 全志 SOC » 入坑荔枝派zero,希望大神帮忙解决一些基础问题 » 2020-01-16 16:38:38
看下晕哥这个帖子: https://whycan.cn/t_397.html
#11 Re: 全志 SOC » 入坑荔枝派zero,希望大神帮忙解决一些基础问题 » 2020-01-16 16:37:48
#13 Re: 全志 SOC » 入坑tiny200 » 2020-01-16 15:41:57
#14 Re: 全志 SOC » 入坑荔枝派zero,希望大神帮忙解决一些基础问题 » 2020-01-16 15:19:58
#17 Re: DIY/综合/Arduino/写字机/3D打印机/智能小车/平衡车/四轴飞行/MQTT/物联网 » 刚刚翻京东方 bp101wx1-206 的手册, 发现有一个 CABC_EN 引脚, 搜了一下,这个神奇的功能 » 2020-01-13 09:32:06
#20 技术人生/软件使用技巧/破解经验/技术吐槽/灌水 » 据说这几天高速公路收费站乱成一团, 感觉这次zf有点鲁莽了,应该先找两个比较偏远的省份先试点,或者先开放一个省际收费站用于调试 » 2020-01-08 15:43:29
#22 Re: 计算机图形/GUI/RTOS/FileSystem/OpenGL/DirectX/SDL2 » emWin中CHECKBOX的边框可以去掉吗? » 2019-12-24 13:51:54
#23 Re: 全志 SOC » 新人第一帖,发个S3的核心板(AXP209+S3) » 2019-12-20 14:48:01
#24 Re: 全志 SOC » 一个纠结了很久的问题,全志的芯片OTG电路如何设计, 才能使 设备(烧录/接电脑adb传文件) 和 HUB(u盘/条码枪) 同时使用呢? » 2019-12-19 11:26:59
#26 Re: 全志 SOC » 也发一个荔枝派zero 全志V3s 32M spi flash 固件,800x480 LCD, 开机自动运行 Qt analogclock » 2019-12-18 13:59:04
#27 Re: 全志 SOC » 即将做第二批TINY200小板子,大家发现有什么槽点尽管提 » 2019-12-14 19:44:15
#30 Re: DIY/综合/Arduino/写字机/3D打印机/智能小车/平衡车/四轴飞行/MQTT/物联网 » bitbucket/gitee 都限制仓库大小了, 没有自建git仓库的朋友们,我来推荐一个腾讯云旗下的代码托管平台 » 2019-12-07 09:02:19
#34 Re: 全志 SOC » @augyy A33 驱动 ov5640 问题 » 2019-12-06 18:03:25
augyy wrote:
終於解決registered sensor subdev 同找到OV5640 sensor.
但還有新問題 [VFE_WARN] Nobody is waiting on this video buffer,buf = xxxx. 是什麼問題?
前面那个问题是怎么解决的?
#35 Re: DIY/综合/Arduino/写字机/3D打印机/智能小车/平衡车/四轴飞行/MQTT/物联网 » 哎哟,腾讯云双十一促销的乞丐版云服务器从88元涨到99元了 » 2019-12-06 10:00:03
#36 Re: 全志 SOC » 电池电量检测 » 2019-12-02 14:43:00
#38 Re: 全志 SOC » v3s bsp(linux3.4)下摄像头问题 » 2019-11-27 15:10:13
#40 Re: 全志 SOC » u-boot如何开启LCD 和 LOGO? » 2019-11-27 10:25:22
#41 Re: 全志 SOC » 求助,480*272的lcd在linux起来后不能正常显示 » 2019-11-23 17:42:40
#42 Re: 全志 SOC » 荔枝派Nano使用gcc-linaro-7.2.1进行交叉编译得到的可执行文件,一运行就"segmentation fault" » 2019-11-23 17:40:15
#43 Re: 全志 SOC » v3s bsp用opencv使用摄像头失败 » 2019-11-22 17:02:15
#44 Re: 全志 SOC » F1C100S linux-4.15 无法软件重启的问题原因 » 2019-11-22 15:24:35
#45 Re: 全志 SOC » F1C100S linux-4.15 无法软件重启的问题原因 » 2019-11-22 15:19:14
#46 Re: 全志 SOC » v3s bsp用opencv使用摄像头失败 » 2019-11-22 13:42:58
#47 Re: 全志 SOC » v3s bsp用opencv使用摄像头失败 » 2019-11-22 09:44:14
#48 Re: 全志 SOC » Debian 9.9 (stretch) 文件系统制作 » 2019-11-20 18:40:56
#50 Re: 计算机图形/GUI/RTOS/FileSystem/OpenGL/DirectX/SDL2 » Windows 编译 libvncclient 的demo程序出问题了, 使用的是 SDL2 库 » 2019-11-20 12:00:10
#51 Re: DIY/综合/Arduino/写字机/3D打印机/智能小车/平衡车/四轴飞行/MQTT/物联网 » [bilibili] DIY亚克力/塑料瓶/泡沫板简易切割工具 » 2019-11-20 09:20:13
#58 Re: 全志 SOC » github上的tinalinux » 2019-11-18 17:02:48
#61 Re: 全志 SOC » 全志R11核心板和底板(主要跑RTT和柿饼UI) » 2019-11-15 17:54:29
#62 Re: 全志 SOC » 全志R11核心板和底板(主要跑RTT和柿饼UI) » 2019-11-15 17:45:14
#63 Re: 好钜润半导体(TIKY) » TK043F1508 竖屏横屏初始化代码 » 2019-11-15 15:28:05
#64 Re: 好钜润半导体(TIKY) » TK043F1508 竖屏横屏初始化代码 » 2019-11-15 14:41:38
#65 Re: 技术人生/软件使用技巧/破解经验/技术吐槽/灌水 » 无意义灌水。。。。 » 2019-11-15 11:10:28
#66 Re: 全志 SOC » 全志违反gplv2许可 » 2019-11-15 08:44:42
#67 Re: 全志 SOC » F1C100s 编译 XBOOT 详细过程 » 2019-11-14 16:38:38
#68 Re: 计算机图形/GUI/RTOS/FileSystem/OpenGL/DirectX/SDL2 » LittlevGL新版本在线生成字体还可以用么? » 2019-11-14 16:37:29
#70 Re: DIY/综合/Arduino/写字机/3D打印机/智能小车/平衡车/四轴飞行/MQTT/物联网 » 凌阳突然出来一款QFP封装神芯SP7021(四核A7+ARM9+8051) » 2019-11-14 10:13:16
#71 Re: 全志 SOC » f1c100s/v3s在主线linux中如何使能定时器 » 2019-11-13 17:44:23
硬件IO中断的 demo: https://whycan.cn/t_1261.html
#72 Re: DIY/综合/Arduino/写字机/3D打印机/智能小车/平衡车/四轴飞行/MQTT/物联网 » 一年一度双十一又来到,大家的购物车里面有什么值得推荐的性价比商品? » 2019-11-13 14:31:10
#73 Re: 全志 SOC » 双层板的四核神器?X3(A33内置DRAM版本) » 2019-11-13 14:11:10
#74 Re: 计算机图形/GUI/RTOS/FileSystem/OpenGL/DirectX/SDL2 » 分享一个好用的 littlevgl / lvgl 字体生成工具. 作者 @阿里 » 2019-11-13 14:10:18
#75 Re: VMWare/Linux/Ubuntu/Fedora/CentOS/U-BOOT » 家里Windows电脑安装FRP客户端, 再装上VNC服务器,这样在地球上任何有网络的地方都可以操作家里的电脑了。 » 2019-11-12 19:05:15
#77 Re: 计算机图形/GUI/RTOS/FileSystem/OpenGL/DirectX/SDL2 » 使用新版本的LittlevGL在线字体生成器,一直无法生成字体 » 2019-11-12 12:46:32
#78 Re: 全志 SOC » 感谢小智科技友情赠送的精品 S3 开发板 » 2019-11-12 12:45:09
#79 Re: DIY/综合/Arduino/写字机/3D打印机/智能小车/平衡车/四轴飞行/MQTT/物联网 » 我也来推荐一个性价比不错的 SD NAND ------ MK(米客方德) » 2019-11-12 12:44:22
#81 Re: 全志 SOC » v536启动异常 » 2019-11-09 23:14:13
#84 Re: 全志 SOC » 全志v536芯片问题求教 » 2019-11-08 23:40:59
#85 Re: 全志 SOC » 关于buildroot » 2019-11-08 21:31:42
#86 Re: 全志 SOC » F1C100s tina3 程序, 请教屏闪是怎么回事? » 2019-11-08 21:26:26
#87 Re: 全志 SOC » V3S LRADC 多路按键实现 » 2019-11-08 21:25:49
#88 Re: 全志 SOC » 全志A64开发板问题 » 2019-11-06 20:29:10
#89 Re: 全志 SOC » Linux系统开机到启动应用 最快的方法需要几s » 2019-11-05 18:00:54
#90 Re: 全志 SOC » nano串口PA2,PA3使用不成功 » 2019-11-05 18:00:15
#91 Re: 计算机图形/GUI/RTOS/FileSystem/OpenGL/DirectX/SDL2 » ZLG开源 GUI 引擎 AWTK 1.1 发布 » 2019-11-05 17:45:25
#92 Re: 全志 SOC » nano串口PA2,PA3使用不成功 » 2019-11-05 17:26:15
#93 Re: 全志 SOC » 【汇总】最便宜的A5 A7 A8 A9 A53芯片汇总 » 2019-11-02 15:47:35
#94 Re: 全志 SOC » 【汇总】最便宜的A5 A7 A8 A9 A53芯片汇总 » 2019-11-02 13:37:50
#95 Re: 全志 SOC » 【汇总】最便宜的A5 A7 A8 A9 A53芯片汇总 » 2019-11-02 13:37:17
#96 Re: 全志 SOC » 【汇总】最便宜的A5 A7 A8 A9 A53芯片汇总 » 2019-11-02 11:16:57
#97 Re: 全志 SOC » 【汇总】最便宜的A5 A7 A8 A9 A53芯片汇总 » 2019-11-02 10:42:03
#100 Re: 全志 SOC » 各位F1C100s有研究过怎样加密吗?? » 2019-10-31 15:19:14
#102 Re: DIY/综合/Arduino/写字机/3D打印机/智能小车/平衡车/四轴飞行/MQTT/物联网 » 多年前做的电脑并口 12864 LCD 液晶显示板 » 2019-10-29 09:04:59
#105 Re: DIY/综合/Arduino/写字机/3D打印机/智能小车/平衡车/四轴飞行/MQTT/物联网 » [bilibili] DIY亚克力/塑料瓶/泡沫板简易切割工具 » 2019-10-25 17:41:58
#106 Re: 技术人生/软件使用技巧/破解经验/技术吐槽/灌水 » 双十一腾讯云促销, 998元 三年 2核/4G RAM/5Mbps/50G 硬盘, 你真的想错过吗? » 2019-10-25 17:37:17
#107 Re: 全志 SOC » 全志A33 UART baudrate 921600 問題!! » 2019-10-25 11:32:41
#108 Re: 全志 SOC » f1c100s调起4.3寸800x480液晶屏 » 2019-10-25 10:32:04
#109 Re: 技术人生/软件使用技巧/破解经验/技术吐槽/灌水 » 现在用arm9做产品用什么芯片好? » 2019-10-25 10:30:53
#110 Re: 全志 SOC » 处女帖:将dtb文件反编译成dts文件 » 2019-10-25 10:28:30
#112 Re: DIY/综合/Arduino/写字机/3D打印机/智能小车/平衡车/四轴飞行/MQTT/物联网 » [bilibili] DIY亚克力/塑料瓶/泡沫板简易切割工具 » 2019-10-25 08:58:07
#113 Re: 全志 SOC » 产品小批量压成本问题, DIY打样量产问题讨论(SMT) » 2019-10-25 08:10:20
#114 Re: 全志 SOC » 产品小批量压成本问题, DIY打样量产问题讨论(SMT) » 2019-10-24 10:36:34
#115 Re: PN532/MFRC522/MFRC523/MFRC500/ » 求助:破解软件显示水卡是M1卡,但是充值前后扇区数据没变化,全为000或者FFF,请问这可能是因为还有cpu区还是是因为数据在后台服务器? » 2019-10-23 19:17:04
#116 Re: 全志 SOC » 编译buildroot问题 » 2019-10-21 00:02:31
#118 Re: 计算机图形/GUI/RTOS/FileSystem/OpenGL/DirectX/SDL2 » N32926上移植FREERTOS+EMWIN,显示的图标有干扰条问题! » 2019-10-18 18:12:51
#119 Re: 全志 SOC » v3s spi nand MX35LF1GE4AB 问题 » 2019-10-18 17:38:38
#120 Re: 全志 SOC » v3s spi nand MX35LF1GE4AB 问题 » 2019-10-18 15:57:16
#121 Re: 全志 SOC » v3s spi nand MX35LF1GE4AB 问题 » 2019-10-18 15:40:31
#122 Re: 计算机图形/GUI/RTOS/FileSystem/OpenGL/DirectX/SDL2 » ZLG开源 GUI 引擎 AWTK 1.1 发布 » 2019-10-17 13:55:07
#123 Re: 计算机图形/GUI/RTOS/FileSystem/OpenGL/DirectX/SDL2 » ZLG开源 GUI 引擎 AWTK 1.1 发布 » 2019-10-17 09:14:08
#124 Re: 全志 SOC » OrangePi zero plus2 H5 编译新的u-boot+linux kernel+rootfs无法启动的问题请教 » 2019-10-17 08:55:10
#125 Re: 全志 SOC » 投屏仪,有搞过的么? » 2019-10-16 10:43:50
#126 Re: 计算机图形/GUI/RTOS/FileSystem/OpenGL/DirectX/SDL2 » N32926上移植FREERTOS+EMWIN,显示的图标有干扰条问题! » 2019-10-15 08:42:02
#127 Re: 计算机图形/GUI/RTOS/FileSystem/OpenGL/DirectX/SDL2 » N32926上移植FREERTOS+EMWIN,显示的图标有干扰条问题! » 2019-10-14 17:59:32
#128 Re: 全志 SOC » 发个很久之前写的一键licheepi nano的环境部署,编译打包脚本 » 2019-10-13 21:17:21
#129 Re: 全志 SOC » 发个很久之前写的一键licheepi nano的环境部署,编译打包脚本 » 2019-10-13 17:11:09
/usr/bin/make  all-recursive
make[10]: Entering directory `/opt/lichee-nano-one-key-package/buildroot-2017.08/buildroot-2017.08/output/build/gdb-7.11.1/gdb/gdbserver/build-gnulib-gdbserver/import'
make[11]: Entering directory `/opt/lichee-nano-one-key-package/buildroot-2017.08/buildroot-2017.08/output/build/gdb-7.11.1/gdb/gdbserver/build-gnulib-gdbserver/import'
/opt/lichee-nano-one-key-package/buildroot-2017.08/buildroot-2017.08/output/host/bin/arm-none-linux-gnueabi-gcc -DHAVE_CONFIG_H -I. -I../.././../gnulib/import -I..     -D_LARGEFILE_SOURCE -D_LARGEFILE64_SOURCE -D_FILE_OFFSET_BITS=64  -Os -g2 -c ../.././../gnulib/import/dirname-lgpl.c
/opt/lichee-nano-one-key-package/buildroot-2017.08/buildroot-2017.08/output/host/bin/arm-none-linux-gnueabi-gcc -DHAVE_CONFIG_H -I. -I../.././../gnulib/import -I..     -D_LARGEFILE_SOURCE -D_LARGEFILE64_SOURCE -D_FILE_OFFSET_BITS=64  -Os -g2 -c ../.././../gnulib/import/basename-lgpl.c
/opt/lichee-nano-one-key-package/buildroot-2017.08/buildroot-2017.08/output/host/bin/arm-none-linux-gnueabi-gcc -DHAVE_CONFIG_H -I. -I../.././../gnulib/import -I..     -D_LARGEFILE_SOURCE -D_LARGEFILE64_SOURCE -D_FILE_OFFSET_BITS=64  -Os -g2 -c ../.././../gnulib/import/stripslash.c
/opt/lichee-nano-one-key-package/buildroot-2017.08/buildroot-2017.08/output/host/bin/arm-none-linux-gnueabi-gcc -DHAVE_CONFIG_H -I. -I../.././../gnulib/import -I..     -D_LARGEFILE_SOURCE -D_LARGEFILE64_SOURCE -D_FILE_OFFSET_BITS=64  -Os -g2 -c ../.././../gnulib/import/localcharset.c
/opt/lichee-nano-one-key-package/buildroot-2017.08/buildroot-2017.08/output/host/bin/arm-none-linux-gnueabi-gcc -DHAVE_CONFIG_H -I. -I../.././../gnulib/import -I..     -D_LARGEFILE_SOURCE -D_LARGEFILE64_SOURCE -D_FILE_OFFSET_BITS=64  -Os -g2 -c ../.././../gnulib/import/malloca.c
../.././../gnulib/import/localcharset.c: In function 'get_charset_aliases':
../.././../gnulib/import/localcharset.c:172:34: error: 'HAVE_WORKING_O_NOFOLLOW' undeclared (first use in this function)
                      O_RDONLY | (HAVE_WORKING_O_NOFOLLOW ? O_NOFOLLOW : 0));
                                  ^
../.././../gnulib/import/localcharset.c:172:34: note: each undeclared identifier is reported only once for each function it appears in
make[11]: *** [localcharset.o] Error 1
make[11]: *** Waiting for unfinished jobs....
make[11]: Leaving directory `/opt/lichee-nano-one-key-package/buildroot-2017.08/buildroot-2017.08/output/build/gdb-7.11.1/gdb/gdbserver/build-gnulib-gdbserver/import'
make[10]: *** [all-recursive] Error 1
make[10]: Leaving directory `/opt/lichee-nano-one-key-package/buildroot-2017.08/buildroot-2017.08/output/build/gdb-7.11.1/gdb/gdbserver/build-gnulib-gdbserver/import'
make[9]: *** [all] Error 2
make[9]: Leaving directory `/opt/lichee-nano-one-key-package/buildroot-2017.08/buildroot-2017.08/output/build/gdb-7.11.1/gdb/gdbserver/build-gnulib-gdbserver/import'
make[8]: *** [subdir_do] Error 1
make[8]: Leaving directory `/opt/lichee-nano-one-key-package/buildroot-2017.08/buildroot-2017.08/output/build/gdb-7.11.1/gdb/gdbserver/build-gnulib-gdbserver'
make[7]: *** [all] Error 2
make[7]: Leaving directory `/opt/lichee-nano-one-key-package/buildroot-2017.08/buildroot-2017.08/output/build/gdb-7.11.1/gdb/gdbserver/build-gnulib-gdbserver'
make[6]: *** [subdir_do] Error 1
make[6]: Leaving directory `/opt/lichee-nano-one-key-package/buildroot-2017.08/buildroot-2017.08/output/build/gdb-7.11.1/gdb/gdbserver'
make[5]: *** [all-lib] Error 2
make[5]: *** Waiting for unfinished jobs....
make[5]: Leaving directory `/opt/lichee-nano-one-key-package/buildroot-2017.08/buildroot-2017.08/output/build/gdb-7.11.1/gdb/gdbserver'
make[4]: *** [subdir_do] Error 1
make[4]: Leaving directory `/opt/lichee-nano-one-key-package/buildroot-2017.08/buildroot-2017.08/output/build/gdb-7.11.1/gdb'
make[3]: *** [all] Error 2
make[3]: Leaving directory `/opt/lichee-nano-one-key-package/buildroot-2017.08/buildroot-2017.08/output/build/gdb-7.11.1/gdb'
make[2]: *** [all-gdb] Error 2
make[2]: Leaving directory `/opt/lichee-nano-one-key-package/buildroot-2017.08/buildroot-2017.08/output/build/gdb-7.11.1'
make[1]: *** [all] Error 2
make[1]: Leaving directory `/opt/lichee-nano-one-key-package/buildroot-2017.08/buildroot-2017.08/output/build/gdb-7.11.1'
make: *** [/opt/lichee-nano-one-key-package/buildroot-2017.08/buildroot-2017.08/output/build/gdb-7.11.1/.stamp_built] Error 2
请教这个错误是什么问题造成的呢?
localcharset.c:172:34: error: 'HAVE_WORKING_O_NOFOLLOW' undeclared (first use in this function)
#132 Re: 全志 SOC » 小白求求挖坑填坑,f1c100s小小sram裸机 » 2019-09-29 20:15:07
#134 Re: 全志 SOC » ft6336触摸ic问题 » 2019-09-26 16:36:10
#135 Re: DIY/综合/Arduino/写字机/3D打印机/智能小车/平衡车/四轴飞行/MQTT/物联网 » 野火开始预售imx6ull开发板了,价格还不错。 » 2019-09-26 16:34:58
#136 Re: 全志 SOC » 领券28买了个2.4寸掌机,希望是能玩的动的芯片,等货拆机 » 2019-09-26 13:41:52
#137 Re: RISC-V » RISC-V的调试速度测试 » 2019-09-24 17:00:23
#138 Re: 技术人生/软件使用技巧/破解经验/技术吐槽/灌水 » 吐槽一下, csdn bbs/blog都被广告占领, code 被关闭, 下载动不动就是钱钱钱, 虽然不能用爱发电,但是也不能广告乱飞吧 » 2019-09-24 11:40:01
#139 Re: 全志 SOC » 使用F1C200S做一个视网膜电容屏,并带有AV摄像头的小MP4 » 2019-09-23 15:17:15
#140 Re: 全志 SOC » f1c100s的esp8089使用方法 » 2019-09-19 09:20:55
#141 Re: 技术人生/软件使用技巧/破解经验/技术吐槽/灌水 » 没有谷狗的日子,不会编程了,看那个必应搜出来是什么辣鸡, 哥来推荐一个俄罗斯的搜索引擎. » 2019-09-19 09:20:37
#142 Re: 好钜润半导体(TIKY) » 好钜润半导体 4.3寸液晶屏, TKM32F499 » 2019-09-18 14:41:52
#143 Re: 全志 SOC » 分享一个 5寸的 800x480 的 f1c100s 固件, 感谢 @xm1994, 调试串口UART0 (PB8/PB9) » 2019-09-18 14:39:19
#145 Re: 计算机图形/GUI/RTOS/FileSystem/OpenGL/DirectX/SDL2 » 《分享!!!》stm32+freeRTOS+littlevgl的综合demo » 2019-09-12 11:19:13
#146 Re: 全志 SOC » v3s zero mount: you must be root » 2019-09-12 11:18:42
#147 Re: 全志 SOC » nano板子GT911触摸屏驱动问题 » 2019-09-11 19:06:09
#148 Re: 全志 SOC » 新人求教!V3s的启动文件在哪?如何添加开机图片logo » 2019-09-11 15:31:47
#152 Re: ESP32/ESP8266 » 求助:IoT espressif的app中的ssid为什么总是显示unknown ssid?(我的路由器wifi是OK的) » 2019-09-10 18:41:15
先把 wifi 账号密码硬编码到固件吧
#155 Re: DIY/综合/Arduino/写字机/3D打印机/智能小车/平衡车/四轴飞行/MQTT/物联网 » 我也来推荐一个性价比不错的 SD NAND ------ MK(米客方德) » 2019-09-06 09:58:04
#156 Re: 全志 SOC » 做了一块全志H6的板子玩,感觉也还可以4K蛮稳定的 » 2019-09-04 10:11:22
#157 Re: 全志 SOC » 新人求教!V3s的启动文件在哪?如何添加开机图片logo » 2019-09-03 00:04:49
#160 Re: 全志 SOC » 分享个licheepi nano镜像,支持adb调试 » 2019-08-26 16:03:15
#162 Re: 技术人生/软件使用技巧/破解经验/技术吐槽/灌水 » 试看看爆照 » 2019-08-26 13:45:42
#163 Re: RISC-V » 兆易创新发布RISC-V单片机,GD32VF103系列。 » 2019-08-23 19:12:01
RT-Thread已率先发布GD32V BSP:
https://github.com/RT-Thread/rt-thread/tree/master/bsp/gd32vf103v-eval
#166 Re: DIY/综合/Arduino/写字机/3D打印机/智能小车/平衡车/四轴飞行/MQTT/物联网 » 1块钱包邮的圣芯 8051 HC89S003F4 开发板(自带仿真器), 手快有,手慢无 » 2019-08-07 09:28:32
#167 Re: 全志 SOC » 请教一下大家,电源芯片与触摸芯片在同一个IIC上,现在启动不了, » 2019-08-05 15:02:32
#168 Re: 全志 SOC » 请教一下大家,电源芯片与触摸芯片在同一个IIC上,现在启动不了, » 2019-08-05 14:37:29
#169 Re: 全志 SOC » 请教一下大家,电源芯片与触摸芯片在同一个IIC上,现在启动不了, » 2019-08-05 14:07:59
#170 Re: 全志 SOC » XBOOT能通过JLINK调试吗? » 2019-08-05 14:04:57
#172 Re: DIY/综合/Arduino/写字机/3D打印机/智能小车/平衡车/四轴飞行/MQTT/物联网 » 编译阿里云的link kit sdk有警告,找不到gawk,但是明明安装了。 » 2019-08-05 09:32:38
#173 Re: DIY/综合/Arduino/写字机/3D打印机/智能小车/平衡车/四轴飞行/MQTT/物联网 » 1块钱包邮的圣芯 8051 HC89S003F4 开发板(自带仿真器), 手快有,手慢无 » 2019-08-05 09:27:25
#176 Re: 全志 SOC » mainline kernel驱动移植到 legacy kernel » 2019-08-02 23:42:15
#179 Re: ESP32/ESP8266 » https访问一定要证书吗? » 2019-07-31 12:29:03
#180 Re: ESP32/ESP8266 » https访问一定要证书吗? » 2019-07-30 22:37:06
我觉得可以忽略证书吧:
https://blog.csdn.net/bytxl/article/details/46989667
curl wget 不验证证书进行https请求:
wget 'https://x.x.x.x/get_ips' --no-check-certificate
curl 'https://x.x.x.x/get_ips' -k
#182 Re: 全志 SOC » 坊间传闻 S3 的经营权被全志收回了, 看芯片 Logo 便知 » 2019-04-02 08:27:42
#183 Re: DIY/综合/Arduino/写字机/3D打印机/智能小车/平衡车/四轴飞行/MQTT/物联网 » 捡了个便宜的高级ZYNQ XC7Z010 开发板玩玩 » 2019-04-01 09:03:53
#184 Re: DIY/综合/Arduino/写字机/3D打印机/智能小车/平衡车/四轴飞行/MQTT/物联网 » 条码/二维码 解码库 zbar和zxing之间的对比 (转) » 2019-03-29 09:49:12
#185 Re: DIY/综合/Arduino/写字机/3D打印机/智能小车/平衡车/四轴飞行/MQTT/物联网 » Ubuntu 运行 quirc 二维码解码程序 » 2019-03-29 08:04:33
#186 Re: DIY/综合/Arduino/写字机/3D打印机/智能小车/平衡车/四轴飞行/MQTT/物联网 » 大神家里水管接口处坏了, 自己动手建模, 用3D打印机打印出来, 然后安装上去, 转自 QQ 群 » 2019-03-28 20:18:27
#187 Re: 全志 SOC » 有关全志V3s硬件电路上的关于SPI flash的问题 » 2019-03-28 17:43:24
#188 Re: 全志 SOC » 有关全志V3s硬件电路上的关于SPI flash的问题 » 2019-03-28 16:26:11
#189 Re: ESP32/ESP8266 » ESP32+mDNS+HTTP Server的方案验证 » 2019-03-28 16:00:20
谢谢, 有空我用 JLINK 试一试!
#190 Re: ESP32/ESP8266 » ESP32+mDNS+HTTP Server的方案验证 » 2019-03-28 15:57:09
#191 Re: ESP32/ESP8266 » ESP32+mDNS+HTTP Server的方案验证 » 2019-03-28 15:53:35
#192 Re: ESP32/ESP8266 » ESP32+mDNS+HTTP Server的方案验证 » 2019-03-28 15:43:22
#193 Re: 技术人生/软件使用技巧/破解经验/技术吐槽/灌水 » 来来来, 做一道小学六年级数学题, 看你能否小学毕业. » 2019-03-25 10:08:05
metro wrote:
这类题目可以先考虑交点的数值。设所有点横向顺序为a到h。
首先可以确定,第一行中间的点有三条线,则必有三组数满足x+y=14-b,枚举后可以发现只有5和7满足要求。
进一步可以验证b=5时三组数分别是(1,8),(2,7),(3,6),g为4。
b=7时三组数分别是(1,6),(2,5),(3,4),g为8。
之后考虑剩下的三个交点。把所有可能的情况加起来,可以得到
(a+b+c)+(b+d+f)+(b+e+h)+(a+d+g)+(c+e+g)
=(a+b+c+d+e+f+g+h)+(a+2*b+c+d+e+g)
=(1+2+3+4+5+6+7+8)+(a+b+c)+(b+e)+(d+e)
=36+14+(b+e)+(d+e)=14*5=70
因此(b+e)+(d+e)=20,代入可以求出所有解。
点赞点赞
#194 Re: Qt/MSVC/MINGW/C++/MFC/GTK+/Delphi/BCB » 使用 QPropertyAnimation 组件, 让你的 Qt 窗口动起来 ... » 2019-03-20 11:51:40
#195 Re: RISC-V » AIRV(K210)一体化开源硬件,3月底即将到来啦 » 2019-03-20 11:50:59
#196 Re: 全志 SOC » 请教个问题,V3S的spi flash选型。 » 2019-03-20 11:50:31
#197 Re: 全志 SOC » v3s matrix keypad 设备树怎么写? » 2019-03-20 08:54:39
debounce-delay-ms 这个去抖延迟时间 100ms 感觉有点太大了, 改小试一试了。
https://e2echina.ti.com/question_answer/dsp_arm/sitara_arm/f/25/t/134142
这个才 5ms
#198 Re: 全志 SOC » 晒晒3D打印的小智极客 S3 BOX外壳 » 2019-03-20 08:32:30
#199 Re: 全志 SOC » F1c100s 开始进入主线内核了 » 2019-03-20 08:31:00
#200 Re: 全志 SOC » 有关QT5.50移植,Qsound播放声音的问题 » 2019-03-19 09:59:35
605364021 wrote:
晕哥 wrote:
605364021 wrote:
https://github.com/tinyalsa/tinyalsa
这个是tinyalsa源码?把头文件和C文件加入到QT程序中一起编译吗?对的,就是这个!
晕哥能简单说下怎么把源码加进QT项目一起编译吗?谢谢
直接把源码加进去,
见错改错,应该只会有很少错.
设置好声卡参数, 然后调用 play_sample() 播放内存数据即可。
https://github.com/tinyalsa/tinyalsa/blob/master/utils/tinyplay.c
- 首页
- » 搜索
- » jimmy 发表的帖子
东莞哇酷科技有限公司开发